
Flutter and Java JDK Setup Guide (Step-by-Step)
Follow the steps below based on your Operating System to properly install and configure Flutter.
Windows Setup
Step 1: Download Flutter SDK
- Go to: Download Flutter
- Download ZIP file
- Extract to
C:\flutter
Step 2: Set Environment Path (Windows)
Step 2.1: Locate Flutter Folder
- After downloading Flutter SDK, extract it to:
C:\flutter
- Inside this folder, locate the bin directory:
C:\flutter\bin
Step 2.2: Open Environment Variables
- Right-click on This PC or My Computer
- Select Properties
- Click Advanced system settings
- Click Environment Variables
Step 2.3: Edit System PATH
- Under System Variables, find Path
- Select it and click Edit
- Click New
- Add the following path:
C:\flutter\bin
- Click OK OK OK to save changes
Step 2.4: Restart Terminal
- Close all Command Prompt or PowerShell windows
- Open a new terminal
Step 2.5: Verify Installation
flutter doctor
- If Flutter is configured correctly, you will see setup details
C:\flutter\bin (not just
C:\flutter)
Step 3: Install Java JDK
Step 3.1: Download Java JDK
- Go to the official Oracle website
- Download Java JDK 22 for your operating system
- Run the installer
Step 3.2: Install Java JDK
- Follow the installation wizard
- Keep default settings (recommended)
- After installation, note the install location
C:\Program Files\Java\jdk-22
Step 3.3: Set JAVA_HOME Environment Variable
- Right-click on This PC or My Computer
- Select Properties
- Click Advanced system settings
- Click Environment Variables
- Under System Variables, click New
Variable Name: JAVA_HOMEVariable Value: C:\Program Files\Java\jdk-22
- Click OK
Step 3.4: Add JAVA_HOME to Path
- In System Variables, find Path
- Click Edit
- Click New
- Add the following:
%JAVA_HOME%\bin
- Click OK OK OK to save changes
Step 3.5: Verify Java Installation
java -version
- If installed correctly, it will display the Java version
bin folder)
Step 4: Install Android Studio
- Download Android Studio
- Install Android SDK
- Install Emulator
- After installation, Install the Flutter and Dart plugins through “Preferences†-> “Plugins†-> “Marketplace.â€
Step 5: Verify Setup
flutter doctor
macOS Setup
Step 1: Download Flutter SDK
- Download Flutter from the official website
- Extract it to your home directory:
~/flutter
Step 2: Set PATH (Permanent)
- Open Terminal
- Edit your shell configuration file:
nano ~/.zshrc
- Add the following line at the end:
export PATH="$HOME/flutter/bin:$PATH"
- Save and apply changes:
source ~/.zshrc
Step 3: Install Xcode
- Install Xcode from the App Store
- Open Xcode once and accept the license agreement
sudo xcode-select --switch /Applications/Xcode.app/Contents/Developer
Step 4: Install Android Studio
- Download and install Android Studio
- Install Android SDK
- Setup Android Emulator
- After installation, Install the Flutter and Dart plugins through “Preferences†-> “Plugins†-> “Marketplace.â€
Step 5: Install CocoaPods (Required for iOS)
sudo gem install cocoapods
Step 6: Verify Setup
flutter doctor
- Fix any ⌠errors shown in the output
Linux Setup
Step 1: Download Flutter SDK
- Download Flutter from the official website
- Extract it to your home directory:
~/flutter
Step 2: Set PATH (Permanent)
- Open Terminal
- Edit your shell configuration file:
nano ~/.bashrc
- Add the following line at the end:
export PATH="$HOME/flutter/bin:$PATH"
- Save and apply changes:
source ~/.bashrc
Step 3: Install Required Packages
								sudo apt update

								sudo apt install git curl unzip xz-utils zip libglu1-mesa
Step 4: Set Permissions
chmod -R 755 ~/flutter
Step 5: Install Android Studio
- Download and install Android Studio
- Install Android SDK
- Setup Emulator
- After installation, Install the Flutter and Dart plugins through “Preferences†-> “Plugins†-> “Marketplace.â€
Step 6: Verify Setup
flutter doctor
- Fix any ⌠errors shown in the output
✅ Final Verification (All Operating Systems)
flutter doctor --verbose
What to Check
- Resolve all ⌠errors shown in the output
- Ensure all required tools show ✔ success status
- Confirm Android SDK, Xcode (macOS), and dependencies are installed
- Make sure a physical device or emulator is connected
Common Issue: Android License Status Unknown
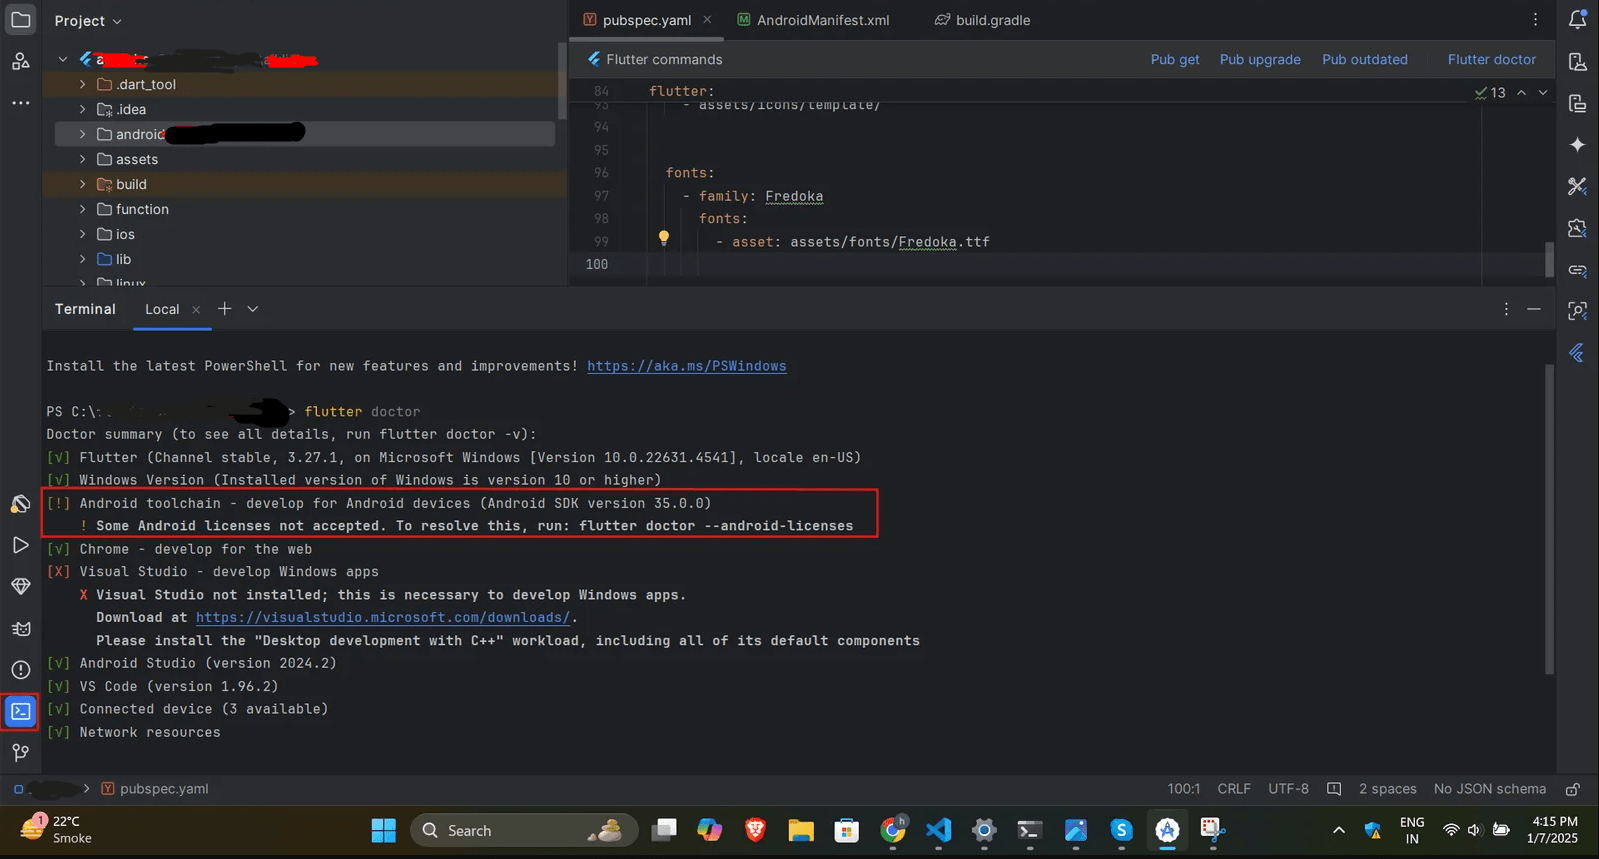
flutter doctor --android-licenses
- Press y and hit Enter to accept all licenses
- Repeat until all licenses are accepted
Re-Verify Setup
flutter doctor
- Ensure there are no remaining ⌠errors
Advanced Troubleshooting (If Issues Persist)
- Verify that the Flutter SDK 3.41.7 is installed and up-to-date
- Ensure Android Studio is up-to-date with all required plugins installed
- Confirm Android SDK (API Level 36) is installed and properly configured
- Check that JDK 22 is correctly installed and linked
- Validate that all required environment variables are properly set
- Restart your system or terminal after making configuration changes
Flutter App Setup
This guide will help you configure and customize the XpressHive Mobile App. Follow each step carefully to successfully build your Flutter application.
Donwload source code from codecanyon and unzip it to your desired location. after that open the project in Android Studio
After extracting (unzipping) the project, open the project folder in Android Studio. This allows you to access and configure the project files properly.
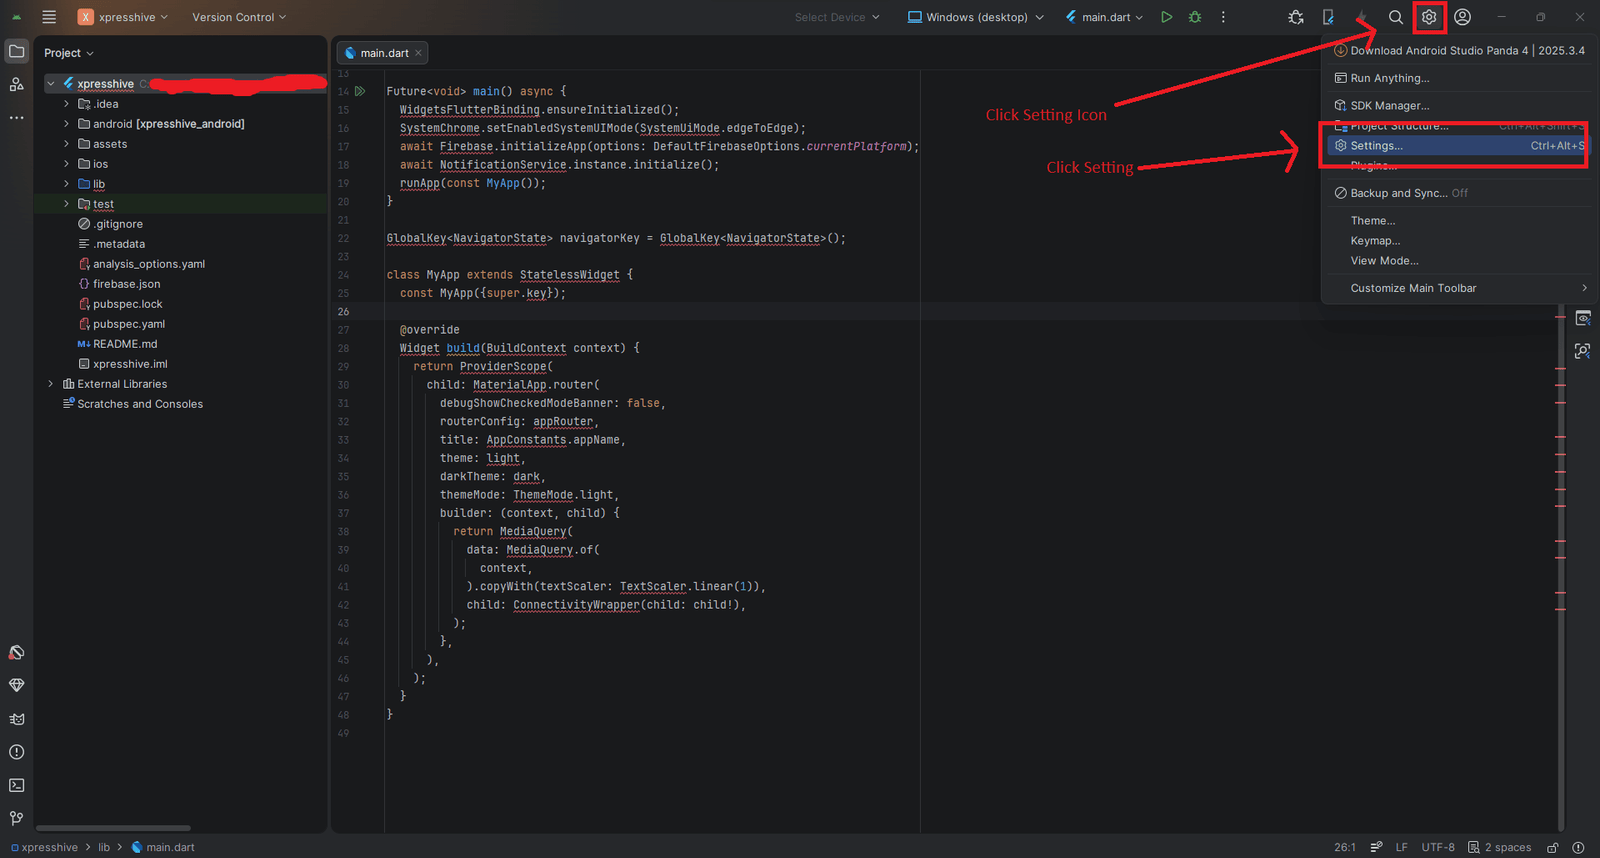
Click on the Settings (icon) in the top-right corner of Android Studio, then go to Languages & Frameworks Flutter.
In the Flutter SDK path field, select your Flutter installation
directory
(for example: C:\flutter).
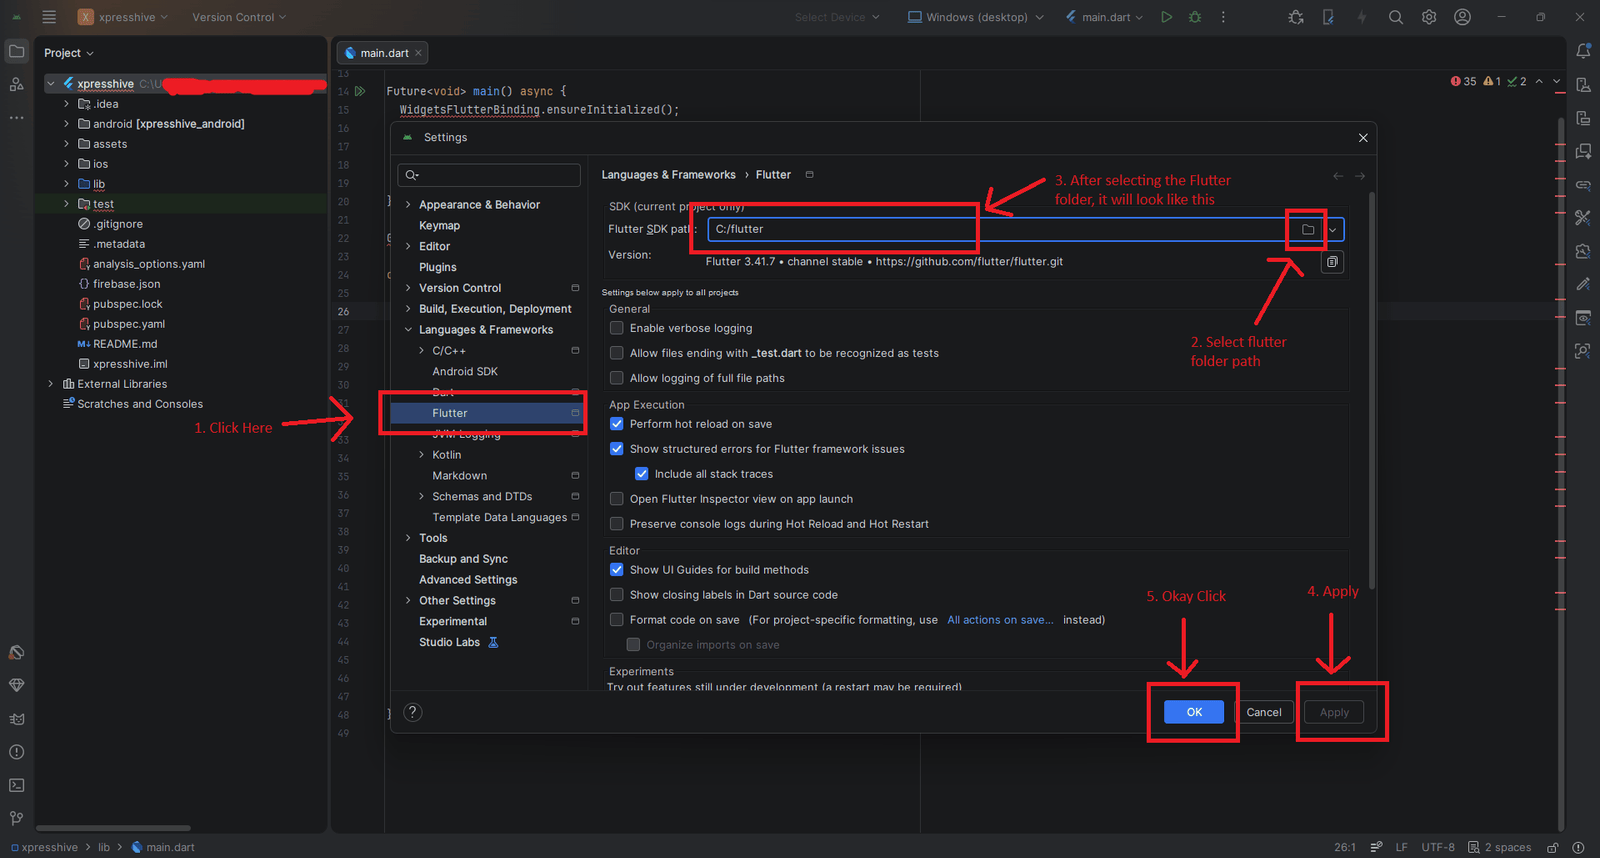
After setting the Flutter SDK path, click Apply and then OK. This step ensures Android Studio can detect and run Flutter properly.
Now open the terminal inside Android Studio and run the following commands:
flutter cleanflutter pub getThese commands will clean the project, install dependencies, and run the application on your device or emulator.
1. How to change package name
Update your application package name for both Android and iOS. This is required before publishing your app.
Example: com.xpresshivetalent.example
Step 1: Replace Package Name (Global Search)
Press Ctrl + Shift + R in Android Studio.
- Old package name:
com.xpresshivetalent.app - New package name:
com.xpresshivetalent.example - Click Replace All
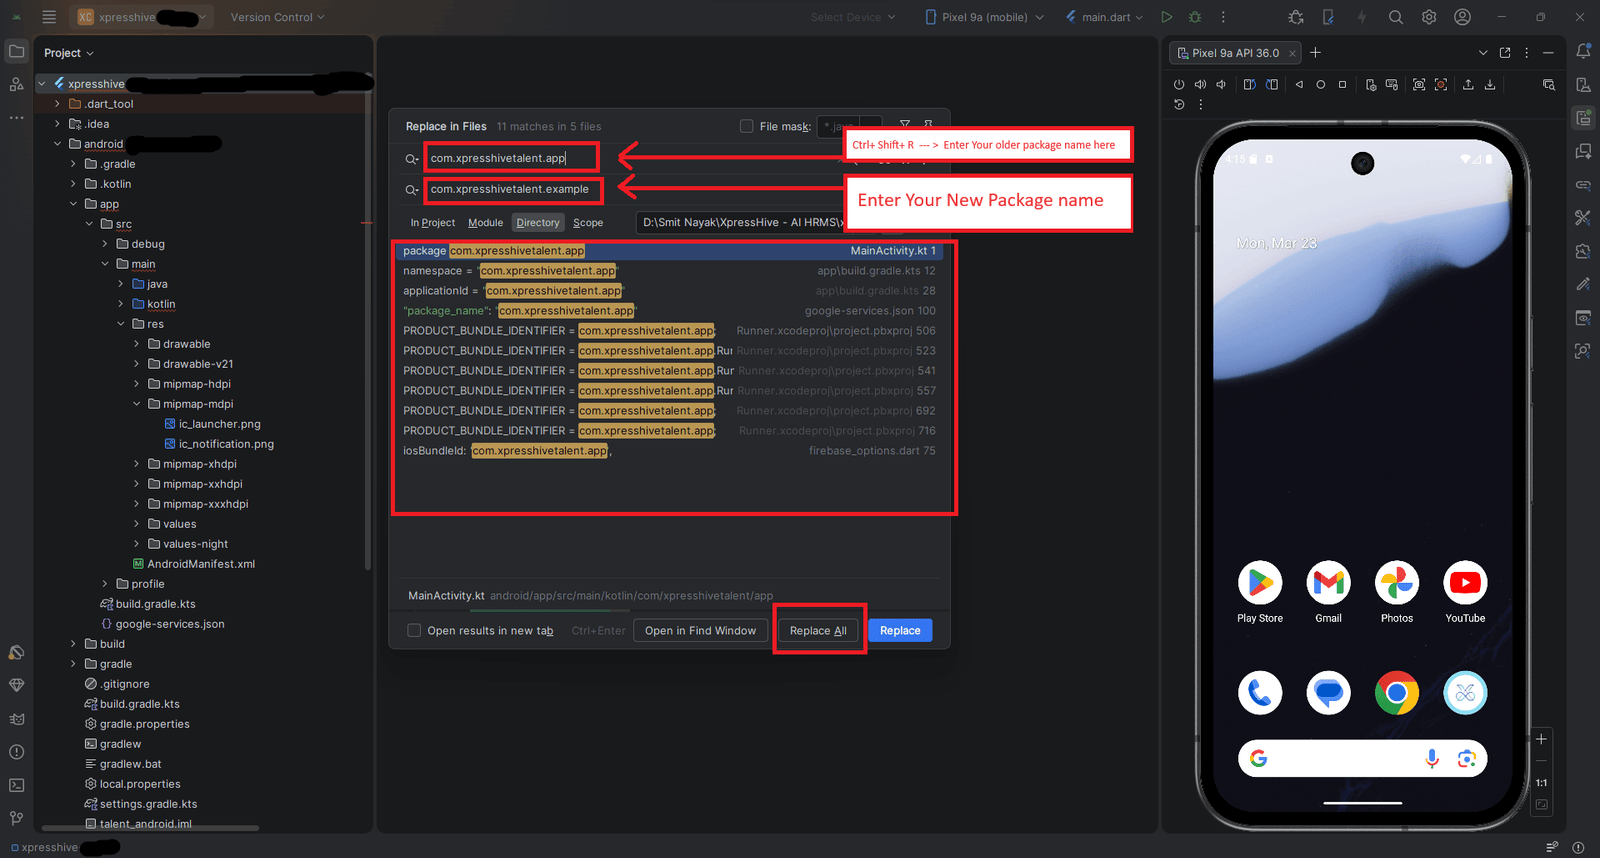
Step 2: Verify with Search
Press Ctrl + Shift + F and search for:
com.xpresshivetalent.app
If found, replace all remaining occurrences with:
com.xpresshivetalent.example
Step 3: Update Kotlin Folder Structure
Navigate to:
android/app/src/main/kotlin/
Rename folders according to your new package name.
- Old:
com/xpresshivetalent/app - New:
com/xpresshivetalent/example
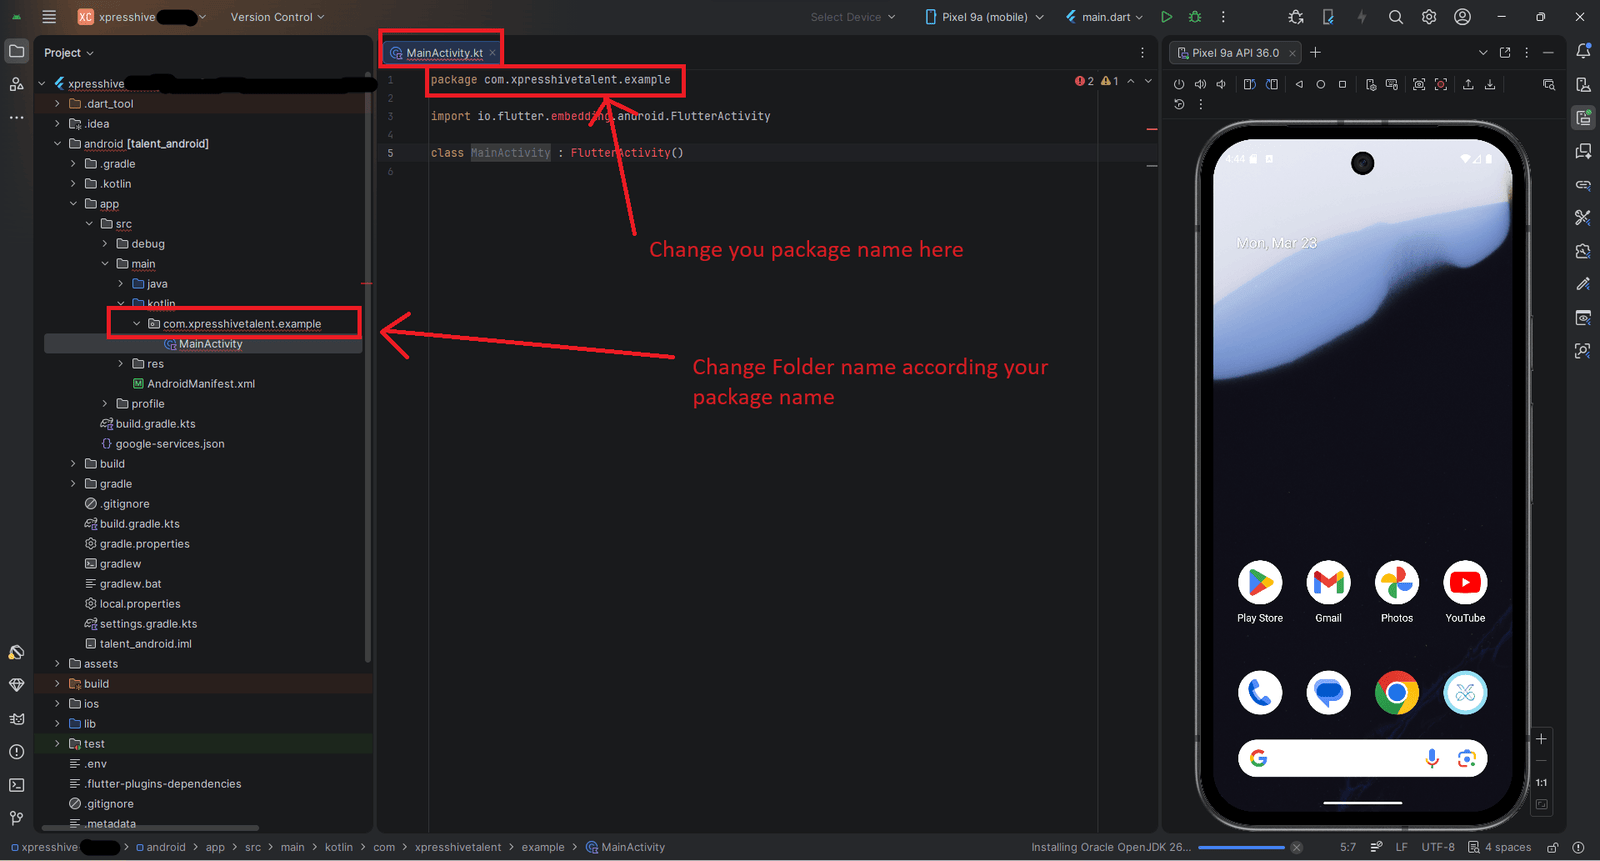
Step 4: Update Required Files
android/app/src/main/kotlin/.../MainActivity.ktandroid/app/build.gradle.kts
Ensure all occurrences of
com.xpresshivetalent.app are replaced.
Step 5: Update iOS Bundle Identifier
ios/Runner/Info.plist
<key>CFBundleIdentifier</key><string>com.xpresshivetalent.example</string>
Important:
- Package name must be unique (Play Store requirement)
- Use lowercase letters only
- No spaces or special characters
- Format:
com.company.app
After changes, run:
flutter cleanflutter pub get2. How to change app name
Update your application name across Android, iOS, and Flutter code. This ensures your app displays the correct name on devices and within the app.
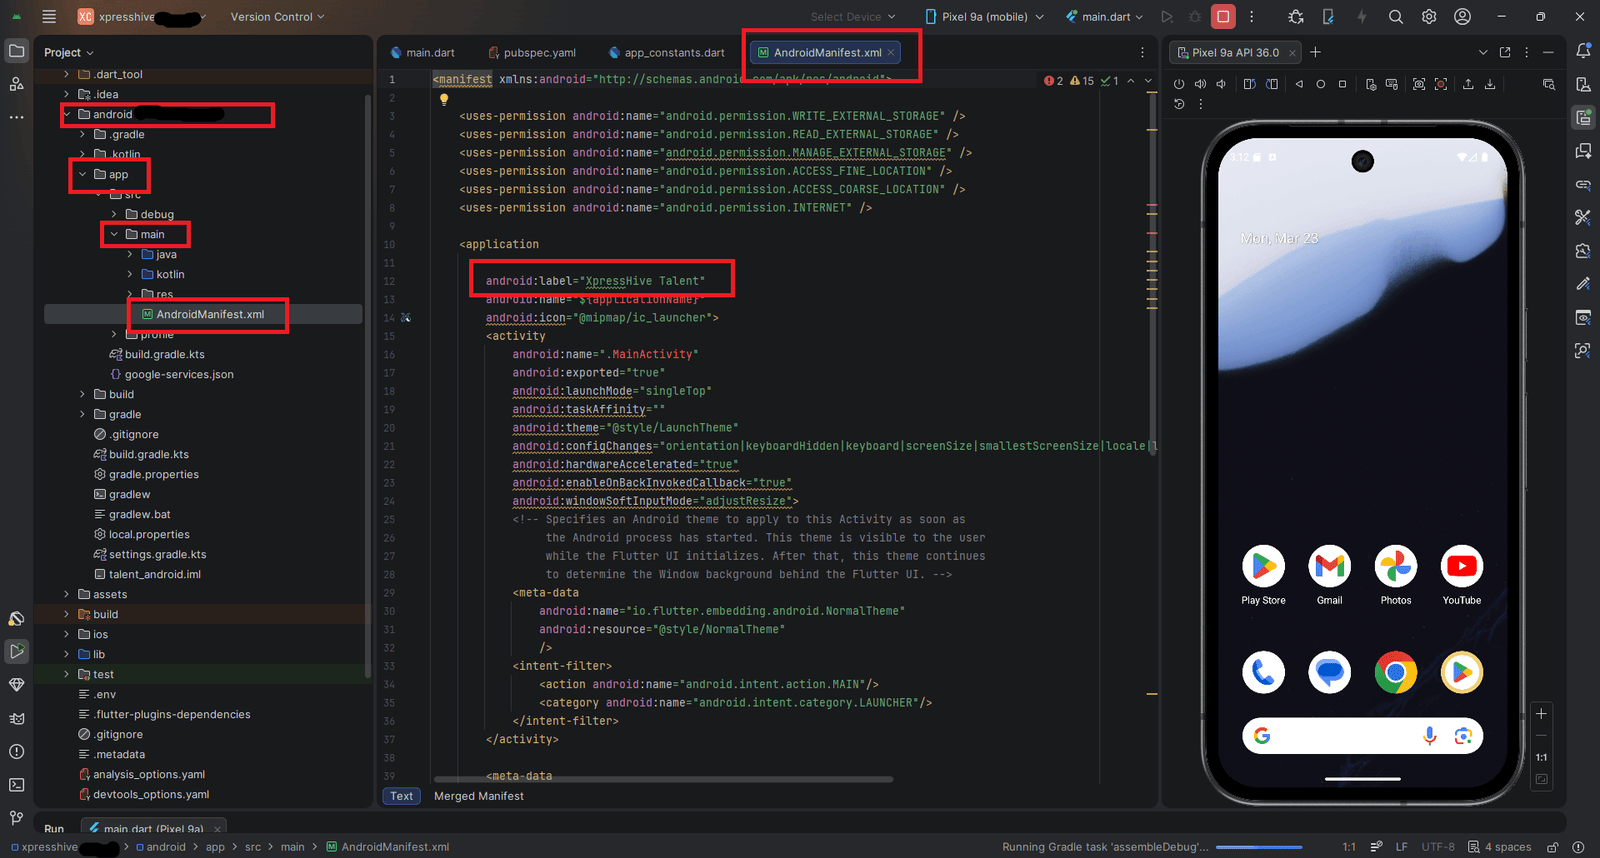
Android Configuration
Navigate to the following file:
android/app/src/main/AndroidManifest.xml
Modify the android:label value inside the <application> tag:
<application
									android:label="Your App Name"
									... >
								</application>
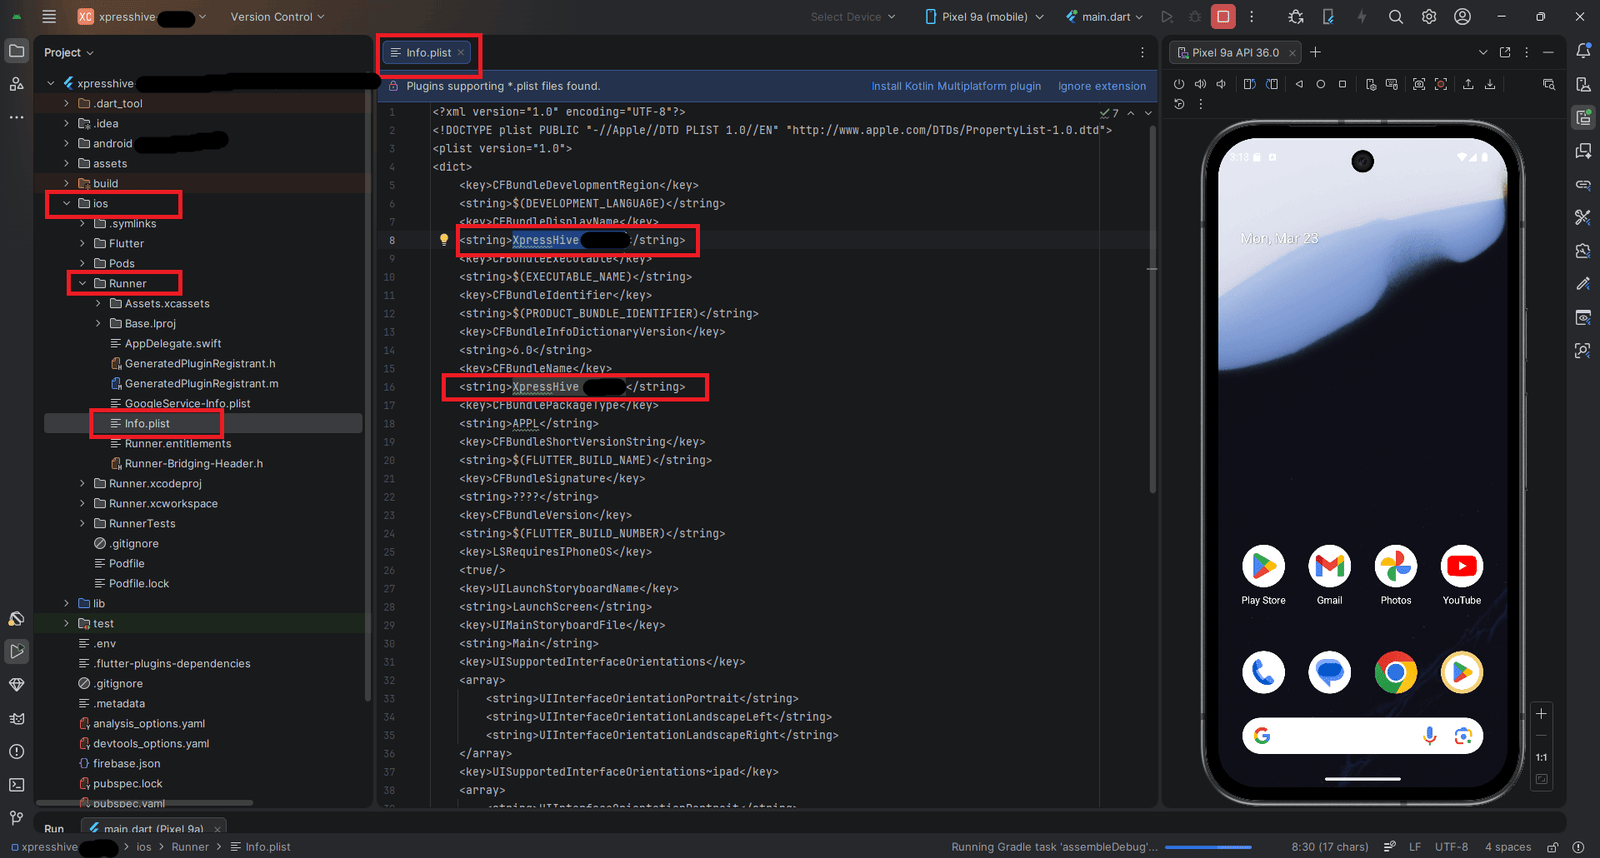
iOS Configuration
Navigate to:
ios/Runner/Info.plist
Update the following keys:
<key>CFBundleDisplayName</key>
								<string>Your App Name</string>

								<key>CFBundleName</key>
								<string>Your App Name</string>
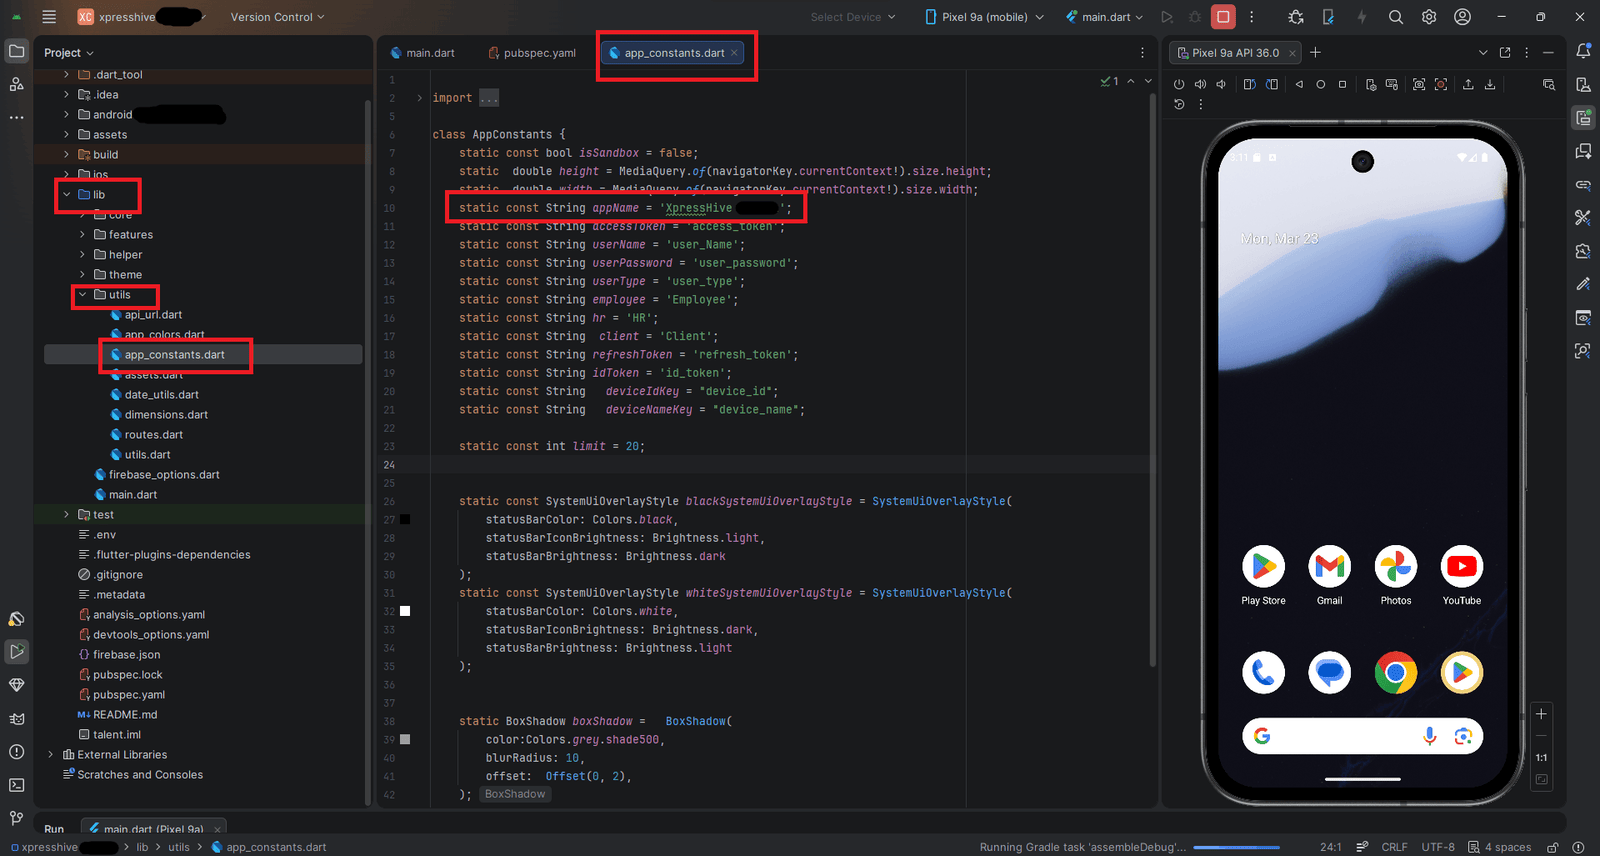
Flutter Code Configuration
Open the following file:
lib/utils/app_constants.dart
Update the appName variable:
class AppConstants {
								static const String appName = "Your App Name";
								}
Note: After making changes, run the following commands:
flutter cleanflutter pub get
3. How to change app logo & icon
You can update your application branding by replacing the logo files and generating launcher icons. Follow the steps below carefully.
Logo File Locations
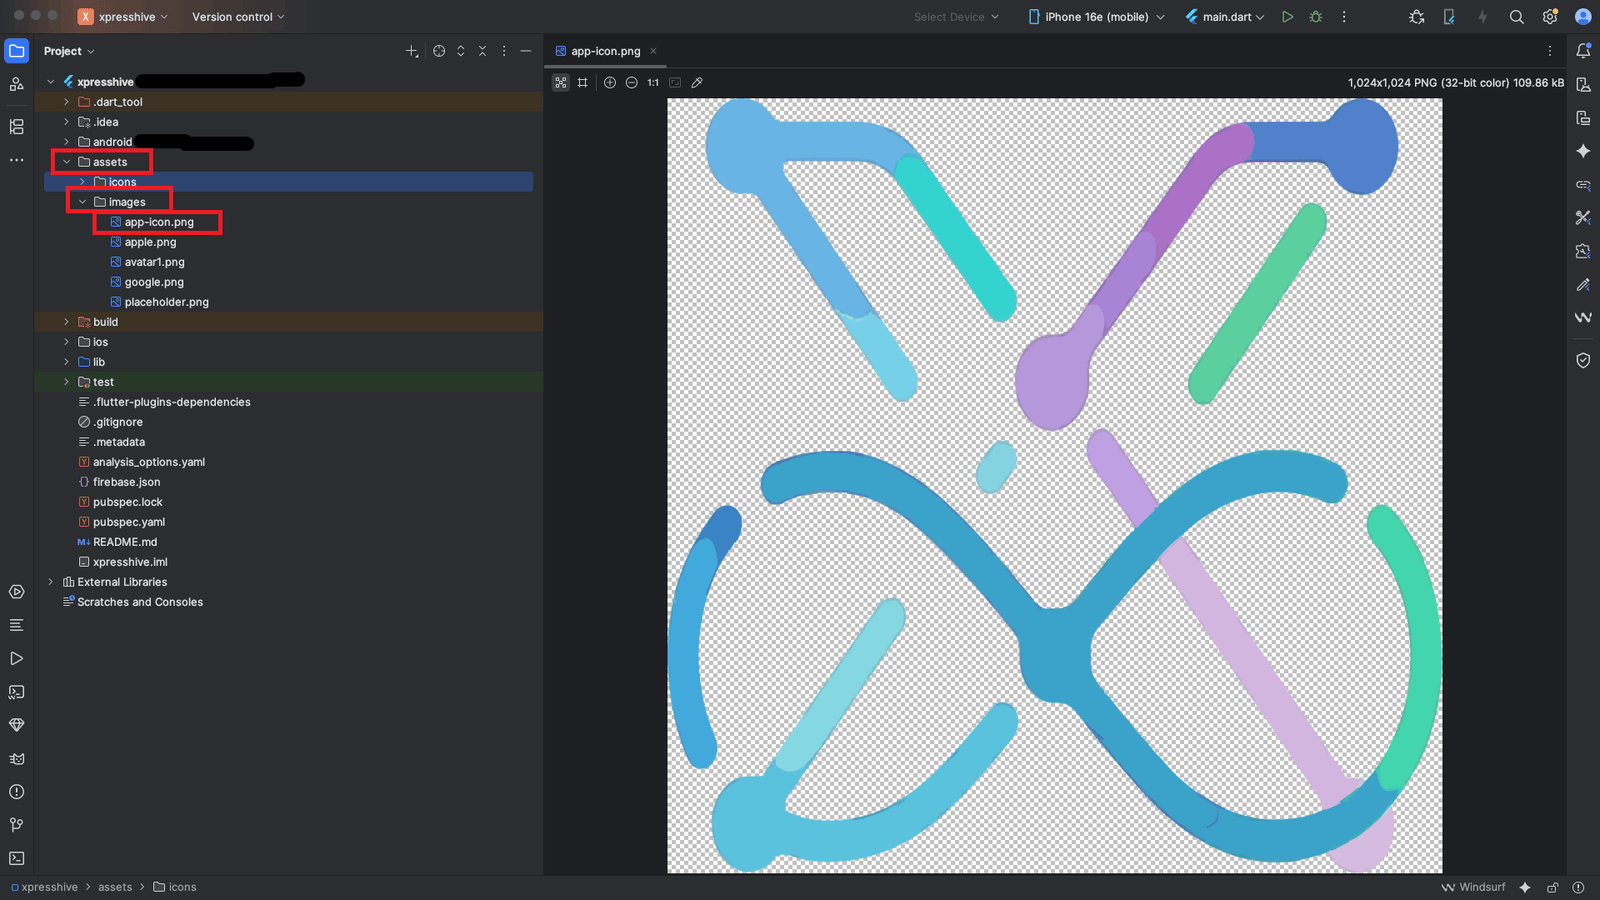
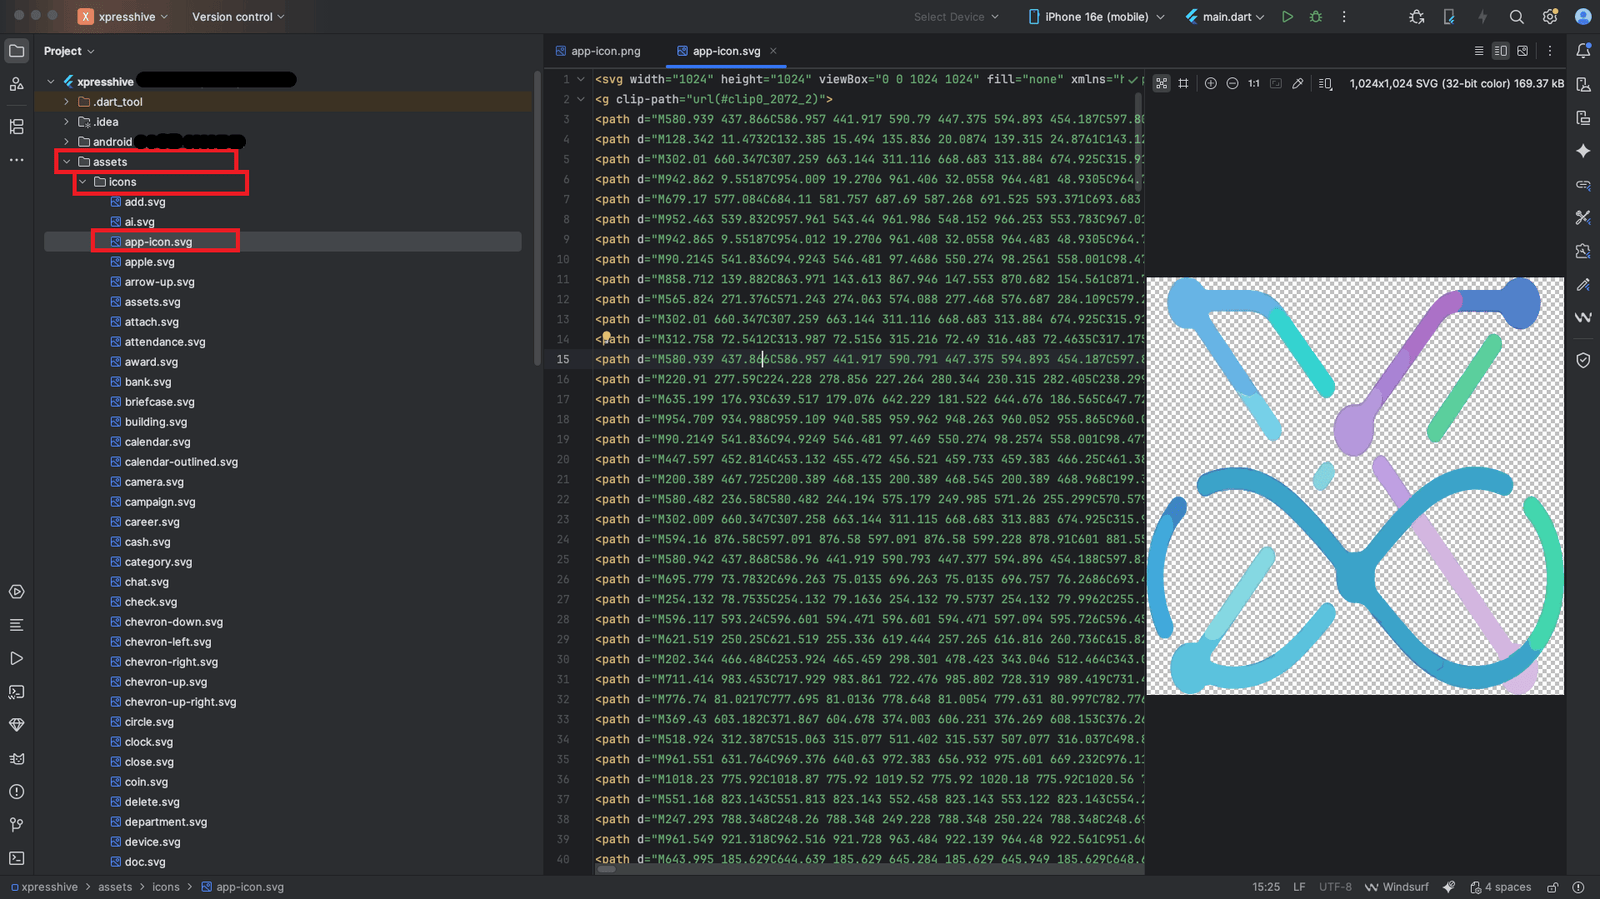
-
PNG Icon:
assets/images/app-icon.png -
SVG Icon:
assets/icons/app-icon.svg
Step 1: Replace PNG Logo
Replace the existing PNG logo with your own image.
Step 2: Replace SVG Icon
Replace the SVG icon file with your custom vector icon.
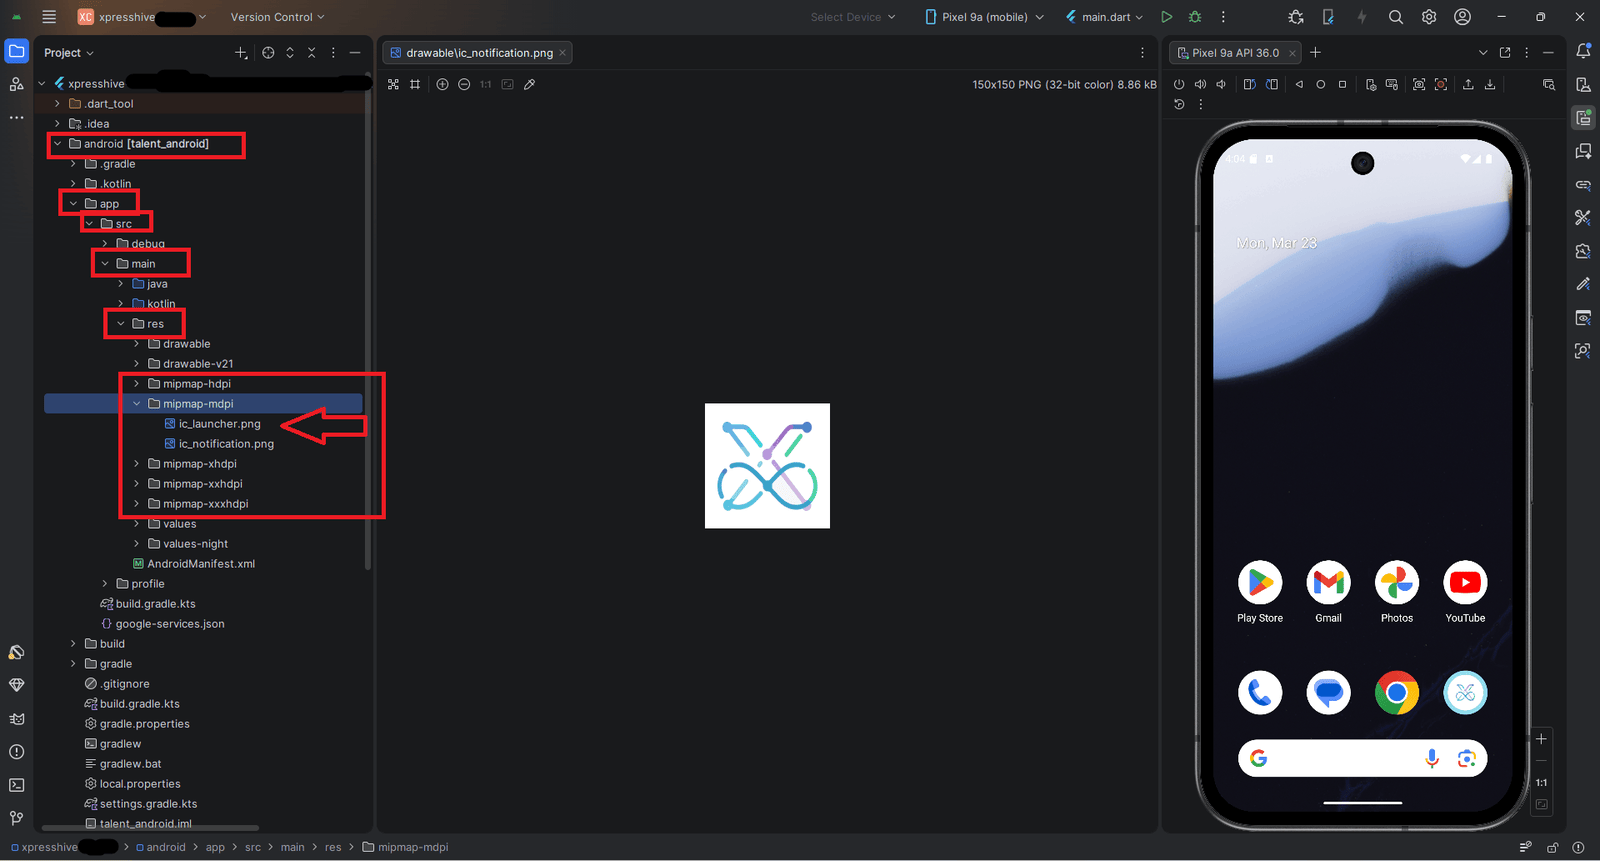
Step 3: Generate App Launcher Icon
To update the app launcher icon (for Android & iOS), generate icons using:
https://www.appicon.co/
- Upload your logo (recommended size: 1024x1024)
- Select Android and iOS
- Click Generate and download the ZIP file
After downloading, paste files into:
-
Android:
Replace allmipmap-*folders with the generated icons. Also manually update the notification icon:ic_notification.png -
iOS:
ios/Runner/Assets.xcassets
Replace the entireAssets.xcassetsfolder with the generated one.
Important:
- Keep file names unchanged (
app-icon.png,app-icon.svg) - Use high-quality images (1024x1024 recommended)
- Do not rename Android mipmap folders
- Replace full
Assets.xcassetsin iOS
After making changes, run:
flutter cleanflutter pub get4. How to change app theme (primary & accent color)
You can customize the look and feel of your Flutter application by updating the Primary and Accent colors. This will affect buttons, app bars, highlights, and overall UI appearance.
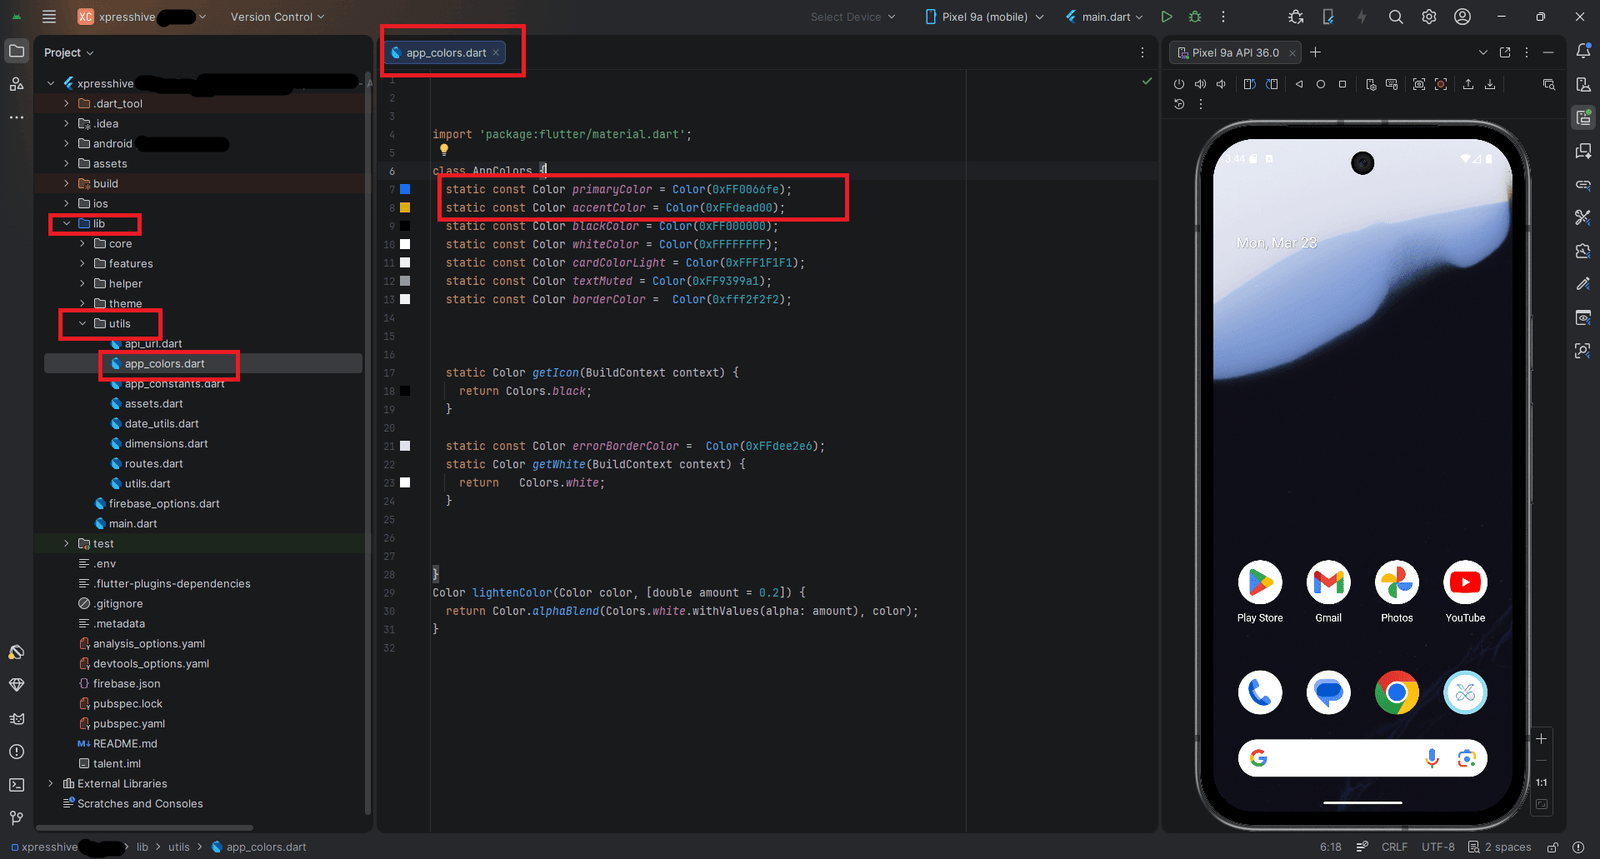
Colors File Location
lib/utils/app_colors.dart
Modify Colors
Open the file and locate the following variables:
								static const Color primaryColor = Color(0xFF000000);
								static const Color accentColor = Color(0xFFFFFFFF);
Update these values with your desired colors:
								static const Color primaryColor = Color(0xFF1E88E5); // Your Primary Color
								static const Color accentColor = Color(0xFFFFC107);  // Your Accent Color
Example Theme Colors
Note:
- Do not change variable names (
primaryColor,accentColor) - Use HEX color format (
0xFF+ HEX code) - Changes will apply globally across the app UI
After making changes, run:
flutter cleanflutter pub get
5. How to change app version
You can update your application version for both Android and
iOS
from a single place using the pubspec.yaml file.
Version File Location
pubspec.yaml
Update Version
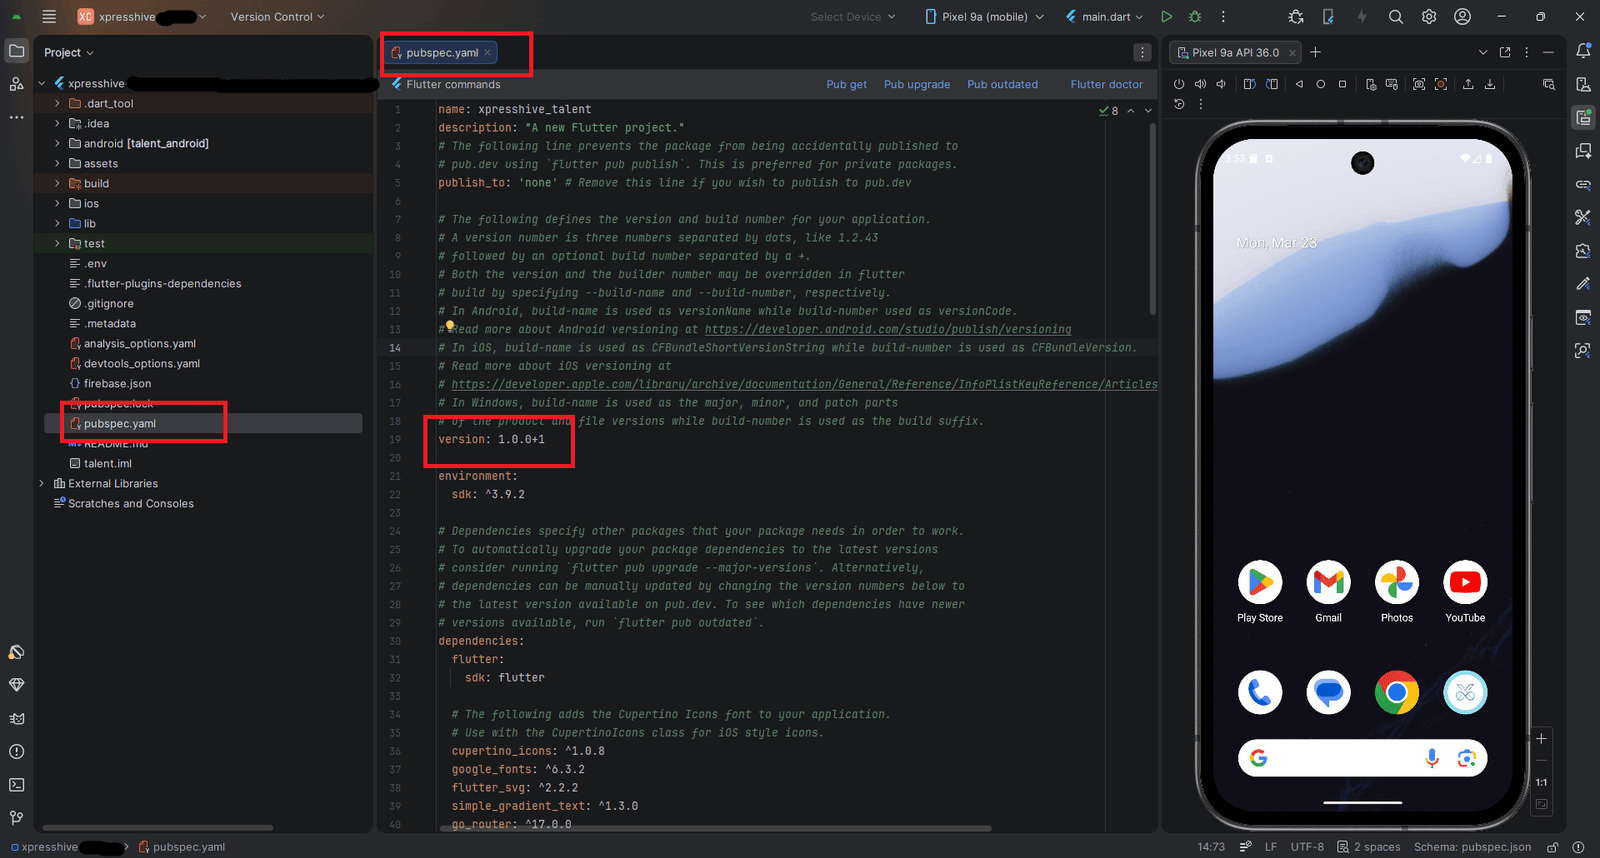
Locate the following line in your pubspec.yaml file:
version: 1.0.0+1
Update it based on your requirement:
version: 1.2.0+5
Version Format Explanation
- A.B.C Version Name (User-visible version)
- +X Build Number (Internal version code)
Android Version Mapping
- A.B.C
versionName - X
versionCode
Example: 1.2.0+5 versionName = 1.2.0, versionCode = 5
iOS Version Mapping
- A.B.C
CFBundleShortVersionString - X
CFBundleVersion
Example: 1.2.0+5 Version = 1.2.0, Build = 5
Version Update Example
Apply Changes
After updating the version, run one of the following commands:
flutter pub getflutter build
Important:
- Always increase the build number (
+X) when uploading a new version - Do not reuse the same versionCode / build number
- Follow semantic versioning (Major.Minor.Patch)
6. Firebase Configuration
Firebase is required to enable Google and Facebook social login. Follow the steps below to configure it properly.
Step 1: Create Firebase Project
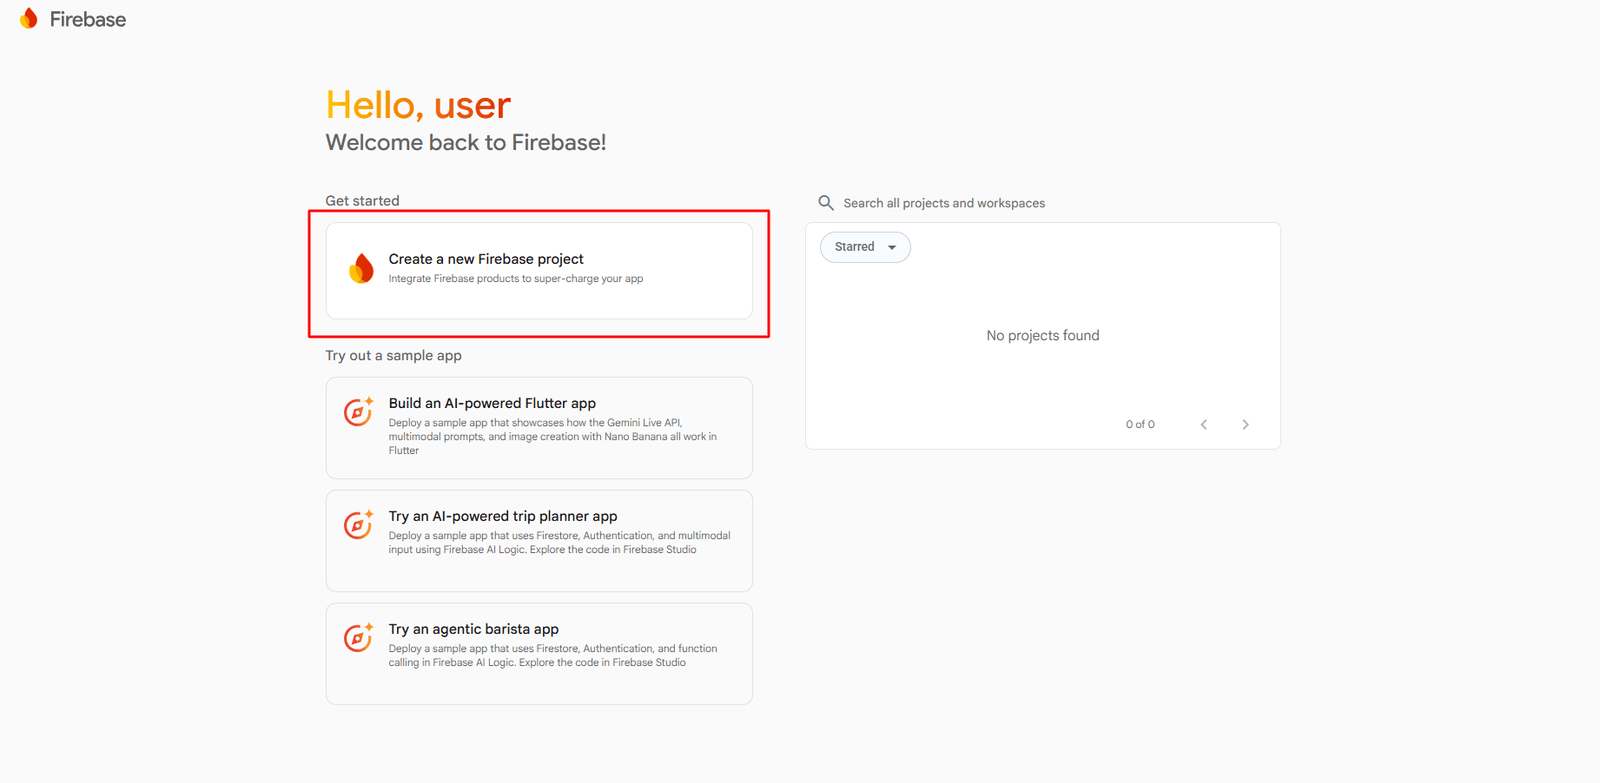
- Open Firebase Console
- Click Create a project
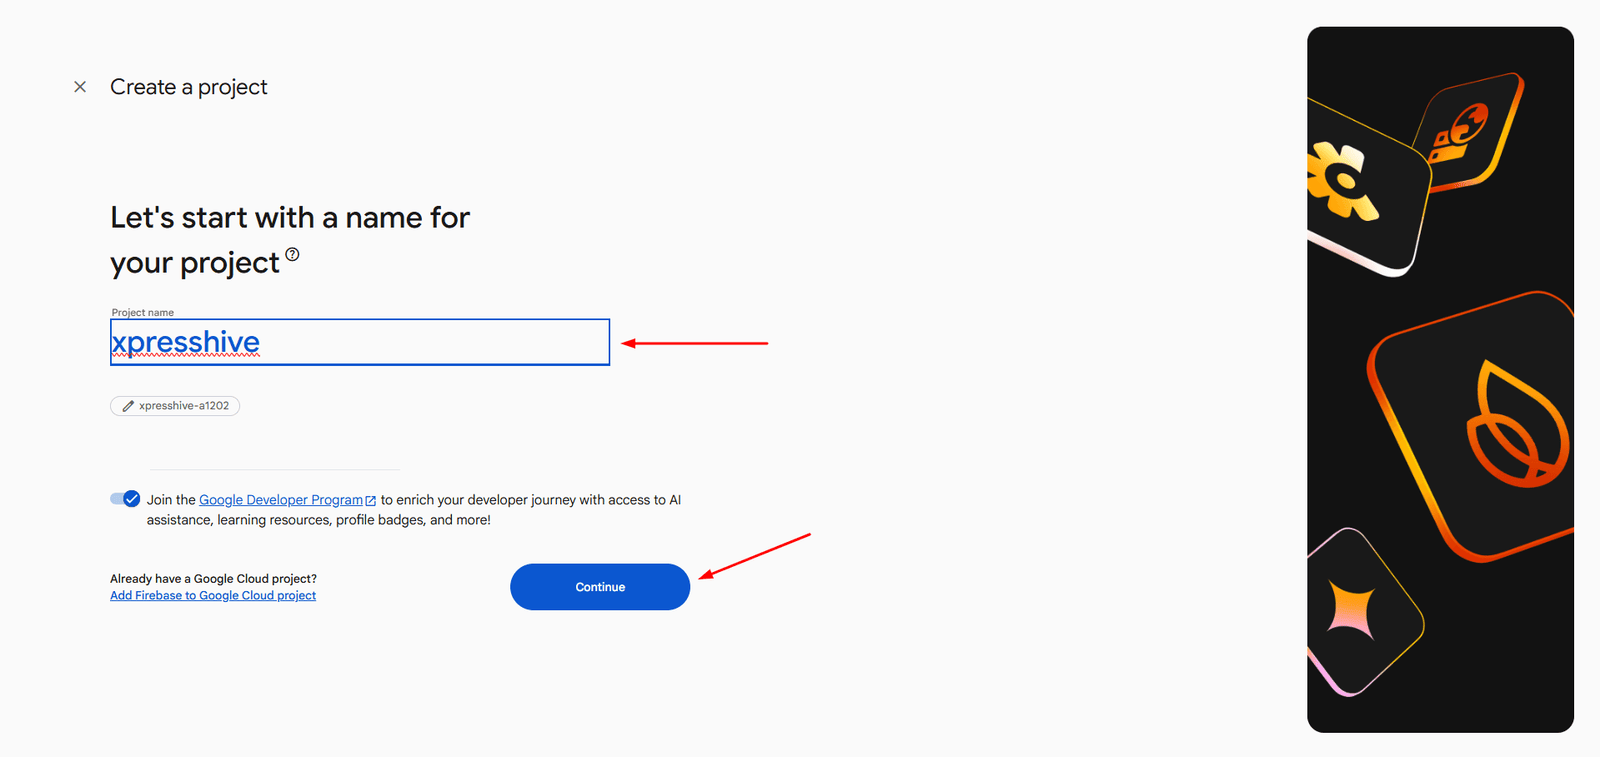
- Enter project name (e.g.,
xpresshive) - Click Continue
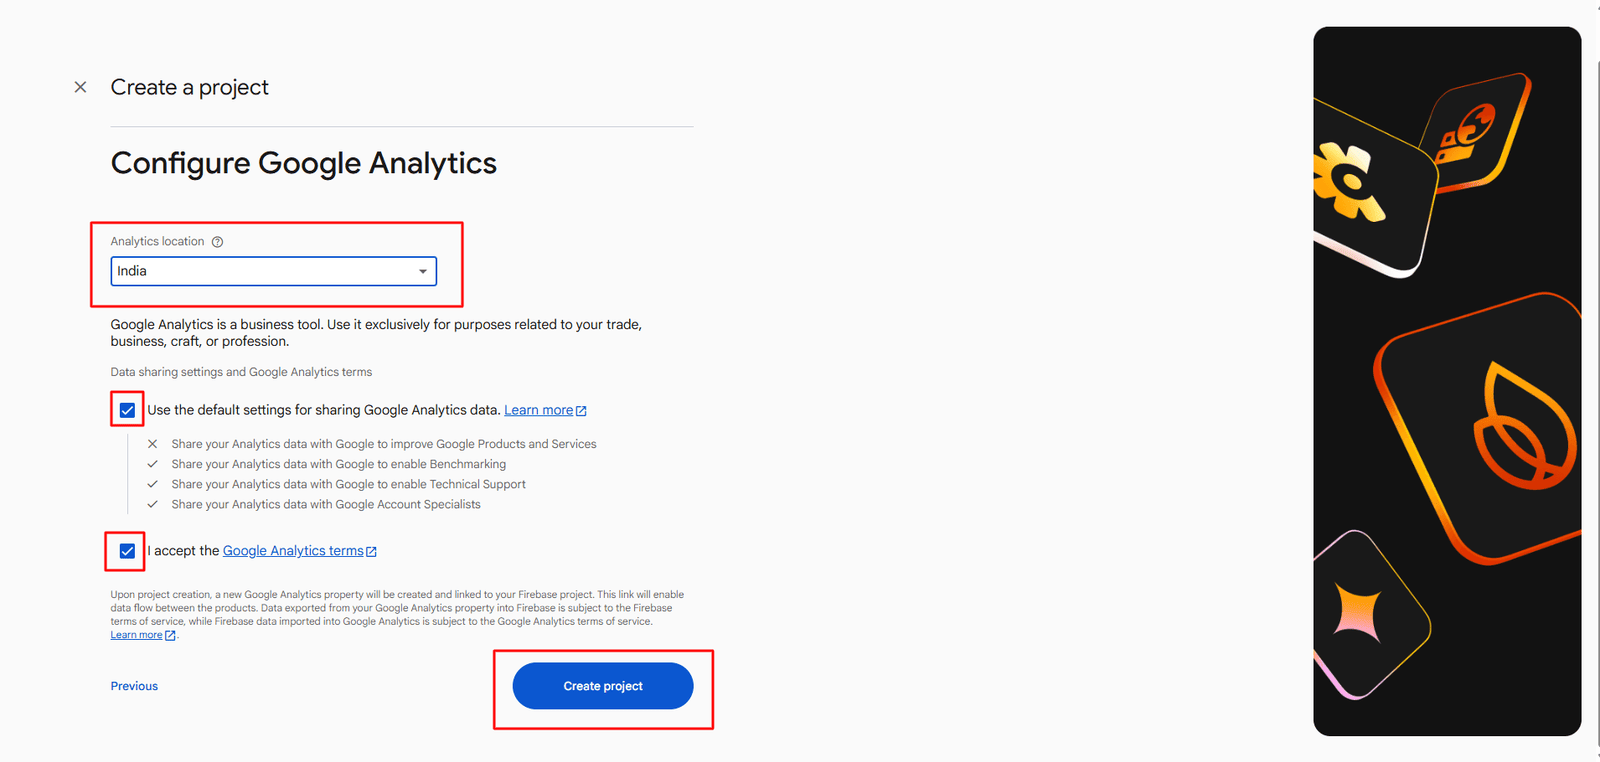
Step 2: Enable Google Authentication
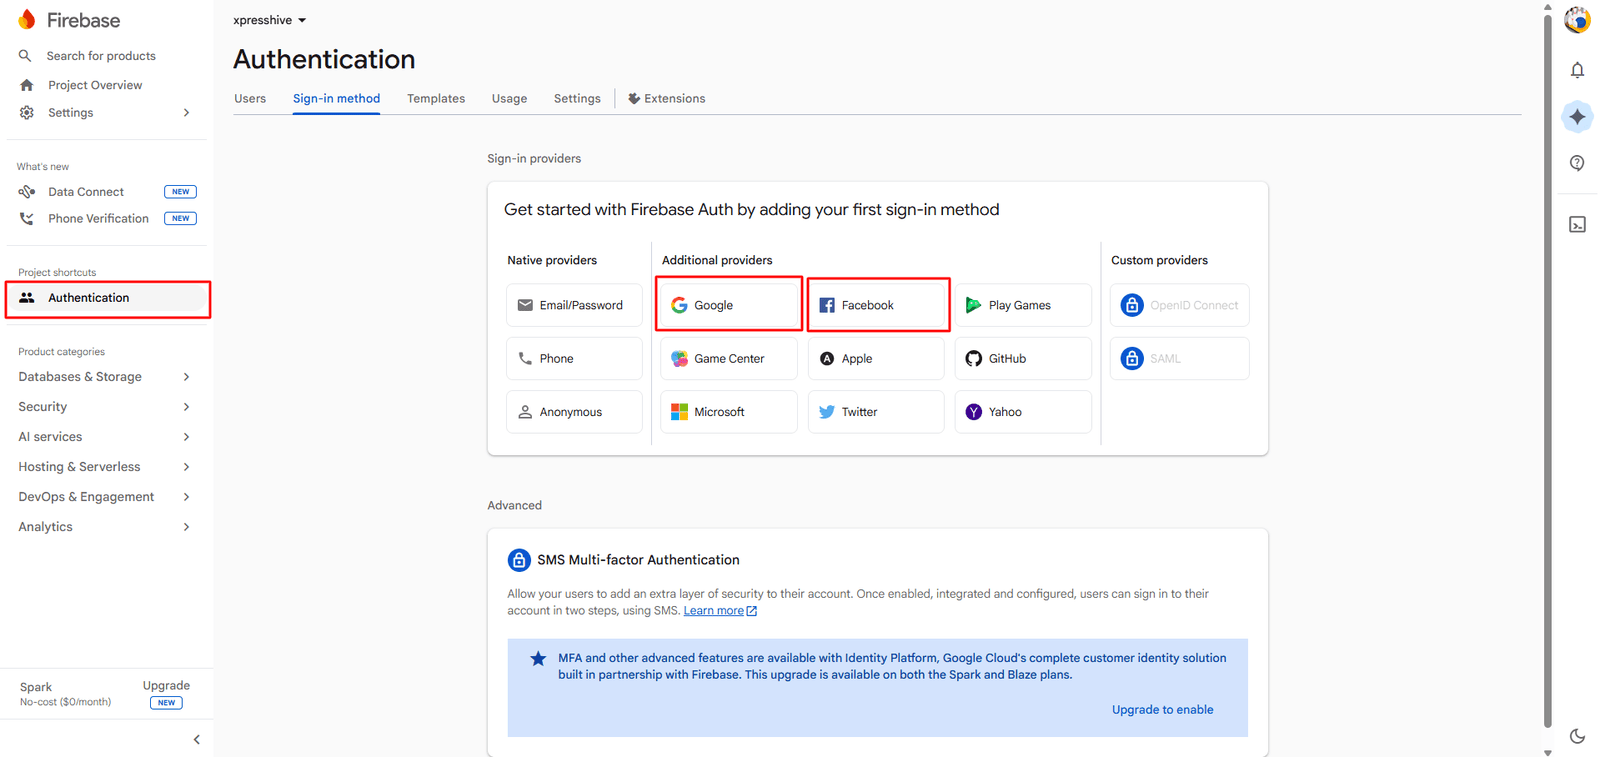
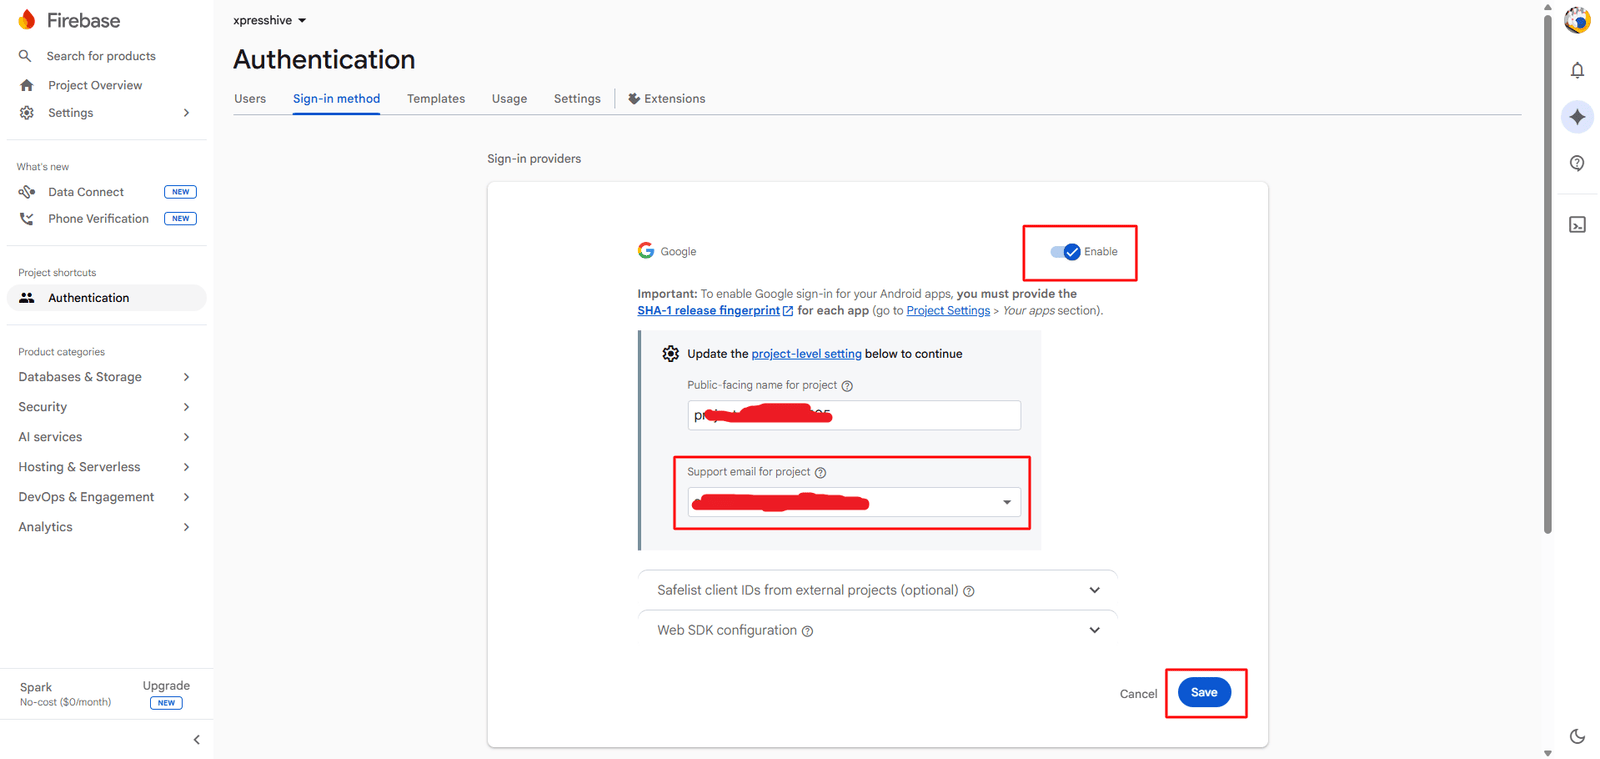
- Go to Authentication Sign-in method
- Enable Google
- Enable Facebook (optional)
- Select support email
- Click Save
Step 3: Facebook App Setup & Integration
Follow the steps below to create and configure your Facebook App and connect it with Firebase Authentication.
Step 1: Create Facebook App
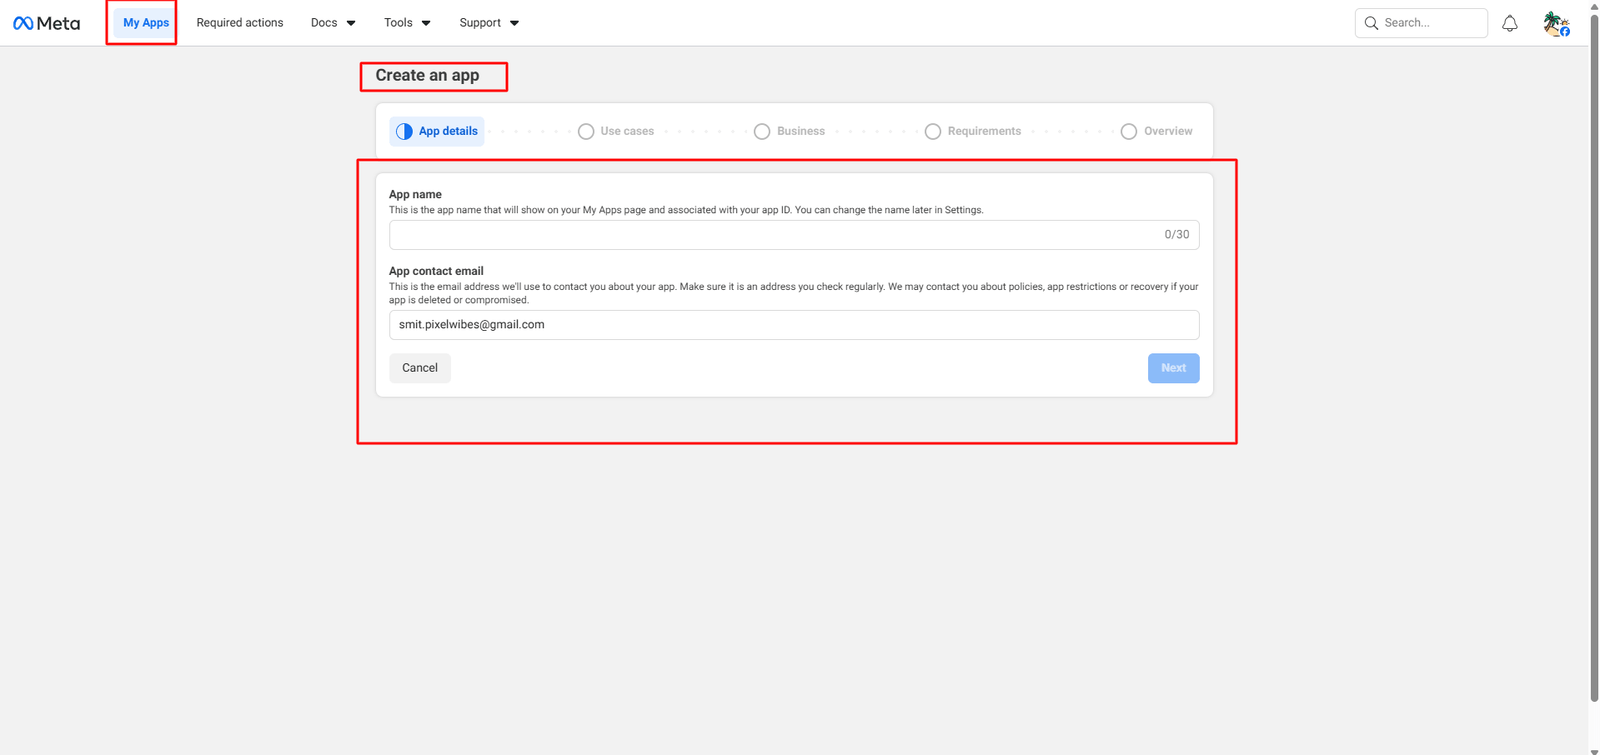
- Go to Meta Developer Console
- Click My Apps Create App
- Enter App Name and Email
- Click Next
Step 2: Select Use Case
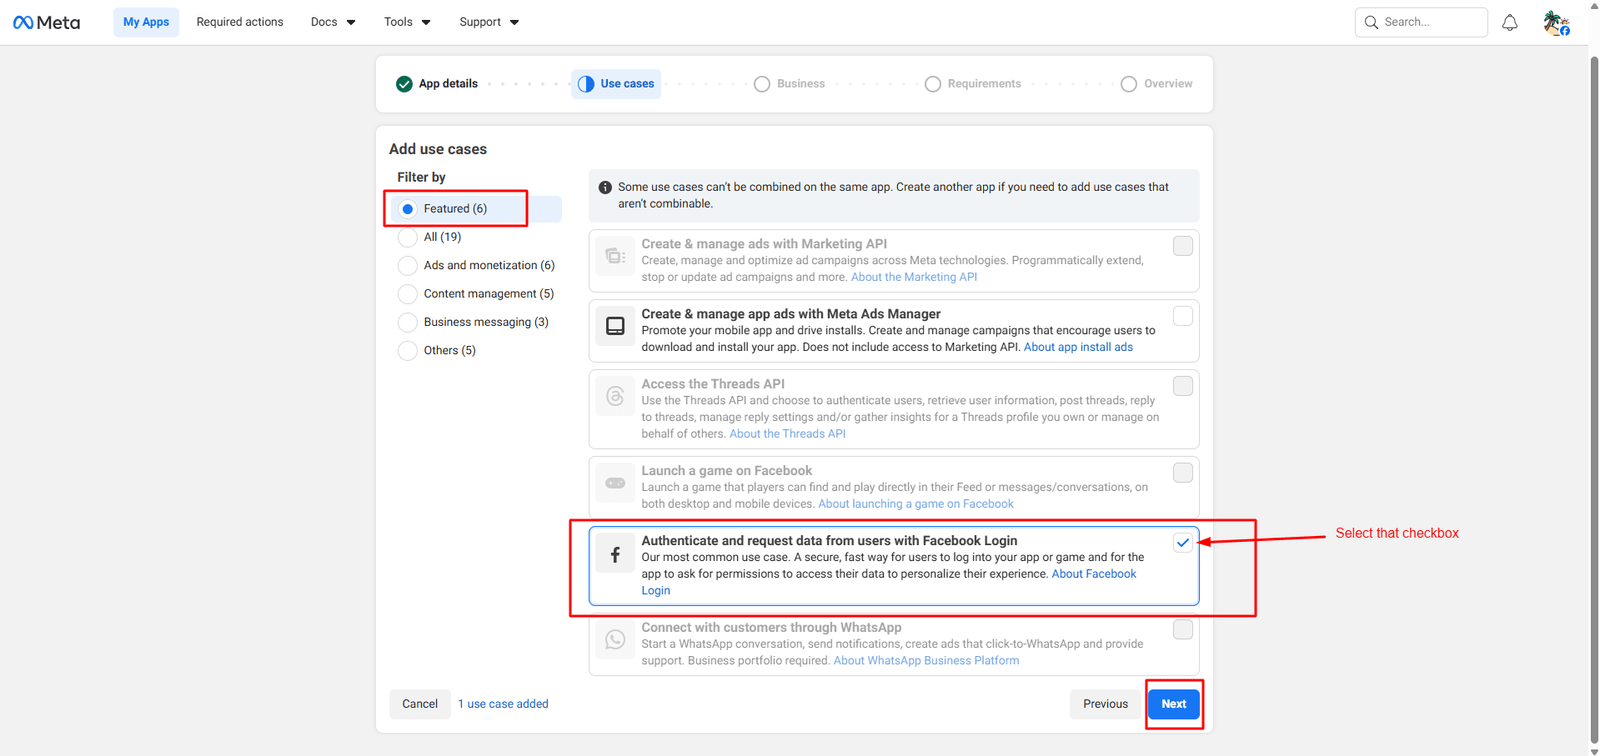
- Select Authenticate and request data from users with Facebook Login
- Click Next
Step 3: Business Selection
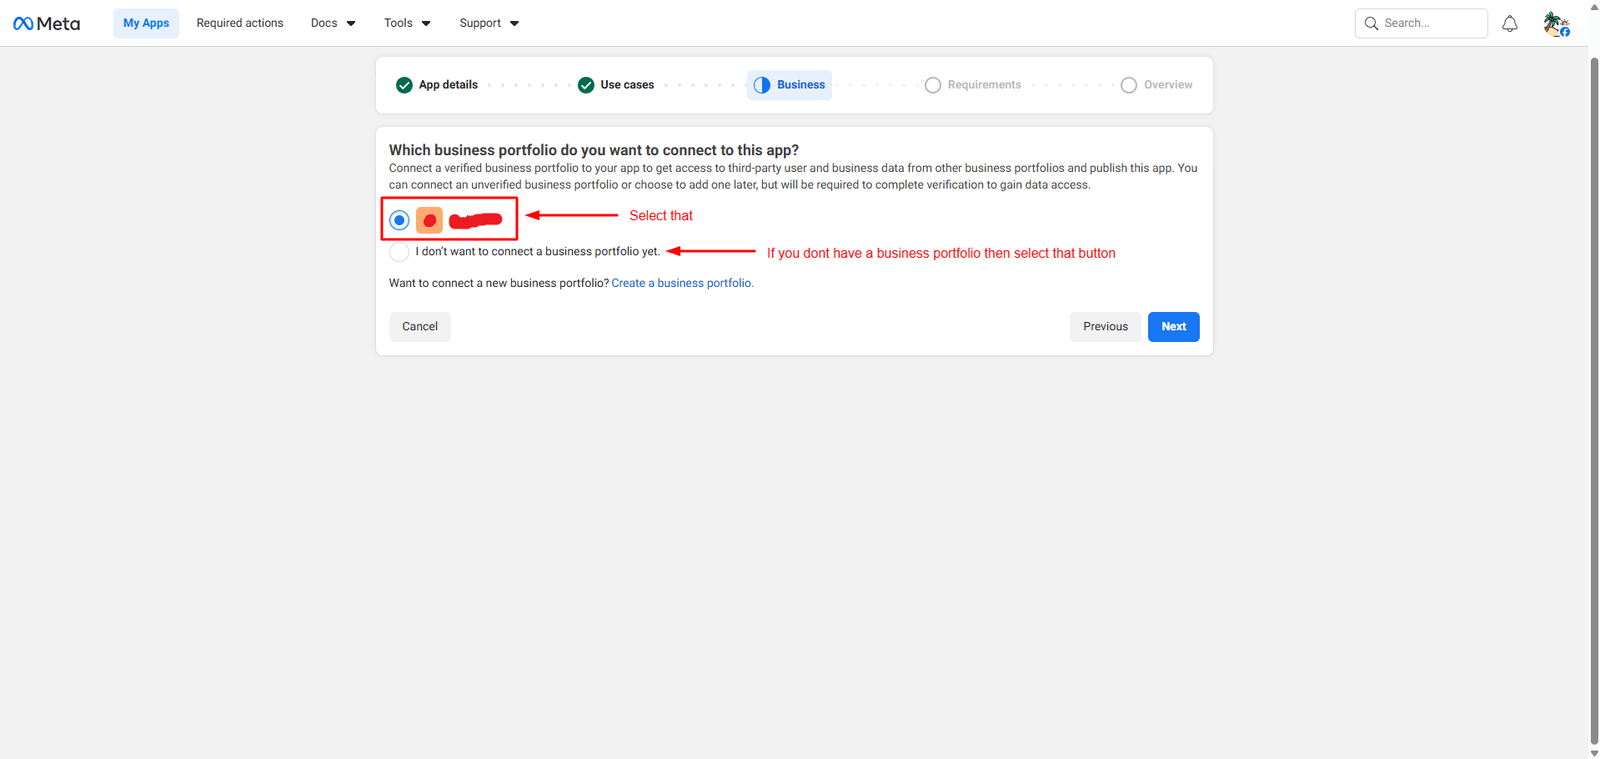
- Select your Business Account
- Or select I don’t want to connect a business portfolio
- Click Next
Step 4: Complete App Creation
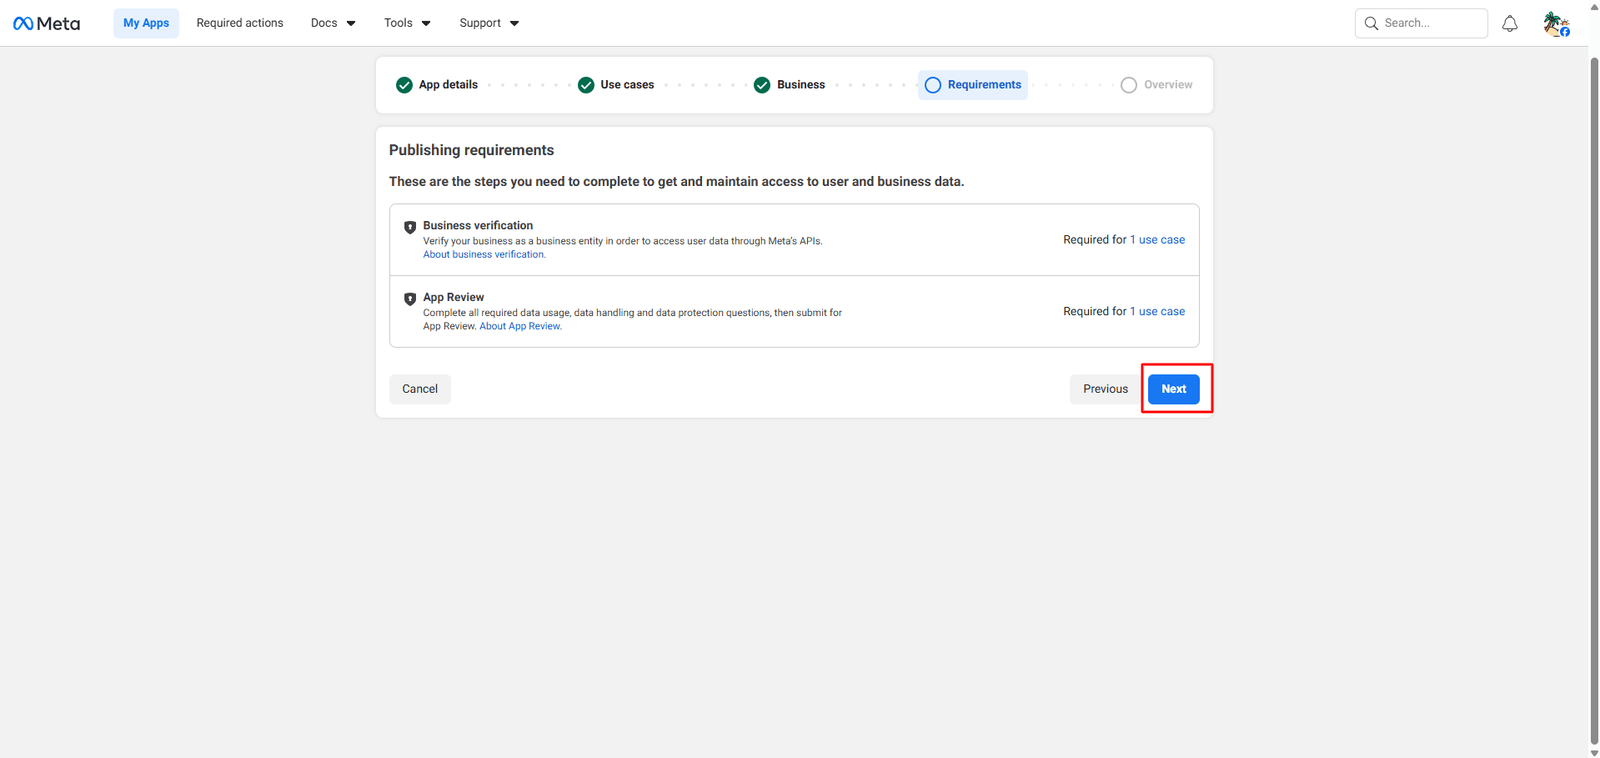
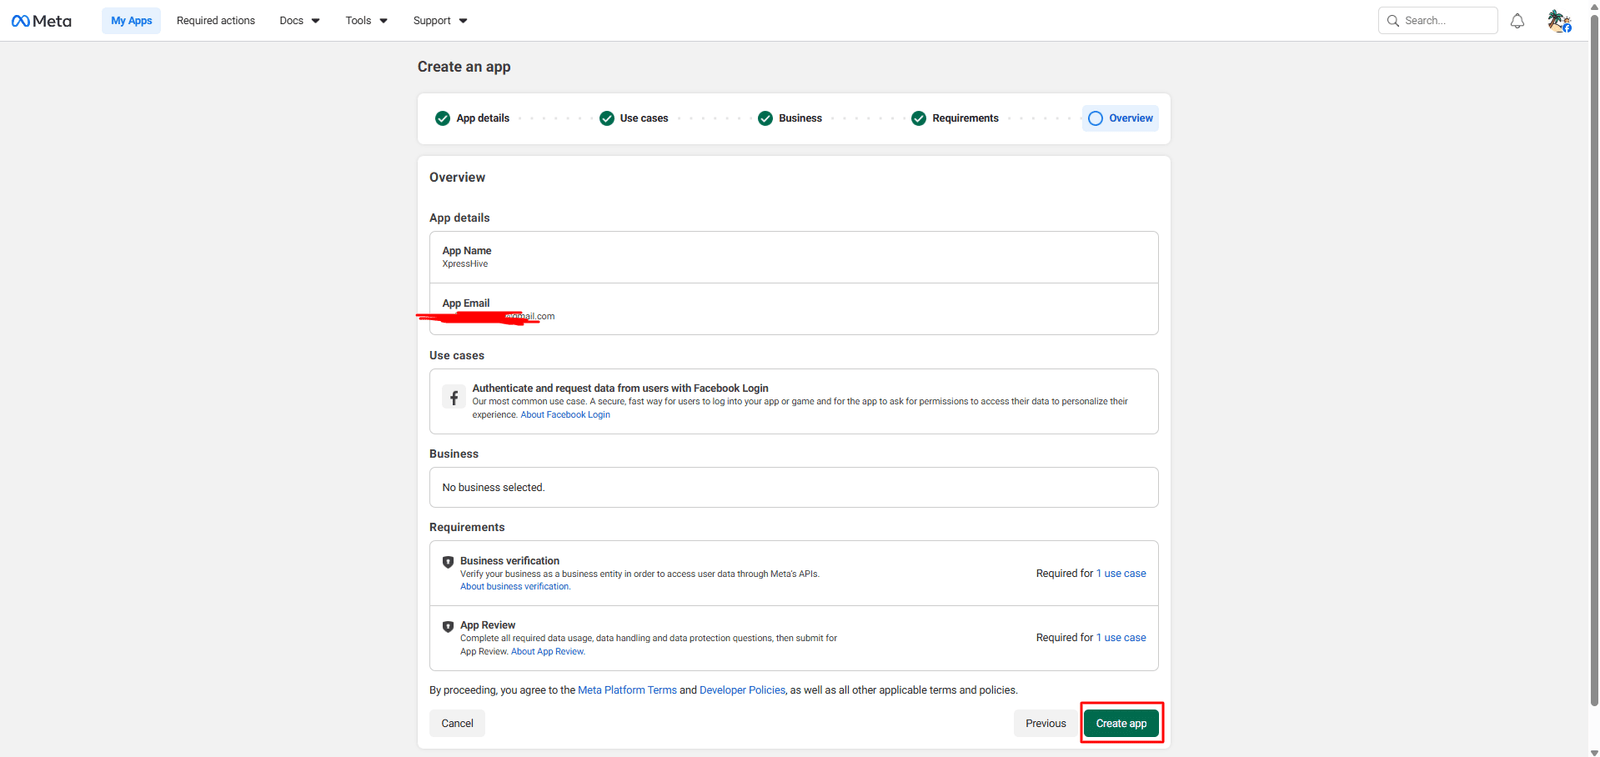
- Review details
- Click Create App
Step 5: Open Dashboard Setup
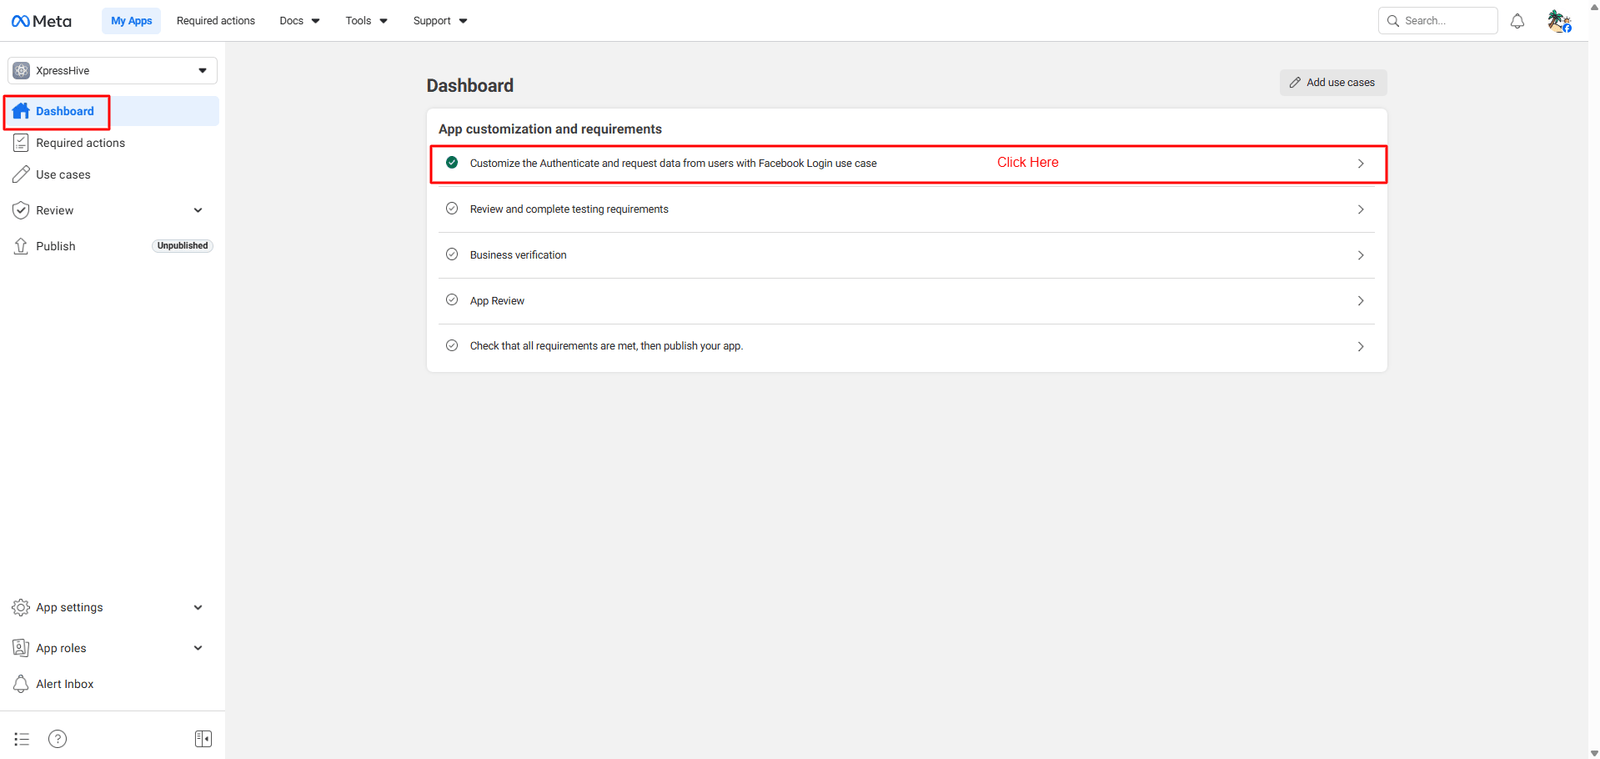
- Go to Dashboard
- Click Customize Facebook Login
Step 6: Configure OAuth Redirect URL
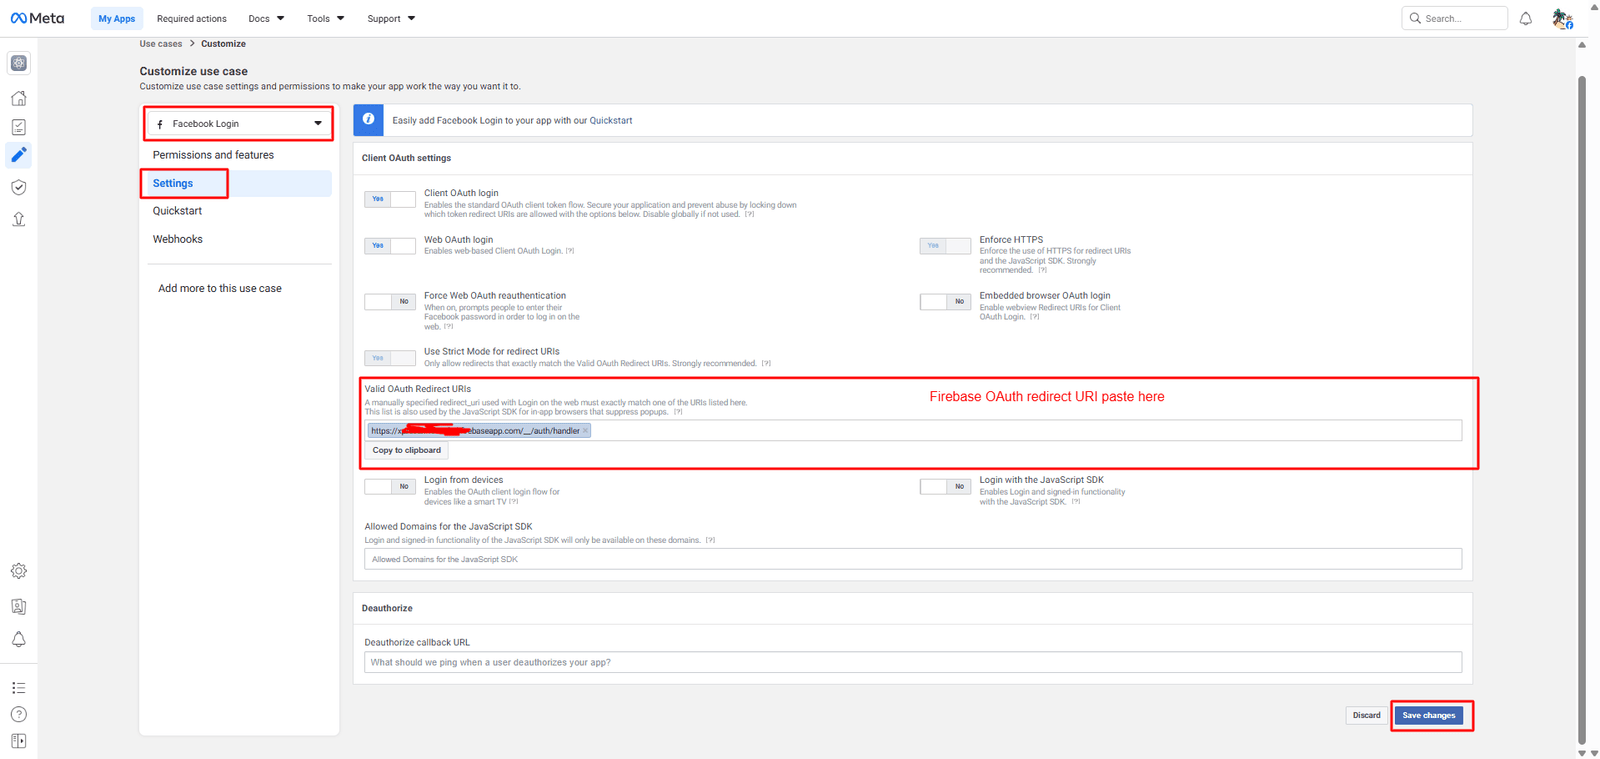
- Go to Facebook Login Settings
- Find Valid OAuth Redirect URIs
- Paste Firebase Redirect URL
- Click Save Changes
Step 7: Go to app setting -> basic
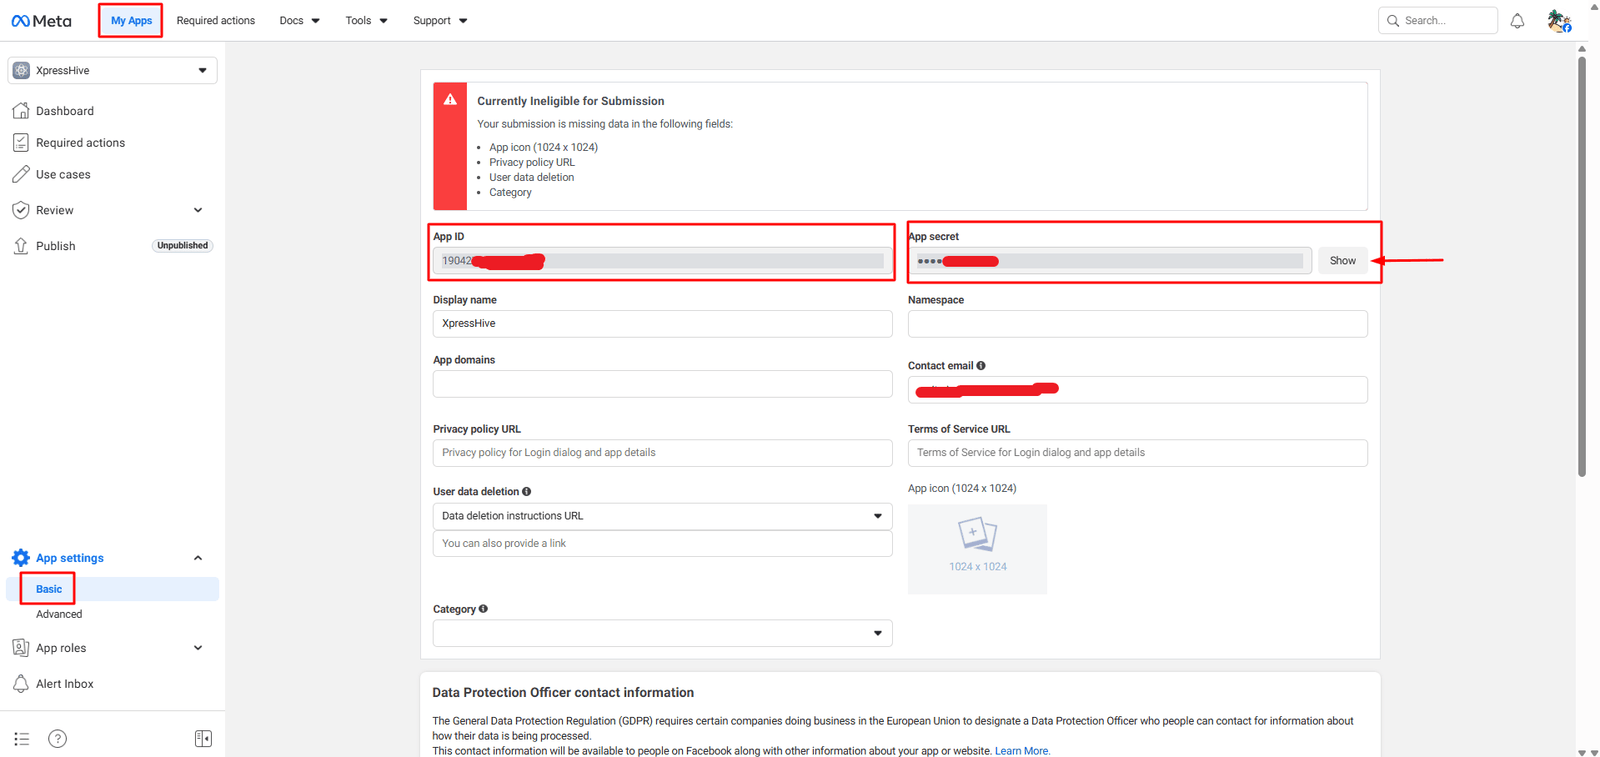
- Go to App Setting
- Get Facebook App ID Copy
- Get Facebook App Secret using show button click and enter password then get secret key Copy
Step 8: Enable in Firebase
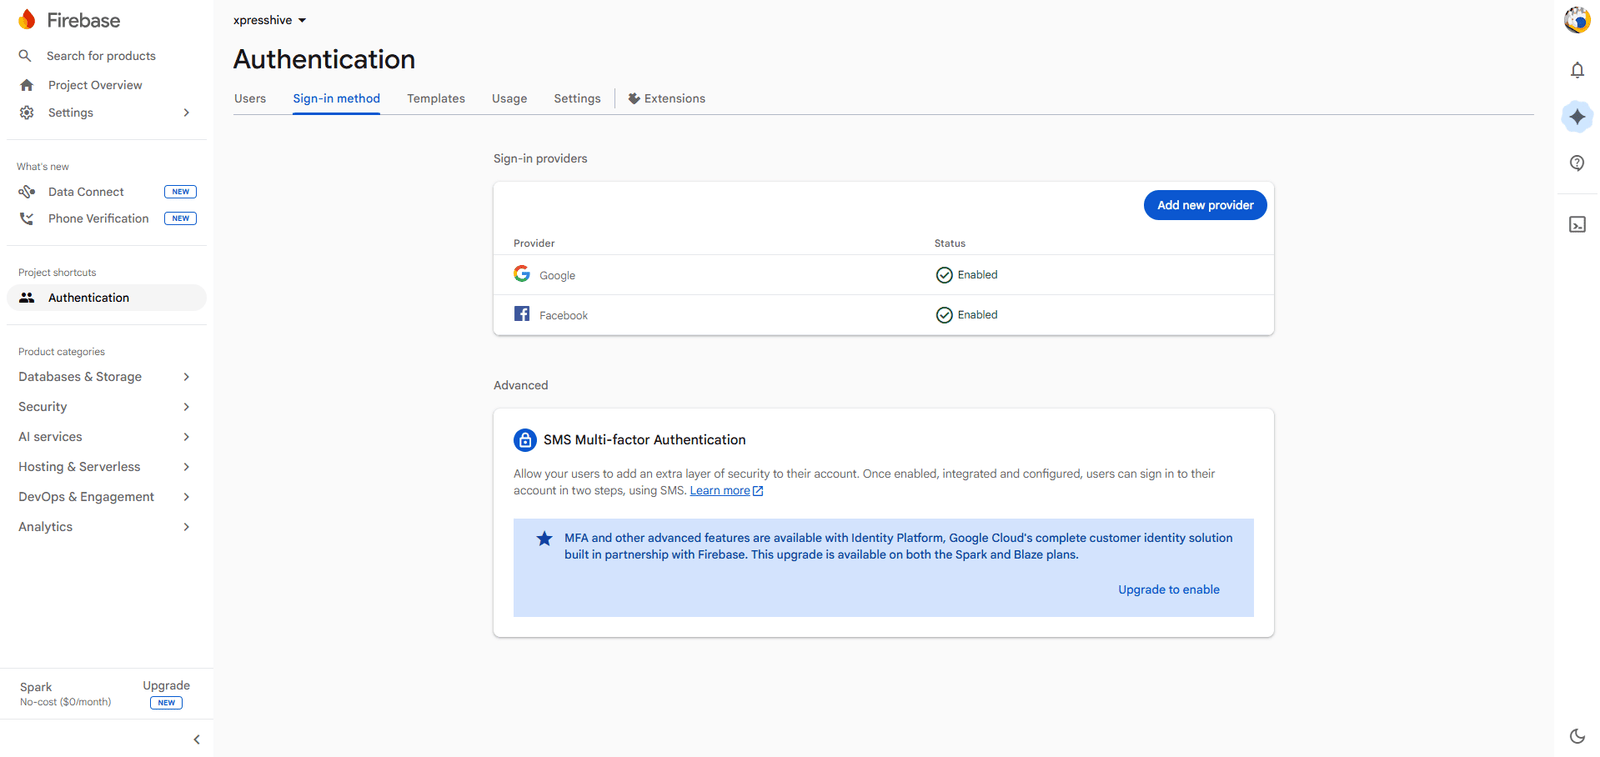
- Go to Firebase Console Authentication
- Open Sign-in method
- Enable Facebook
- Paste App ID and App Secret
- Click Save
Step 4: Install Firebase CLI (Automatically configured)
Before creating a Firebase app from Flutter, you must install Firebase CLI.
npm install -g firebase-tools
Follow the official guide to install Firebase CLI:
Firebase CLI Installation Guide
Create a Firebase App for Flutter
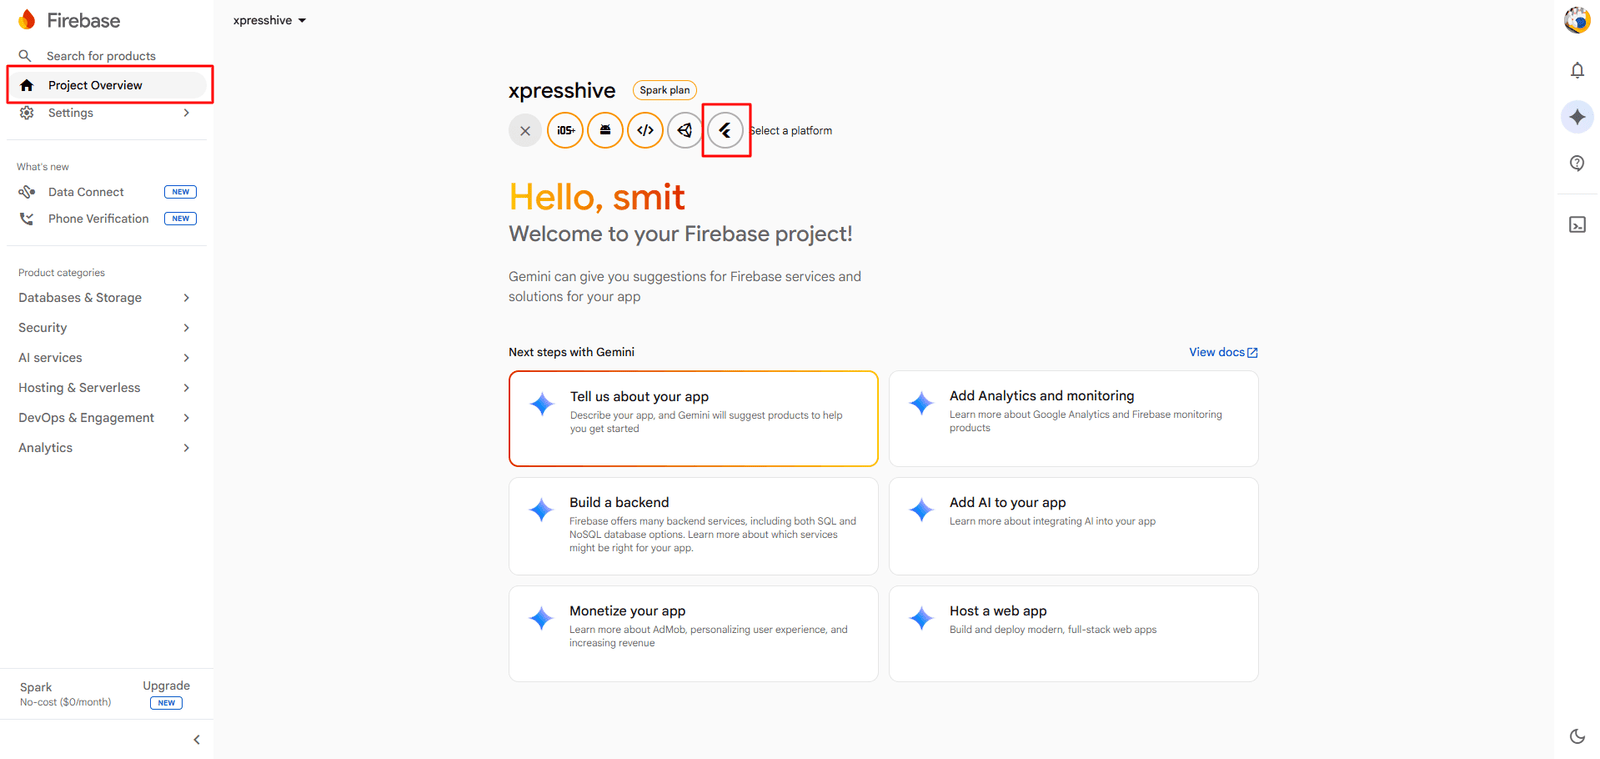
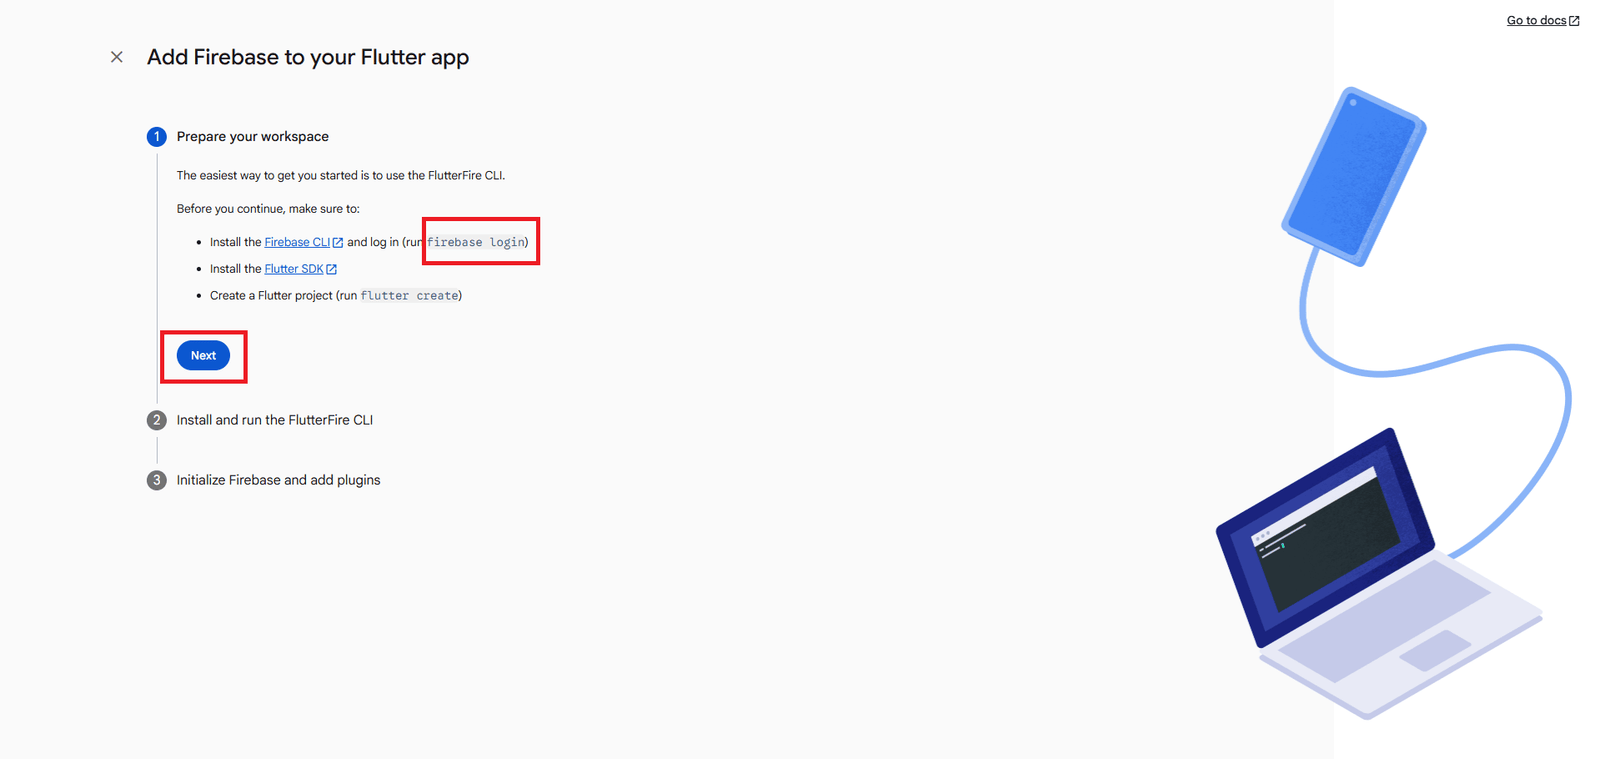
- Select Flutter as the app type
- Click Next to continue
Log in to Firebase via Terminal
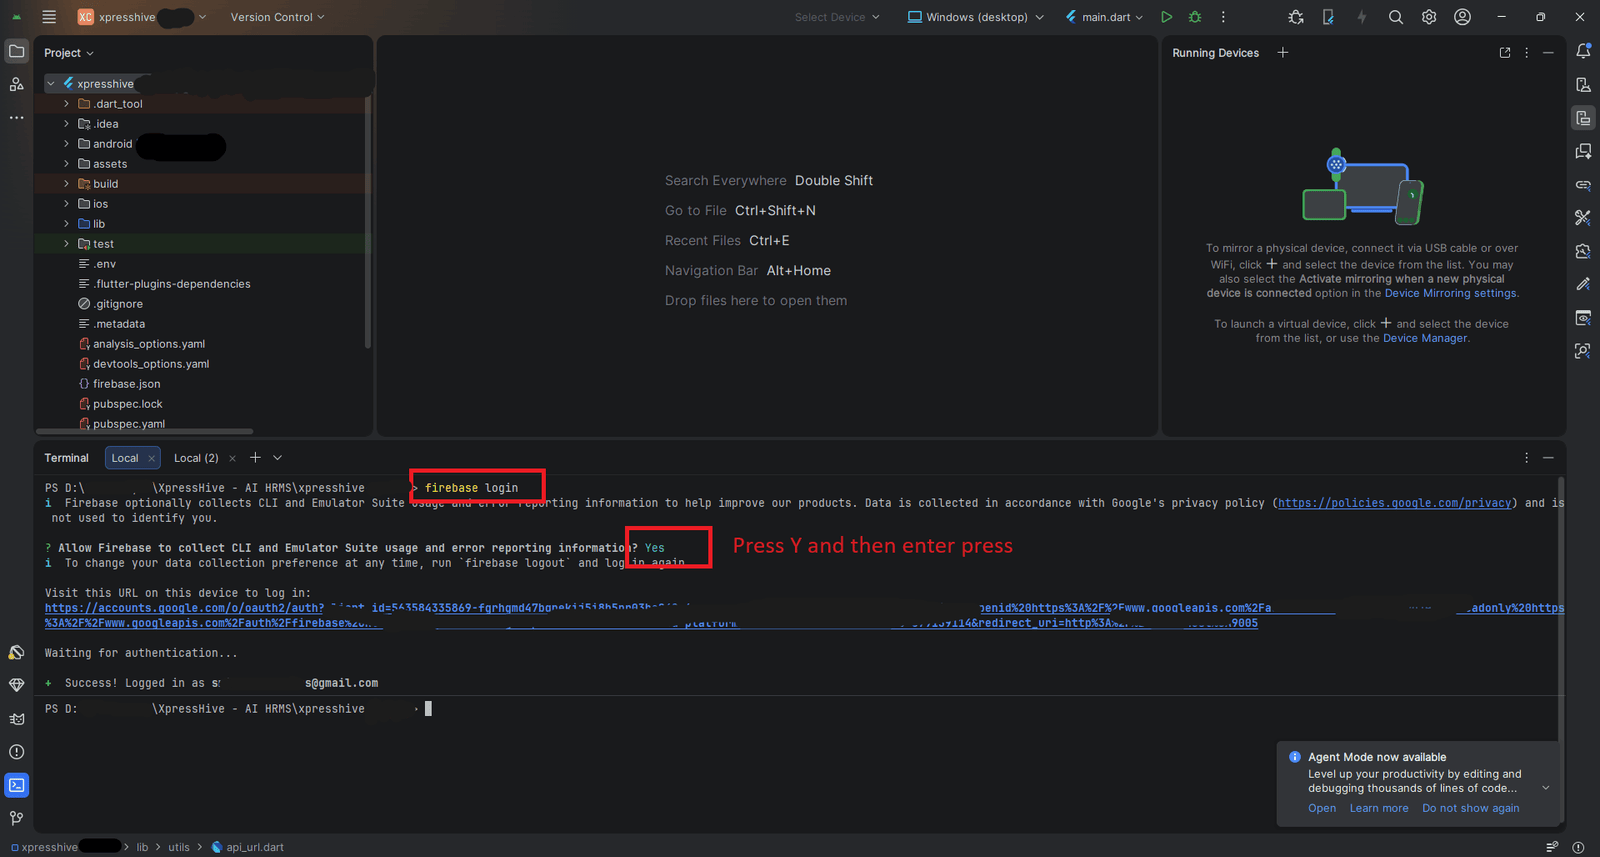
- Open CLI Terminal (VS Code / Android Studio / Terminal)
- Run the command below (skip if already logged in)
firebase login
- A browser window will open Login to your Firebase account
- Allow Firebase CLI permissions
- When prompted, type YES and press Enter
Run Firebase Initialization Commands
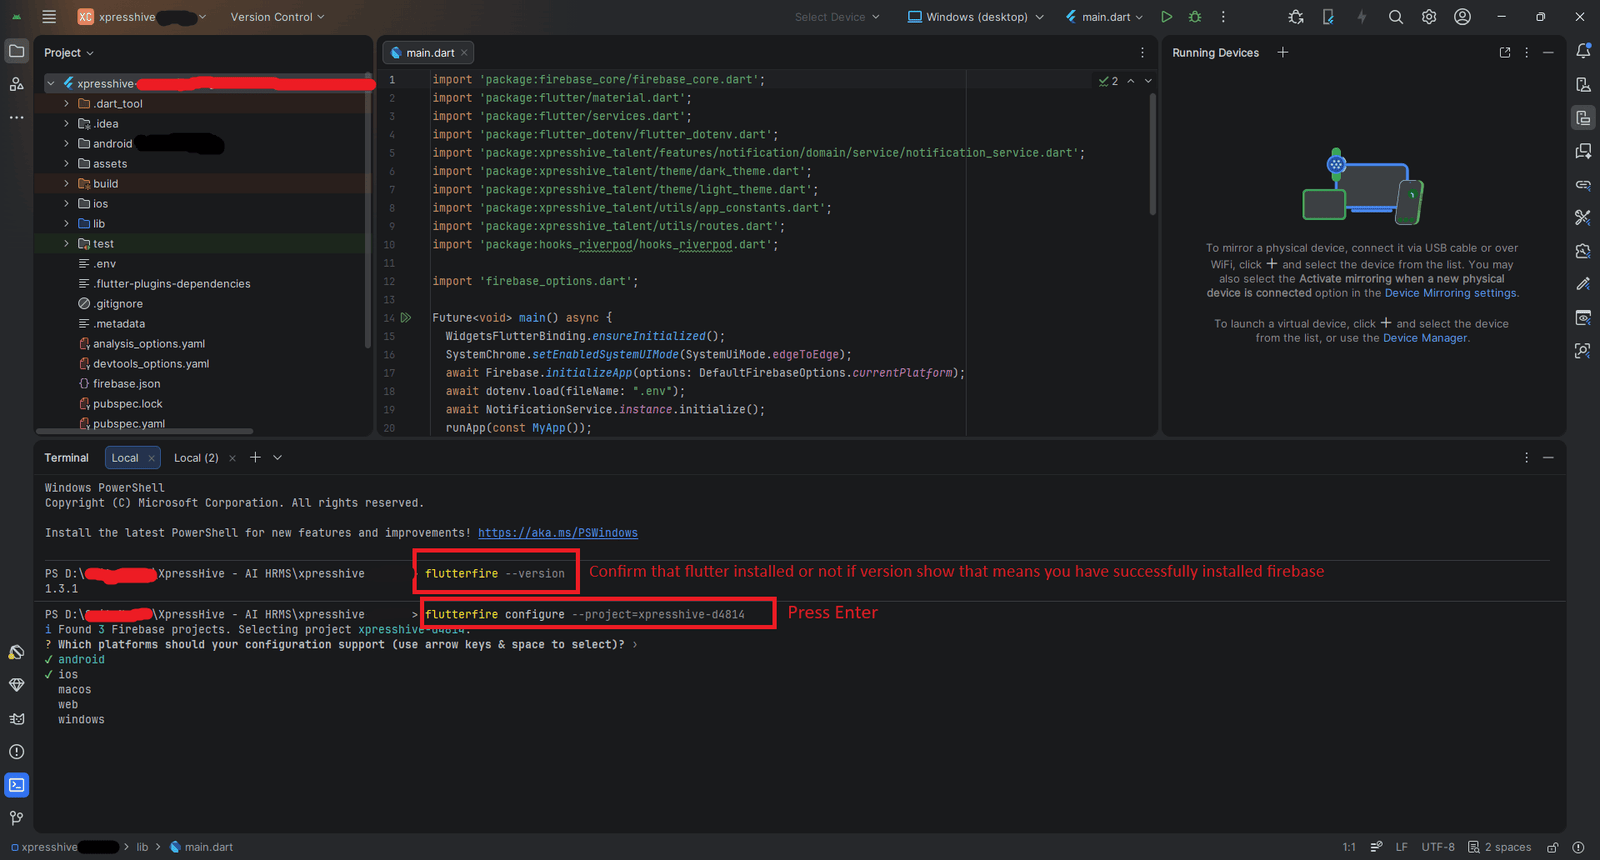
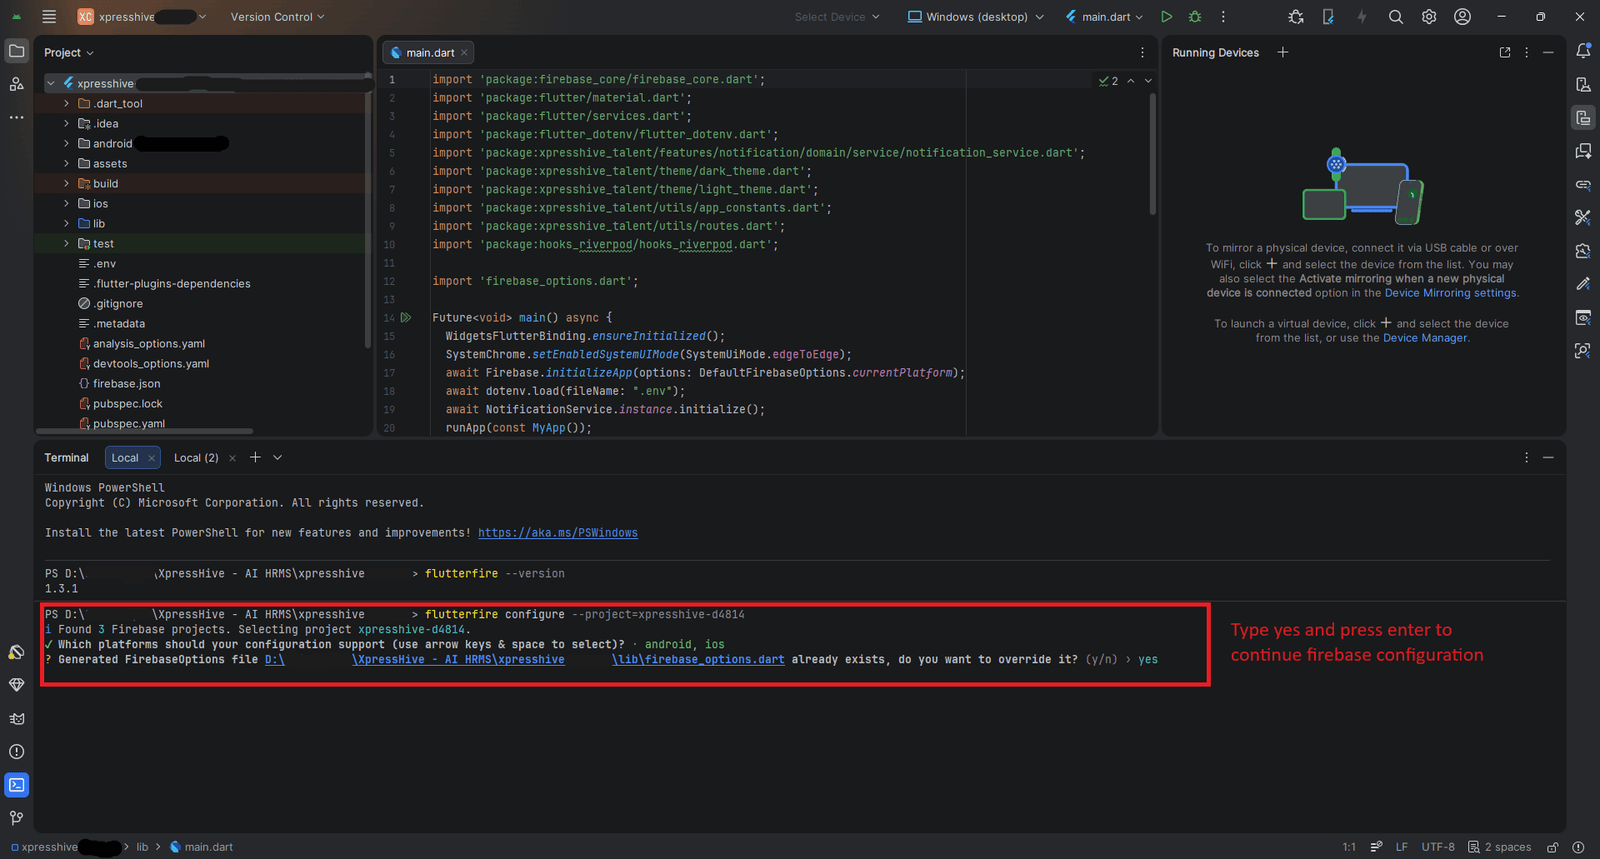
- Run the Firebase initialization command
dart pub global activate flutterfire_cli
- Run FlutterFire configuration command
you have already copy that command from the previous step for example: flutterfire configure --project=your-firebase-project-id
- Press Enter to continue when prompted
- Press Yes to confirm selections
Finalizing Firebase Setup
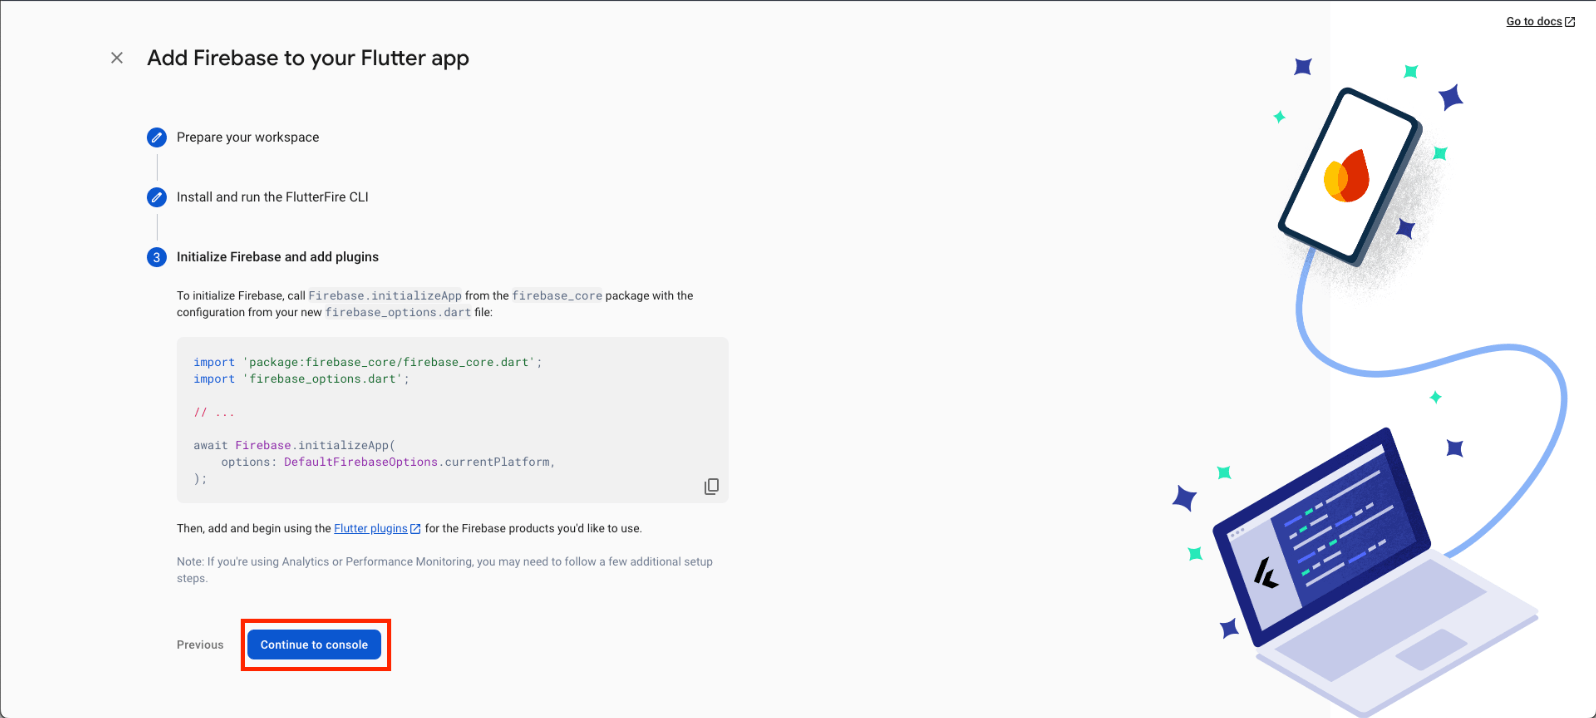
- Press Nextto continue.
- Click Continue to Console.
Firebase Configuration Notice:
Verify Firebase Configuration Files
After running the Firebase CLI command, check whether the configuration files were updated correctly:
-
Android:
Check for
android/app/google-services.json -
iOS:
Check for
ios/Runner/GoogleService-Info.plist
If the files are missing or the Firebase project details are incorrect, manually download the latest configuration files from the Firebase Console.
How to Download Firebase Config Files Manually
- Open the Firebase Console.
- Select your Firebase project.
- Click the âš™ Project Settings icon.
- Under the General tab, scroll down to the Your Apps section.
- Select your Android or iOS application.
-
Download the required configuration file:
-
Android:
Download
google-services.json -
iOS:
Download
GoogleService-Info.plist
-
Android:
Download
-
Move the downloaded files into the following locations:
-
android/app/google-services.json -
ios/Runner/GoogleService-Info.plist
-
Tip: Manual configuration works on all operating systems and ensures your Firebase project settings remain synchronized.
Firebase Configuration & firebase_options.dart Maintenance
After running the Firebase CLI command
the following files are usually generated automatically:
android/app/google-services.jsonios/Runner/GoogleService-Info.plistlib/firebase_options.dart
In some cases, the FlutterFire CLI may not update
lib/firebase_options.dart
correctly, especially when:
- Using multiple Firebase apps
- Changing package names or bundle IDs
- Replacing Firebase configuration files manually
- Switching Firebase projects
Manual FirebaseOptions Configuration
If
lib/firebase_options.dart
is not updated automatically,
you must manually copy Firebase values from:
android/app/google-services.jsonios/Runner/GoogleService-Info.plist
ANDROID SETUP
Step 1: Find Android Package Name
Open:
android/app/build.gradle
defaultConfig {
    applicationId "com.xpresshive.app"
}
Your Android package name is:
com.xpresshive.app
Step 2: Open google-services.json
Open:
android/app/google-services.json
If your Firebase project contains multiple apps,
the file will contain multiple
client
blocks.
Find the block matching your package name:
"package_name": "com.xpresshive.app"
Example:
{
  "client_info": {
    "mobilesdk_app_id": "1:123456789:android:abc123",
    "android_client_info": {
      "package_name": "com.xpresshive.app"
    }
  },

  "api_key": [
    {
      "current_key": "AIzaSyXXXX"
    }
  ]
}
Use values only from the matching package name block.
Step 3: Copy Android Firebase Values
| firebase_options.dart | Where to Find in google-services.json |
|---|---|
projectId |
|
messagingSenderId |
|
storageBucket |
|
appId |
|
apiKey |
|
IOS SETUP
Step 1: Find iOS Bundle ID
Open:
ios/Runner.xcodeproj
or
ios/Runner/Info.plist
PRODUCT_BUNDLE_IDENTIFIER = com.xpresshive.app
Your iOS bundle ID is:
com.xpresshive.app
Step 2: Open GoogleService-Info.plist
Open:
ios/Runner/GoogleService-Info.plist
If multiple iOS apps exist inside the Firebase project, download the correct plist file matching your iOS bundle ID.
Verify:
<key>BUNDLE_ID</key>
<string>com.xpresshive.app</string>
Step 3: Copy iOS Firebase Values
| firebase_options.dart | Where to Find in GoogleService-Info.plist |
|---|---|
apiKey |
|
appId |
|
messagingSenderId |
|
projectId |
|
storageBucket |
|
iosBundleId |
|
iosClientId |
|
Final firebase_options.dart Example
static const FirebaseOptions android = FirebaseOptions(
  projectId: 'YOUR_PROJECT_ID',
  messagingSenderId: '123456789',
  storageBucket: 'project.appspot.com',
  apiKey: 'AIzaSyXXXX',
  appId: '1:123456789:android:abc123',
);

static const FirebaseOptions ios = FirebaseOptions(
  apiKey: 'AIzaSyXXXX',
  appId: '1:123456789:ios:abc123',
  messagingSenderId: '123456789',
  projectId: 'YOUR_PROJECT_ID',
  storageBucket: 'project.appspot.com',
  iosBundleId: 'com.xpresshive.app',
  iosClientId: '123456.apps.googleusercontent.com',
);
Final Step
After updating Firebase configuration manually, run:
flutter clean
flutter pub get
Then restart the application completely.
Step 5: Add App (Android) Manual Configuration
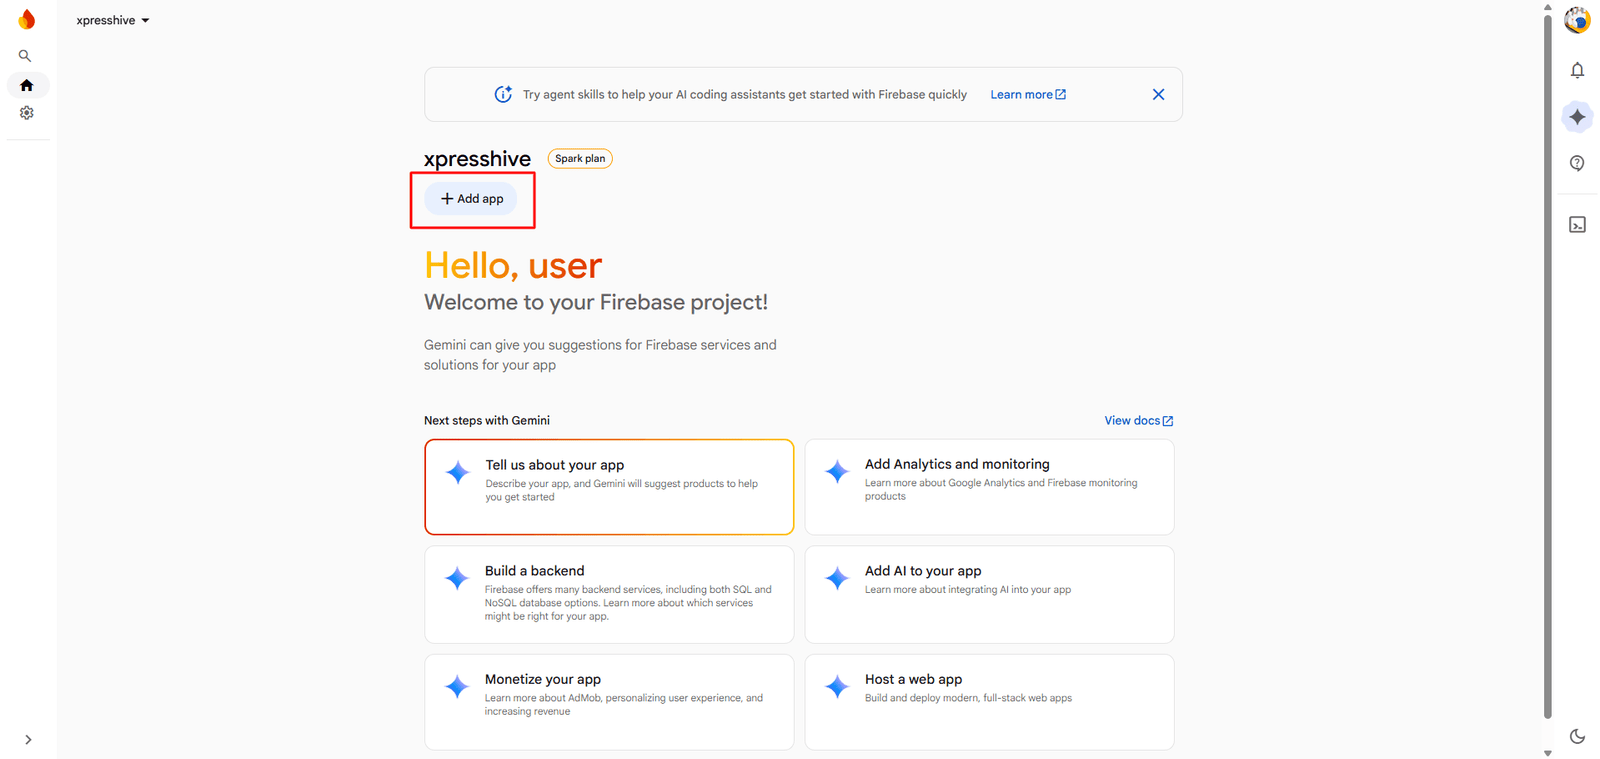
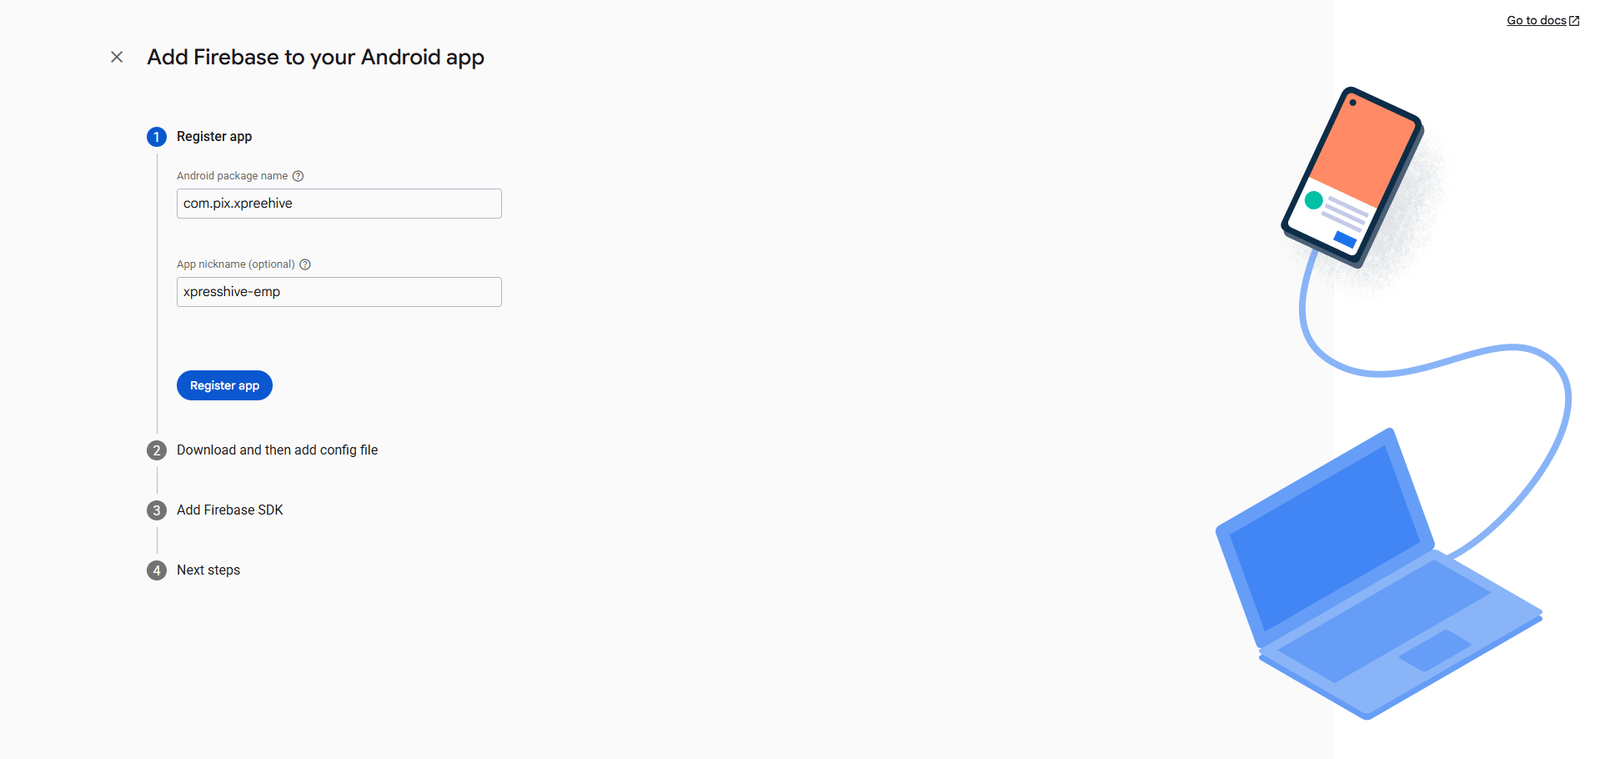
- Click Add App
- Select Android
- Enter your Android package name
- Enter app nickname (optional)
- Click Register app
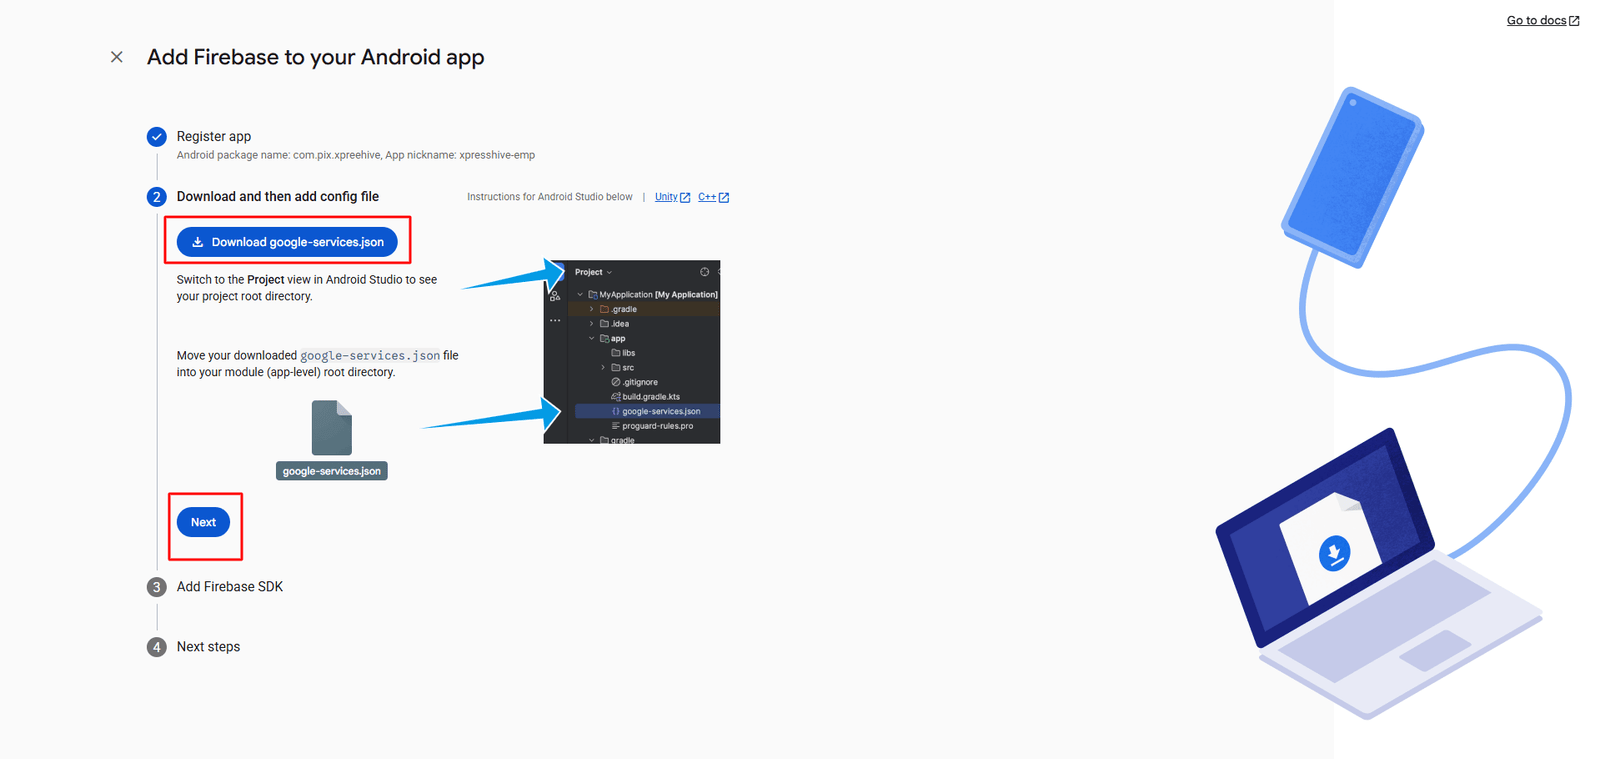
- Download the google-services.json file
- Place it inside:
android/app/
Configure firebase_options.dart Manually
If flutterfire configure does not automatically generate
your Firebase configuration correctly, you can manually add the values
inside firebase_options.dart.
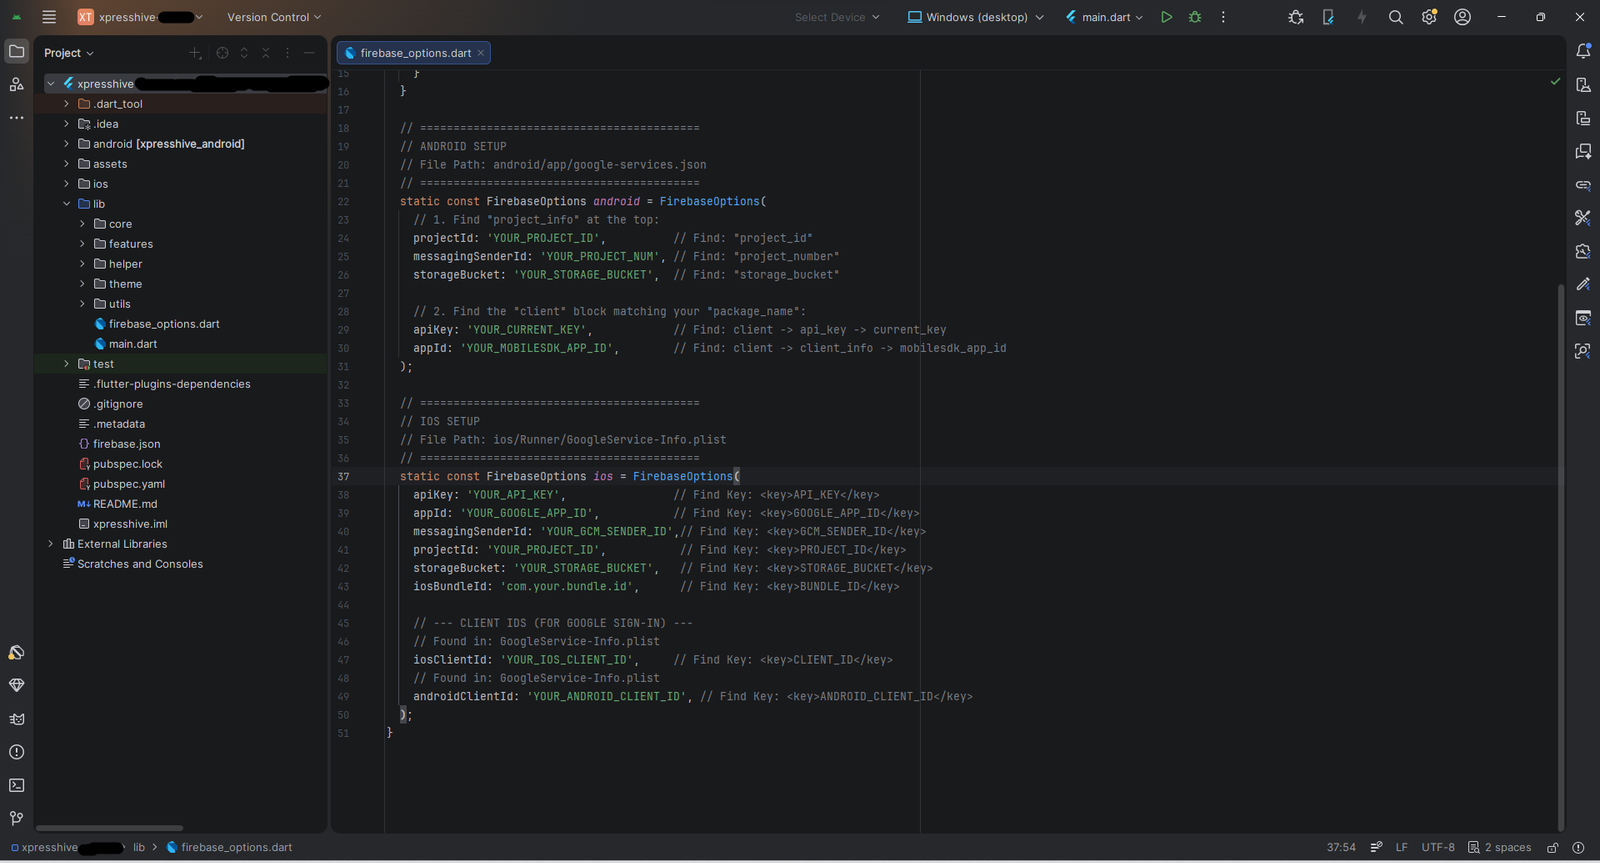
Android Firebase Configuration
Open the following file:
android/app/google-services.jsonCopy the required values and paste them into:
lib/firebase_options.dart
// ==========================================
// ANDROID SETUP
// File Path: android/app/google-services.json
// ==========================================
static const FirebaseOptions android = FirebaseOptions(
  // 1. Find "project_info" at the top:
  projectId: 'YOUR_PROJECT_ID',
  messagingSenderId: 'YOUR_PROJECT_NUMBER',
  storageBucket: 'YOUR_STORAGE_BUCKET',

  // 2. Find the "client" block matching your "package_name":
  apiKey: 'YOUR_CURRENT_KEY',
  appId: 'YOUR_MOBILESDK_APP_ID',
);
client block that matches
your Android package name.
Step 6: Add App (iOS) Manual Configuration
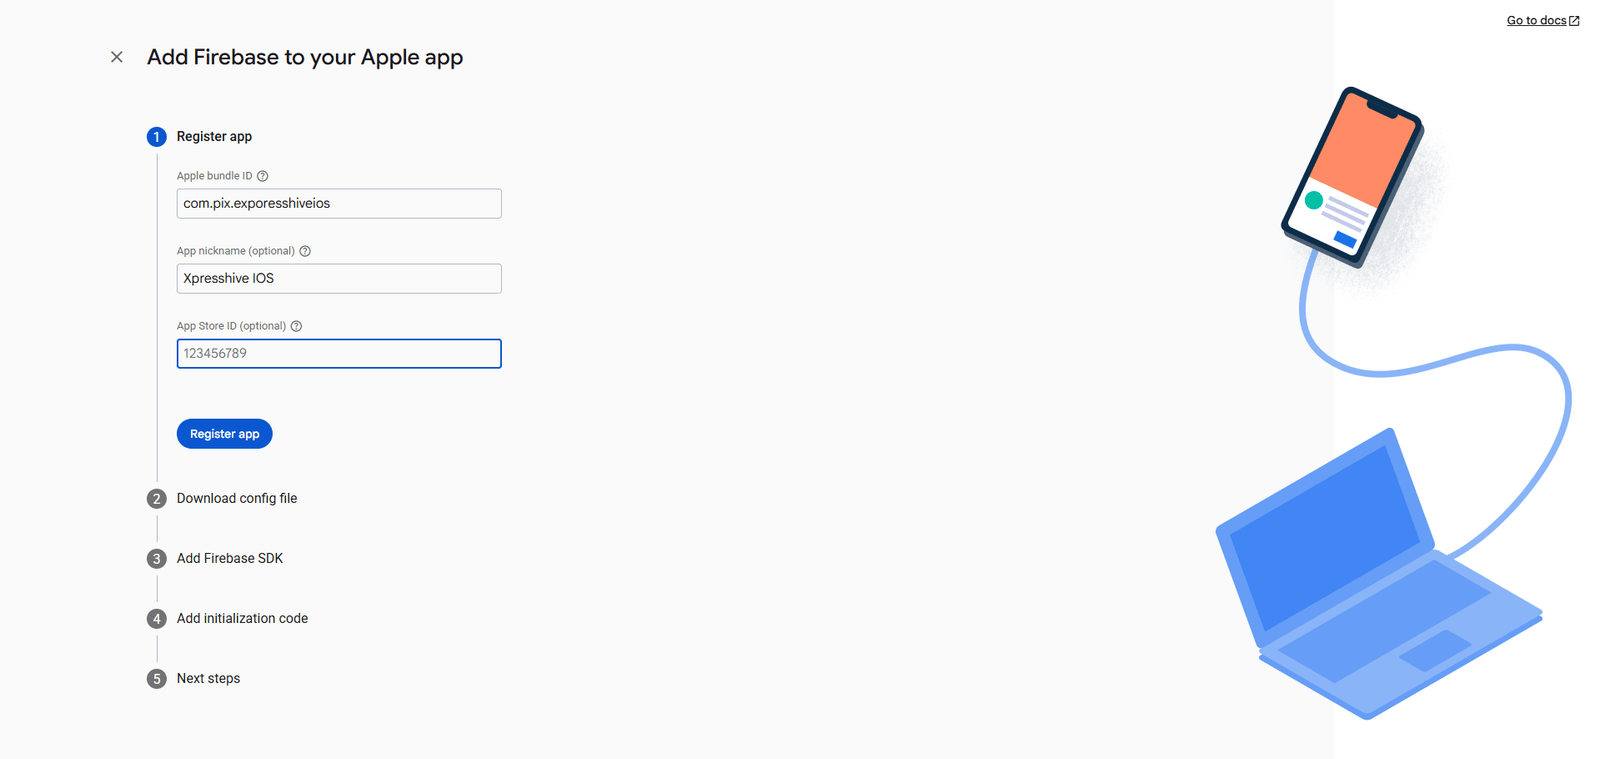
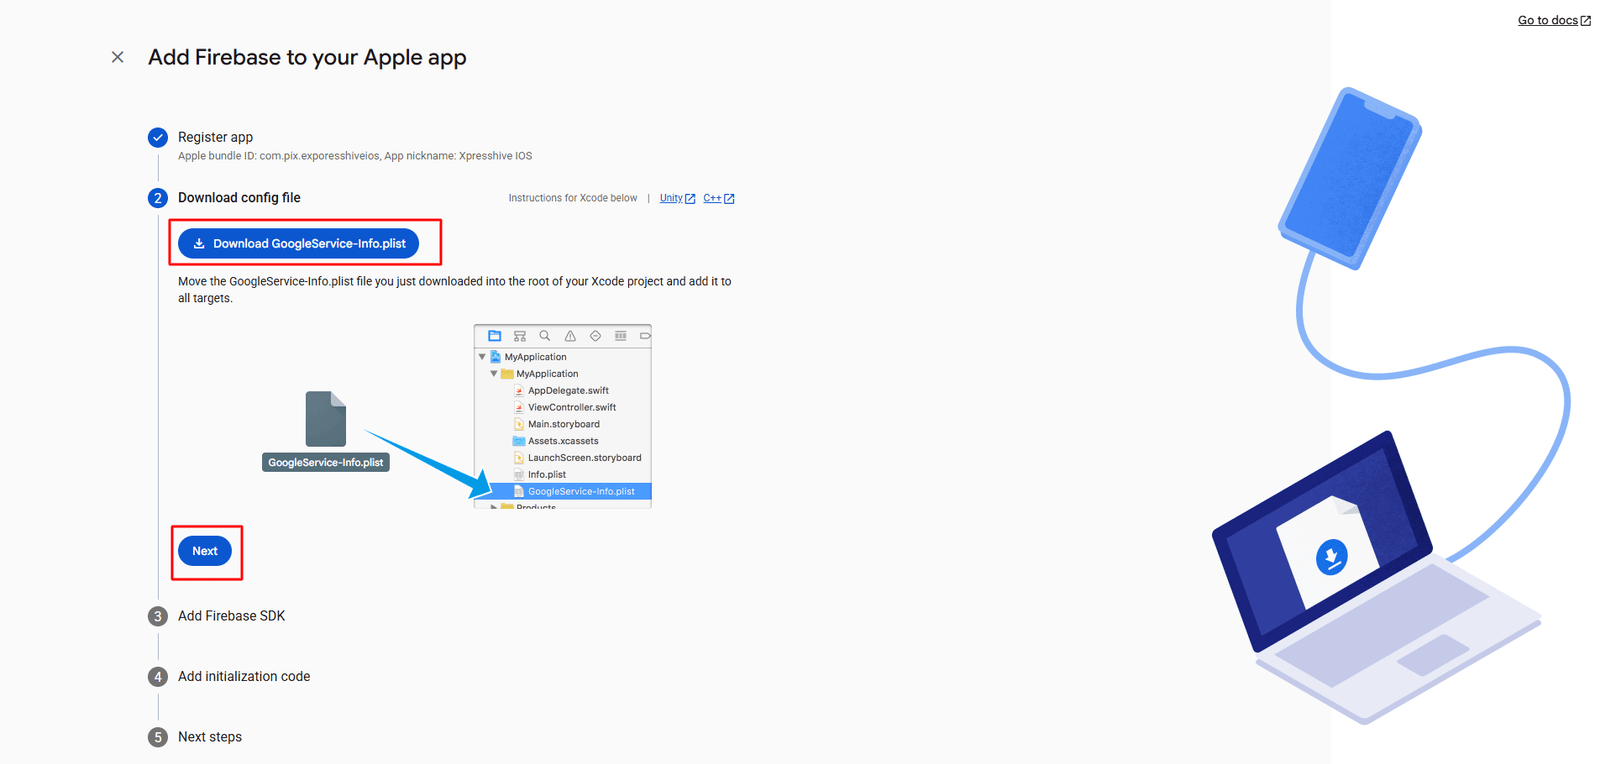
- Click Add App in Firebase console
- Select iOS
- Enter your iOS Bundle ID (must match Xcode project)
- Enter app nickname (optional)
- Click Register app
- Download GoogleService-Info.plist
- Open your Flutter project in android studio
- Drag and drop the
GoogleService-Info.plistintoios/Runner
Configure firebase_options.dart Manually
If flutterfire configure does not automatically generate
your Firebase configuration correctly, you can manually add the values
inside firebase_options.dart.
iOS Firebase Configuration
Open the following file:
ios/Runner/GoogleService-Info.plistCopy the required values and paste them into:
lib/firebase_options.dart
// ==========================================
// IOS SETUP
// File Path: ios/Runner/GoogleService-Info.plist
// ==========================================
static const FirebaseOptions ios = FirebaseOptions(
  apiKey: 'YOUR_API_KEY',
  appId: 'YOUR_GOOGLE_APP_ID',
  messagingSenderId: 'YOUR_GCM_SENDER_ID',
  projectId: 'YOUR_PROJECT_ID',
  storageBucket: 'YOUR_STORAGE_BUCKET',
  iosBundleId: 'com.your.bundle.id',

  // --- CLIENT IDS (FOR GOOGLE SIGN-IN) ---
  iosClientId: 'YOUR_IOS_CLIENT_ID',
  androidClientId: 'YOUR_ANDROID_CLIENT_ID',
);
GoogleService-Info.plist.
Step 7: Add SHA1 & SHA256 Keys in Firebase (Android)
To enable Firebase Authentication (Google, Facebook, Phone, etc.), you must add SHA-1 and SHA-256 keys for your Android app.
Step 7.1: Generate Debug SHA Keys
- Open your project in Terminal / CMD
- Navigate to android folder:
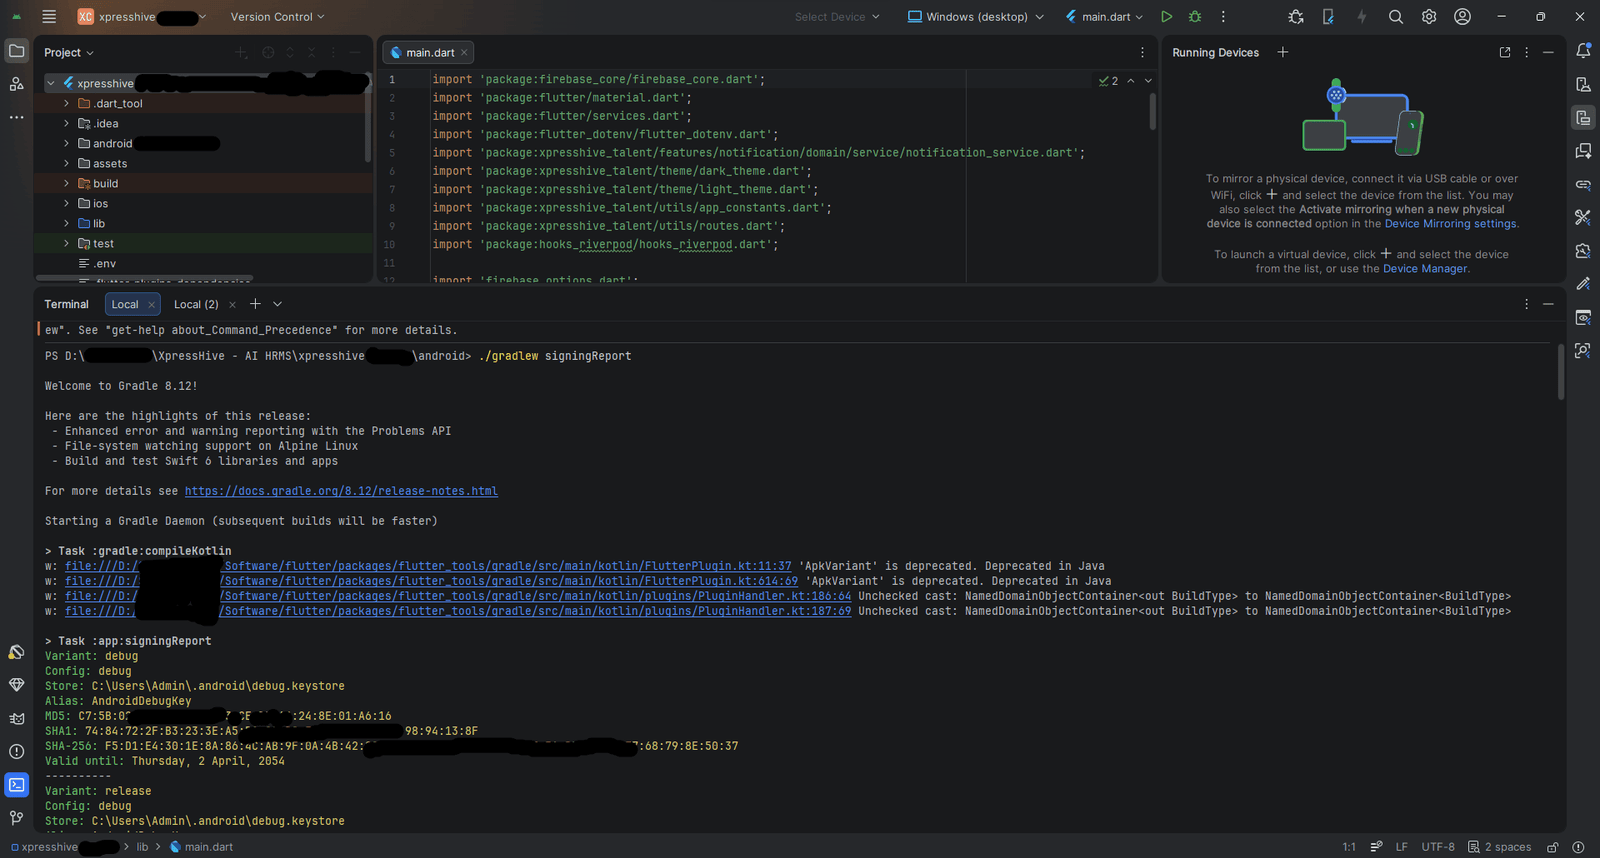
cd androidFor Windows/Mac/Linux: (Generate SHA Keys)
./gradlew signingReport- Copy the SHA1 and SHA256 keys from the output
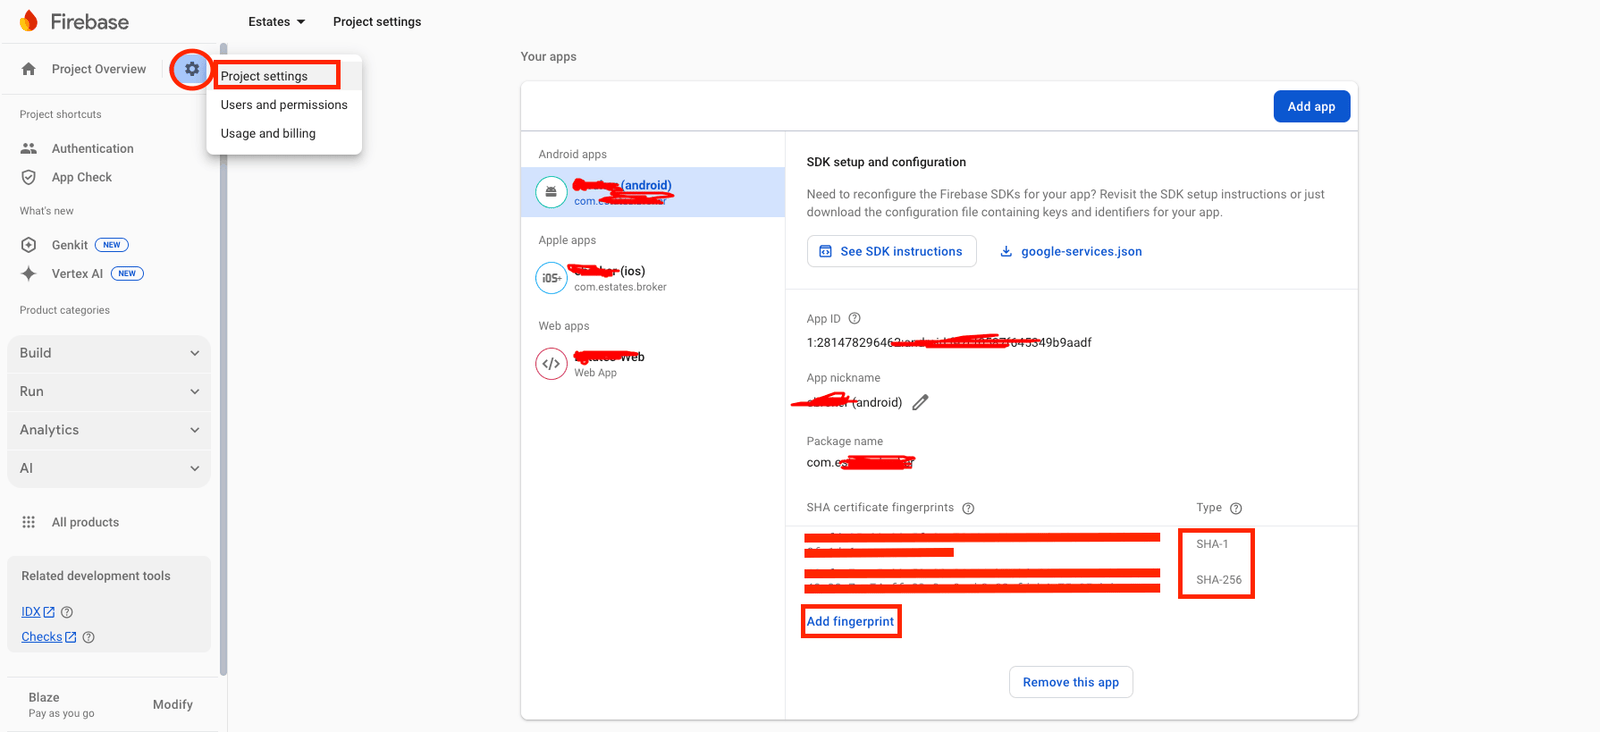
Step 7.2: Add SHA Keys to Firebase
- Go to Firebase Console
- Open Project Settings
- Select your Android App
- Scroll to SHA certificate fingerprints
- Click Add fingerprint
- Paste your SHA1 and SHA256 keys
- Click Save
Step 7.3: Generate Release Keystore
For Windows:
keytool -genkey -v -keystore $env:USERPROFILE\upload-keystore.jks `-storetype JKS -keyalg RSA -keysize 2048 -validity 10000 `-alias upload
For Mac/Linux:
keytool -genkey -v -keystore ~/upload-keystore.jks -keyalg RSA \-keysize 2048 -validity 10000 -alias upload
Note: Enter a password when prompted and remember it. Other fields are optional (press Enter to skip).
Step 7.4: Create key.properties File
Create a file named key.properties inside the android folder and add:
storePassword=YOUR_PASSWORD
keyPassword=YOUR_PASSWORD
keyAlias=release
storeFile=release-key.jks
Step 7.5: Get Release SHA Keys
keytool -list -v -keystore "release-key.jks" -alias release- Enter your keystore password
- Copy SHA1 and SHA256
- Add them in Firebase Console
Step 7.6: Add Google Play App Signing SHA (Important)
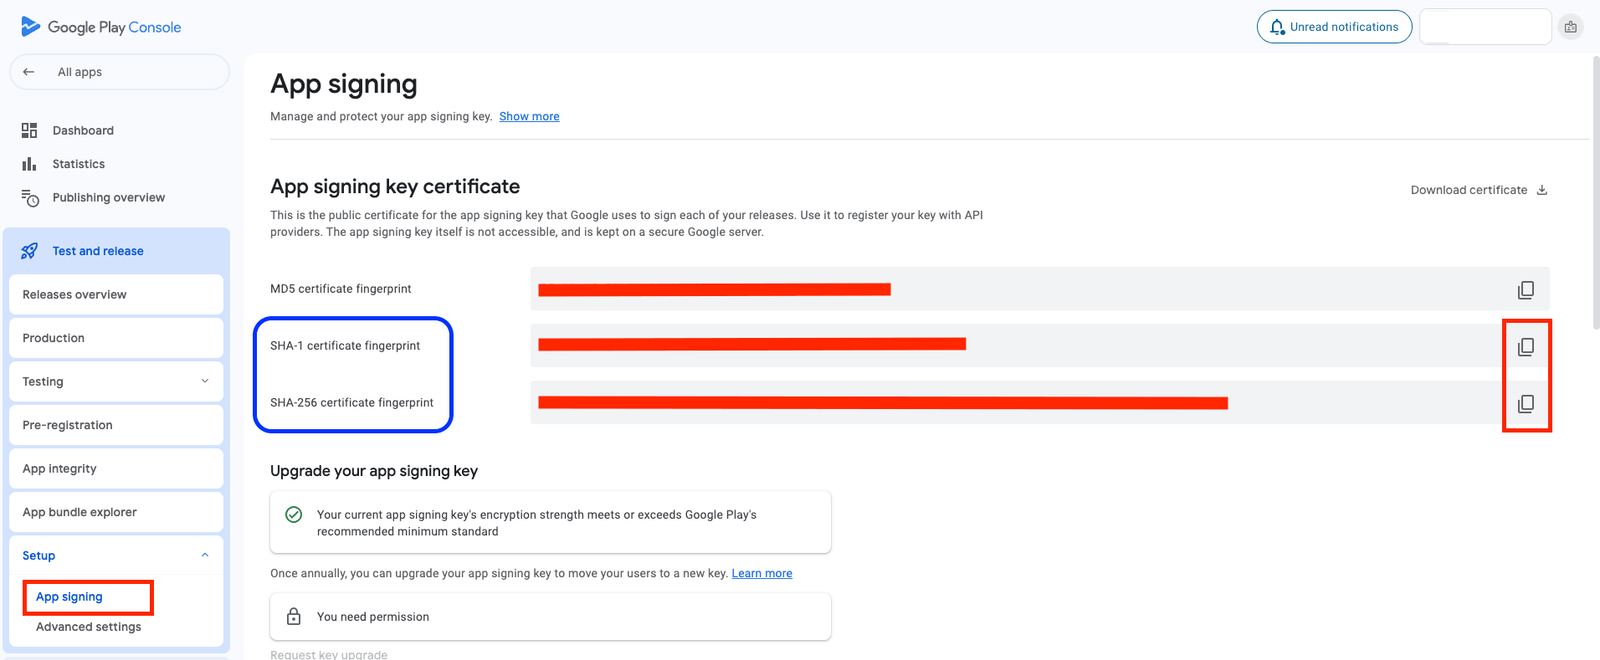
- Go to Google Play Console
- Navigate to Test and release Setup App integrity
- Find App signing key certificate
- Copy SHA1 and SHA256
- Paste them into Firebase Console
🎠iOS Configuration (Authentication Setup)
To enable Firebase Authentication in iOS, you must configure Apple Sign-In and URL schemes correctly.
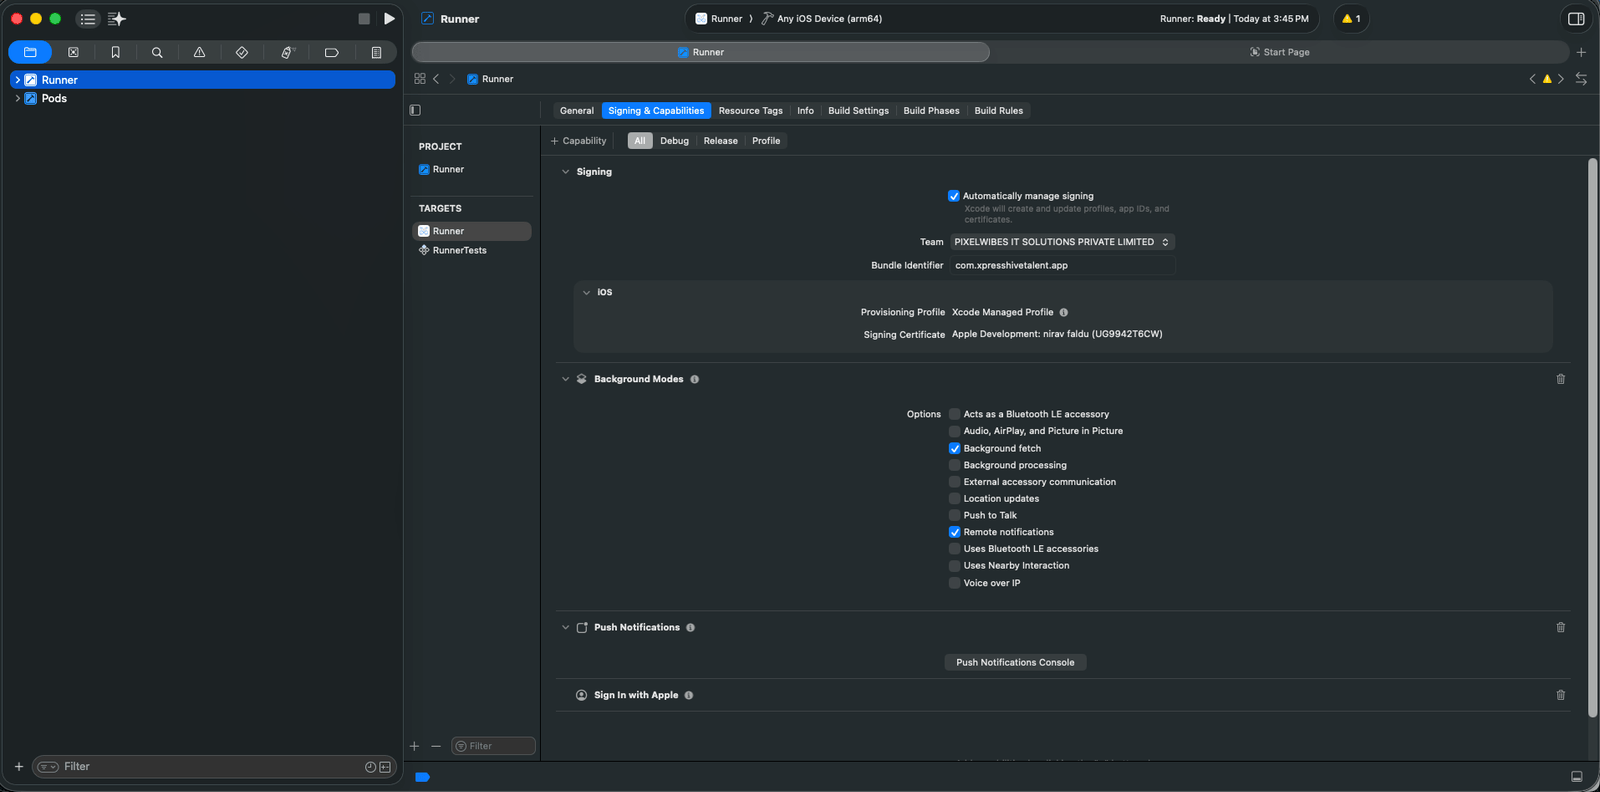
Step 7.3: Enable Sign In with Apple
- Open Xcode > Open Your Project's ios folder
- Go to Signing & Capabilities tab
- Add Sign In With Apple capability
- Select a Team in the Code Signing section
Step 7.4: Mandatory iOS Configuration
Open ios/Runner/Info.plist in your code editor and add the following
configurations:
iOS Client ID Setup
Add the client ID from GoogleService-Info.plist into your
Info.plist file.
<key>GIDClientID</key>
<string>YOUR_CLIENT_ID</string>
iOS URL Types Setup
Update the CFBundleURLTypes attributes in the Info.plist file:
<key>CFBundleURLTypes</key>
<array>
    <dict>
        <key>CFBundleTypeRole</key>
        <string>Editor</string>
        <key>CFBundleURLSchemes</key>
        <array>
            <string>YOUR_REVERSED_CLIENT_ID</string>
        </array>
    </dict>
</array>
Success: Firebase Authentication is now successfully configured for android & iOS.
Important: Without adding Release & Play Store SHA keys, authentication will NOT work in production.
Important:
- Set Facebook app to Live Mode
- Add Firebase OAuth Redirect URL
- Ensure correct App ID & Secret
- Complete required fields (privacy policy, app icon, etc.)
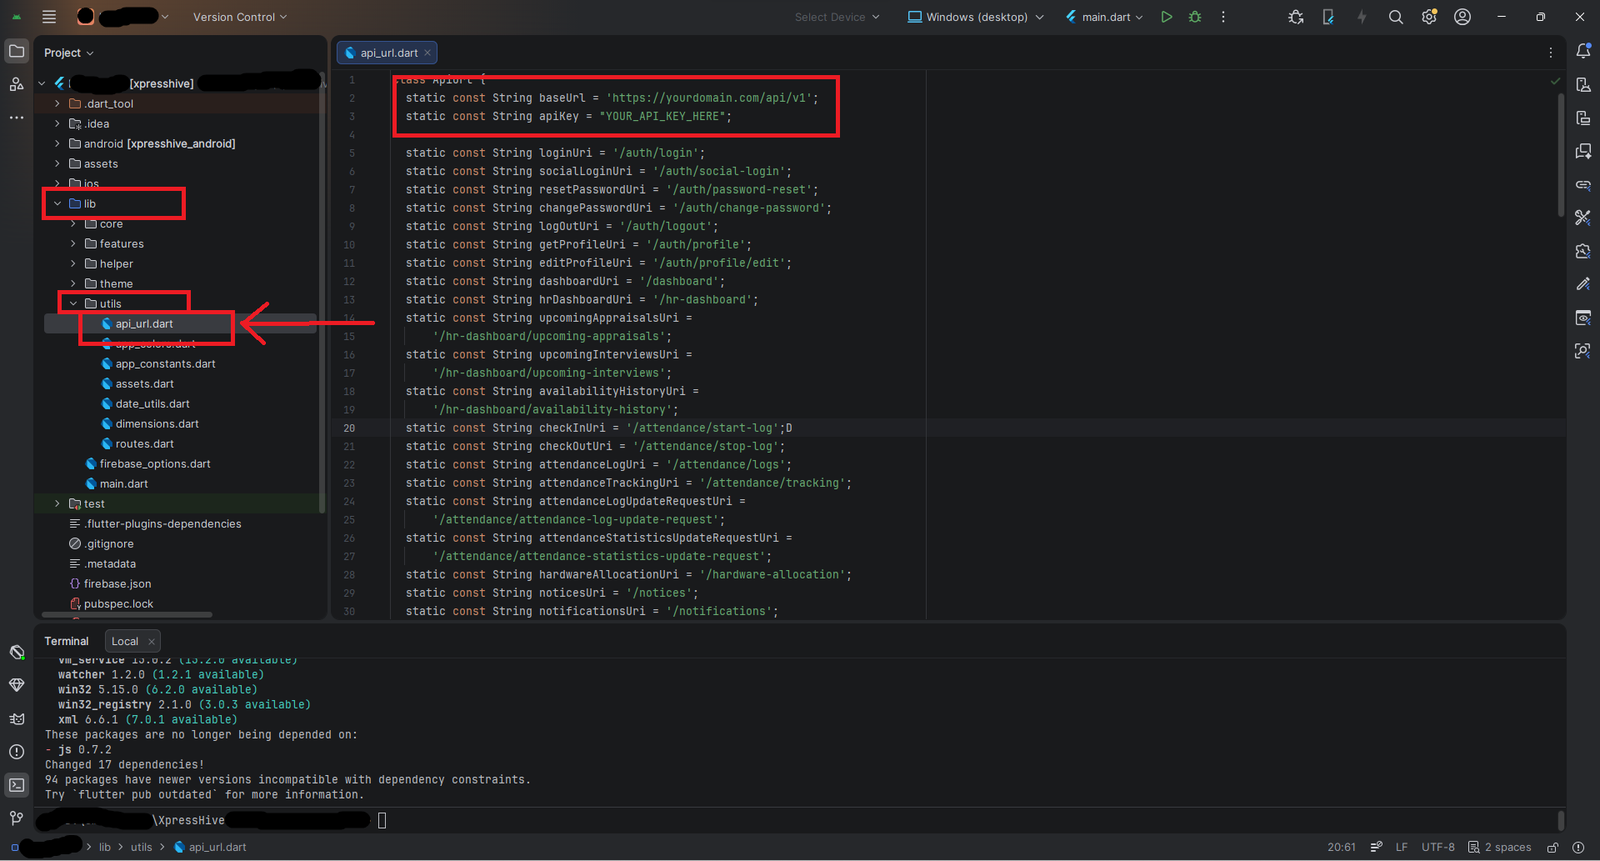
7. Configuring the mobile API key (Base URL & API Key)
To connect your application with the backend server, you need to update the Base URL and API Key.
Configuration File
lib/utils/api_url.dart
Step 1: Update Base URL
Locate the baseUrl variable:
static const String baseUrl = "https://yourdomain.com/api/v1";
Replace it with your server URL:
static const String baseUrl = "https://api.xpresshive.com/v1";
Step 2: Update API Key
Locate the apiKey variable:
static const String apiKey = "YOUR_API_KEY_HERE";Replace it with your actual API key:
static const String apiKey = "abcd1234xyz";Mobile Settings - Manage API Key
Create API Key
To connect the mobile application securely with your backend server, you must generate an API Key from the Web Panel.
Login to your Admin Panel and navigate to:
Mobile Settings Manage API Key
From this section, create a new API Key and use that key inside the mobile application configuration file for API verification and secure communication.
Important: Please refer to the detailed API Key setup documentation here: Click Here
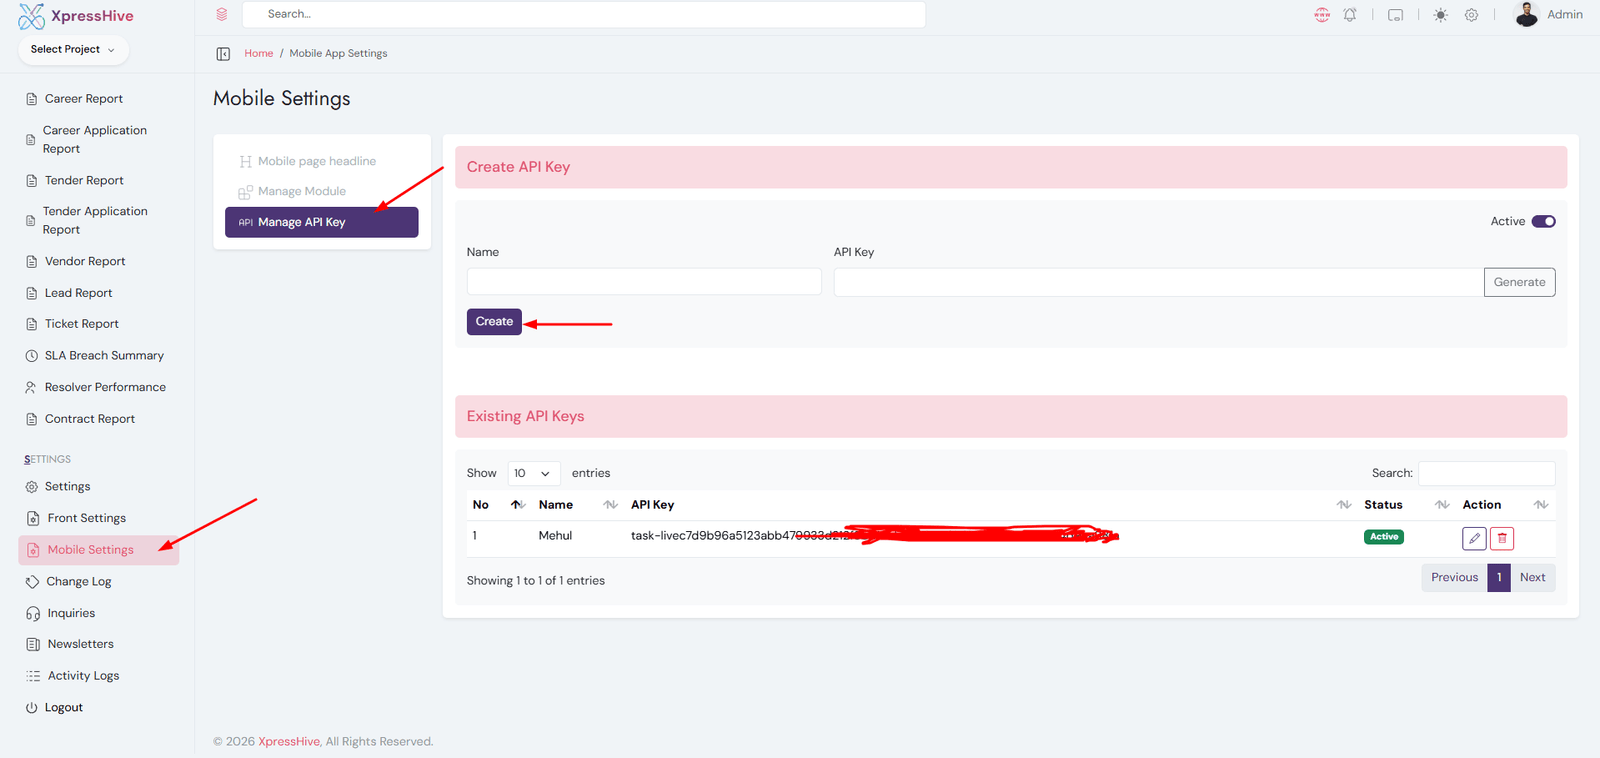
- Login to the Web Panel using administrator credentials
- Go to Mobile Settings Manage API Key
- Create a new API Key for your mobile application
- Copy the generated API Key
- Paste the key inside the mobile app configuration file
- The API Key is used to verify and authenticate mobile API requests
- You can activate, deactivate, edit, or delete API Keys anytime
- Use separate API Keys for different applications if needed
Create API Key
- Name: Enter a label for the API key (e.g., Mobile App, Admin App)
- API Key: Click Generate to auto-create a unique key
- Status: Set Active or Inactive
- Create: Click to save the API key
Existing API Keys
- View all generated API keys in a table
- Check name, key value, and status
- Edit or delete API keys anytime
- Deactivate keys to block access instantly
Usage
- Used for authenticating mobile app API requests
- Ensures only authorized apps can access the system
- Helps manage multiple app integrations
Important Notes
- Keep API keys secure and do not expose publicly
- Regenerate keys if compromised
- Use different keys for different applications
- Always save changes after generating a key
Configuration Example
Step 4: Apply Changes
flutter cleanflutter pub getImportant:
- Ensure your API URL is correct and accessible
- Use HTTPS for production
- Do not expose sensitive API keys in production apps
- Make sure your server is running before testing
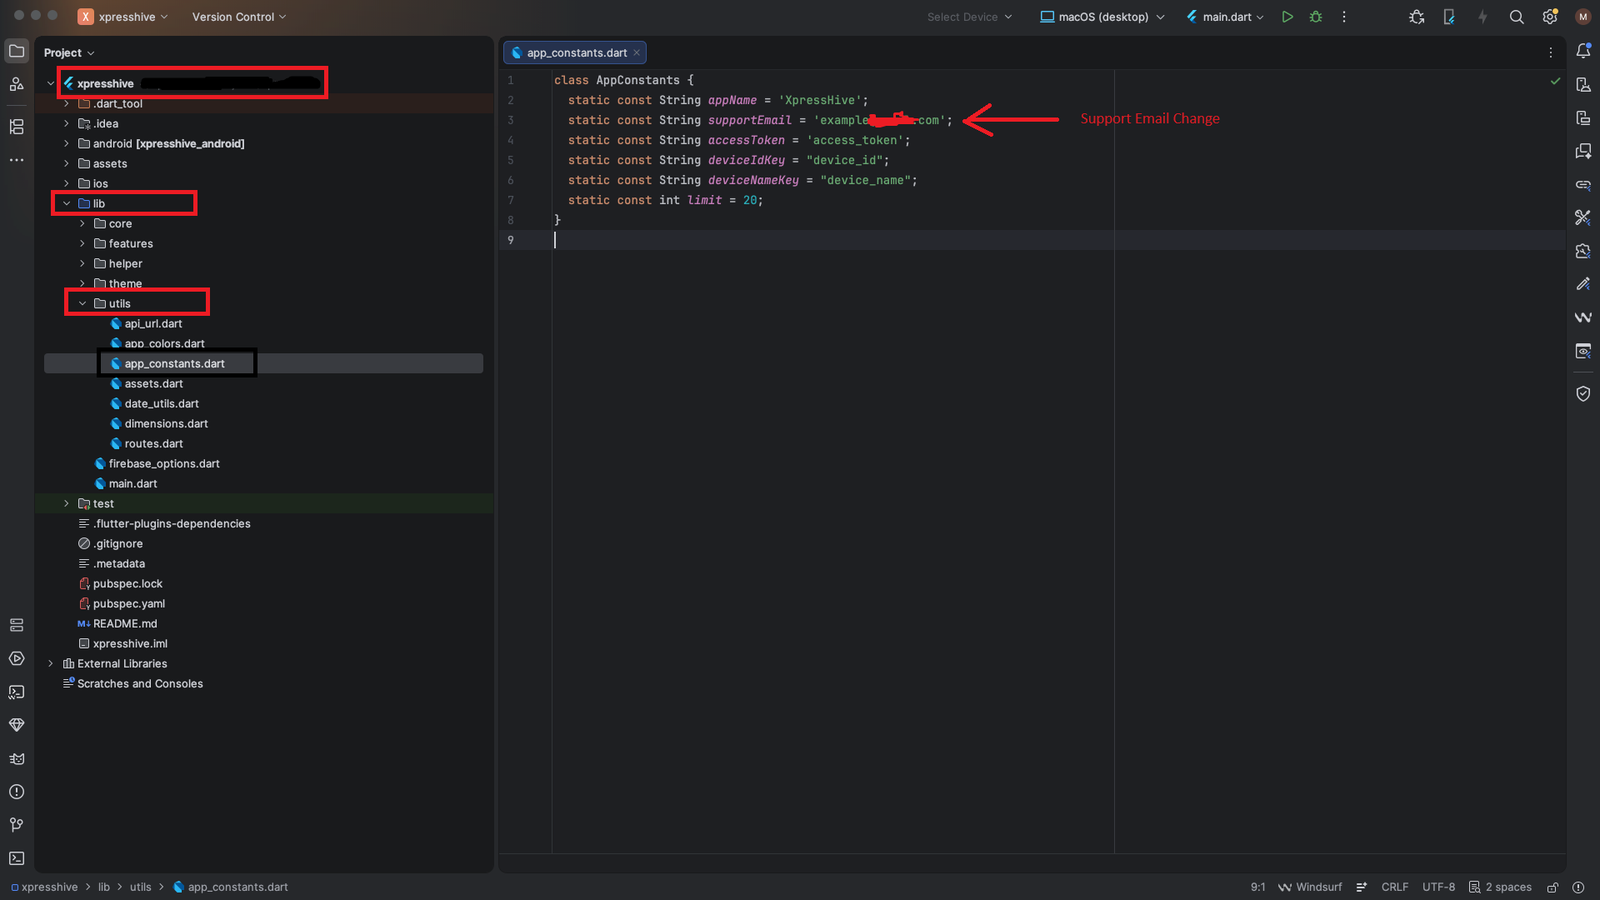
8. Change Support Email
To change the support email, you need to update the supportEmail in the
lib/utils/app_constants.dart file.
Flutter Code Configuration
Open the following file:
lib/utils/app_constants.dart
Update the supportEmail variable:
class AppConstants {
								static const String supportEmail = "Your Email Name";
								}
Note: After making changes, run the following commands:
flutter cleanflutter pub get
9. Run This App
Follow the steps below to run the Flutter application in debug mode on Android and iOS devices.
- Open Android Studio, VS Code, or your preferred terminal.
- Navigate to the Flutter project directory.
- Install Flutter dependencies:
flutter pub get- For iOS only, navigate to the iOS folder and install CocoaPods dependencies:
cd ios
pod install- Start an Android Emulator, iOS Simulator, or connect a physical device.
- Run the following command:
flutter runFlutter will automatically detect the connected Android or iOS device and launch the application in debug mode.
Useful Flutter Commands
flutter clean
flutter pub get
flutter devices
flutter doctor
10. App Build & Release
Build Debug APK
flutter build apk
Build Release APK
Generate Android Release Build
Open terminal in your Flutter project root directory and execute the following command:
flutter build apk --releaseAfter the build process is completed successfully, the generated release APK file will be available at:
build/app/outputs/flutter-apk/app-release.apkGenerate iOS Release Build
Open terminal in your Flutter project root directory and execute the following command:
flutter build ios --releaseAfter the build process is completed successfully, open the generated Xcode workspace using:
open ios/Runner.xcworkspaceIn Xcode:
- Select Any iOS Device as the build target
- Go to Product Archive
- Wait for the archive process to complete
- Follow the upload steps to publish on App Store Connect
Troubleshooting
Troubleshooting
Common issues and solutions:
Flutter SDK Issues:- Ensure Flutter SDK is properly installed
- Add
C:\flutter\binto Environment Variables PATH (not justC:\flutter) - Run
flutter doctorto verify Flutter installation
- Verify keystore file exists in correct location
- Check keystore passwords are correct
- Ensure
signingConfigis set torelease
- Verify certificates are valid in Apple Developer account
- Check provisioning profiles are up to date
- Ensure bundle identifier matches your app configuration
Release Build & Deployment Documentation
Follow the official Flutter documentation links below for generating release builds and publishing applications:
-
Android App Bundle & Play Store Deployment:
https://flutter.dev/docs/deployment/android -
iOS Release Build & App Store Deployment:
https://flutter.dev/docs/deployment/ios
Ready
Your Flutter app is now ready for testing or Play Store deployment.
You can follow the same step-by-step process (Step 1 to Step 10) to configure and build other applications.
11. App Deployment
This guide provides an overview of deploying your Flutter application to different platforms. For detailed step-by-step instructions, please refer to the comprehensive deployment sections included below.
Platform-Specific Deployment
Both Android and iOS platforms have different deployment requirements, review processes, and publishing guidelines.
Google Play Store Deployment
To deploy your application on Google Play Store, complete the following steps:
- Create a Google Play Developer account
- Prepare your application for release
- Create a new application listing
- Upload release APK or App Bundle
- Complete Play Store listing information
- Submit the application for review
App Store Deployment
To deploy your application on Apple App Store, complete the following steps:
- Enroll in Apple Developer Program
- Prepare the application for release
- Create a new app in App Store Connect
- Upload the generated IPA build
- Complete App Store application information
- Submit the application for review
Comprehensive Deployment Guide
For detailed step-by-step deployment instructions, refer to the complete deployment documentation sections for Android and iOS platforms.
Important Notes
- Ensure your application meets all platform-specific requirements
- Keep signing keys, certificates, and provisioning profiles secure
- Test release builds thoroughly before submission
- Be prepared for platform review processes, which may take several days
- Prepare all required assets before submission
Common Requirements
Both Google Play Store and Apple App Store require:
- Privacy Policy
- Application Icons in required sizes
- Application Screenshots
- Application Description
- Keywords and Metadata
- Support URL
- Marketing Assets
Troubleshooting
If you encounter issues during deployment:
- Check platform-specific guidelines carefully
- Verify all required assets are provided
- Ensure application meets technical requirements
- Review rejection reasons carefully if rejected
Troubleshooting
Common issues and solutions you may encounter during iOS deployment and App Store submission.
Build Fails
- Check Flutter version compatibility
- Update Flutter dependencies
- Verify installed Xcode version
- Check signing configuration
- Validate Bundle Identifier
Upload Issues
- Verify certificates and provisioning profiles
- Check application version number
- Validate screenshots and visual assets
- Confirm application bundle size
- Check API compatibility requirements
Review Rejection
- Read rejection reasons carefully
- Make all required changes
- Update policy compliance issues
- Resubmit updated application build
Need Help?
If you encounter deployment or review issues, refer to the following resources:
- Flutter Documentation
- Apple Developer Documentation
- Flutter Community Forums
- App Store Review Guidelines
- Apple Developer Support