XpressHive Overview

Latest

XpressHive is a modern and scalable HR management system designed to help businesses manage their workforce efficiently through a centralized platform.

It includes dedicated mobile applications for HR, Vendor, and Talent workflows, enabling seamless collaboration, recruitment, and business operations in one connected ecosystem.

Latest Version: 19 JUNE 2026   |   Platform: Web & Application |   Access: Secure Role-Based System
📦 System Modules
HR Management
Employee records, attendance, leave, payroll, shifts, and performance tracking.
Project Management
Manage projects, assign tasks, track progress, and collaborate with teams.
AI
Generate documents, ticket responses and more using AI.
Support System
Handle support tickets, track issues, and improve response time.
Recruitment
Post jobs, manage applications, and track candidates easily.
Finance
Manage expenses, invoices, payments, and financial reports.
Asset Management
Track company assets, allocations, and inventory.
Admin Controls
Manage users, roles, permissions, and system settings.
Demo Access

You can explore XpressHive using the live demo environment. This allows you to experience all features and modules before using the system.

🔐 Login Credentials
Role Email Password Platform
Super Admin admin@example.com abcd1234 Web & Application
HR hr@example.com abcd1234 Web & Application
Employee employee@example.com abcd1234 Web & Application
Client client@example.com abcd1234 Web & Application
Candidate candidate@example.com abcd1234 Application
Vendor vendor@example.com abcd1234 Application
👥 User Roles & Permissions
Super Admin
Full system access with complete control over all modules and settings.
HR
Manage employees, attendance, payroll, leave, departments, and HR operations.
Employee
Access attendance, apply for leave, and manage assigned tasks.
Client
View projects, invoices, and related client information.
Candidate
External users applying for jobs and tracking recruitment progress.
Vendor
External suppliers participating in tenders and procurement processes.

Note

The demo environment is for testing purposes only. Data may be reset periodically, and some features may have limited access.

📱 System Applications
Application Type Description Key Features Access Role Android iOS
HR / Employee Application Internal Internal system for managing employees and organizational operations.
  • Attendance & Shift Management
  • Task & Project Tracking
  • Leave Management
  • Payroll & Salary
  • Performance Tracking
HR / Employee Download APK Download APK
Talent Application Recruitment Public platform for job seekers to explore and apply for jobs.
  • Job Listings
  • Apply for Jobs
  • Resume Upload
  • Application Tracking
Candidate Download APK Download APK
Vendor Application Procurement Platform for vendors to manage tenders and procurement activities.
  • Tender Listings
  • Apply for Tenders
  • Vendor Profile
  • Document Upload
Vendor Download APK Download APK

Modular Architecture

Each application in XpressHive runs on a separate authentication guard (user, candidate, vendor) ensuring security, scalability, and independent workflows.

🌐 Dynamic Website Features

Website Management

Update your website content anytime with a fully dynamic system - no coding required.

  • Manage pages like About, Contact, FAQs, and Services
  • Career page with job listings and applications
  • Tender portal for public users
  • Newsletter and contact form integration
  • Mobile-friendly and SEO-ready design
⚙️ Additional Features
  • Smart dashboards and reports
  • Advanced search across the system
  • Activity tracking and logs
  • Mobile app support
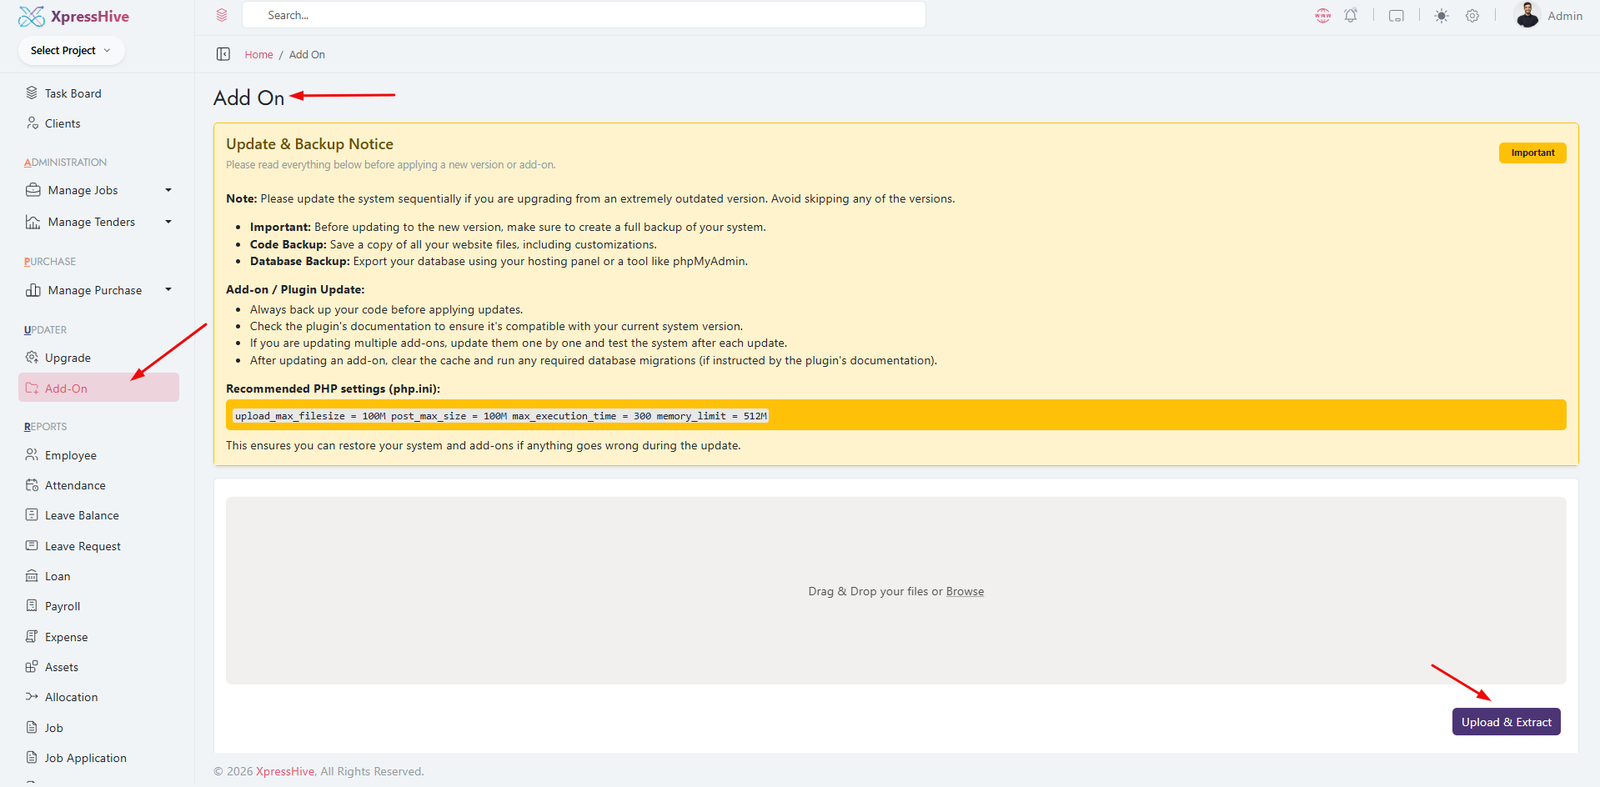
  • Extendable system with plugins
File Uploads & Media

XpressHive allows you to upload and manage files such as profile pictures, documents, and attachments easily within the system.

Media Management

All uploaded files are securely stored and organized, making it easy to access and manage content whenever needed.

  • Upload profile images and documents
  • Manage files through a centralized media system
  • Easy access and download of uploaded content
⚠️ Image & Assets Disclaimer

Important Notice

Images used in demos, previews, and screenshots are for demonstration purposes only. They are not included in the final downloadable package. Placeholder images will be used instead.

Technical Requirements

Before installing XpressHive, please ensure your server meets the following requirements for smooth performance and stability.

🖥️ Server Requirements
Compatible with Shared Hosting or VPS (cPanel or similar control panel supported)
  • Framework: Laravel 12
  • PHP Version: 8.2 to 8.4
  • Database: MySQL 8.0 or higher
  • Node.js: Required for frontend asset compilation
Required PHP Extensions:
  • PDO
  • OpenSSL
  • mbstring
  • fileinfo
  • Zip
  • GD
  • JSON
  • Tokenizer
  • cURL

Apache & PHP Extension Requirements

Ensure the PHP Sodium extension is enabled for secure encryption and authentication features.

Ensure the Apache mod_rewrite module is enabled for proper URL routing and clean URLs.

⚙️ Backend Dependencies

XpressHive uses modern backend libraries to provide security, performance, and advanced functionality.

Composer Version: 2.8.12 or higher
  • Core: PHP 8.2+, Laravel 12, Sanctum Authentication
  • PDF & Reports: PDF & report generation
  • Performance: Queue handling and caching support
  • Media Handling: File upload and media management system
📱 Mobile Apps
Flutter SDK 3.41.7
XCode : XCode version 26.4
Android SDK : SDK 36
Java Version: JDK version 22
🎨 Frontend & Build Tools

The frontend is powered by modern tools to ensure a fast and responsive user experience.

Node.js Version: 20.x or higher recommended
  • Modern asset bundling with Vite
  • Responsive UI using Bootstrap 5
  • Interactive components with JavaScript and jQuery
  • Charts, calendars, and dynamic UI elements
npm run build (used to compile frontend assets)
📊 Supported Features
  • Dynamic dashboards and reports
  • Data tables and analytics
  • Form handling and validations
  • Interactive charts and graphs
  • Calendar and scheduling tools
âš¡ Recommended PHP Configuration

For optimal performance, update the following values in your php.ini file:

memory_limit = 512M
max_execution_time = 300

Important Note

Make sure your server meets all the above requirements before installation to avoid compatibility issues and ensure smooth system performance.

Installation Guide

This guide will help you install XpressHive on your server. Please follow each step carefully to ensure a successful installation.

Before You Start

Before starting the installation process, make sure your server meets all the minimum requirements listed below.

Server Requirements
  • PHP: Version 8.2 or higher
  • Composer: Version 2.8.12 or higher
  • MySQL: Version 8.0 or higher
Enable PHP Sodium Extension

XpressHive requires the PHP Sodium extension for secure encryption and authentication features.

You can verify whether the extension is enabled by checking your PHP configuration using phpinfo();.

If the Sodium extension is disabled, enable it by adding the following line to your php.ini file:

extension=sodium
Verify Installed Versions

Run the following commands in Terminal or Command Prompt to verify your installed PHP and Composer versions:

php -v
composer --version
Project Installation

After downloading and extracting the project files into your XAMPP - htdocs or WAMP - www directory, open Terminal or Command Prompt and navigate to the project root directory.

Run the following command to install all required dependencies:

composer install

Next, create the environment configuration file:

cp .env.example .env

Make sure all commands are executed from the project's root directory where the composer.json file is located. Once the installation is completed successfully, upload the project files to your hosting server and start installation.

3. Database Setup (Local)

Step 1: Open PHPMyAdmin & Create Database

Save the database name, username, and password for later use during installation. Make sure to grant all privileges to the database user for proper functionality.(In local setup, username is usually root with no password)

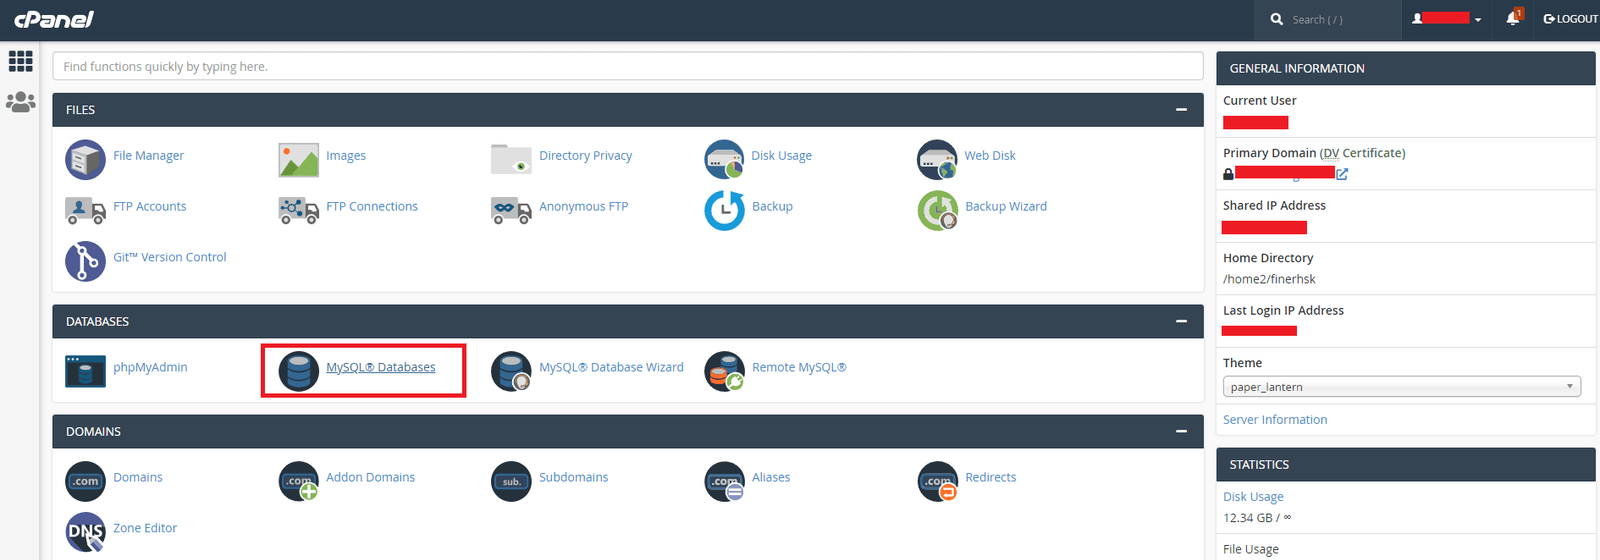
3. Database Setup (cPanel)

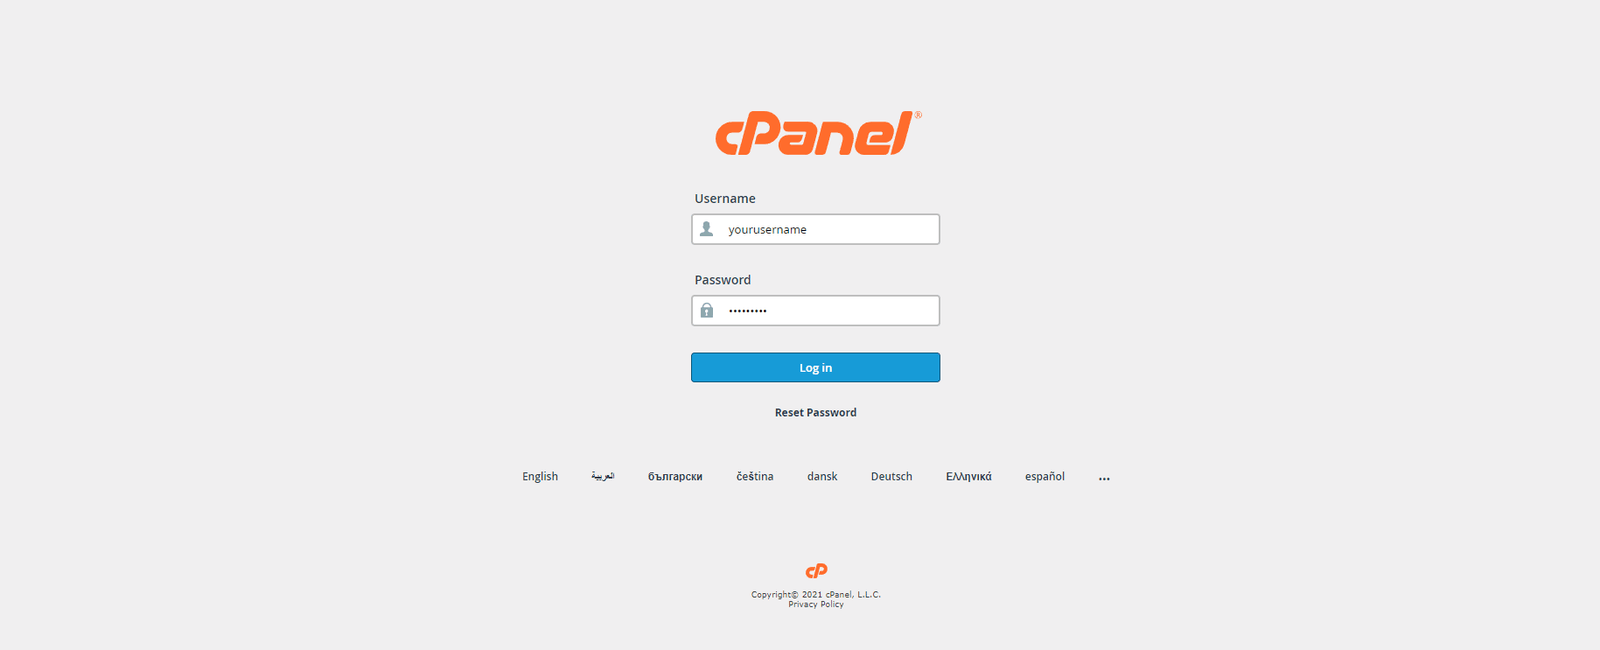
Step 1: Login to cPanel
Step 2: Open MySQL Databases
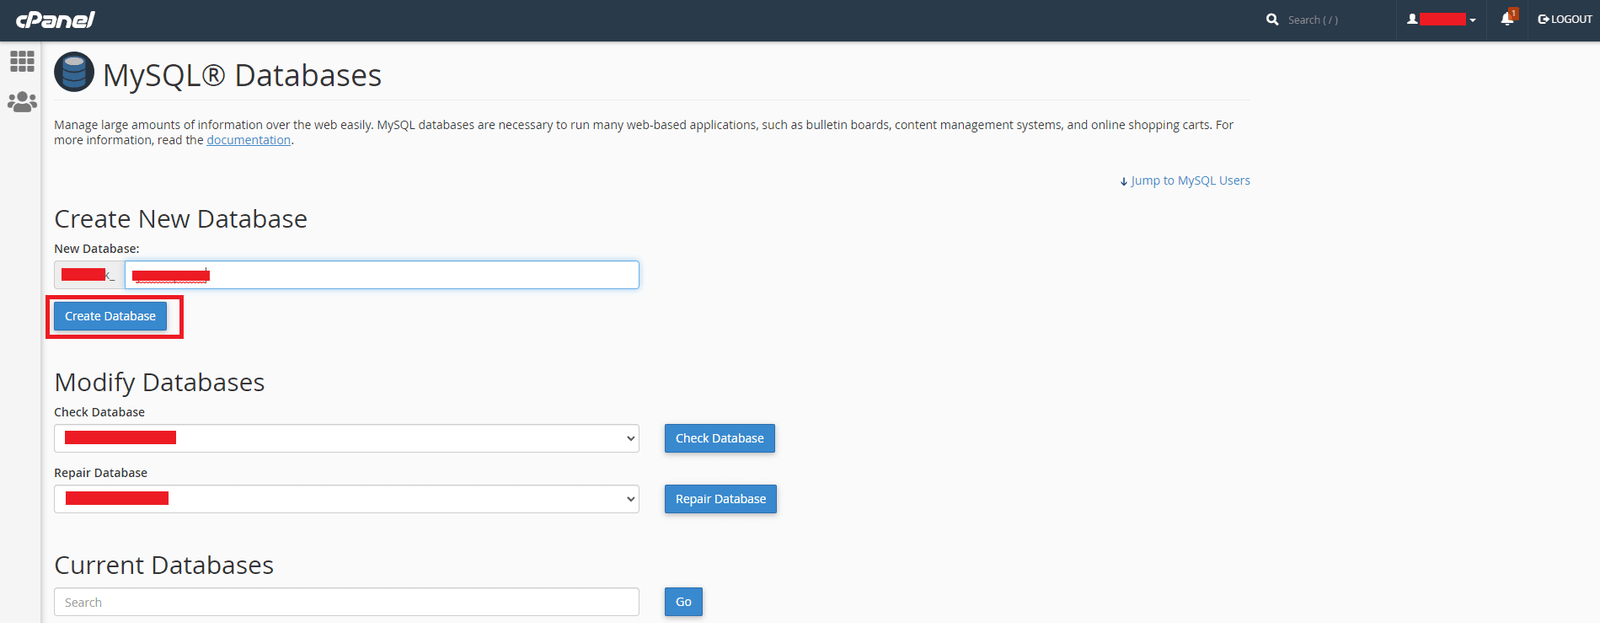
Step 3: Create Database
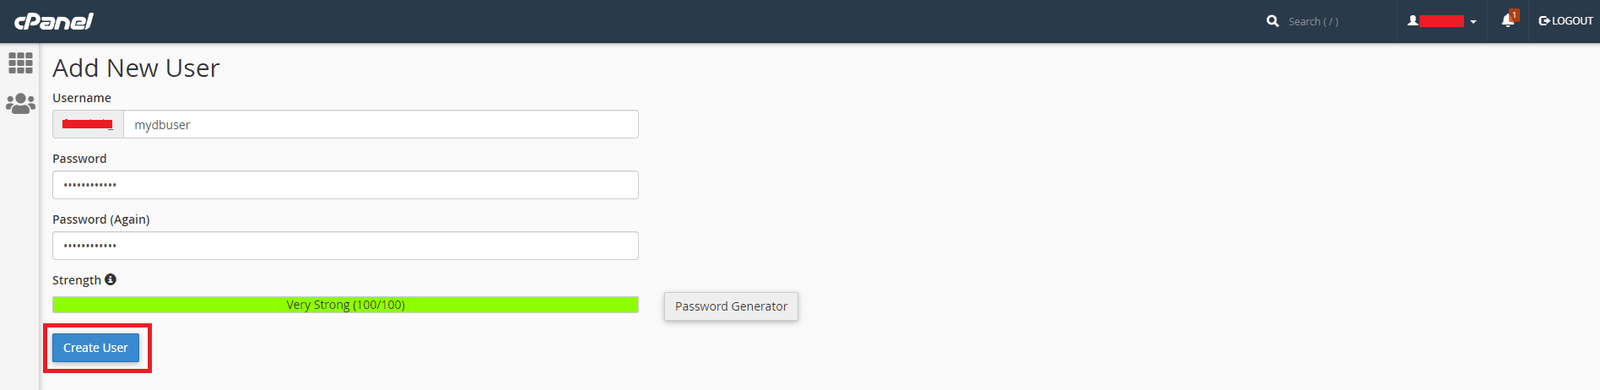
Step 4: Create Database User
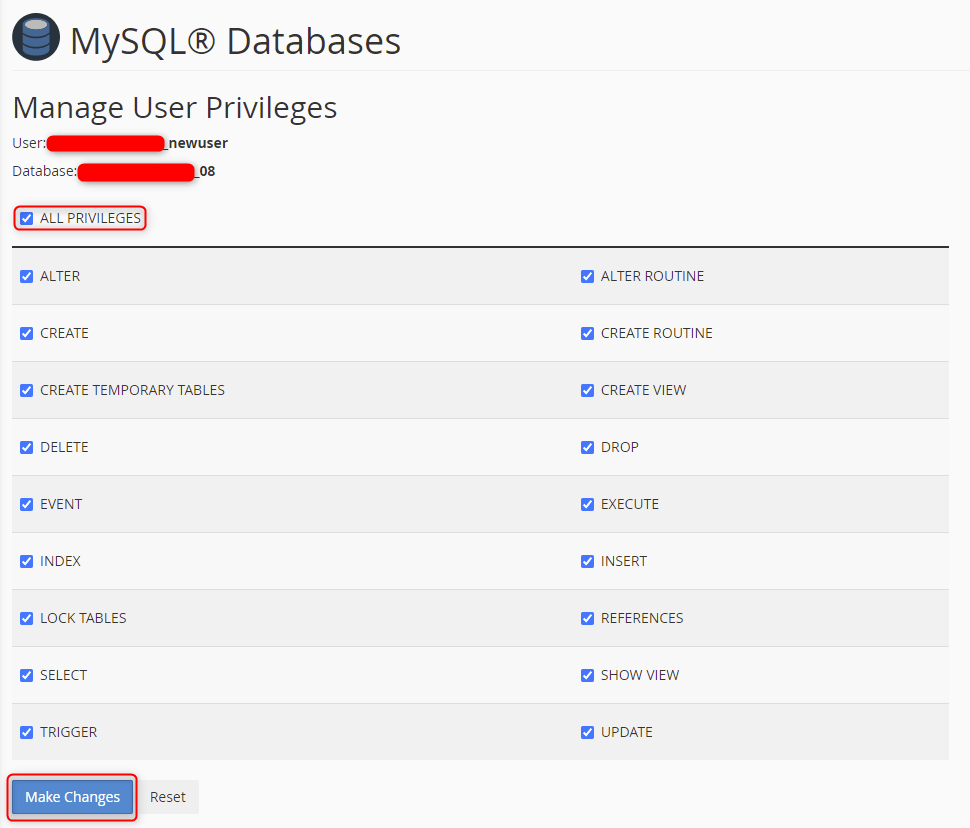
Step 5: Assign Database to User
Step 6: Set All Privileges

4. File Upload

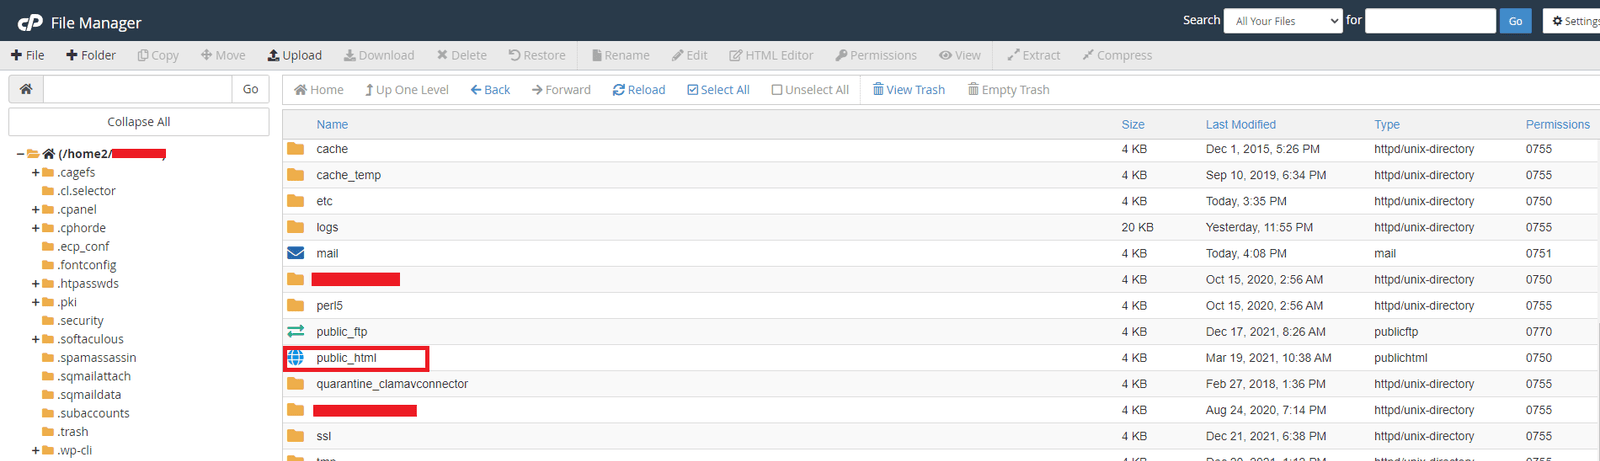
Step 1: Open File Manager
Step 2: Go to public_html

Choose correct folder based on domain/subdomain.

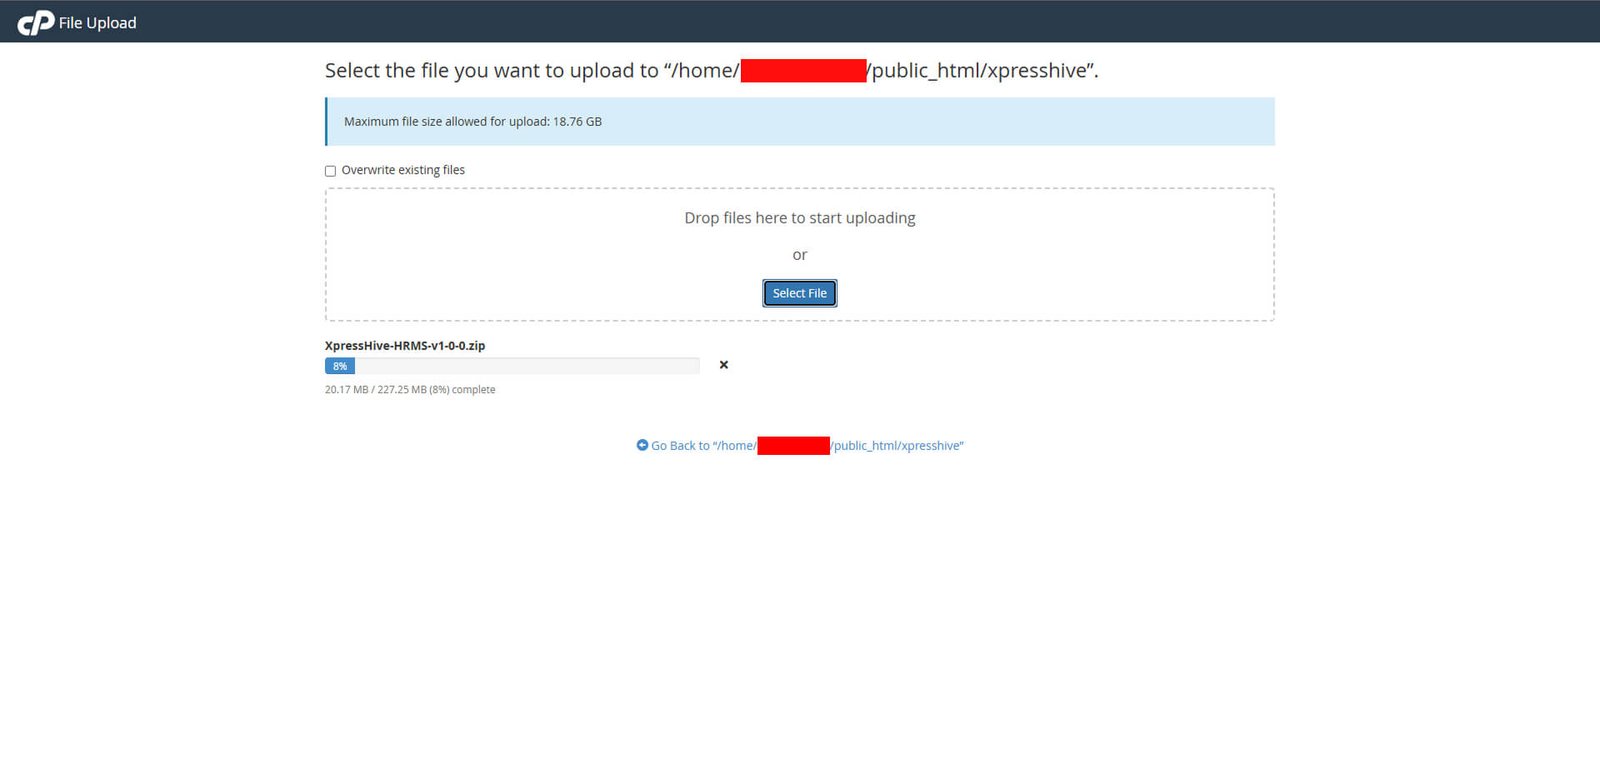
Step 3: Upload ZIP File
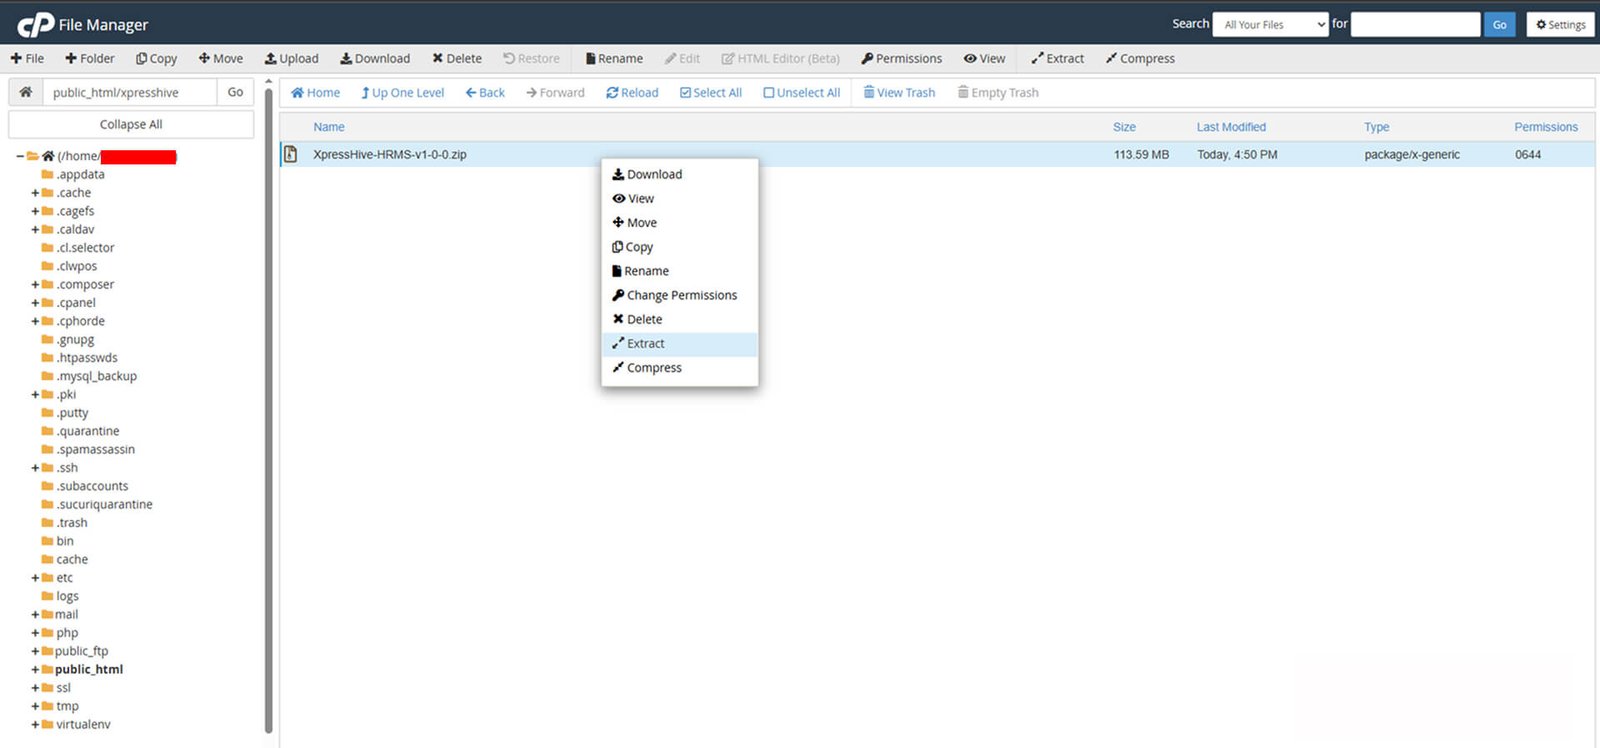
Step 4: Extract Files
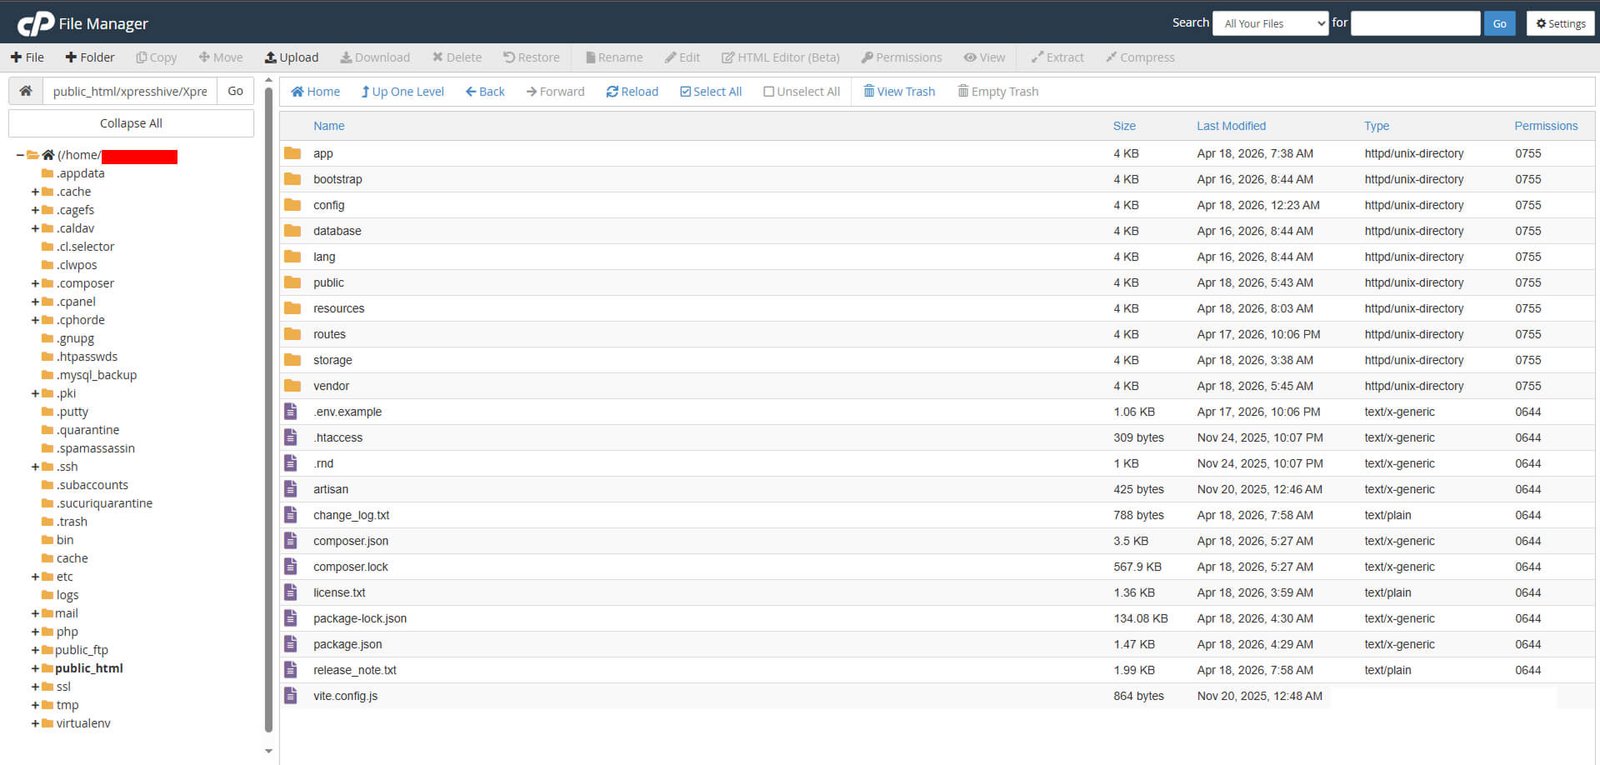
Step 5: Verify Files

4. Install Application (Local)

Step 1: Copy .env.example file to env file
Copy .env.example to .env before starting.
Step 2: Run server command
visit php artisan serve to install the application
Open in browser:
visit http://127.0.0.1:8000
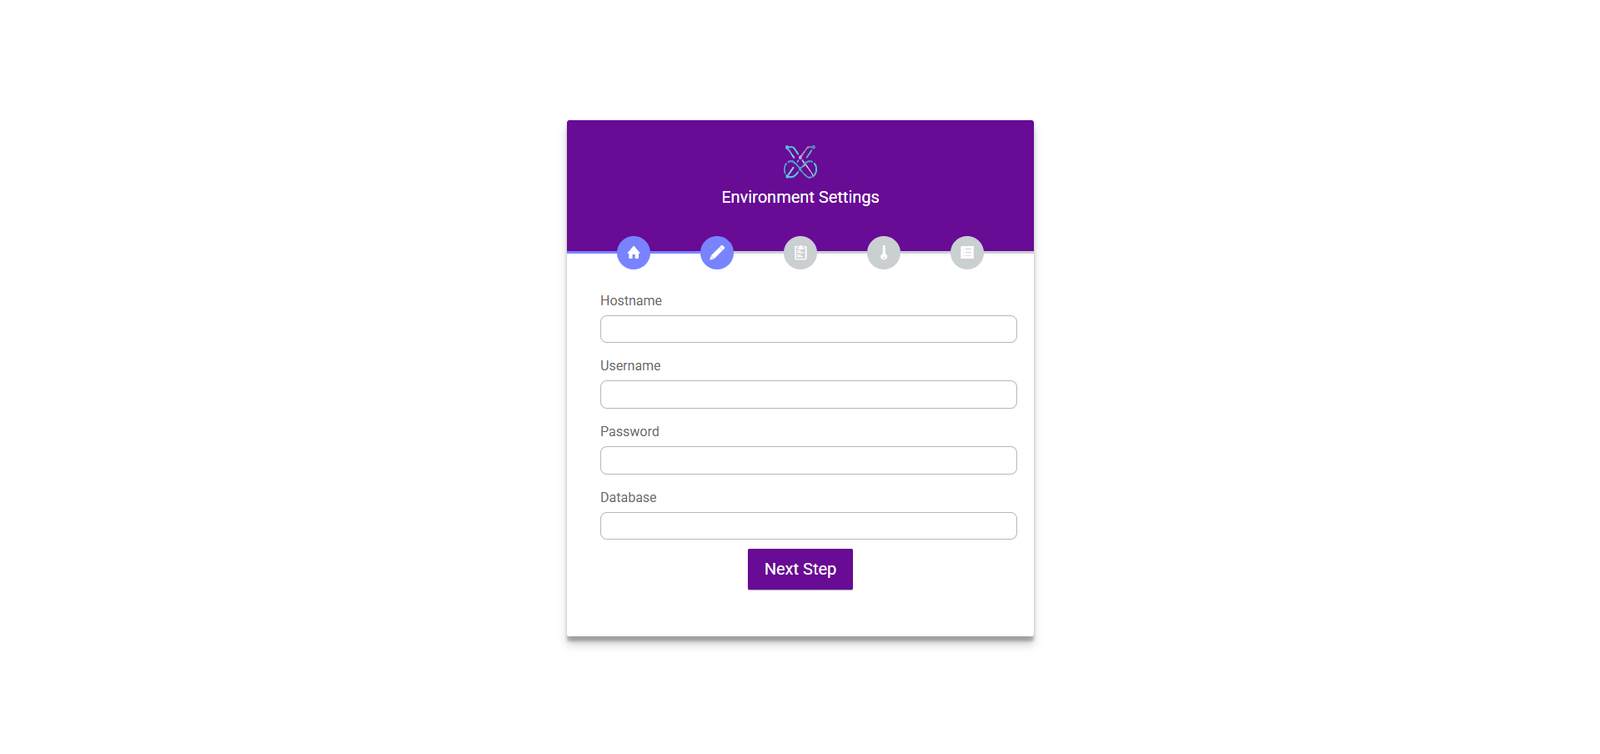
Step 3: Database Configuration

Use the database credentials you created in the previous step to fill in the database configuration form.

  • Hostname → 127.0.0.1 or localhost
  • Username → Your database username
  • Database → Your database password
  • Database Name → Your database name
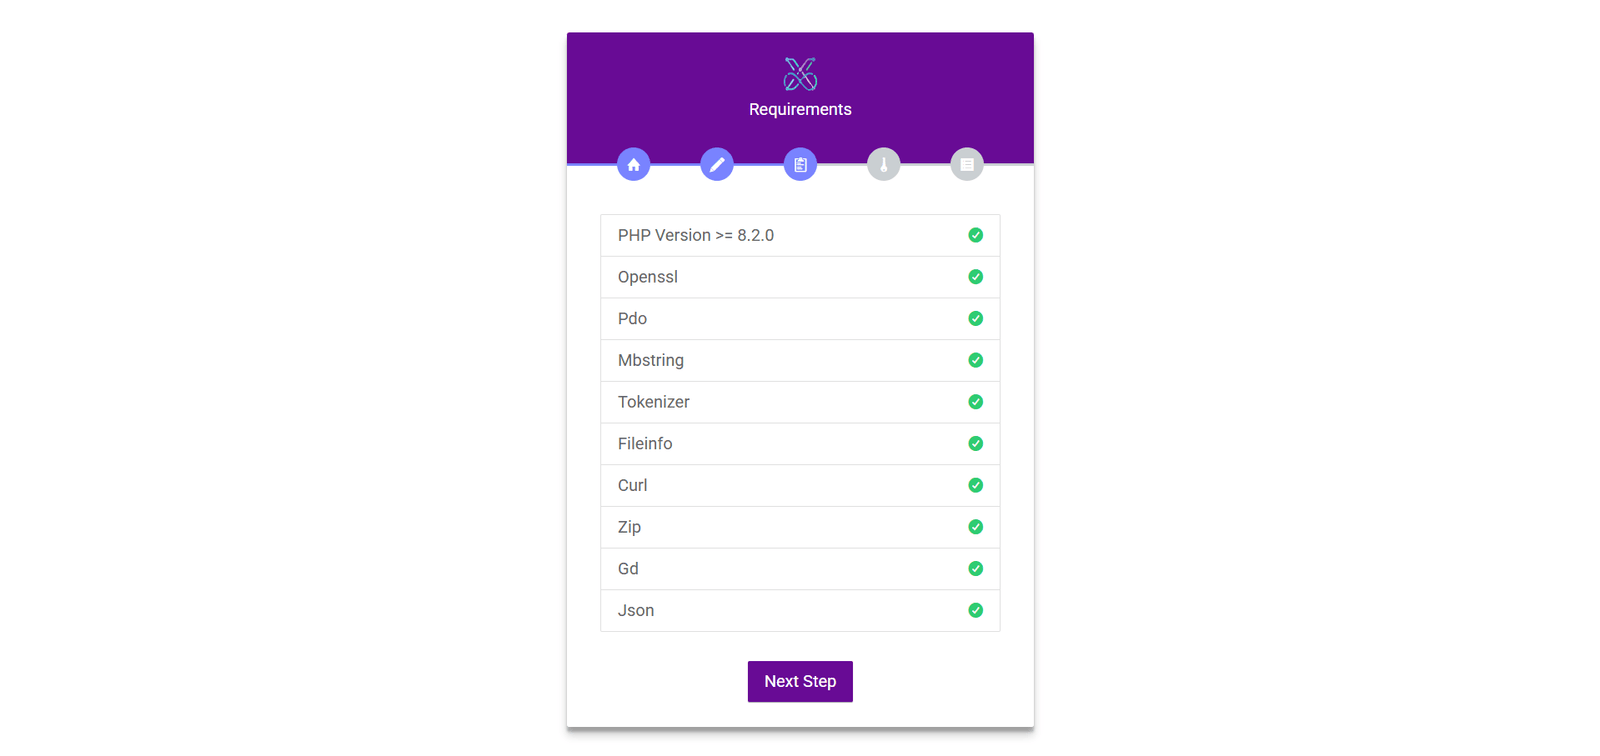
Step 4: Server Requirements
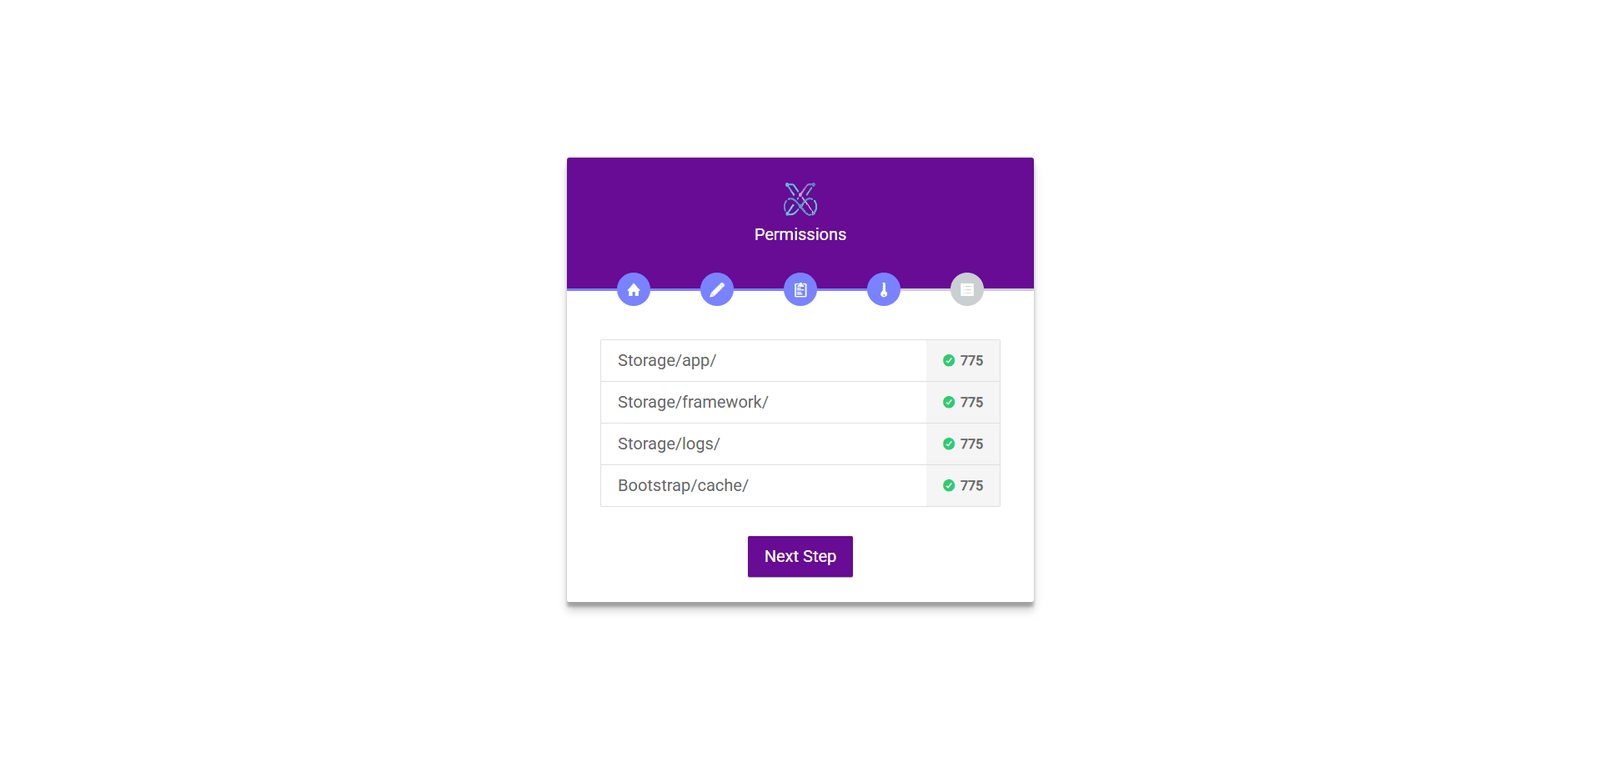
Step 5: Folder Permission Check

Required Permissions

  • /storage/app → for uploads
  • /storage/framework → cache & sessions
  • /storage/logs → logs
  • /bootstrap/cache → system cache

5. Install Application

Step 1: Copy .env.example file to env file
Copy .env.example to .env before starting.
Step 2: Go to your domain/subdomain
visit http://your-domain.in/install to install the application #Must be run project root directory, and also check your domain/subdomain url
Step 3: Database Configuration

Use the database credentials you created in the previous step to fill in the database configuration form.

  • Hostname → 127.0.0.1 or localhost
  • Username → Your database username
  • Database → Your database password
  • Database Name → Your database name
Step 4: Server Requirements
Step 5: Folder Permission Check

Required Permissions

  • /storage/app → for uploads
  • /storage/framework → cache & sessions
  • /storage/logs → logs
  • /bootstrap/cache → system cache

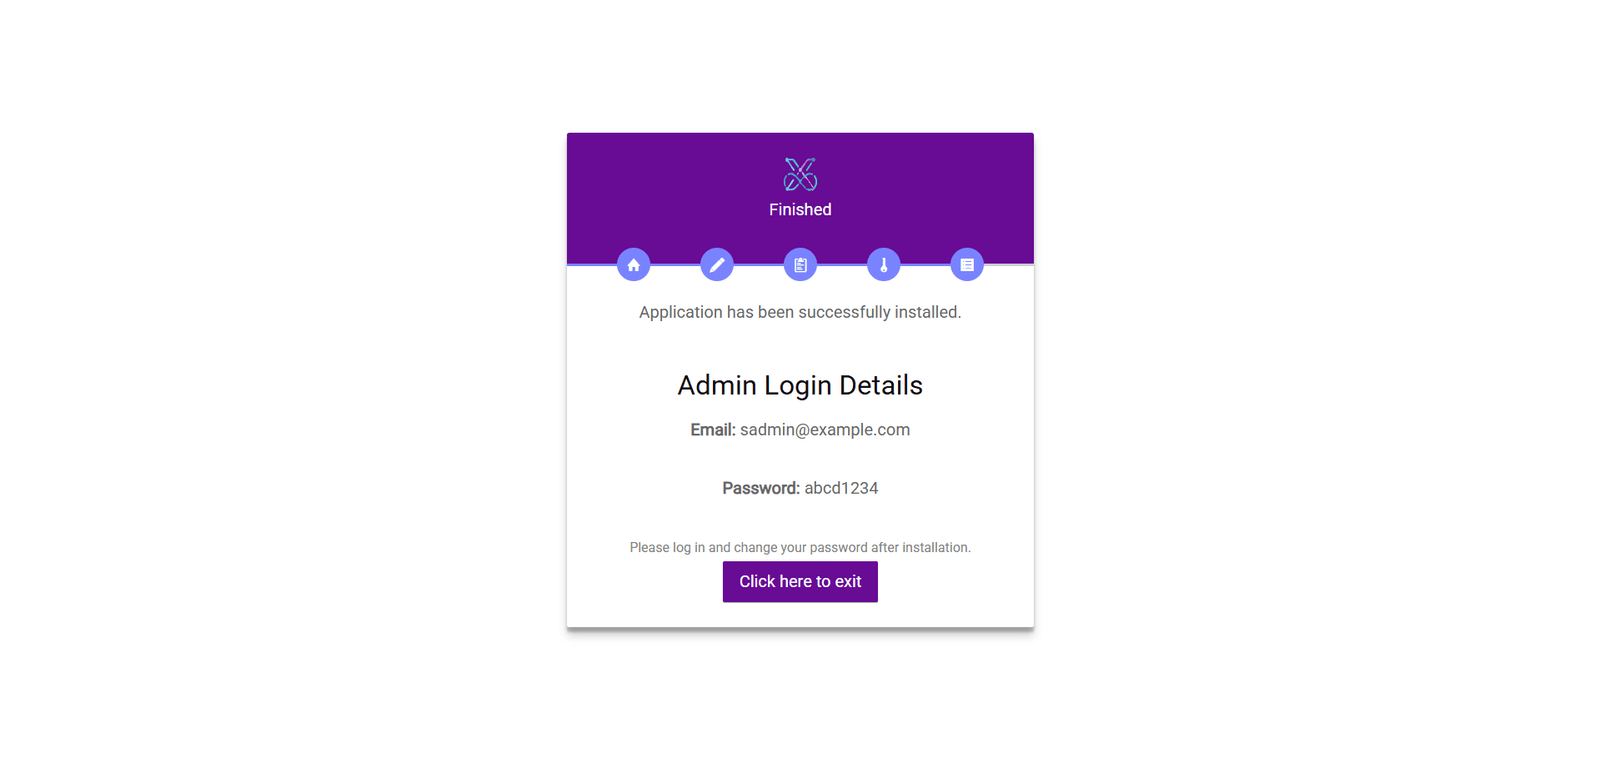
Installation Complete

Success

Your system is successfully installed and ready to use.

You are ready to run your App http://your-domain.in/admin/login

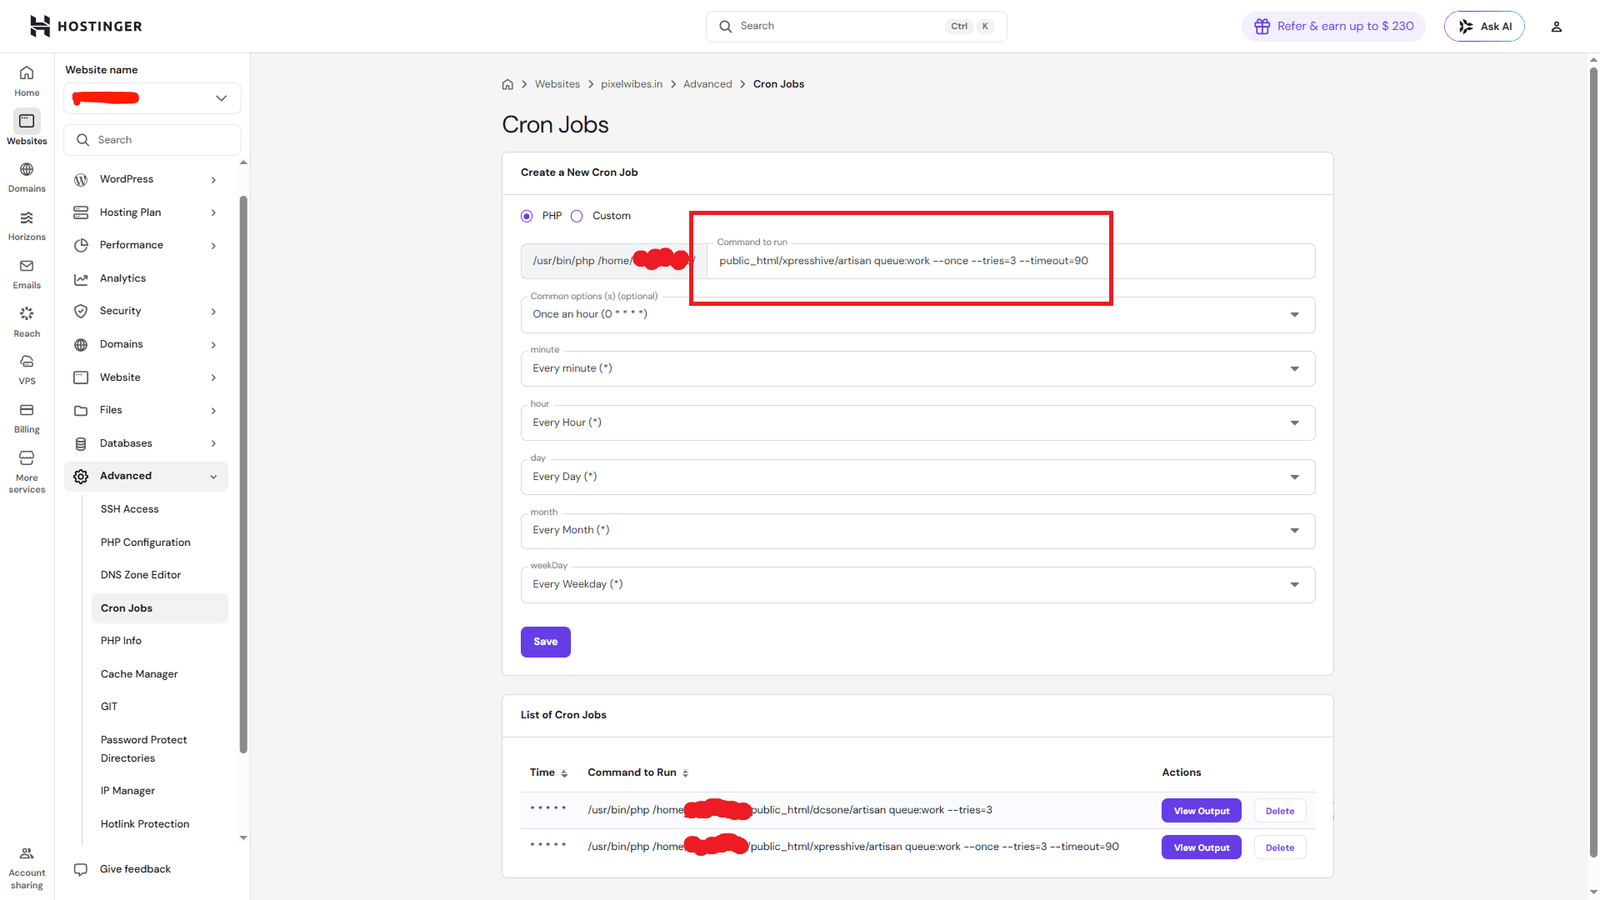
Setup Cron Job (Queue Worker)

Cron Job Setup

To ensure background jobs (emails, notifications, etc.) are processed, you need to configure a cron job on your server.

Steps to Add Cron Job:
  1. Login to your hosting panel (e.g., Hostinger).
  2. Go to Advanced → Cron Jobs.
  3. Click on Create New Cron Job.
  4. Select PHP as the command type.
  5. Enter the following command:
/usr/bin/php /home/your-username/public_html/your-project/artisan queue:work --once --tries=3 --timeout=90
  1. Set cron timing (Recommended: Every 1 minute).
  2. Click Save.

Done

Your cron job is now configured. The system will automatically process queued tasks.

1. Backend Setup (Laravel) - For Local

Follow the steps below to set up the backend application.

Before You Start

Before starting the installation process, make sure your server meets all the minimum requirements listed below.

Server Requirements
  • PHP: Version 8.2 or higher
  • Composer: Version 2.8.12 or higher
  • MySQL: Version 8.0 or higher
Enable PHP Sodium Extension

XpressHive requires the PHP Sodium extension for secure encryption and authentication features.

You can verify whether the extension is enabled by checking your PHP configuration using phpinfo();.

If the Sodium extension is disabled, enable it by adding the following line to your php.ini file:

extension=sodium
Verify Installed Versions

Run the following commands in Terminal or Command Prompt to verify your installed PHP and Composer versions:

php -v
composer --version
Project Installation

After downloading and extracting the project files into your XAMPP - htdocs or WAMP - www directory, open Terminal or Command Prompt and navigate to the project root directory.

Run the following command to install all required dependencies:

composer install

Next, create the environment configuration file:

cp .env.example .env

Make sure all commands are executed from the project's root directory where the composer.json file is located. Once the installation is completed successfully, upload the project files to your hosting server and start installation.

  1. Install dependencies:
    composer install
  2. Copy environment file:
    cp .env.example .env
  3. Generate application key: (Optional)
    php artisan key:generate
  4. Run the server:
    php artisan serve
  5. Open in browser:
    http://127.0.0.1:8000

1. Backend Setup (Laravel) - For Live

Before You Start

Before starting the installation process, make sure your server meets all the minimum requirements listed below.

Server Requirements
  • PHP: Version 8.2 or higher
  • Composer: Version 2.8.12 or higher
  • MySQL: Version 8.0 or higher
Enable PHP Sodium Extension

XpressHive requires the PHP Sodium extension for secure encryption and authentication features.

You can verify whether the extension is enabled by checking your PHP configuration using phpinfo();.

If the Sodium extension is disabled, enable it by adding the following line to your php.ini file:

extension=sodium
Verify Installed Versions

Run the following commands in Terminal or Command Prompt to verify your installed PHP and Composer versions:

php -v
composer --version
Project Installation

After downloading and extracting the project files into your XAMPP - htdocs or WAMP - www directory, open Terminal or Command Prompt and navigate to the project root directory.

Run the following command to install all required dependencies:

composer install

Next, create the environment configuration file:

cp .env.example .env

Make sure all commands are executed from the project's root directory where the composer.json file is located. Once the installation is completed successfully, upload the project files to your hosting server and start installation.

  1. Install dependencies:
    composer install
  2. Copy environment file:
    cp .env.example .env
  3. After Composer installation, compress project folder to .zip and upload to server:
    yourname.zip

2. Frontend Setup (Vite)

The frontend uses modern build tools for styling and interactivity.

  1. Install dependencies:
    npm install
  2. Start development server:
    npm run dev
  3. Build assets for production:
    npm run build

3. Server Setup Notes

Using VPS / SSH
  • Copy .env.example to .env
  • Run php artisan key:generate
  • Update database and mail configuration
Using Shared Hosting
  • A pre-configured .env file is available in the shared_hosting folder
  • Update only database and mail settings
  • Do not change APP_KEY (it may break the application)

Important

Always ensure your environment meets the technical requirements before setup.

Mandatory Panel Configuration & Mandatory Setup

After installation, complete the following basic setup to ensure your XpressHive system works properly.

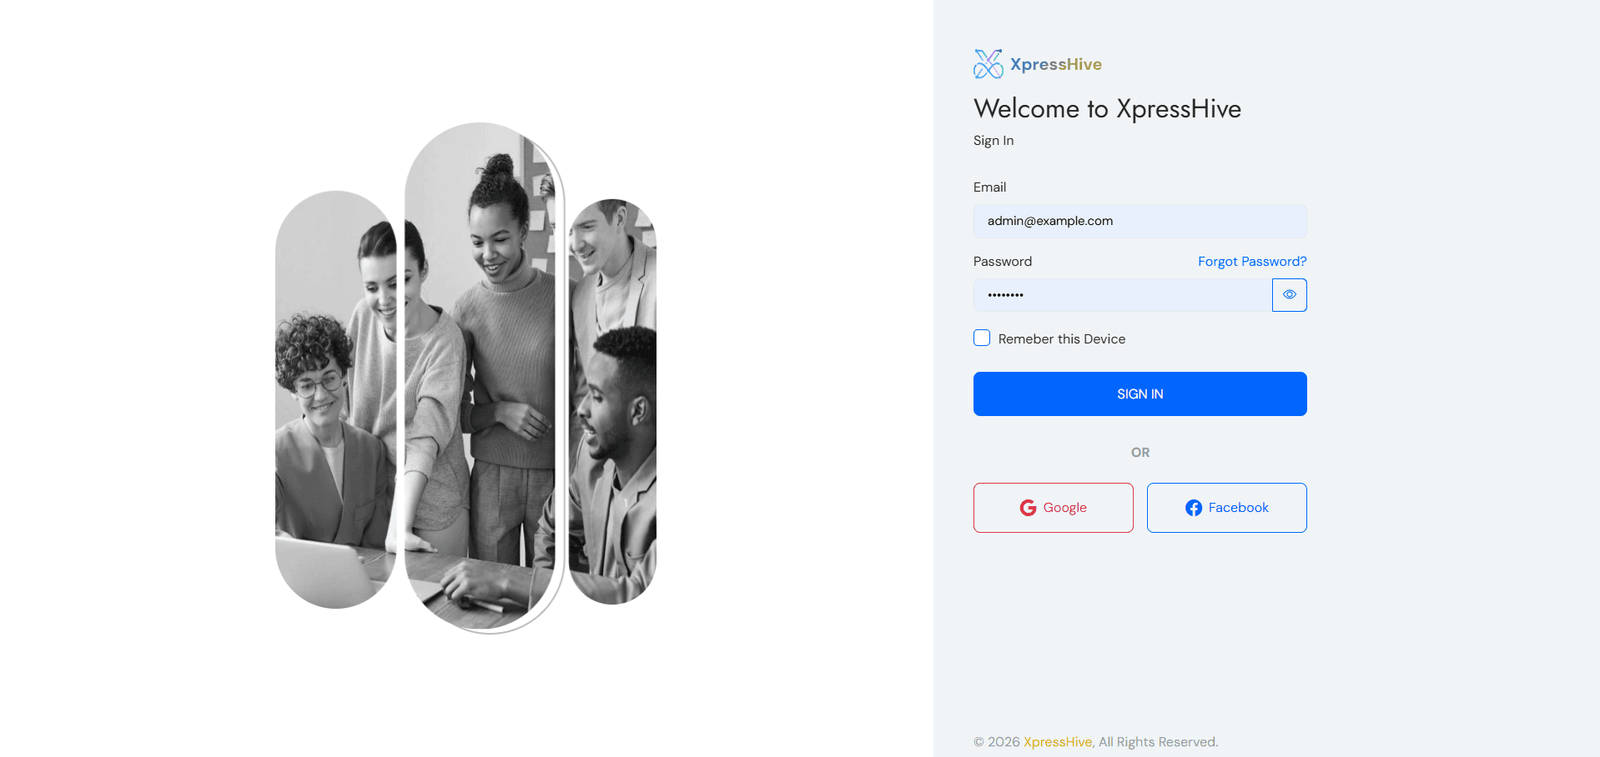
You are ready to run your App http://your-domain.in/admin/login

Login

  • Enter your admin email
  • Enter your password
  • Use credentials created during installation

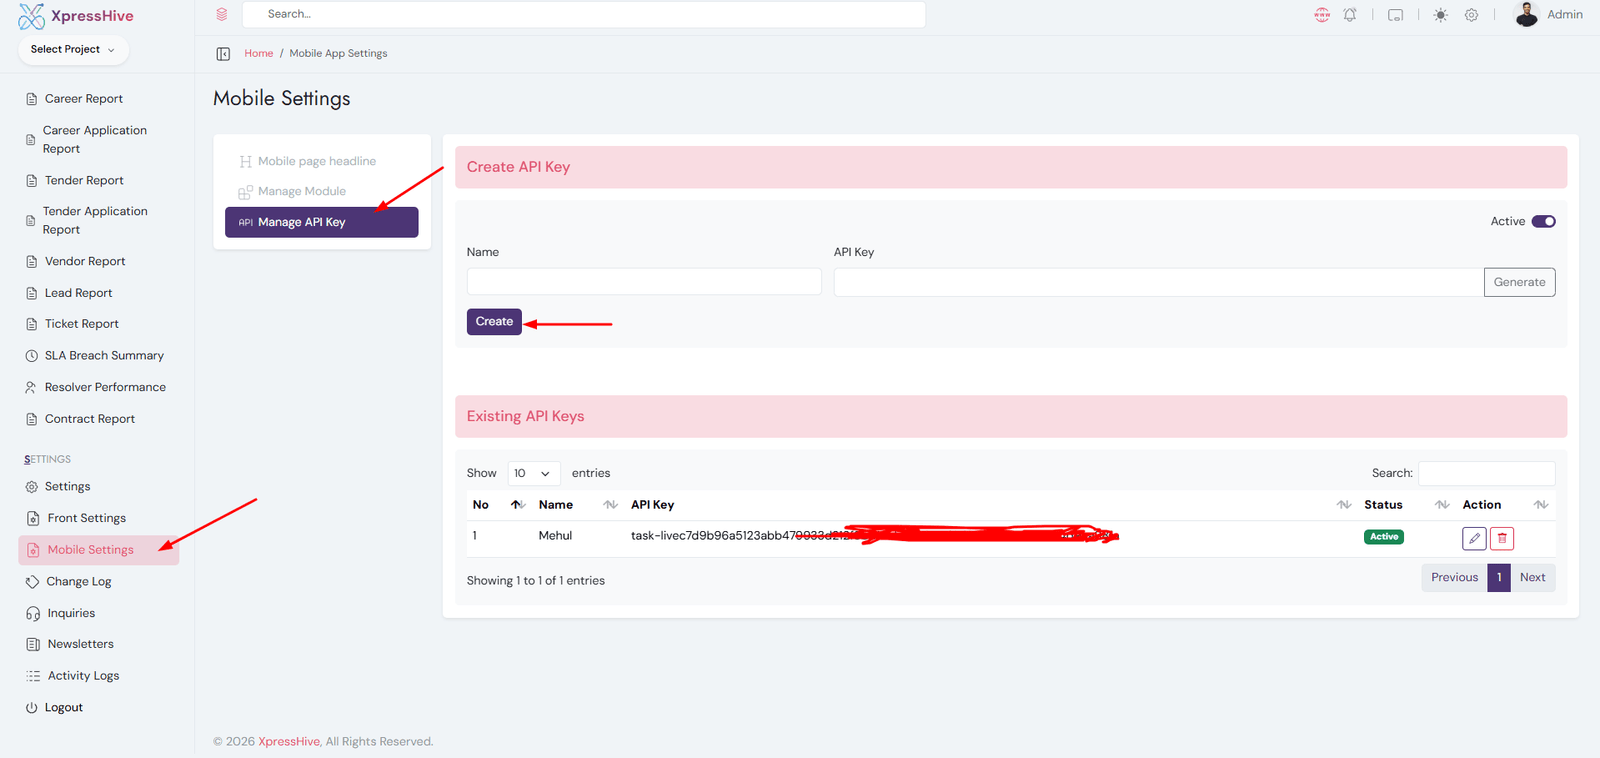
Mobile Settings - Manage API Key

Create API Key
  • The Manage API Key section allows you to generate and manage API keys for mobile app access
  • API keys are used to securely connect the mobile app with the backend system
  • Each key is unique and can be activated or deactivated
  • This ensures controlled and secure API usage
Create API Key
  • Name: Enter a label for the API key (e.g., Mobile App, Admin App)
  • API Key: Click Generate to auto-create a unique key
  • Status: Set Active or Inactive
  • Create: Click to save the API key
Existing API Keys
  • View all generated API keys in a table
  • Check name, key value, and status
  • Edit or delete API keys anytime
  • Deactivate keys to block access instantly
Usage
  • Used for authenticating mobile app API requests
  • Ensures only authorized apps can access the system
  • Helps manage multiple app integrations
Important Notes
  • Keep API keys secure and do not expose publicly
  • Regenerate keys if compromised
  • Use different keys for different applications
  • Always save changes after generating a key

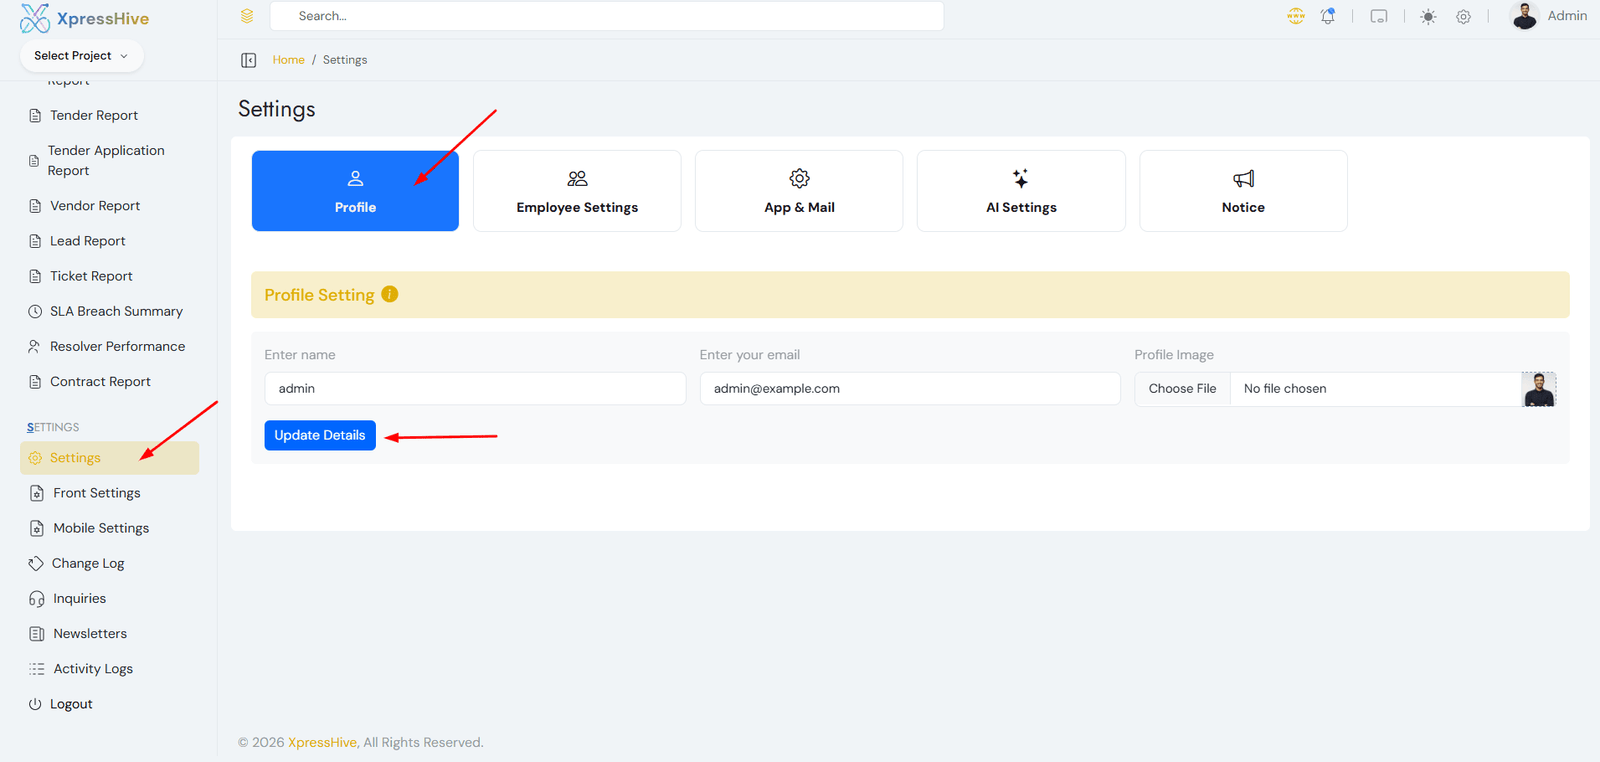
Profile & General Settings

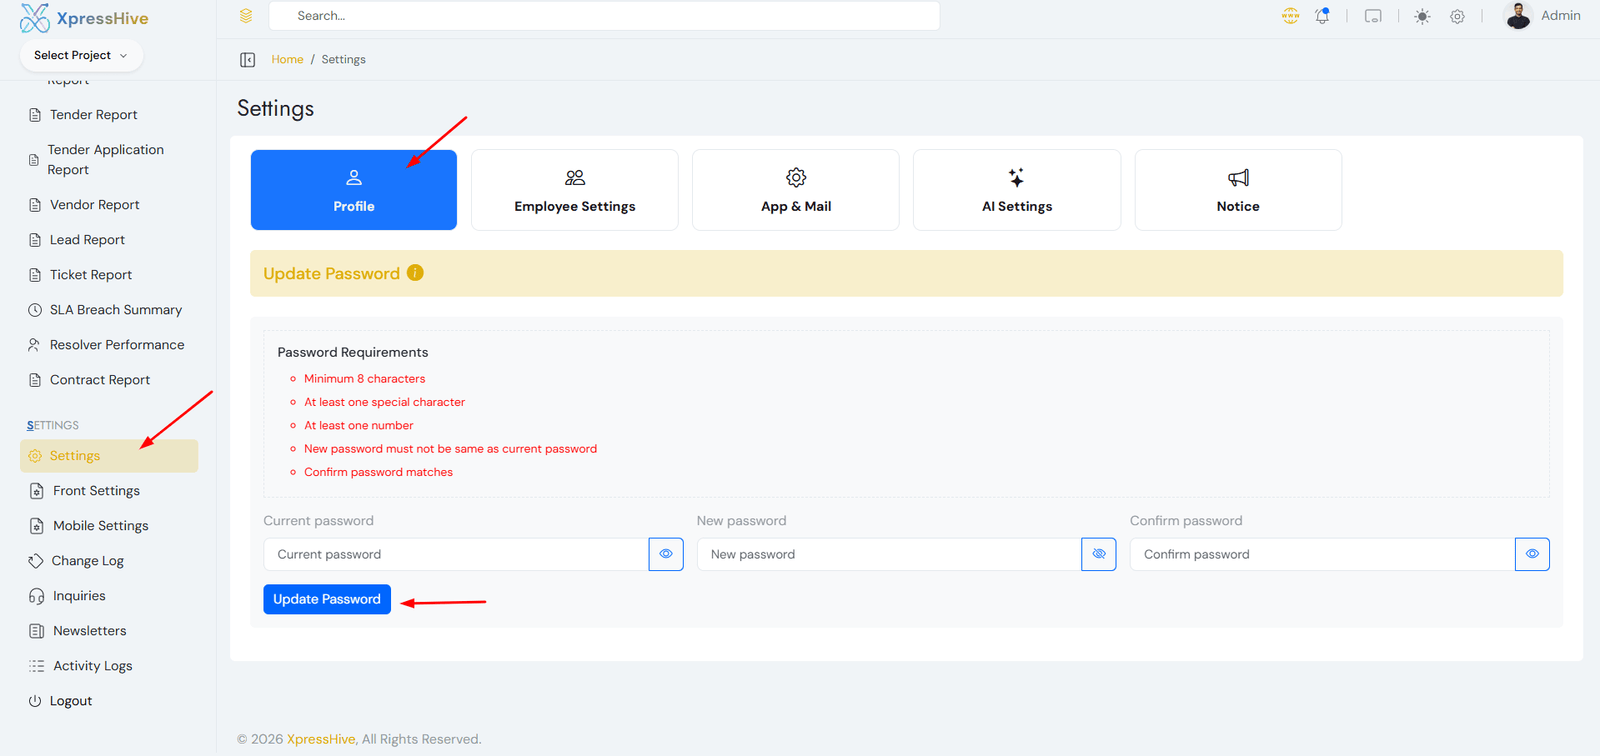
Profile
Update Password
  • Update your profile information
  • Change your password for security

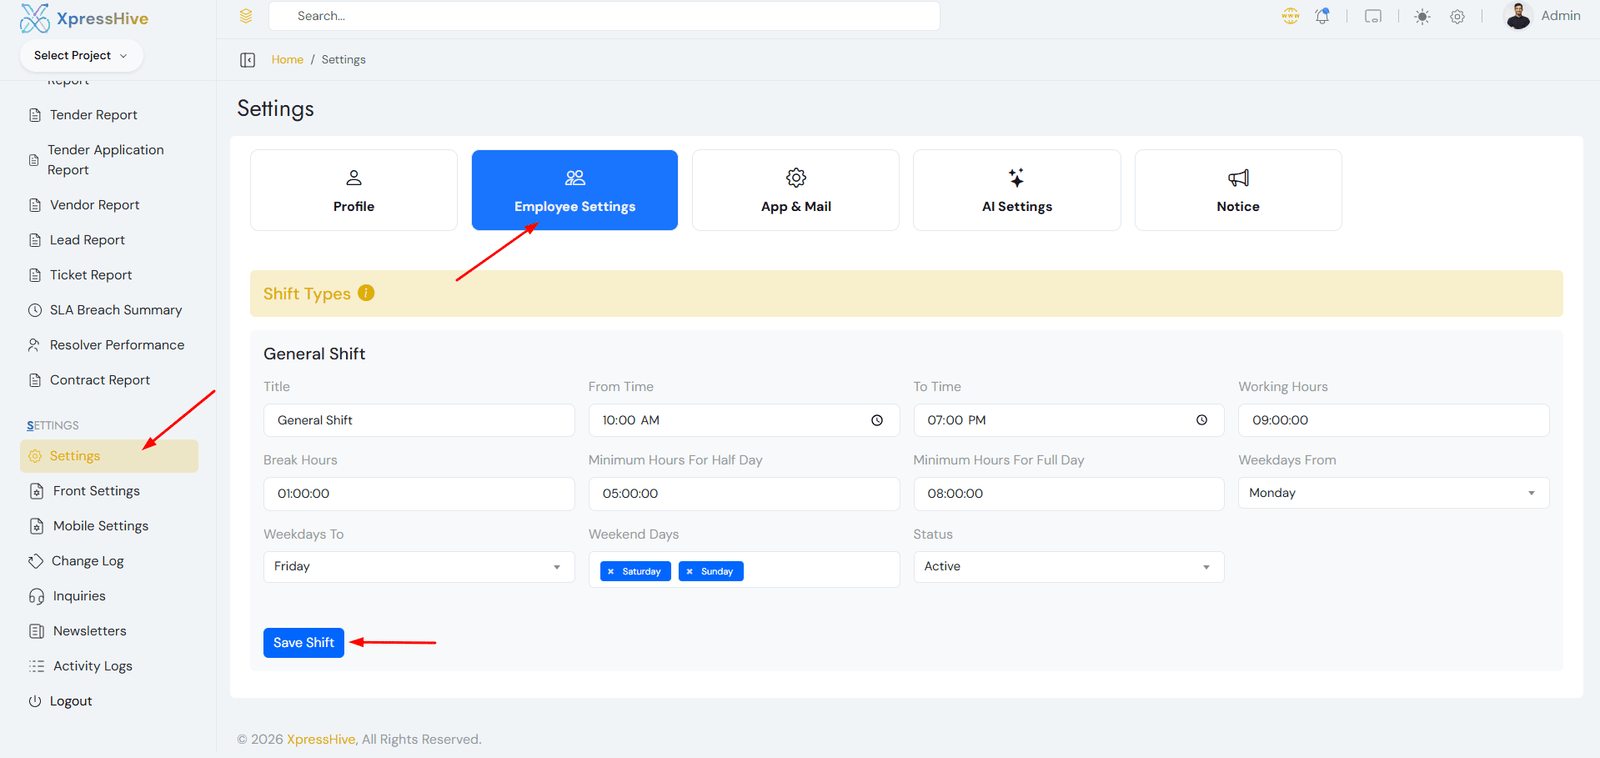
Shift Management

  • Define working hours and break time
  • Set minimum hours for attendance
  • Configure working days and weekends
  • Required when creating employees

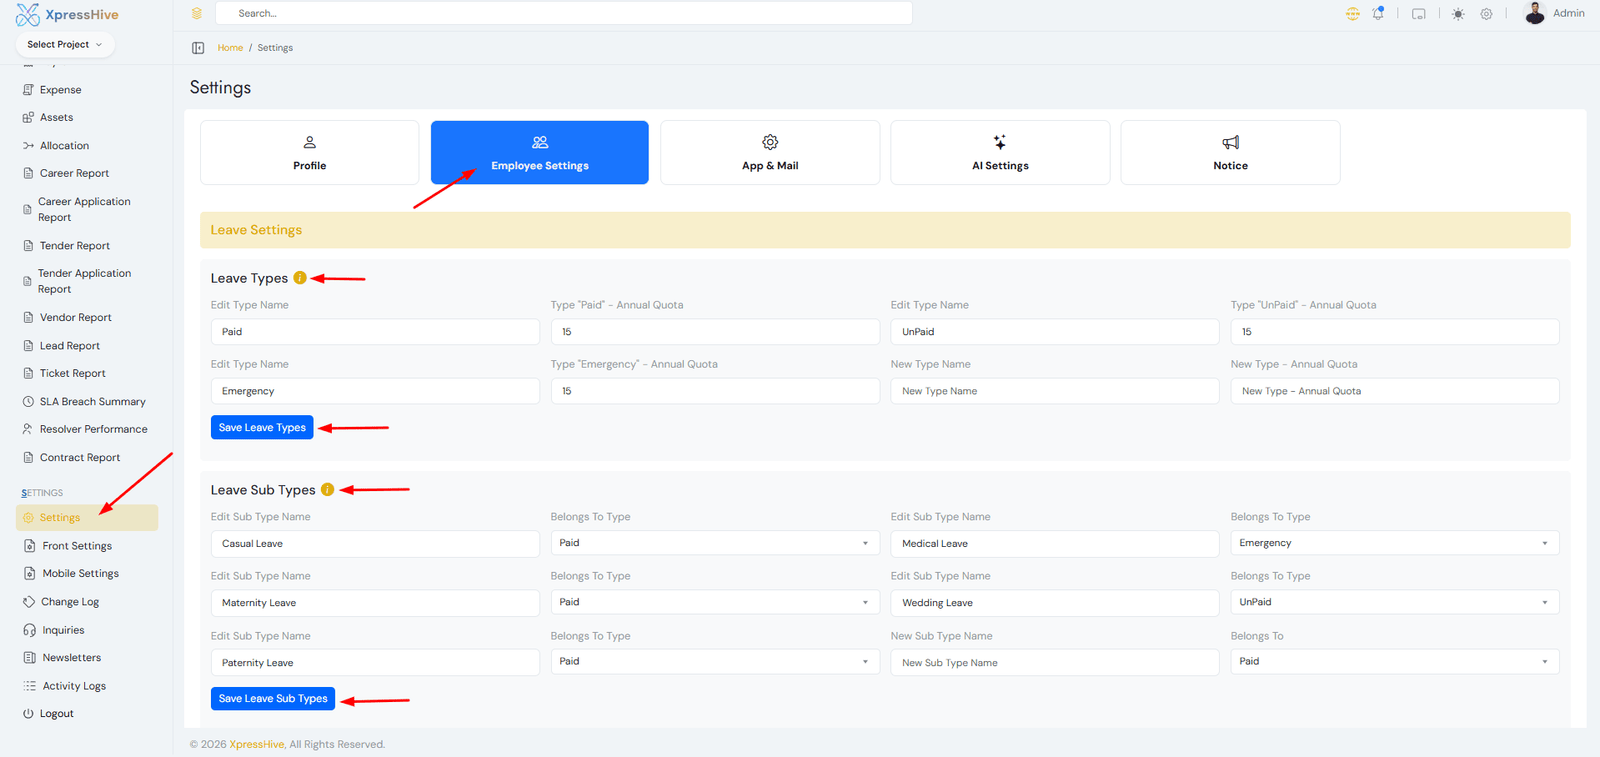
Leave Management

  • Create leave types (Paid, Unpaid, etc.)
  • Set annual quotas
  • Create sub-types for better categorization
  • Required for employee leave requests

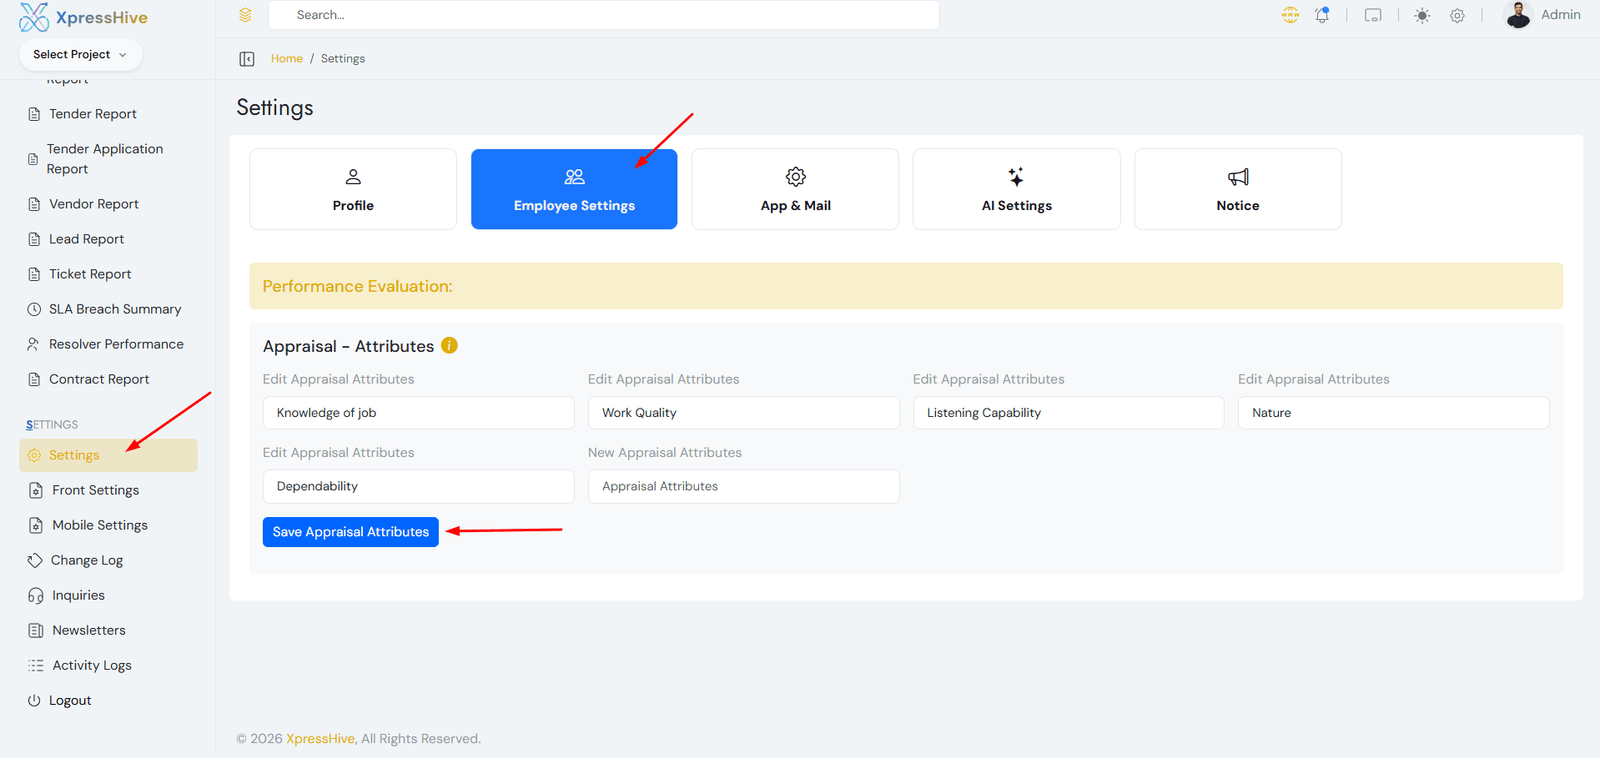
Appraisal Management

  • Define performance criteria
  • Evaluate employees systematically

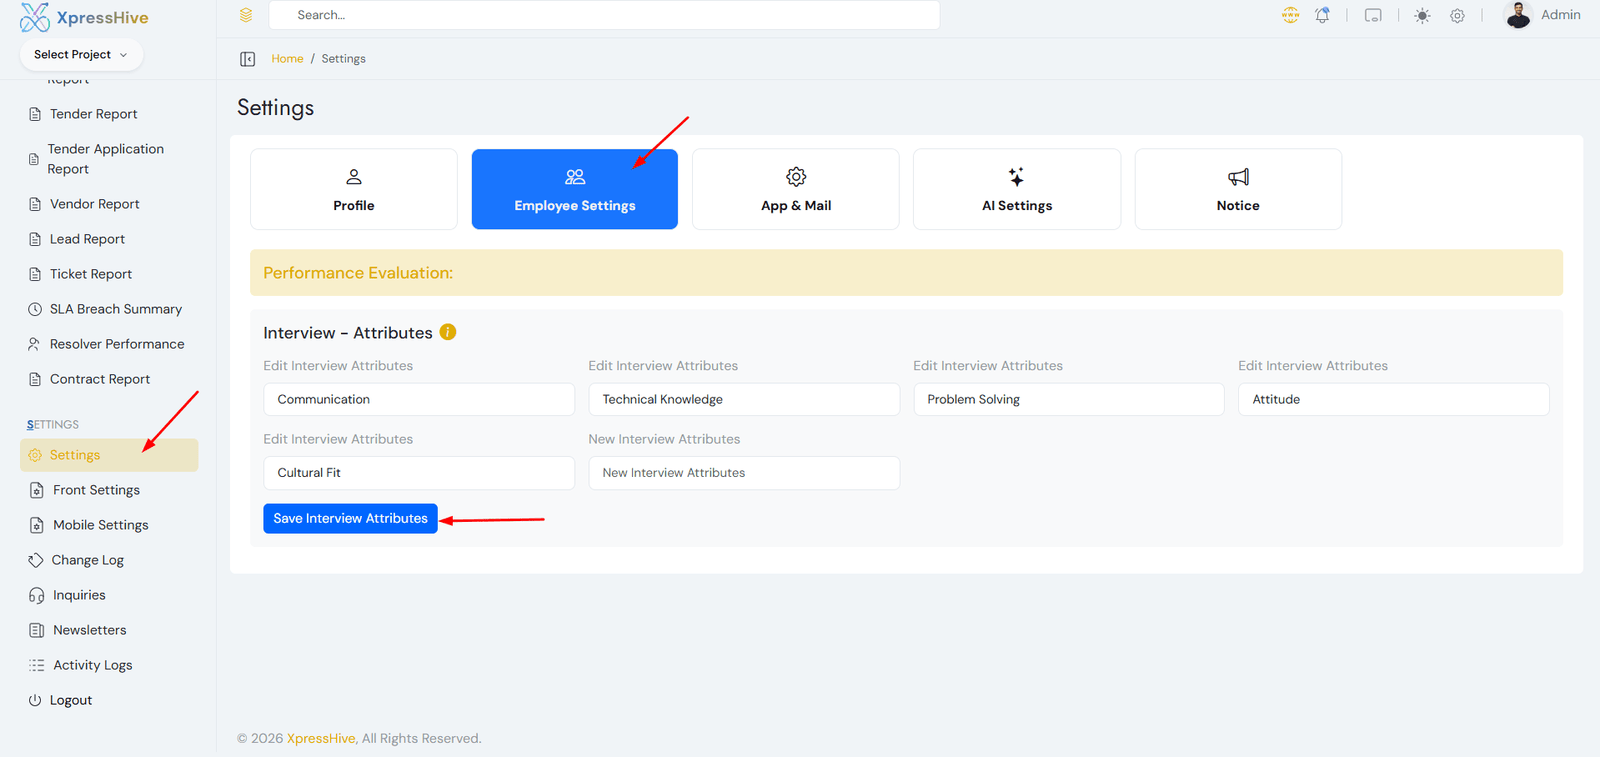
Interview Management

  • Define interview evaluation criteria
  • Score candidates effectively
  • Standardize hiring process

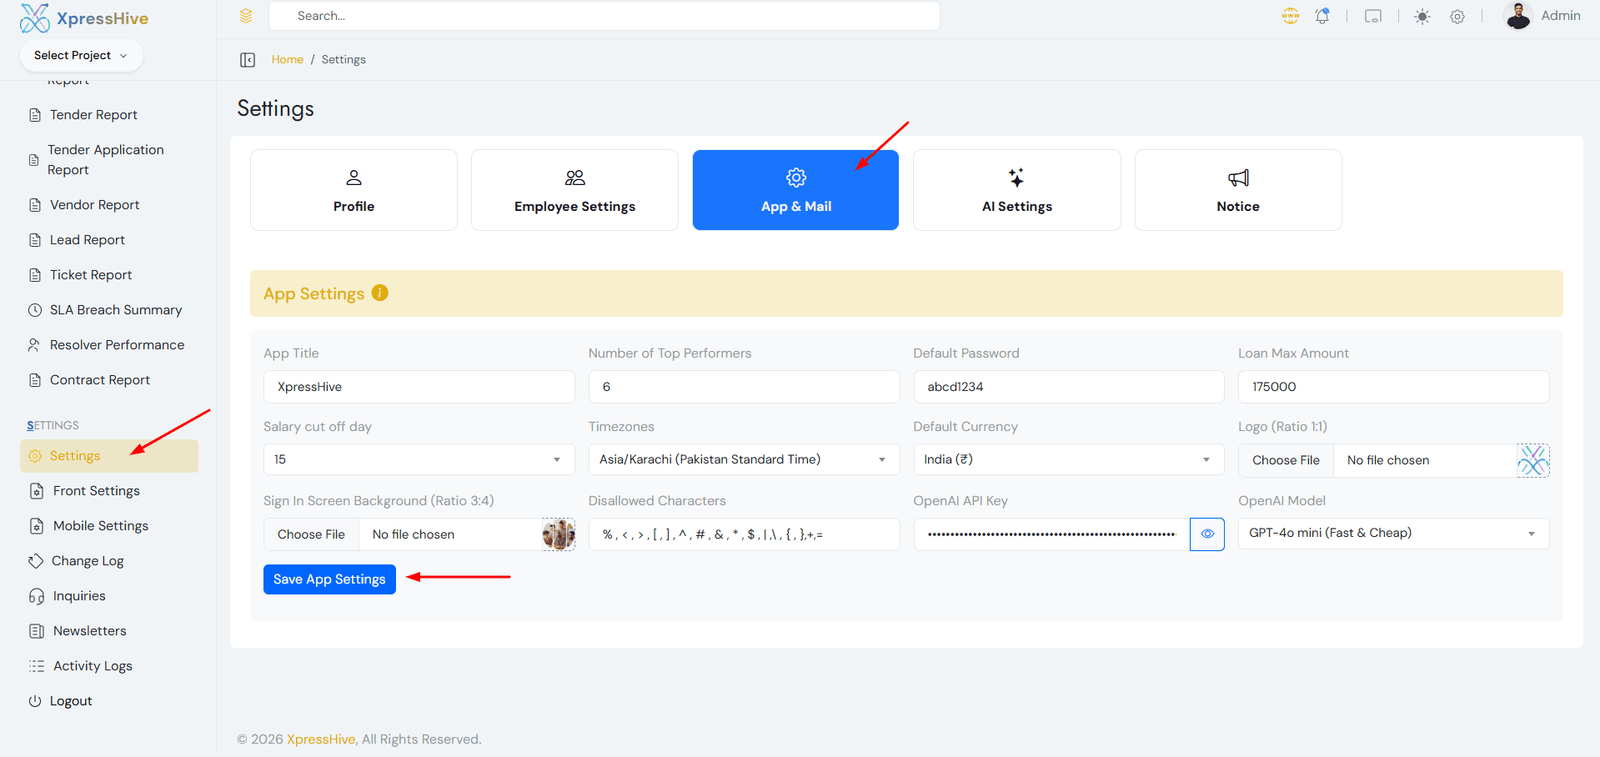
Application Settings

The application settings allow you to configure system-wide behavior, branding, financial rules, and AI features. These settings are essential for proper system functionality.

  1. Web App Title: Xpresshive

    This is the name of the application displayed across the system interface.

    • Visible in dashboard headers and browser titles
    • Represents your company or product branding
  2. Number of Top Performers: 6

    Defines how many employees will be highlighted as top performers.

    • Used in reports and dashboards
    • Helps identify high-performing employees
  3. Default Password: abcd1234

    The default password assigned to newly created users.

    • Users should change this after first login
    • Helps simplify onboarding process
  4. Loan Max Amount: 175,000

    Sets the maximum loan amount an employee can request.

    • Controls financial limits within the system
    • Used in loan approval workflows
  5. Salary Cut Off Day: 7

    Determines the payroll calculation cycle.

    • Salary is calculated based on this date each month
    • Important for attendance and payroll reports
  6. Timezones: Asia/Kolkata (Indian Standard Time)

    Sets the default timezone for the entire application.

    • Affects timestamps, reports, and scheduling
    • Ensure this matches your business location
  7. Default Currency: India (₹)

    Defines the currency used across financial modules.

    • Used in payroll, expenses, invoices, and reports
    • Ensures consistent financial calculations
  8. Logo (Ratio 1:1)

    Upload your application logo.

    • Recommended sizes: 200×200, 512×512
    • Must be square (1:1 ratio)
    • Displayed in dashboard and system header
  9. Sign In Screen Background (Ratio 3:4)

    Background image for the login screen.

    • Recommended sizes: 300×400, 600×800
    • Improves visual appearance of login page
  10. Disallowed Characters

    The following characters are restricted in inputs:

    % , < , > , [ , ] , ? , ^ , # , & , * , $ , | , \ , { , }, +, =, /
    • Prevents invalid or unsafe input
    • Improves system security and stability
  11. OpenAI API Key

    Used to enable AI-powered features in the system.

    • Generate project SRS documents
    • Create Employee descriptions automatically
    • Generate employee CVs
    • Provide smart ticket responses
    • Enable AI-based content generation
  12. OpenAI Model

    Used to choose which AI model to use.

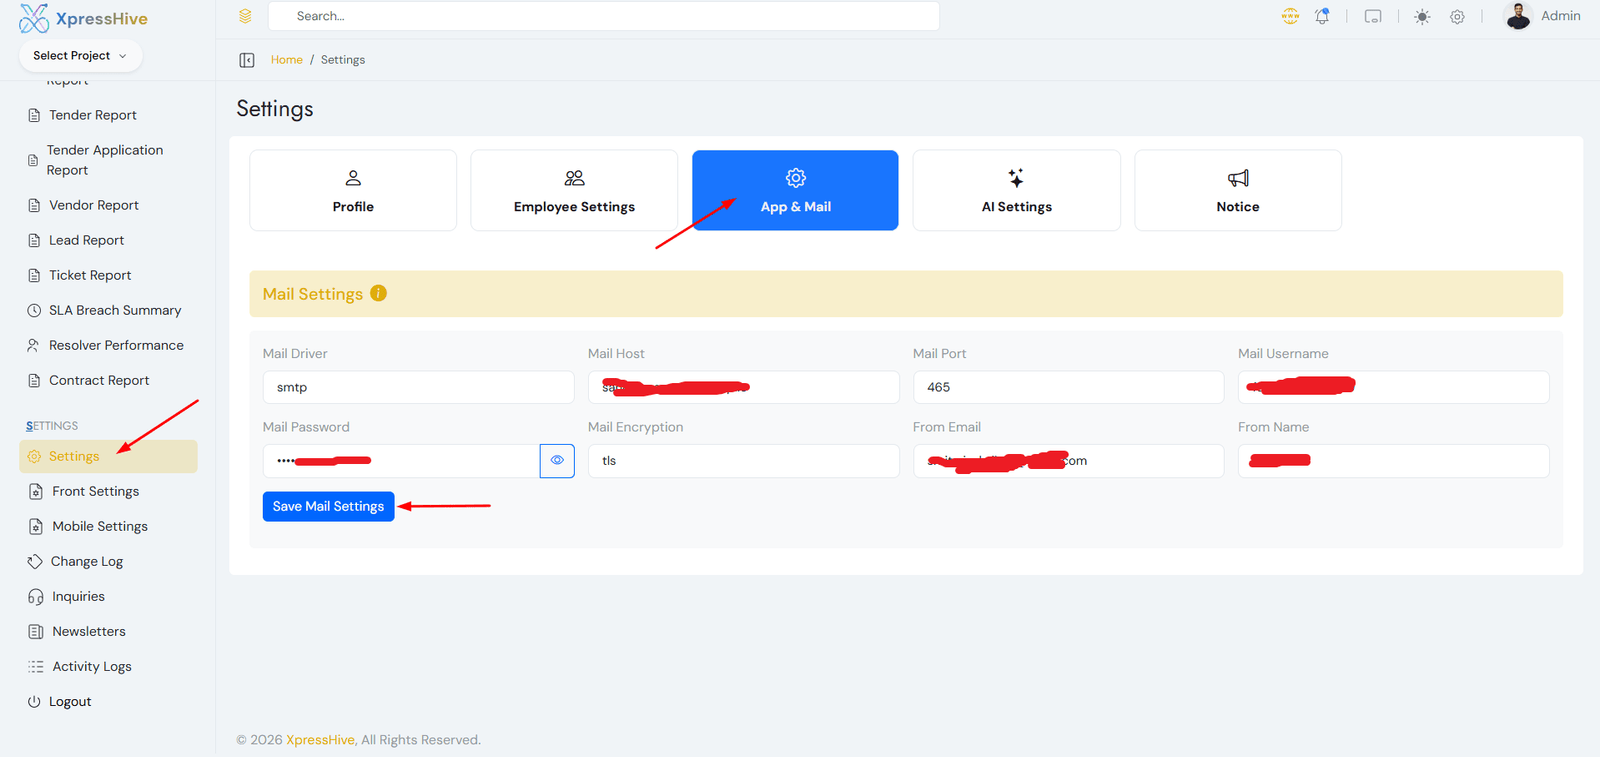
Mail Settings

  • Configure SMTP settings
  • Set email and password
  • Required for password reset and notifications

Important

Email configuration is required for system notifications and password recovery.

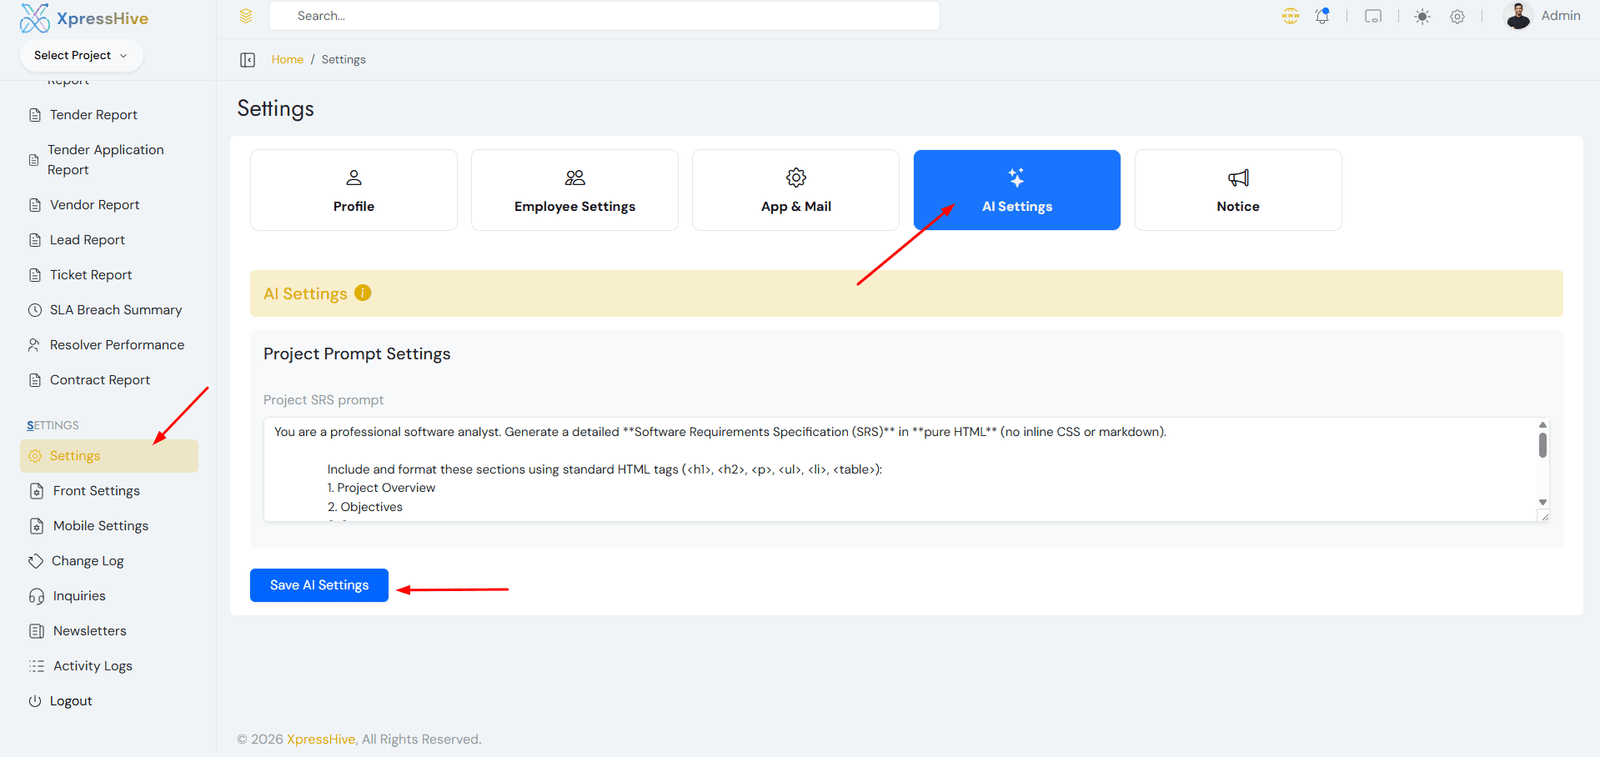
AI Settings

  • Configure AI prompts for modules
  • Customize AI behavior
  • Enable smart automation features

Firebase Configuration (Google & Facebook Login)

Firebase is required to enable Google and Facebook social login. Follow the steps below to configure it properly.

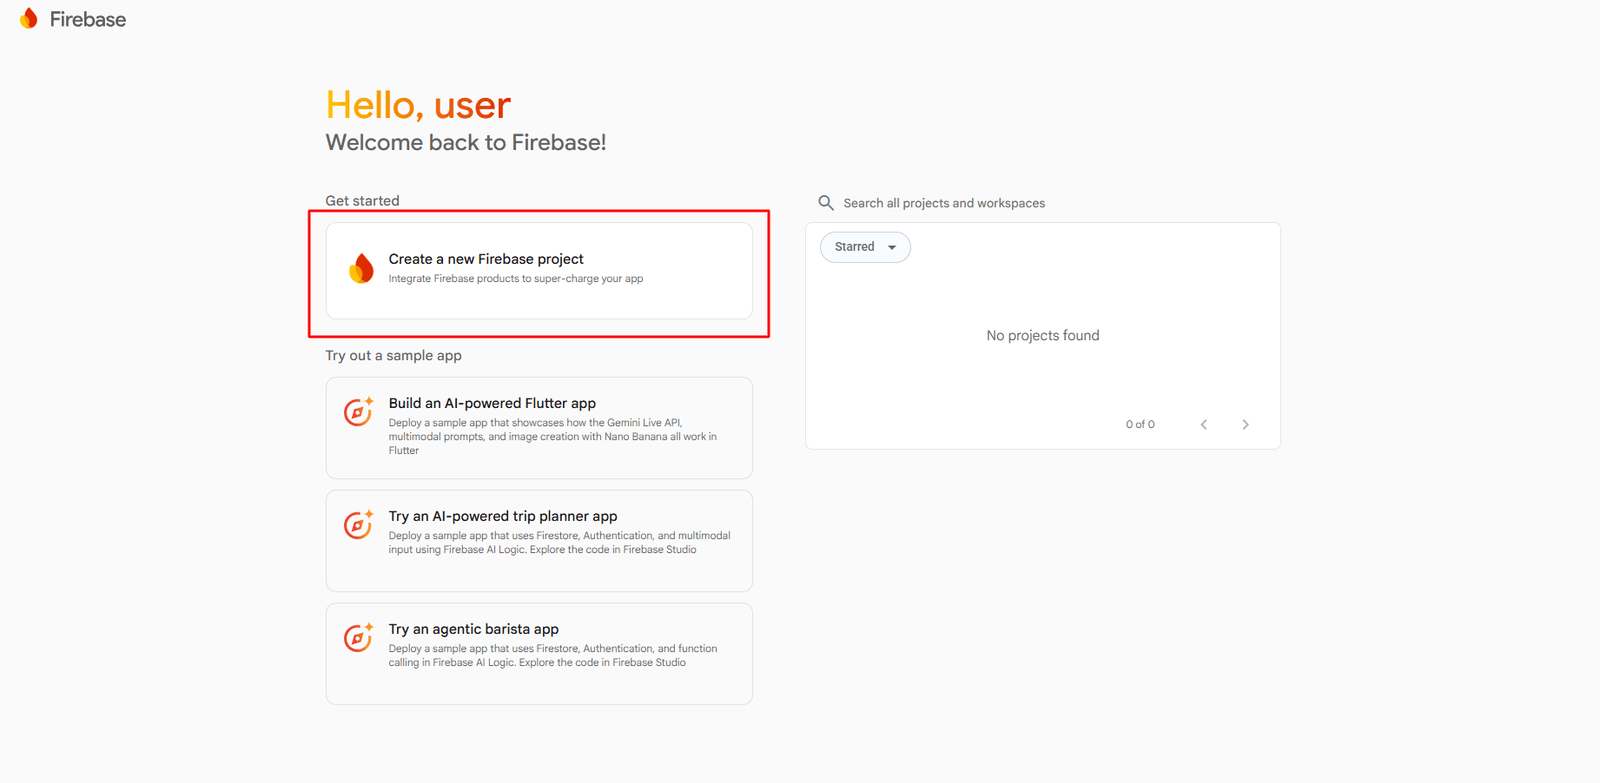
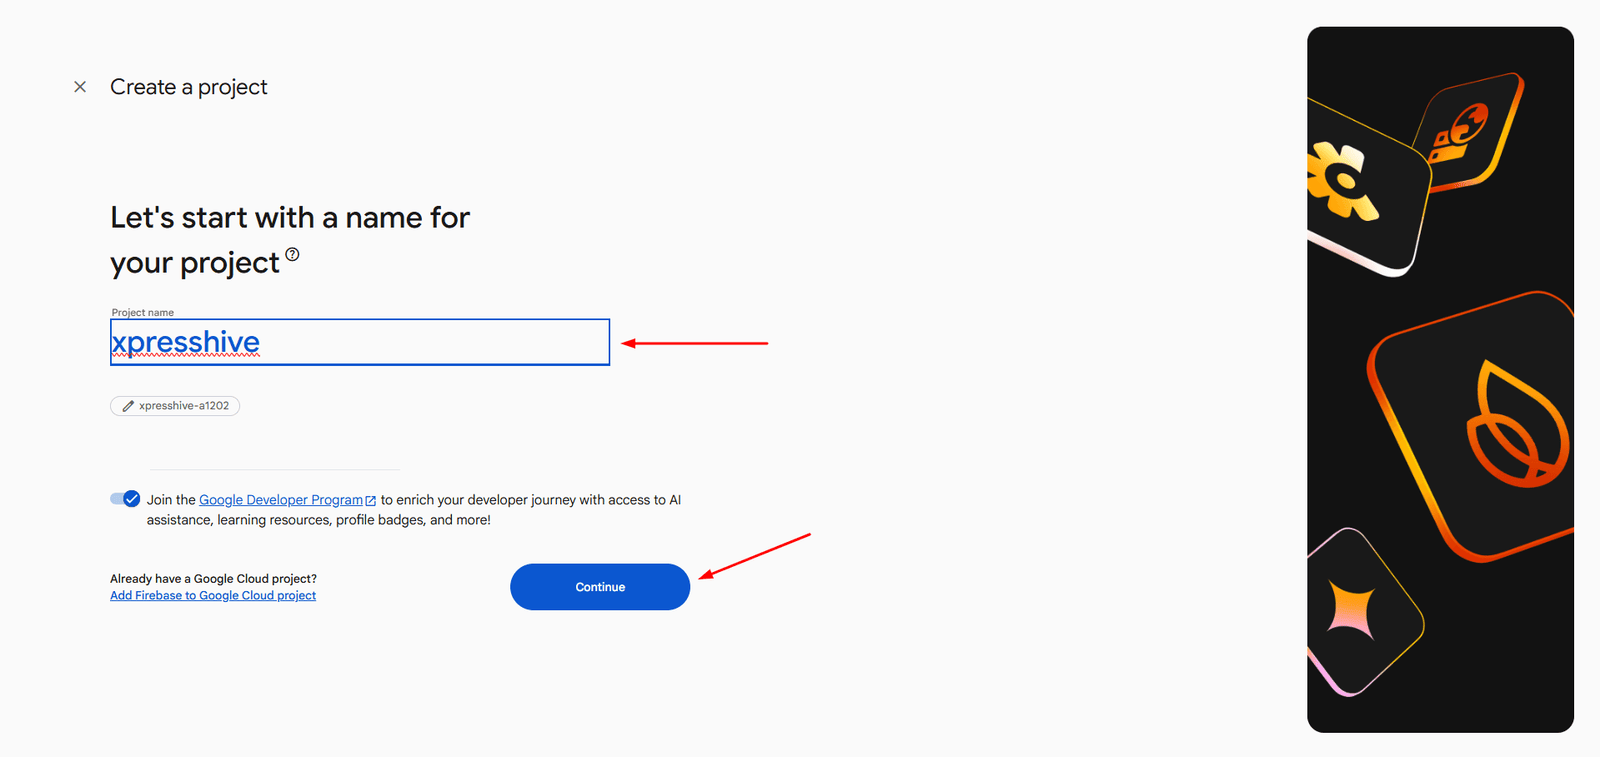
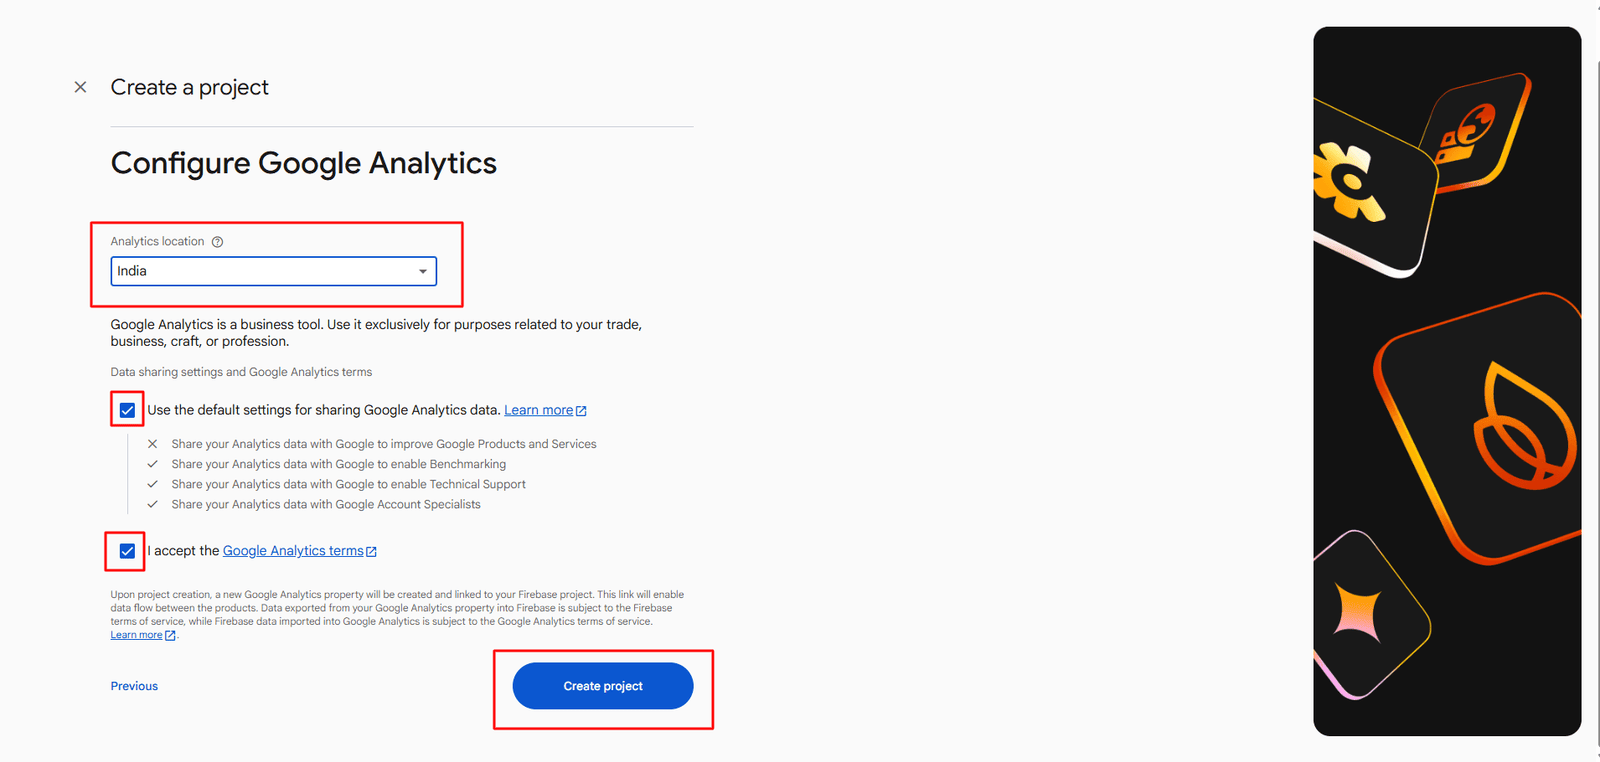
Step 1: Create Firebase Project

  1. Open Firebase Console
  2. Click Create a project
  3. Enter project name (e.g., xpresshive)
  4. Click Continue

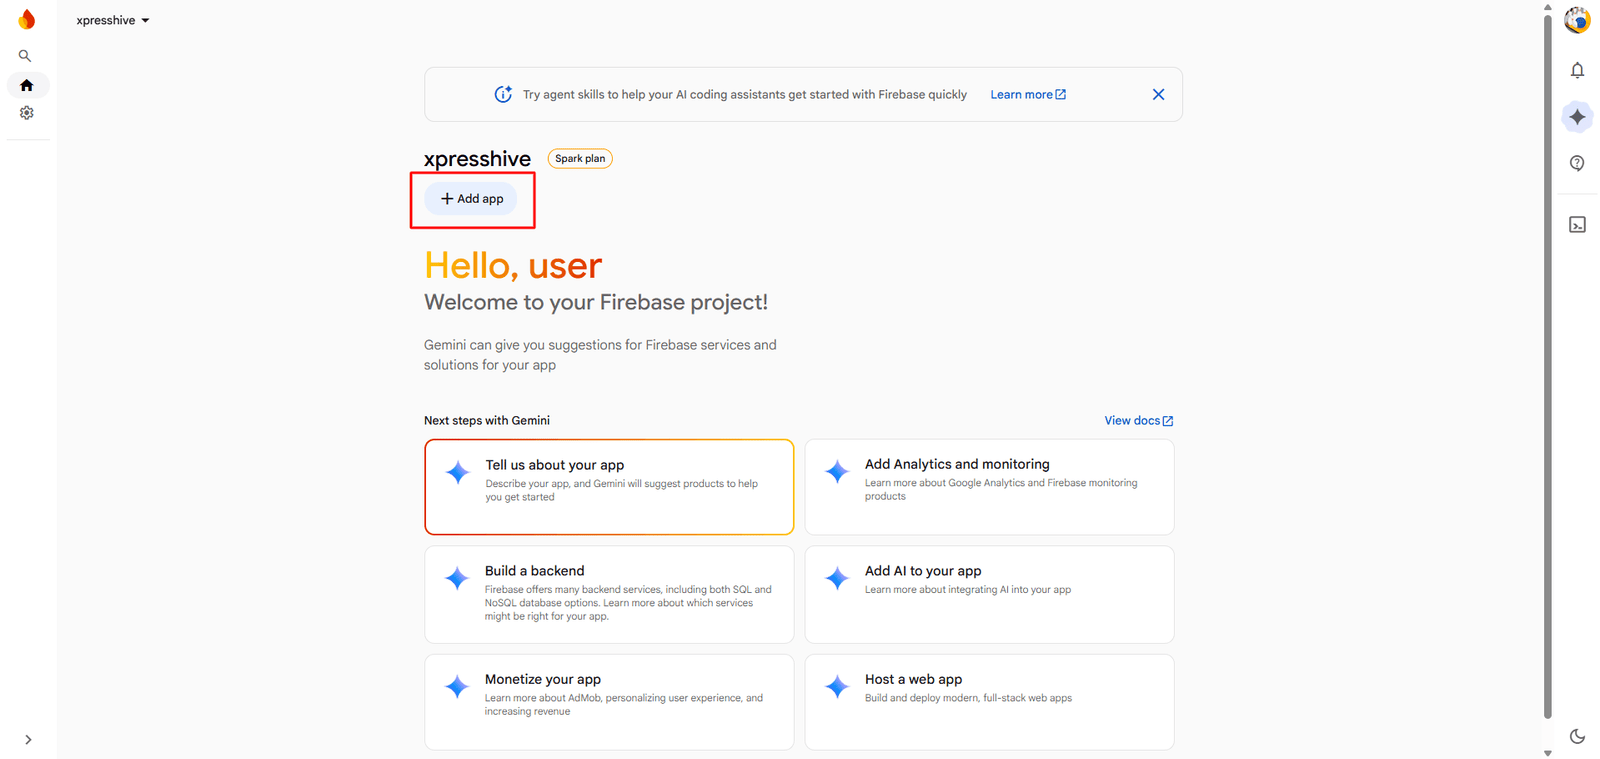
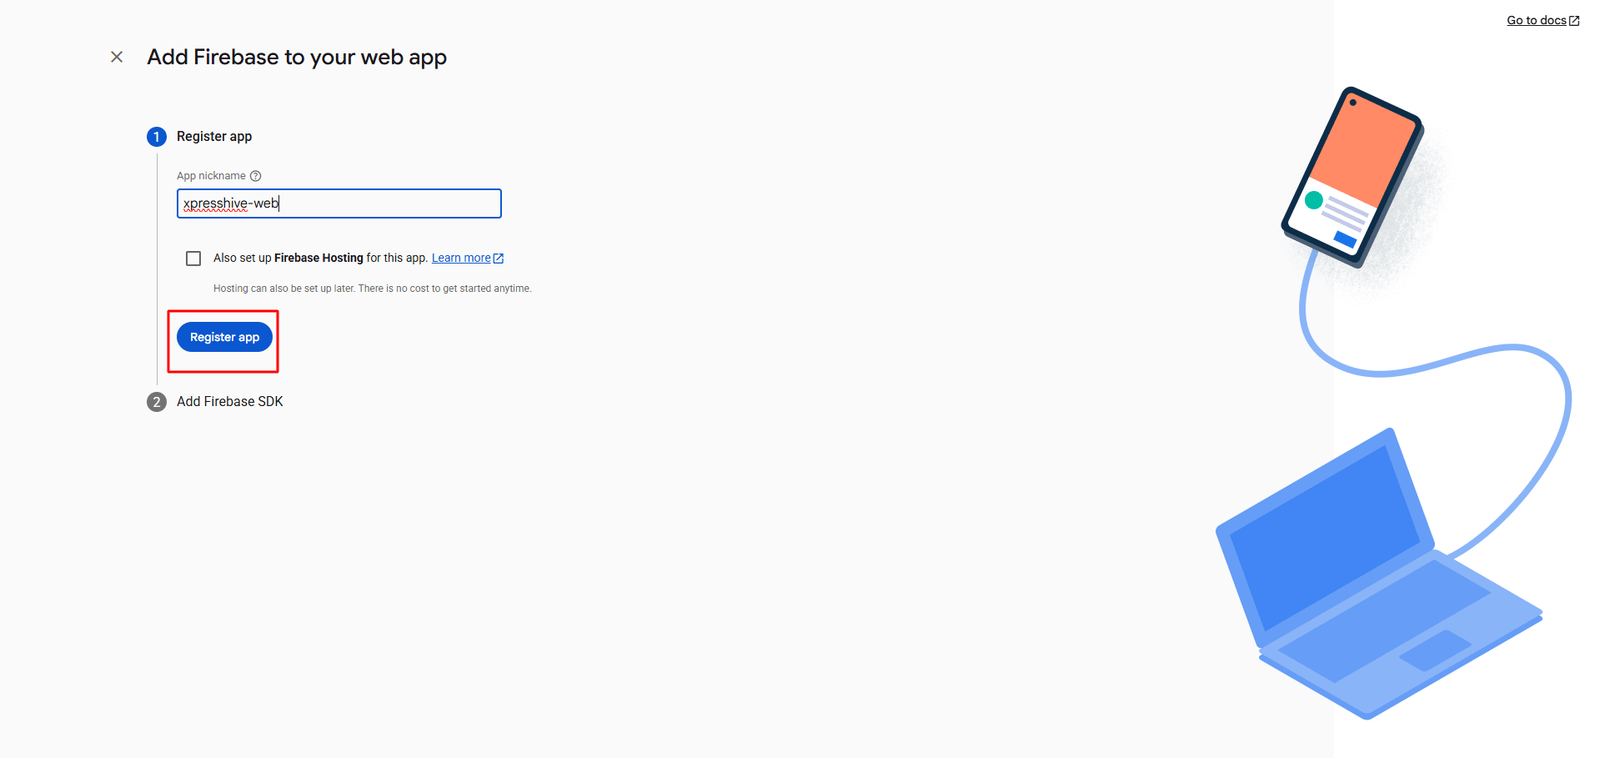
Step 2: Add App (Web / Android)

  1. Click Add App
  2. Select Web ( </> ) or Android
  3. Enter app nickname
  4. Click Register app

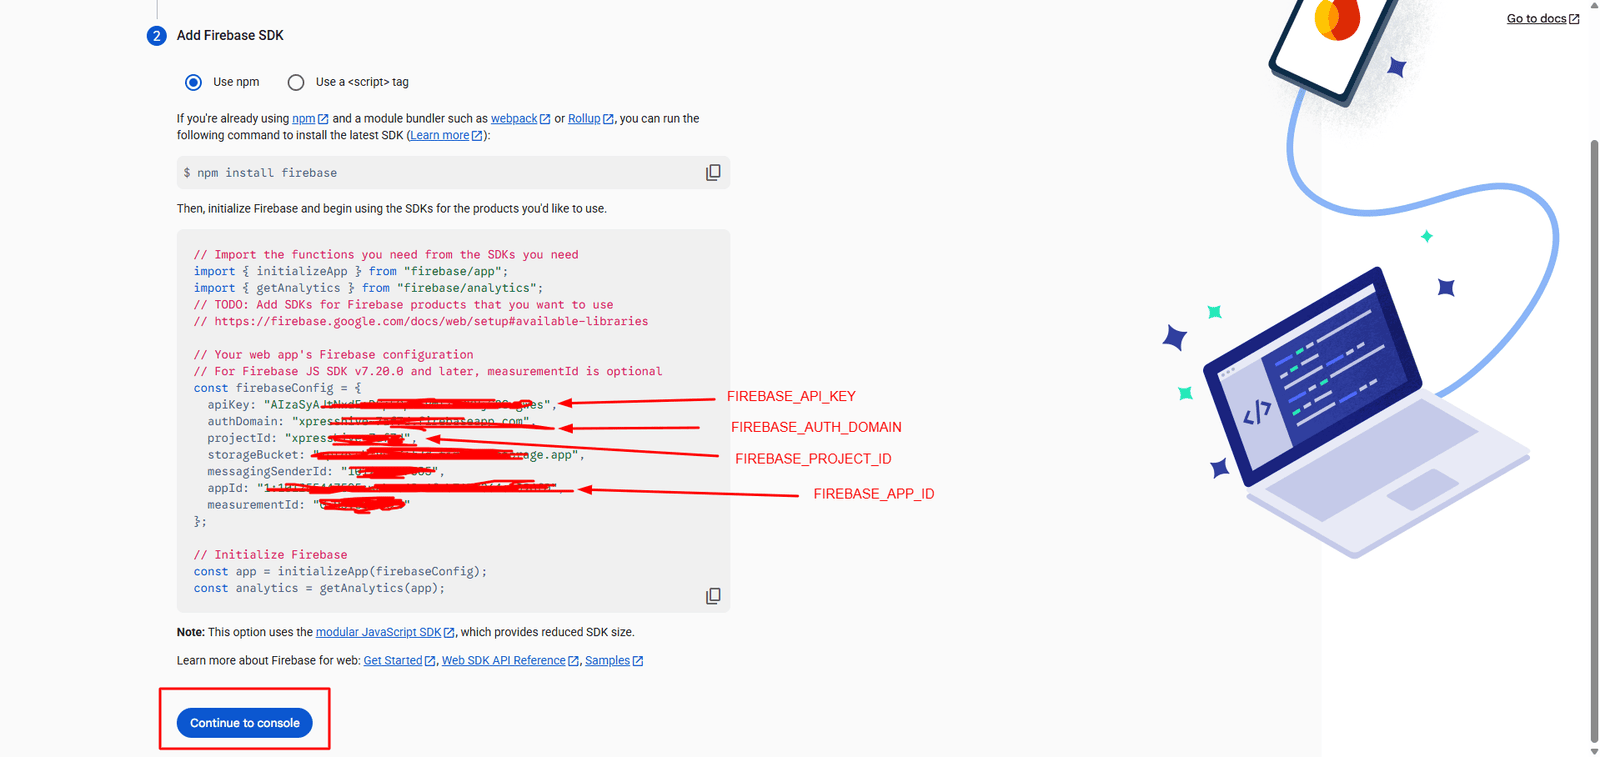
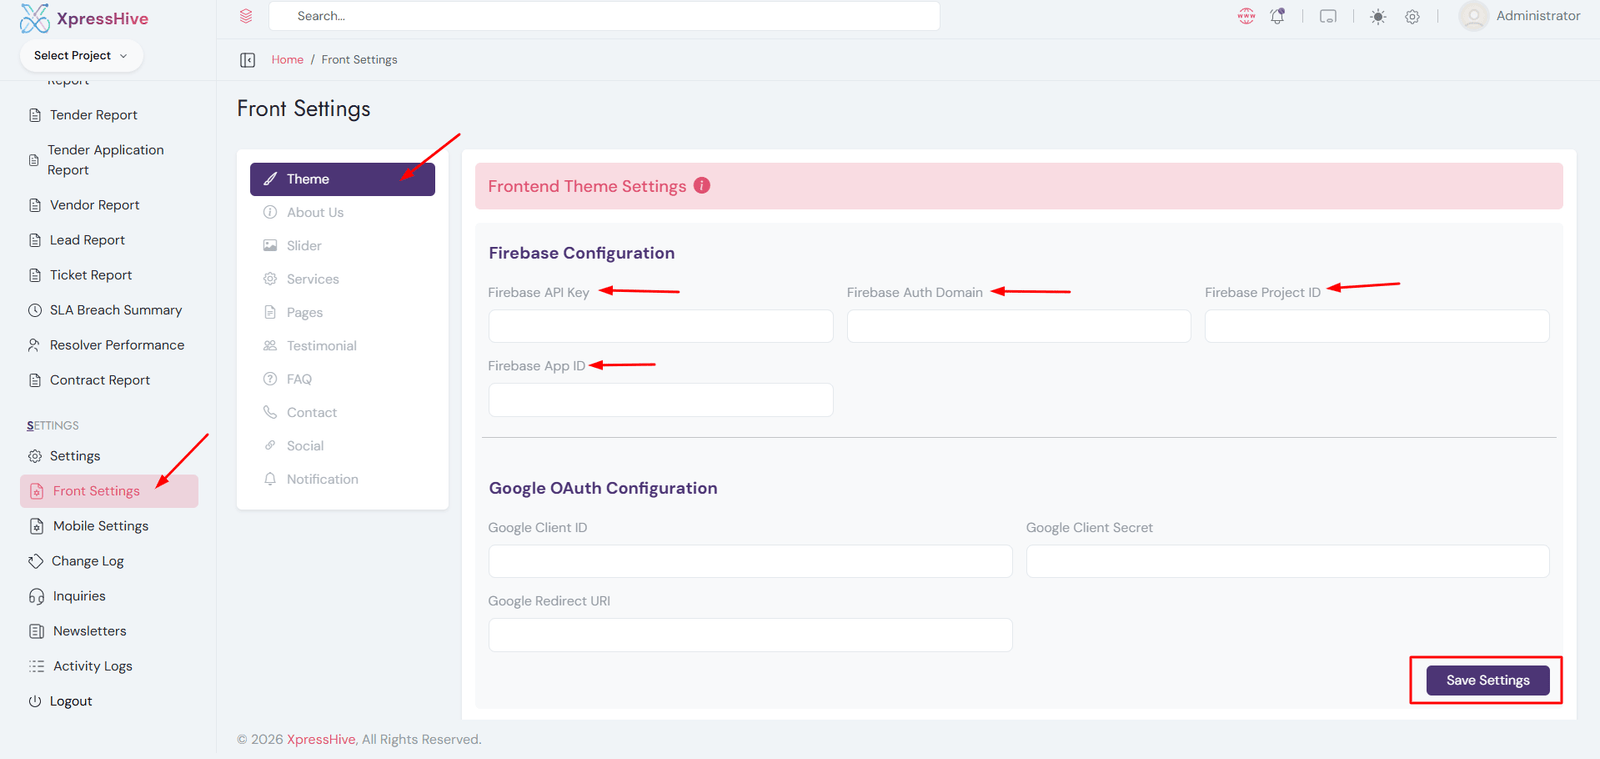
Step 3: Copy Firebase Keys and added to admin panel

  • apiKey
  • authDomain
  • projectId
  • appId

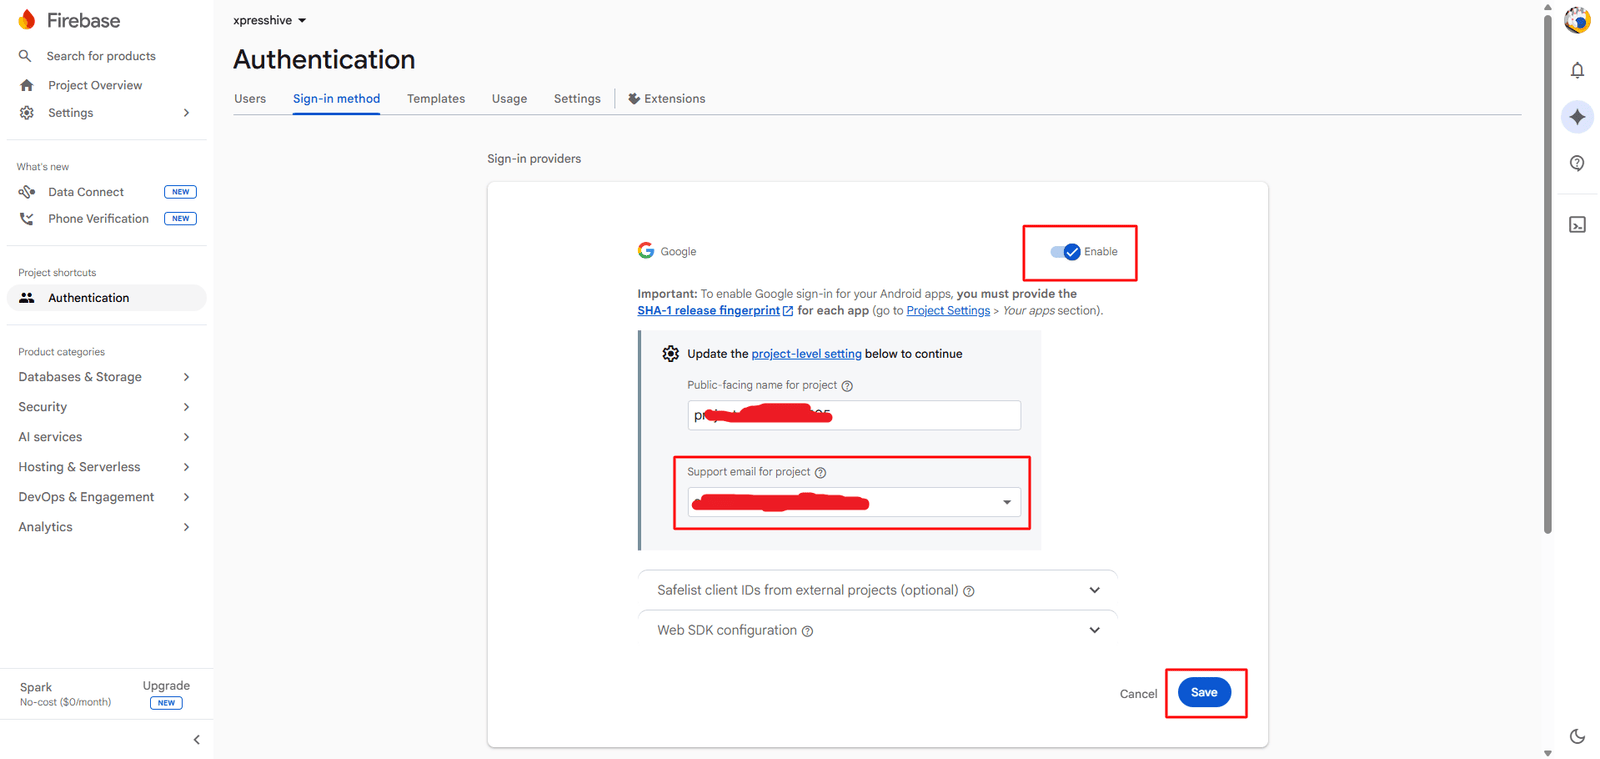
Step 4: Enable Google Authentication

  1. Go to Authentication → Sign-in method
  2. Enable Google
  3. Select support email
  4. Click Save

Step 5: Facebook App Setup & Integration

Follow the steps below to create and configure your Facebook App and connect it with Firebase Authentication.

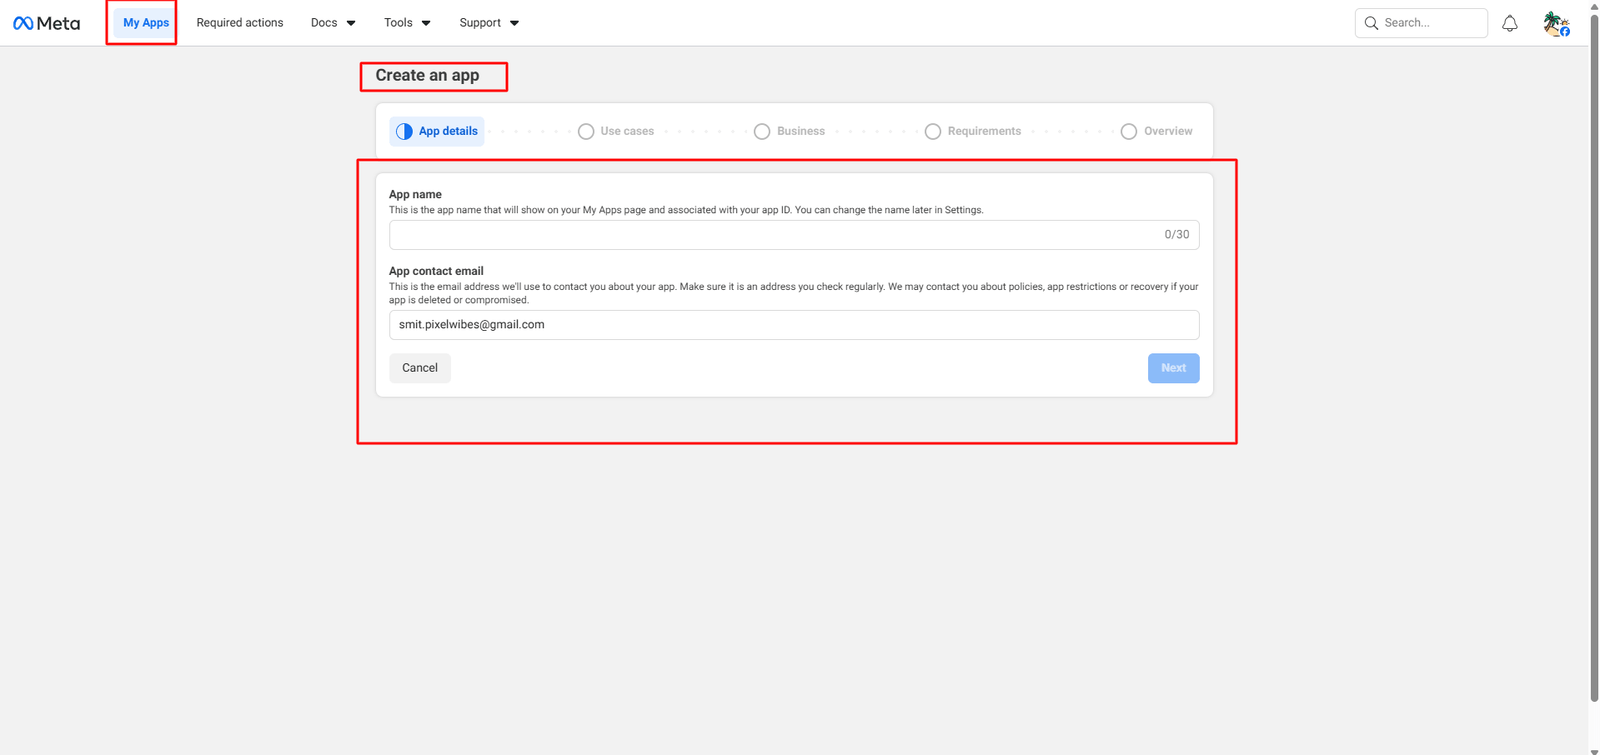
Step 1: Create Facebook App
  1. Go to Meta Developer Console
  2. Click My Apps → Create App
  3. Enter App Name and Email
  4. Click Next
Step 2: Select Use Case
  1. Select Authenticate and request data from users with Facebook Login
  2. Click Next
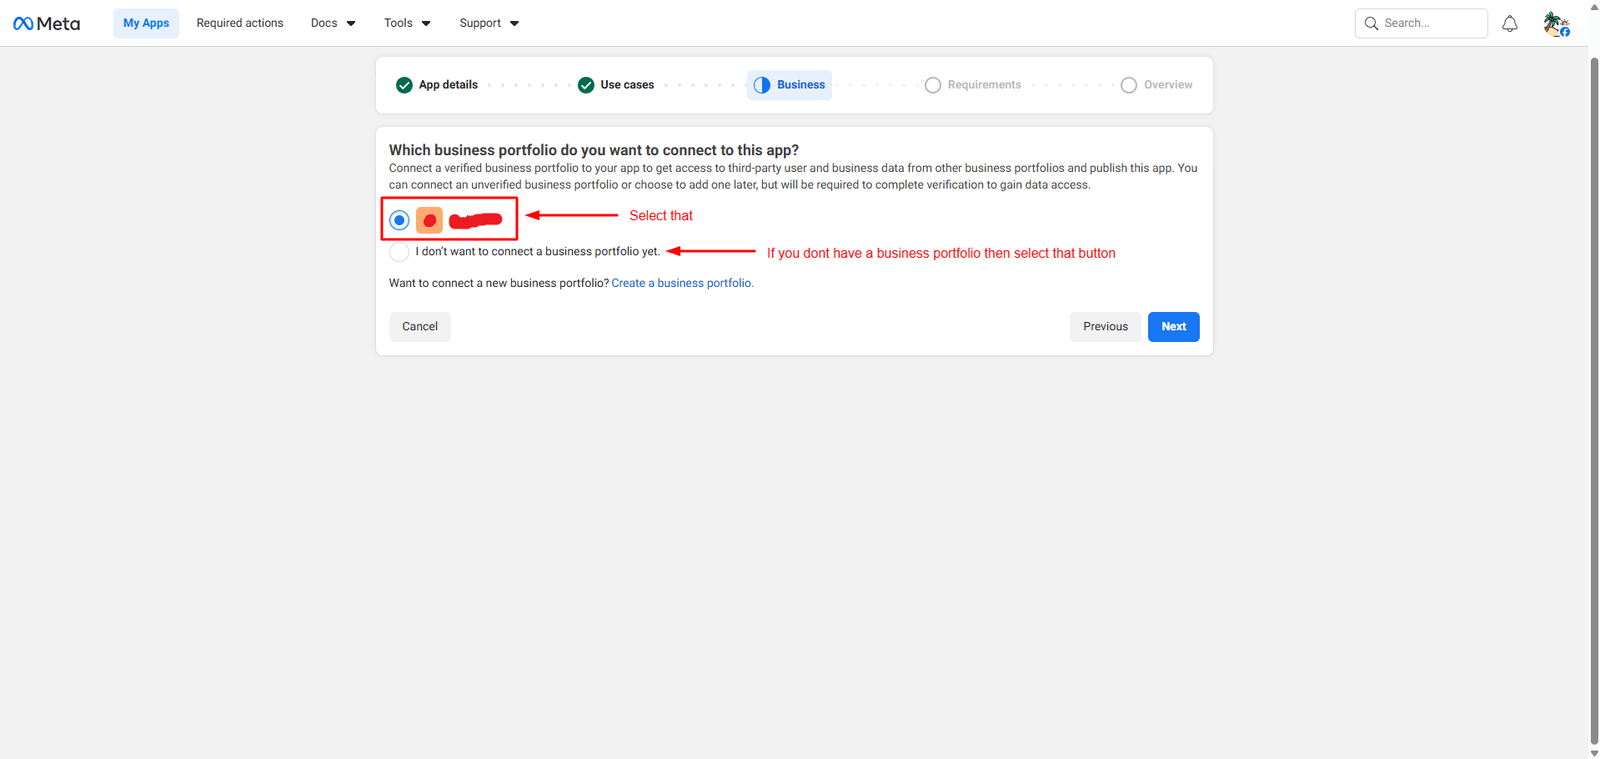
Step 3: Business Selection
  1. Select your Business Account
  2. Or select I don’t want to connect a business portfolio
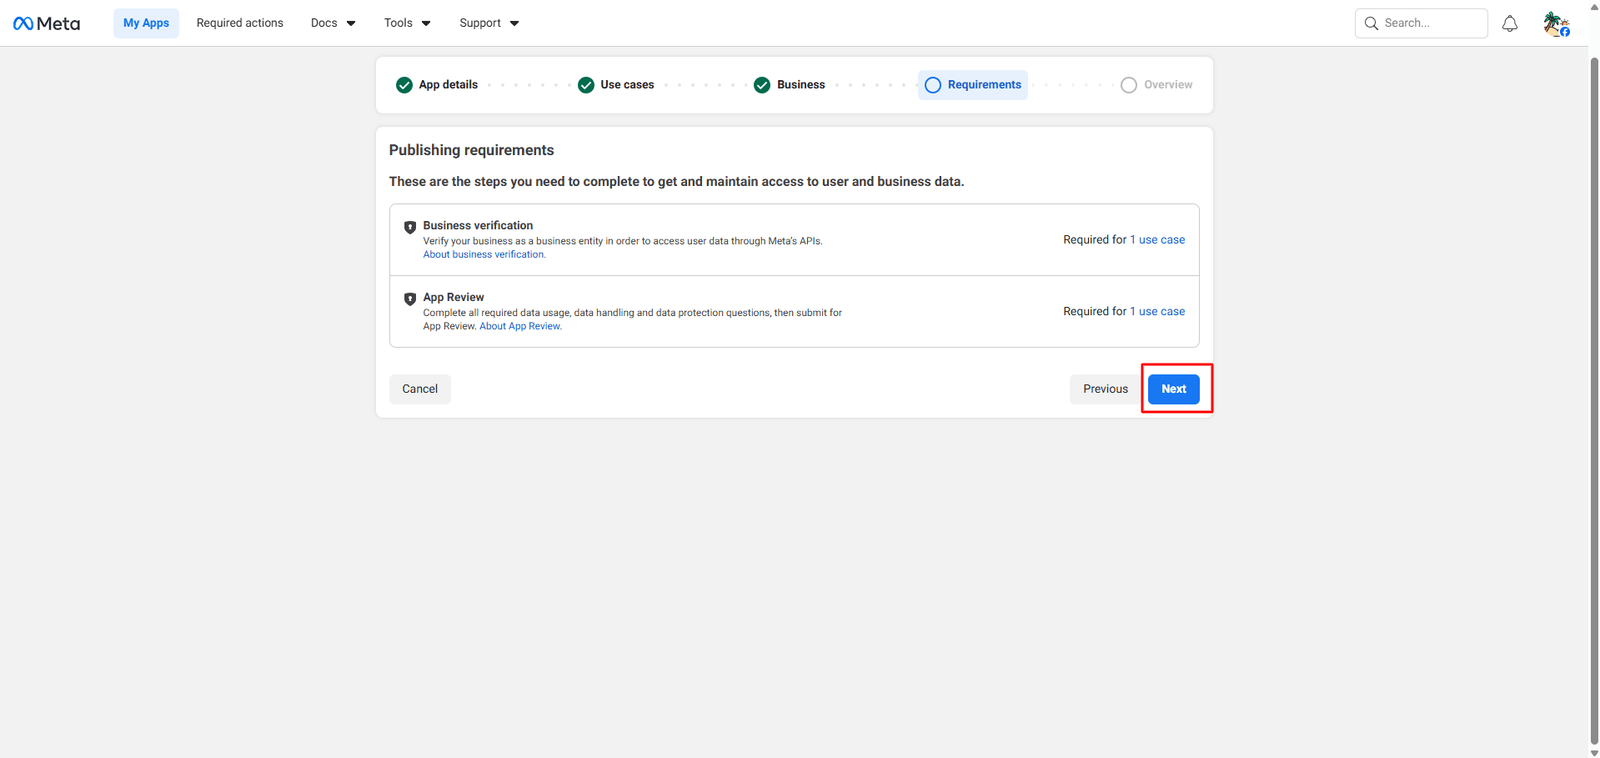
  3. Click Next
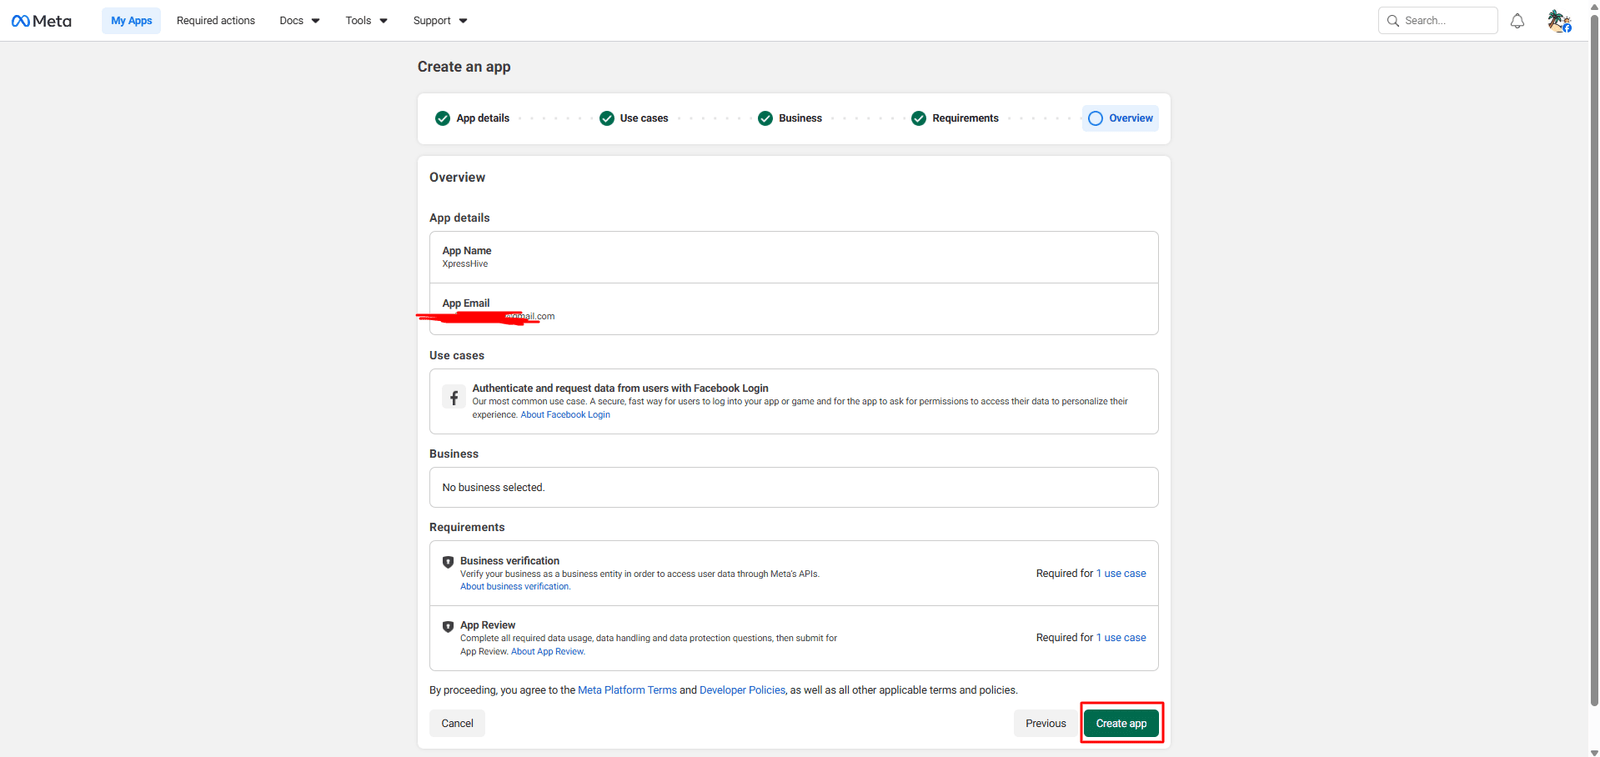
Step 4: Complete App Creation
  1. Review details
  2. Click Create App
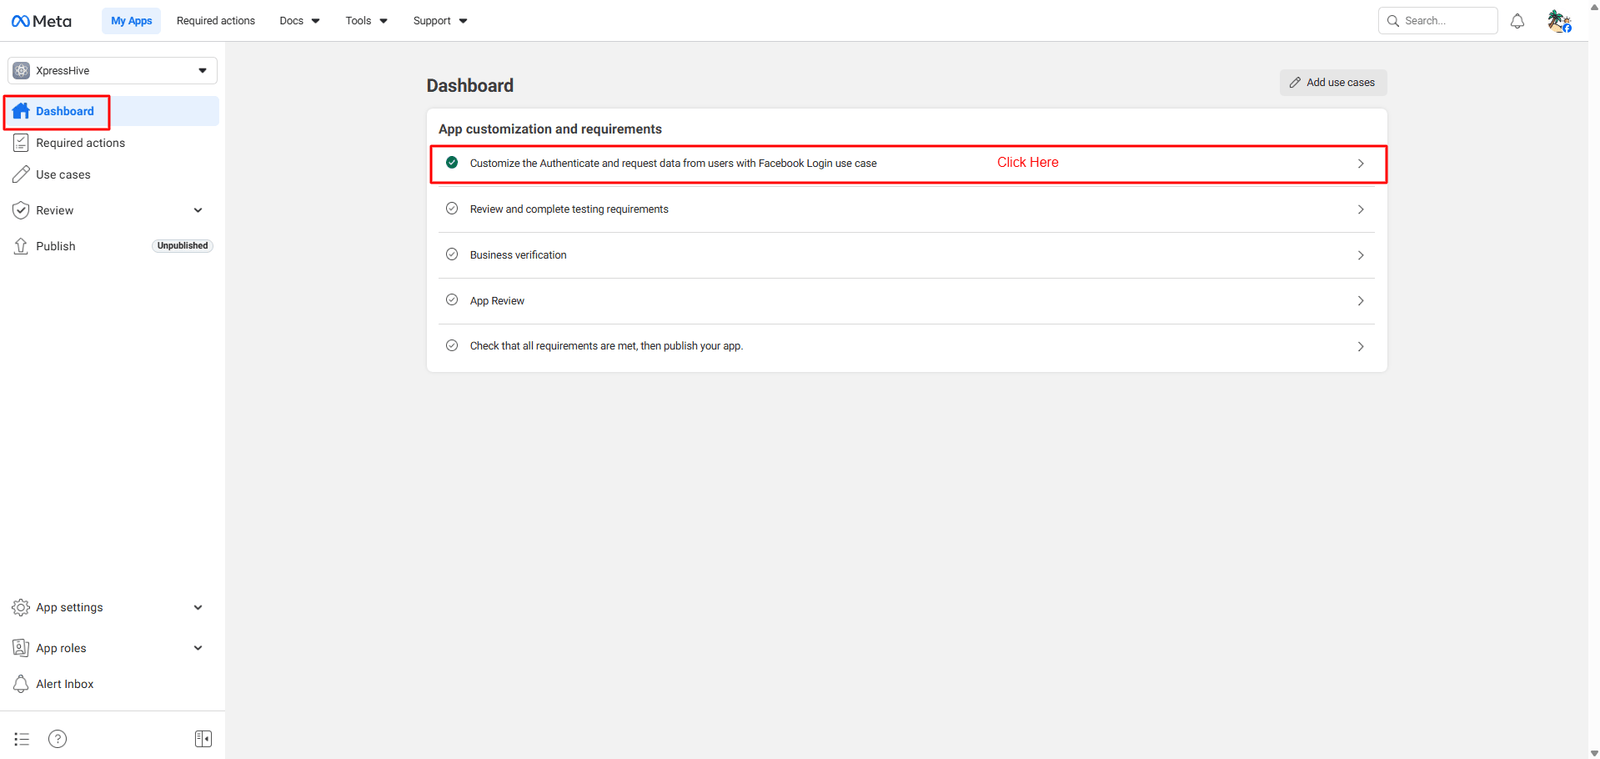
Step 5: Open Dashboard Setup
  1. Go to Dashboard
  2. Click Customize Facebook Login
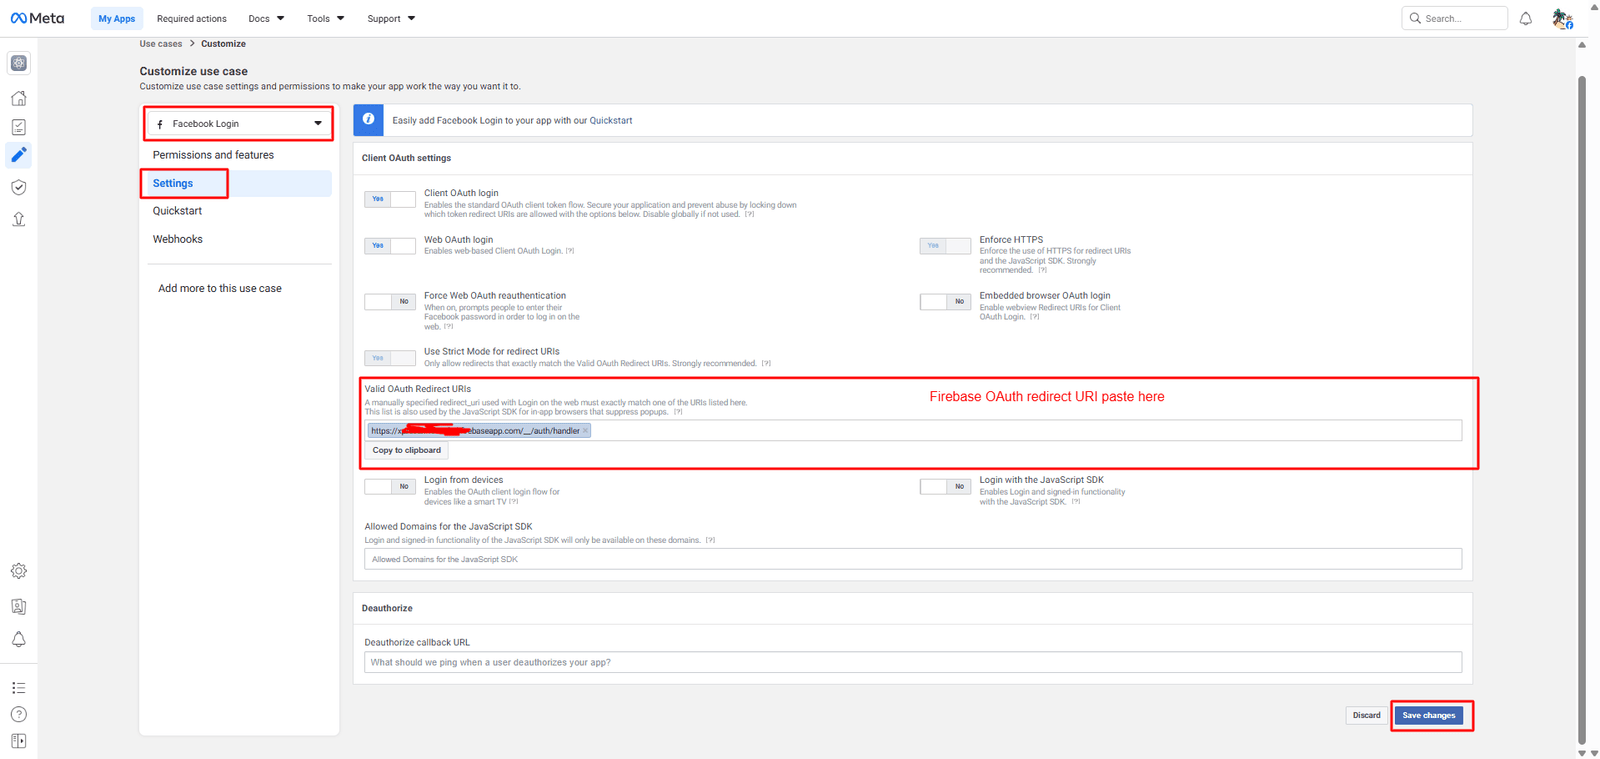
Step 6: Configure OAuth Redirect URL
  1. Go to Facebook Login → Settings
  2. Find Valid OAuth Redirect URIs
  3. Paste Firebase Redirect URL
  4. Click Save Changes
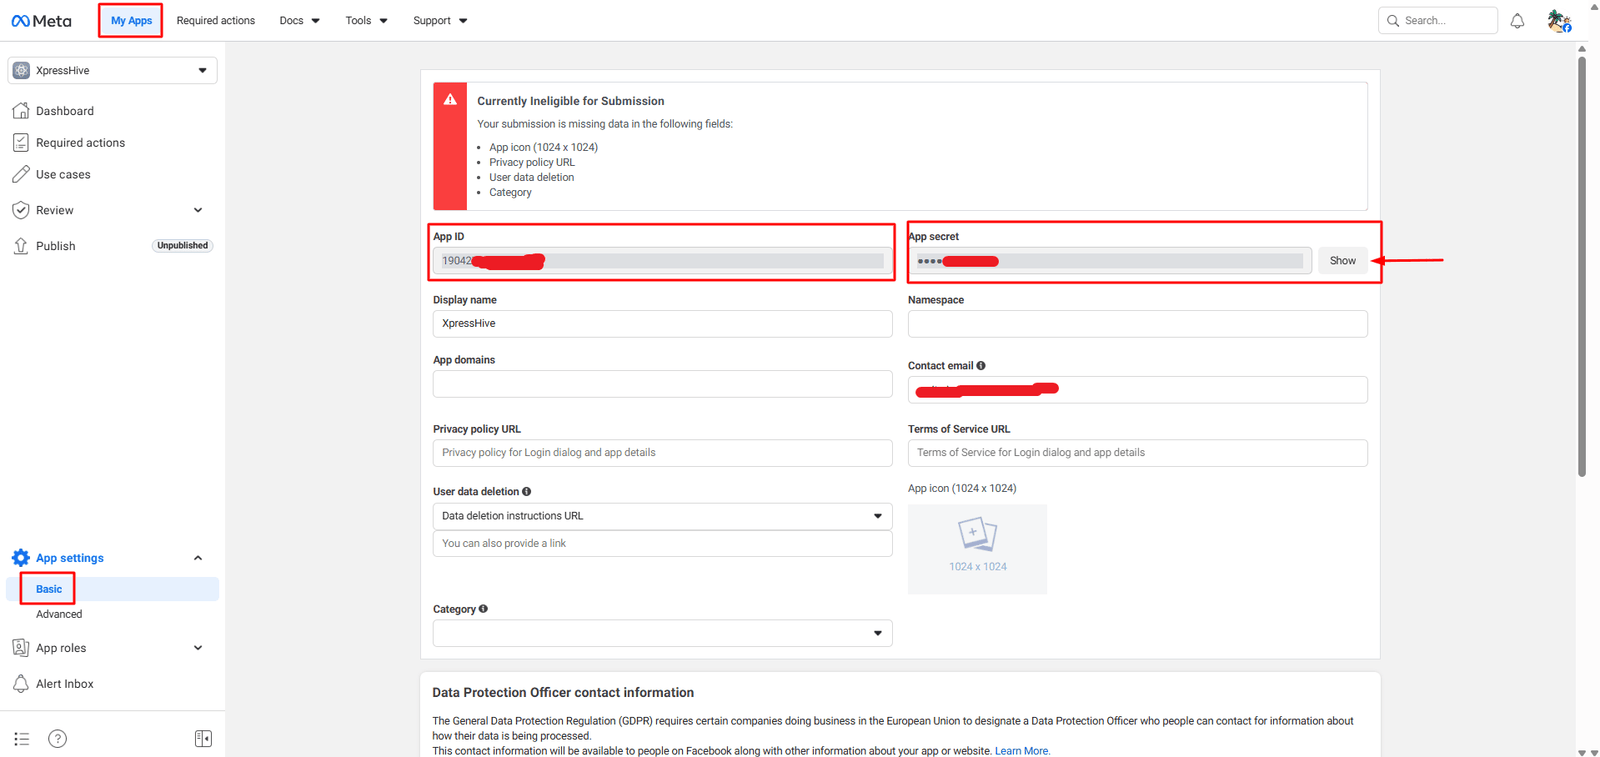
Step 7: Go to app setting -> basic
  1. Go to App Setting
  2. Get Facebook App ID Copy
  3. Get Facebook App Secret using show button click and enter password then get secret key Copy
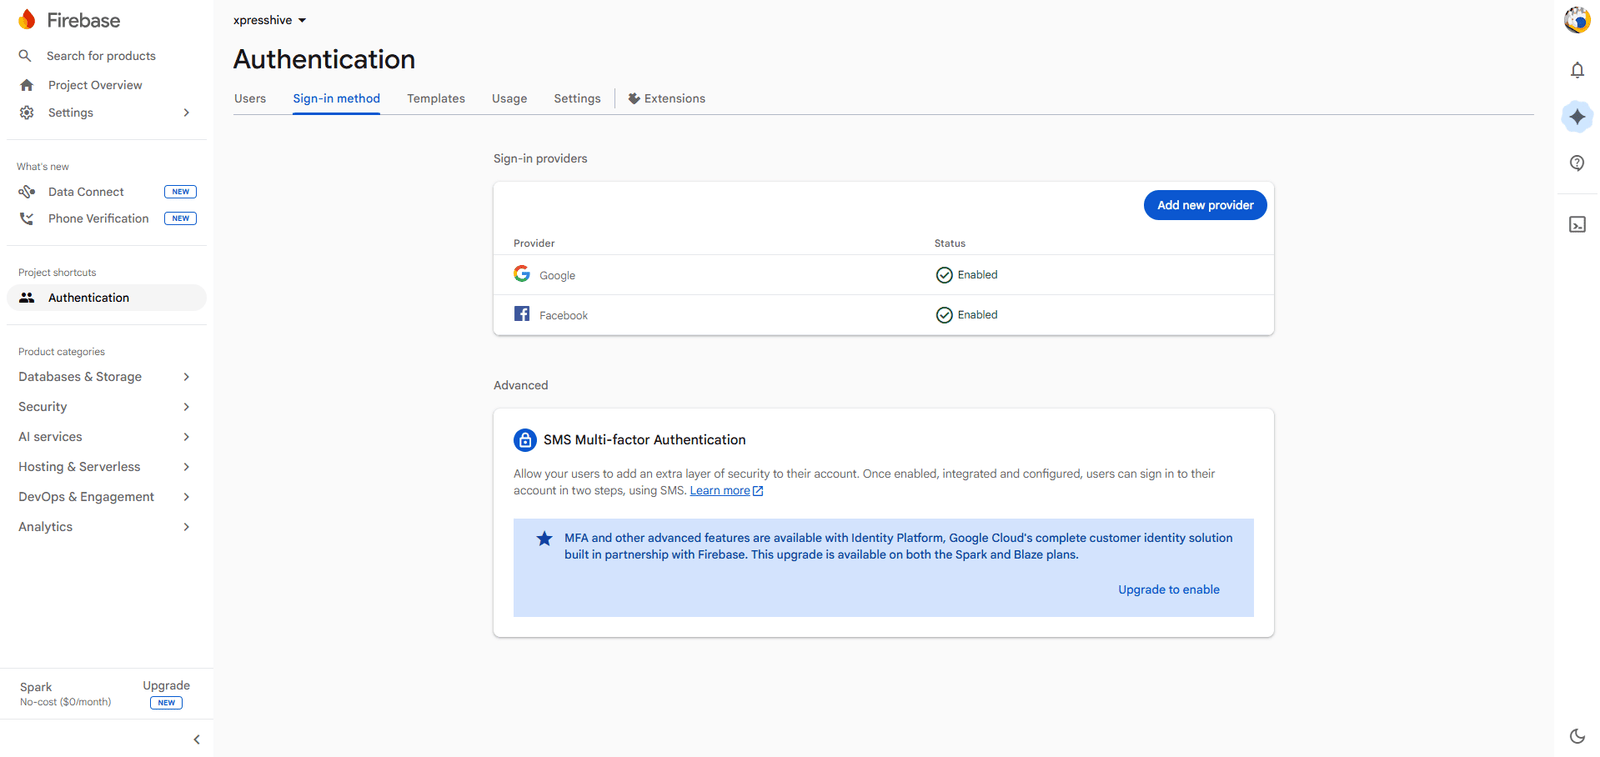
🔹 Step 8: Enable in Firebase
  1. Go to Firebase Console → Authentication
  2. Open Sign-in method
  3. Enable Facebook
  4. Paste App ID and App Secret
  5. Click Save

Step 6: Backend Setup

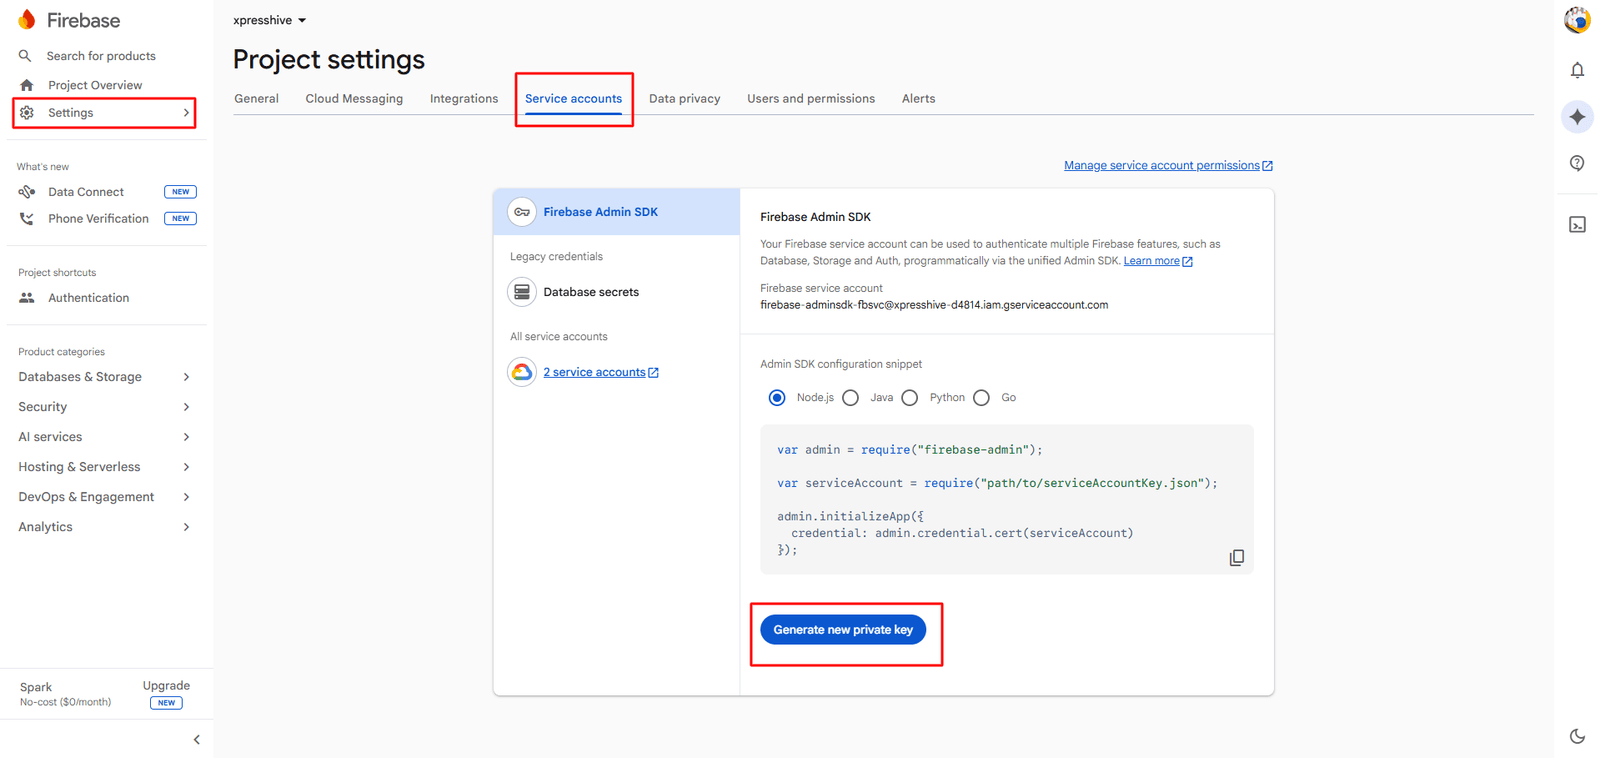
  1. Download Firebase Service Account Key
    Go to Firebase Console → Project Settings → Service Accounts and click on "Generate new private key".
    This will download a JSON file (e.g., service-account.json).
  2. Upload File to Server
    Place the downloaded file inside your Laravel project at:
    storage/app/firebase/service-account.json
  3. Configure Environment Variable
    Open your .env file and add:
    FIREBASE_CREDENTIALS=storage/app/firebase/service-account.json
Note:
  • Ensure the file path is correct and accessible
  • Do not commit the JSON file to version control (add it to .gitignore)
  • Set proper permissions so Laravel can read the file

Google Client Key Configuration

Follow the steps below to generate Google Client ID and Client Secret for integration.
Note: This setup is used for Google APIs (Calendar, Meet, etc.) and is different from Firebase social login.

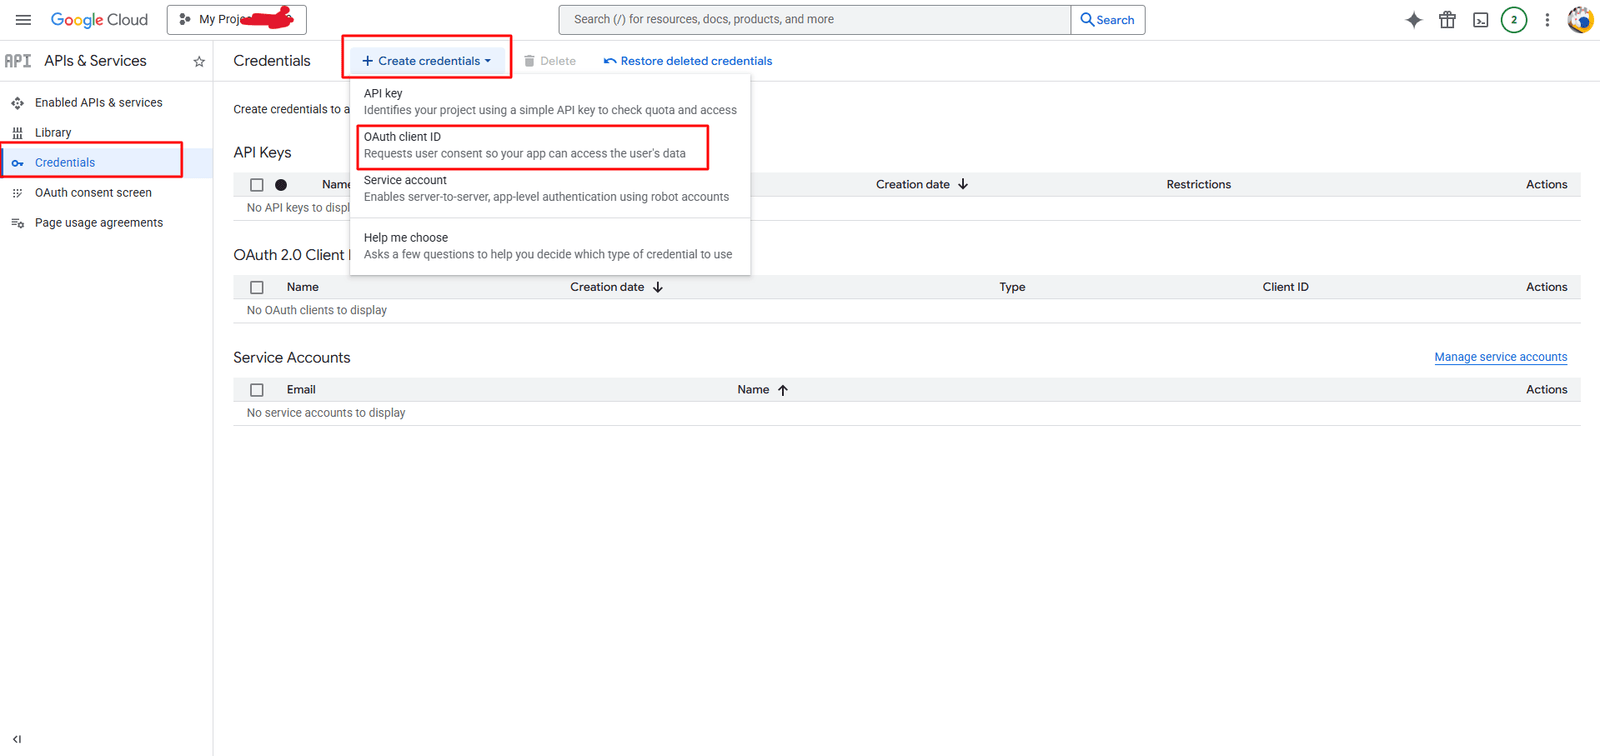
📌 Open google console: 🔗 Google Cloud Console

Step 1: Create New Project

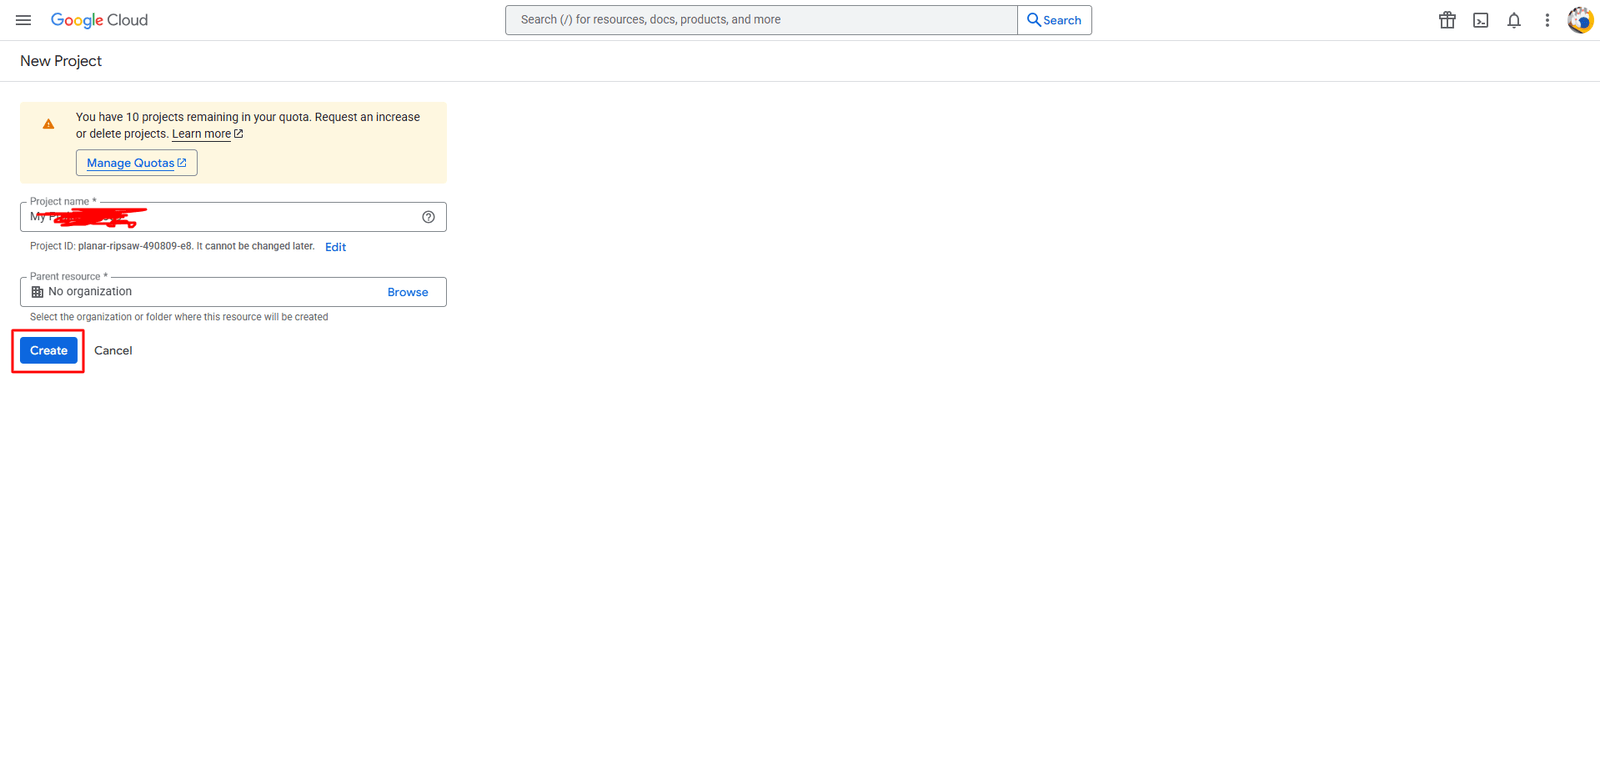
Open Google Cloud Console → Click Select Project → New Project, enter project name and click Create.

Step 2: Go to APIs & Services

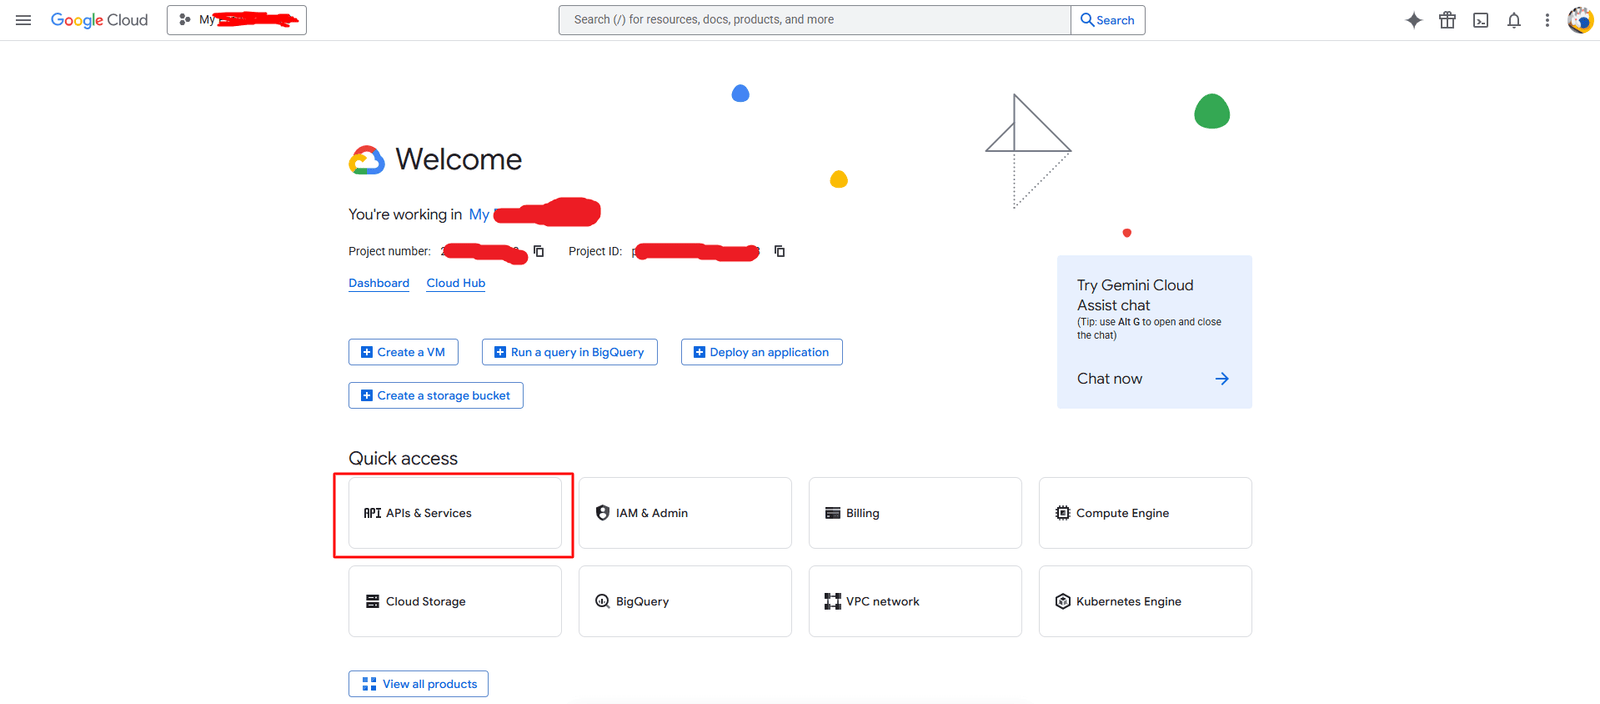
After project creation, open dashboard and click APIs & Services.

Step 3: Open OAuth Consent Screen

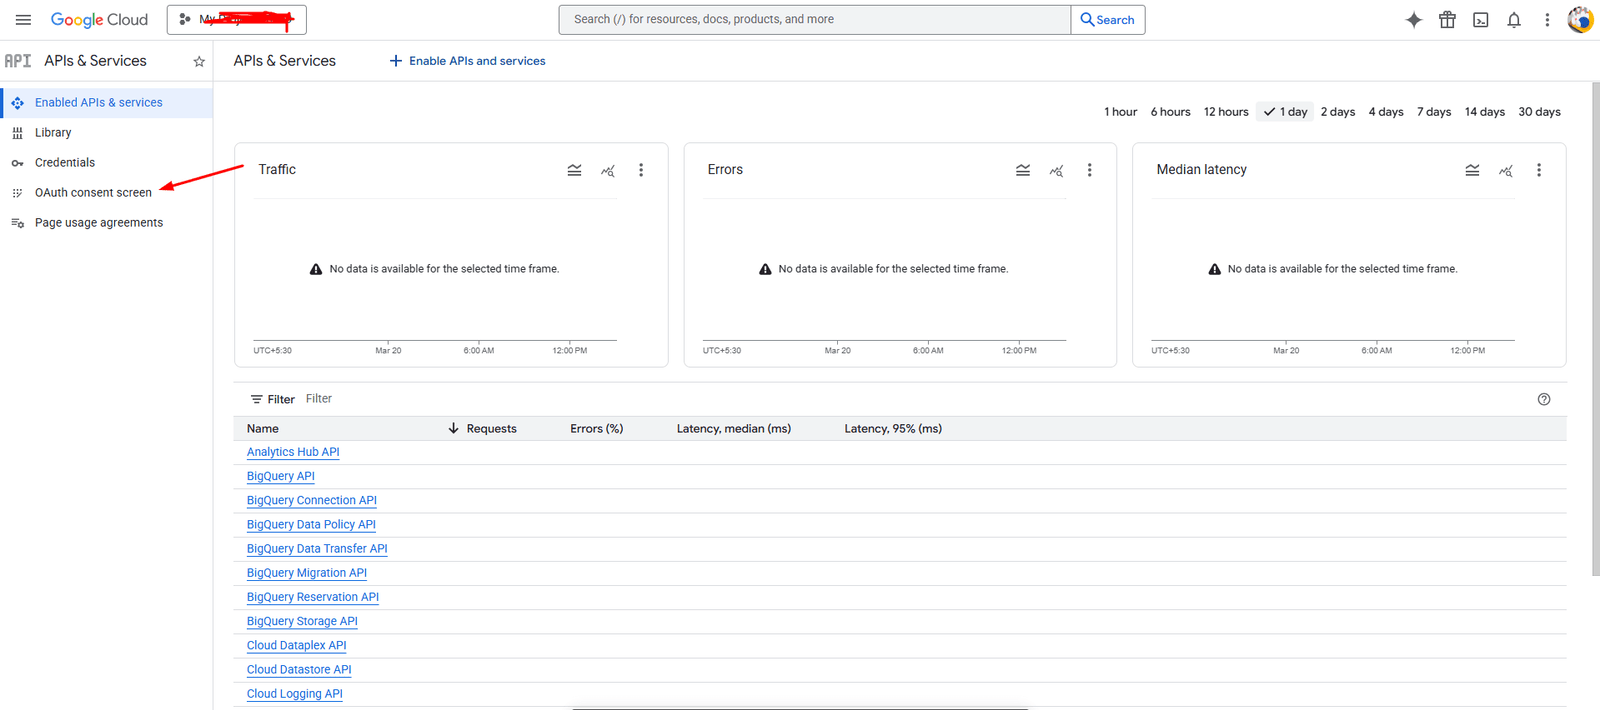
Click on OAuth consent screen from the left sidebar.

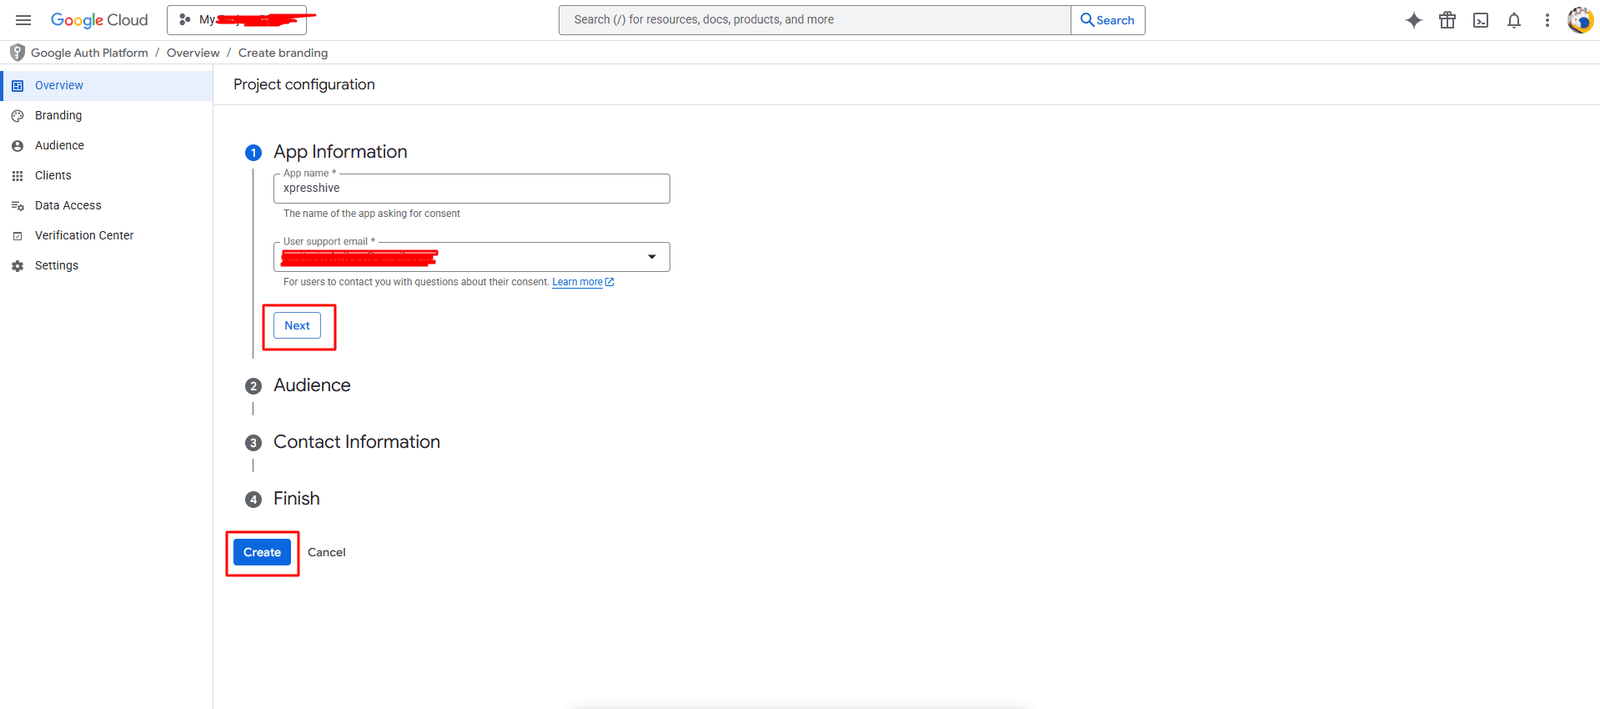
Step 4: Fill OAuth Consent Form

  • Enter App Name
  • Select User Support Email
  • Click Create / Save

Step 5: Create OAuth Credentials

Go to Credentials → Click Create Credentials → OAuth Client ID.

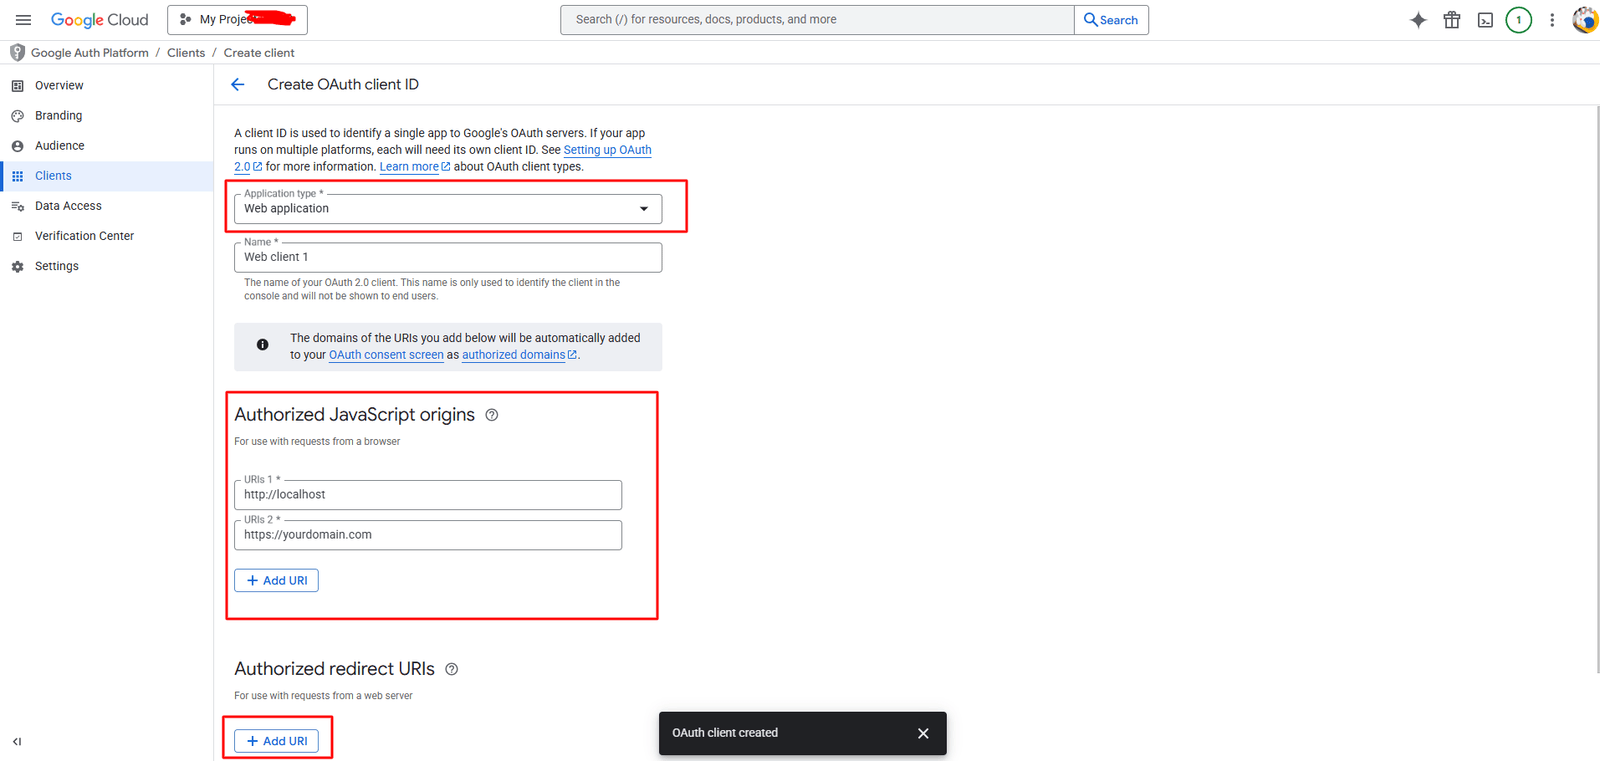
Step 6: Configure OAuth Client

  • Select Application Type: Web Application
  • Add in Authorized JavaScript Origins:
    https://yourdomain.com
  • Add in Authorized Redirect URIs:
    https://yourdomain.com/google/callback
⚠️ Make sure the redirect URL exactly matches your backend route (including http/https). Otherwise, you will get redirect_uri_mismatch error.

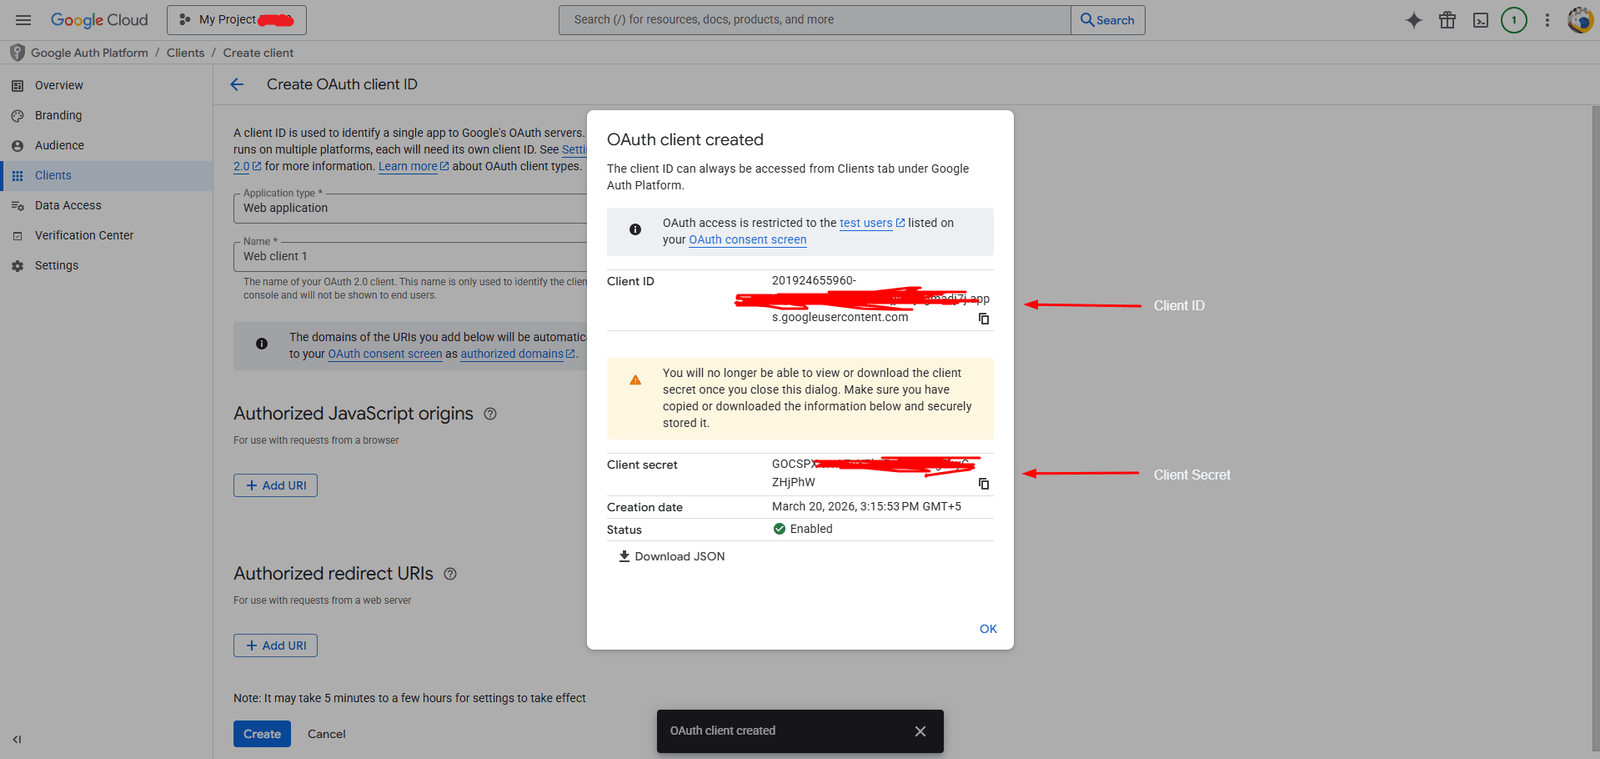
Step 7: Copy Client ID & Secret

After creation, copy your Client ID and Client Secret.

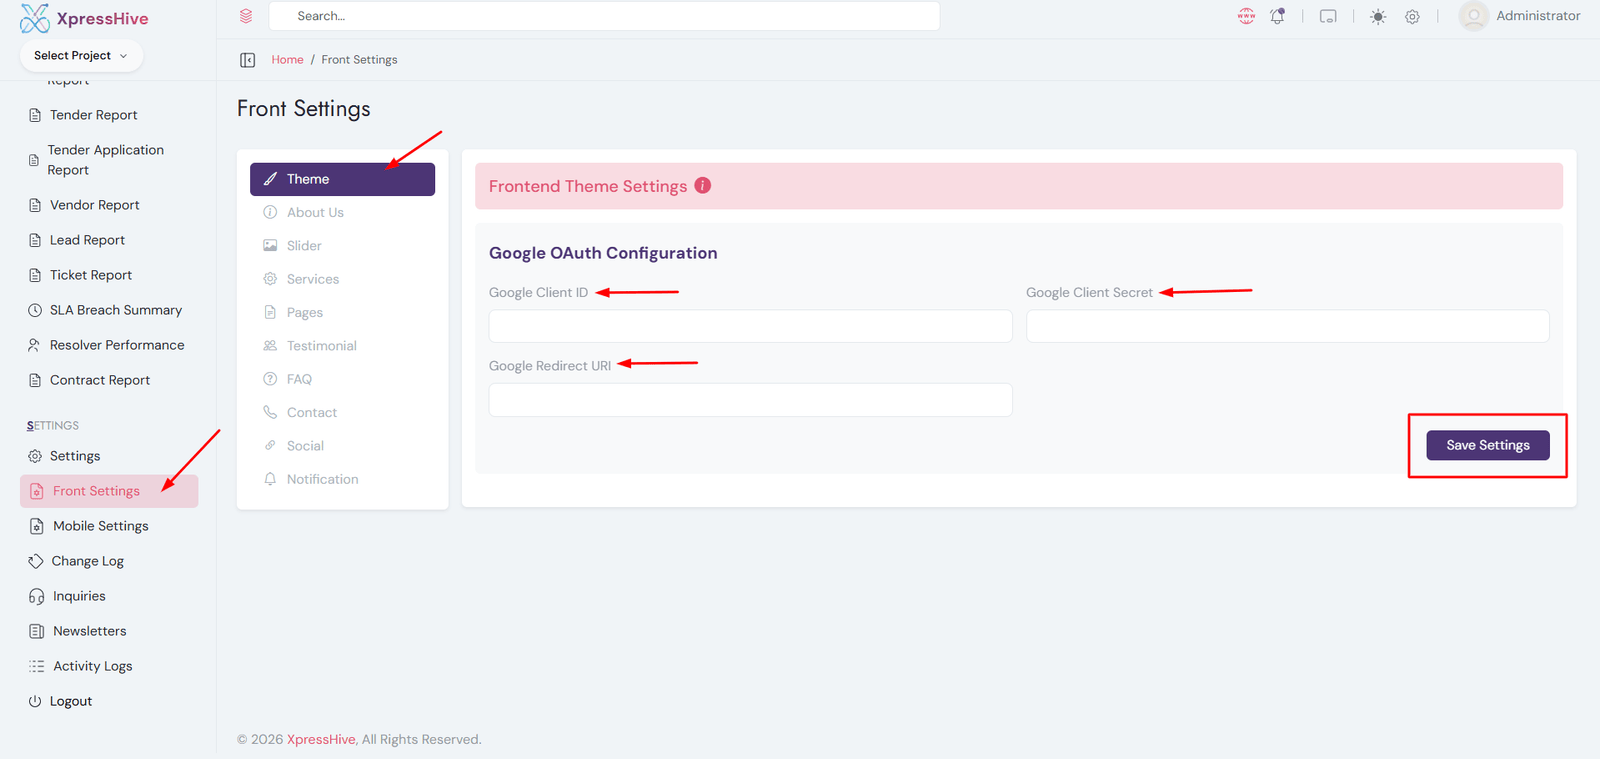
Step 8: Add Keys in XpressHive

  • Go to Admin Panel → Front Settings → Theme
  • Enter:
    • Google Client ID
    • Google Client Secret
    • Google Redirect URI - https://yourdomain.com/google/callback
  • Click Save Settings

Important Note

Firebase is used for social login (Google/Facebook login), while Google Client credentials are used for Google API integrations.

Google reCAPTCHA Configuration

Google reCAPTCHA helps protect your application from spam and automated abuse. Follow the steps below to generate Site Key and Secret Key and configure them in your system.

Step 1: Open Google reCAPTCHA Console

Go to:
https://www.google.com/recaptcha/admin/create

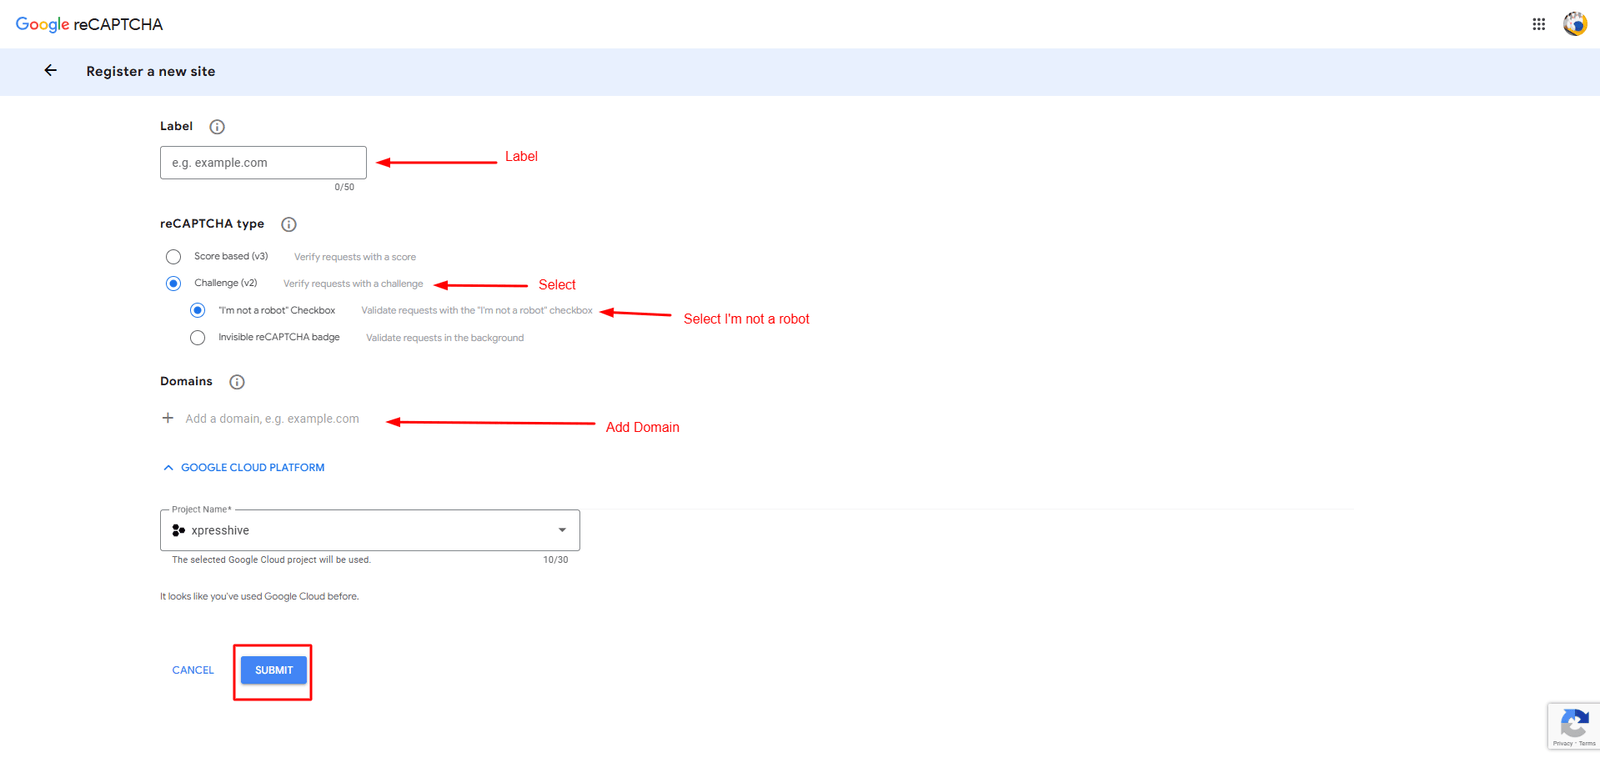
Step 2: Register a New Site

  • Enter Label (your project name)
  • Select reCAPTCHA v2
  • Choose "I'm not a robot" Checkbox
  • Add your domain (e.g. yourdomain.com)
  • Accept terms and click Submit

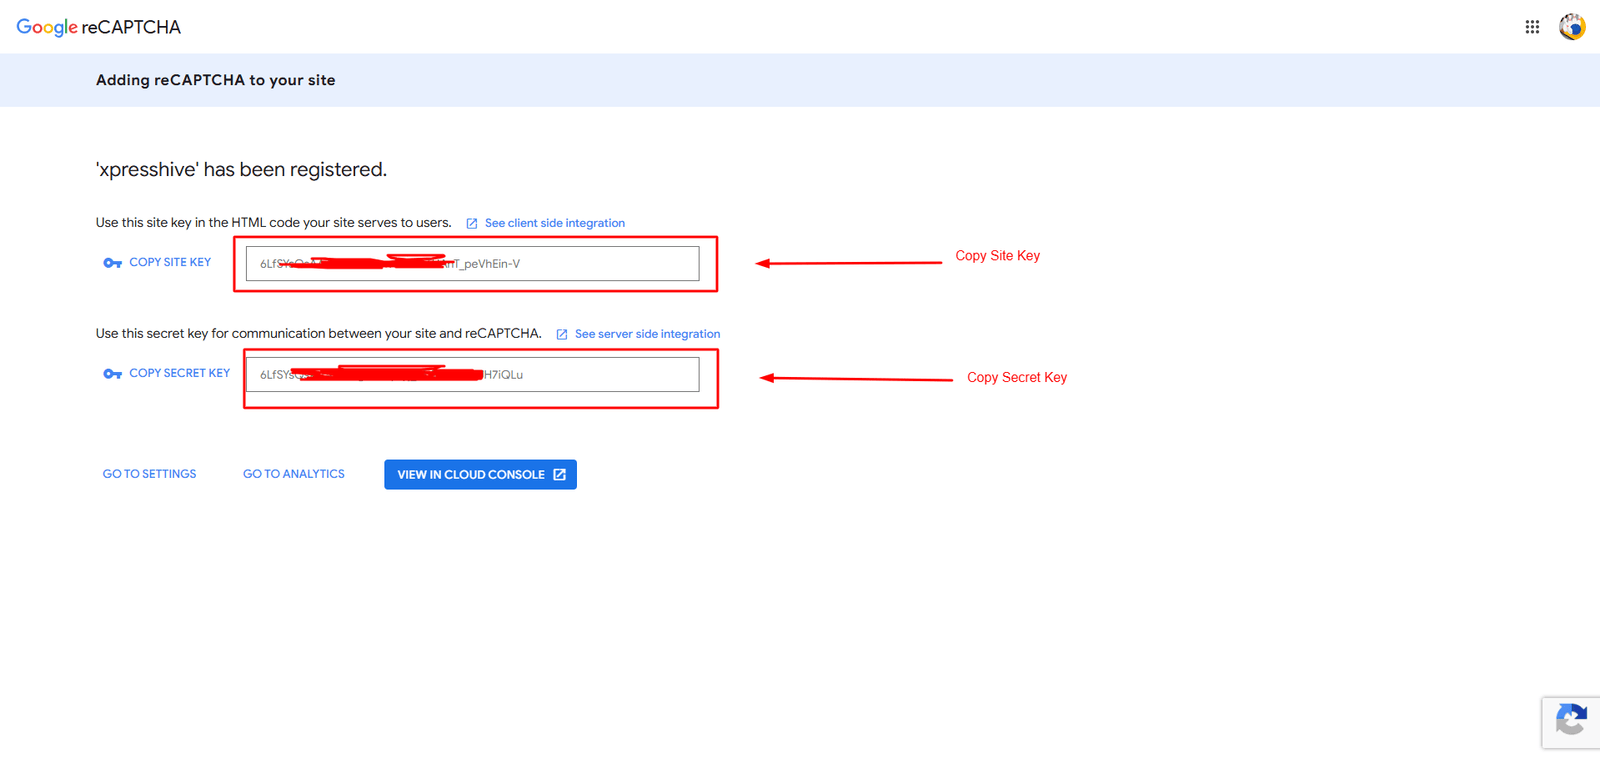
Step 3: Get Site Key & Secret Key

  • After submission, Google will generate:
  • Site Key
  • Secret Key
  • Copy both keys

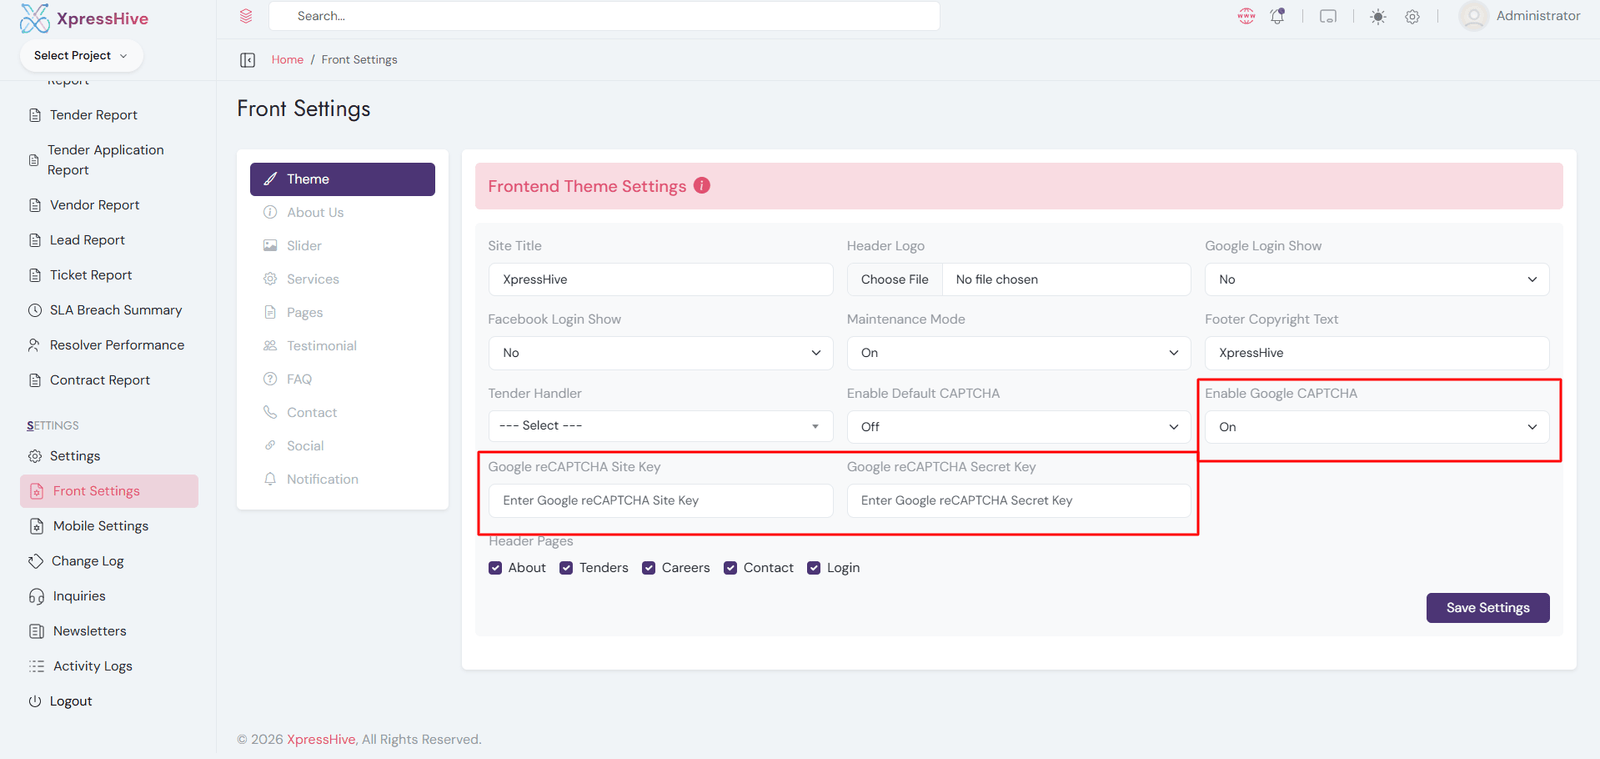
Step 4: Add Keys in XpressHive

  • Go to Admin Panel → Front Settings → Theme
  • Enable Google CAPTCHA
  • Enter the following:
    • Google reCAPTCHA Site Key
    • Google reCAPTCHA Secret Key
  • Click Save Settings

Step 5: Verify Integration

  • Open your login or form page
  • Check if reCAPTCHA checkbox is visible
  • Submit form to ensure validation works

Important Note

Make sure your domain is correctly added in the reCAPTCHA settings. Otherwise, the CAPTCHA will not work properly.

Features

Follow the steps below to configure your system properly and start using all features smoothly. This flow ensures everything is set up in the correct order.

XpressHive HR & Employee App Features

XpressHive HR & Employee App enables employees to manage attendance, timesheets, projects, tasks, leave requests, loans and workplace activities directly from their mobile devices.

Login & Secure Access
  • Download the app
  • Sign in using credentials
  • Access account securely through authentication controls
  • Maintain account security from profile settings
View Dashboard
  • Access employee statistics and activity summaries
  • View attendance information and work status
  • View notifications
  • Quickly access frequently used modules
Manage Attendance
  • View daily attendance records
  • Monitor punch-in and punch-out history
  • Review attendance reports and summaries
  • Submit attendance update requests when required
Create & Manage Timesheets
  • Create auto & manual timesheet entries
  • Select projects, tasks, and work tags
  • Track working hours using live timers
  • Review completed and active timesheet records
  • Monitor productivity and work history
Manage Projects
  • View assigned projects
  • Monitor project progress and milestones
  • Access project information and updates
  • Download project files and documents
Manage Tasks
  • Create and update tasks
  • Set priorities and due dates
  • Attach files, documents, and images
  • Track task progress and completion status
  • Collaborate with team members on assigned work
Leave Management
  • Submit leave requests
  • Select leave types and date ranges
  • Track approval statuses
  • Review leave balances and leave history
  • Monitor upcoming approved leaves
Loan Management
  • Submit employee loan requests
  • Specify amount, duration, and purpose
  • Track approval progress
  • View loan history and repayment information
  • Monitor active loan balances
Lead Management
  • Create lead and assign lead to employee
  • Edit Lead / Update Lead / Delete Lead
  • Lead Follow-up & lead notes management
  • View Leads and lead related information
Employee Directory
  • Browse employee records
  • Search employees by name or department
  • View contact information and designations
Performance & Appraisals
  • View appraisal records and evaluations
  • Review employee performance ratings
Support Tickets
  • Create support tickets and requests
  • Upload supporting documents
  • Track ticket statuses and updates
  • Communicate with support teams
  • Review previous ticket history
Notifications & Notices
  • Receive attendance and leave updates
  • Get project and task notifications
  • View appraisal and approval alerts
  • Stay informed about company notices
Profile Management
  • View personal and employment information
  • Update profile details
Account Security & Device Management
  • Change account passwords
  • Reset forgotten passwords
  • Manage active devices and login sessions
  • Log out from unauthorized devices
Employee Features
  • Attendance management
  • Timesheet tracking
  • Project management
  • Task management
  • Leave requests & approvals
  • Lead management
  • Loan requests & tracking
  • Attendance update requests
  • Employee directory
  • Performance appraisals
  • Support ticket system
  • Notifications & announcements
  • Profile management
  • Secure authentication

XpressHive Vendor App Features

XpressHive Vendor App enables vendors to discover tenders, submit applications, track approvals, manage profiles, receive notifications, and securely access tender opportunities from a mobile device.

Download & Register
  • Download the app
  • Register using email address and company information
  • Verify account using OTP authentication
  • Securely log in to access vendor services
Complete Vendor Profile
  • Enter company name and business information
  • Add contact person details
  • Provide business address and website information
  • Enter tax registration and company identification details
  • Save profile information for tender applications
Discover Tenders
  • Browse available tenders published by departments
  • Search tenders using keywords
  • Filter tenders by department, category, and status
  • View recently published opportunities
Review Tender Details
  • View tender descriptions and requirements
  • Check project values and submission deadlines
  • Download tender-related documents
  • Access department contact information
Apply for Tenders
  • Submit applications using company information
  • Attach required business and tax details
Manage Tender Activities
  • Save important tenders for future review
  • Track submitted tender applications
  • Monitor application statuses and updates
  • View approved and successful tenders
Receive Notifications
  • Get alerts for new tender opportunities
  • Receive application status updates
  • View notifications
Manage Vendor Profile
  • Update company information and contacts
  • Modify business addresses and website details
  • Maintain tax and registration information
  • Keep vendor records up to date
Account Security & Device Management
  • Change account passwords
  • Reset forgotten passwords
  • Manage active devices and login sessions
  • Log out from unauthorized devices
Vendor Features
  • Tender search & filtering
  • Tender document downloads
  • Tender application management
  • Saved tenders
  • Application tracking
  • Approved tender monitoring
  • Notification center
  • Vendor profile management
  • Device & session management
  • Secure authentication

XpressHive Talent App Features

XpressHive Talent App enables job seekers to create professional profiles, search and apply for jobs, track applications, manage interviews, receive notifications, and securely manage their accounts from a mobile device.

Download & Register
  • Download the Talent App
  • Create a new account using personal information
  • Register with email address and mobile number
  • Verify account using OTP authentication
  • Securely log in to access job opportunities
Account Verification
  • Receive OTP verification code via email
  • Verify account during registration
  • Resend OTP when required
  • Activate account securely before accessing services
Job Listing
  • Browse available job opportunities
  • Search jobs using keywords and job titles
  • Filter jobs by category, location, and experience level
  • View recently posted openings
Review Job Details
  • View complete job descriptions
  • Check required skills and qualifications
  • Review salary information and benefits
  • View company details and job requirements
Apply for Jobs
  • Submit job applications directly from the app
  • Upload resume
  • Apply using profile information
  • Track application submissions
Manage Job Activities
  • Save jobs for future applications
  • Track applied jobs
  • Monitor application statuses
  • View shortlisted and rejected applications
  • Track interview schedules and updates
Profile Management
  • Update personal information
  • Manage profile photo and contact details
  • Update experience information
  • Manage current and expected CTC details
  • Maintain address and professional information
Receive Notifications
  • Get alerts for new job opportunities
  • Receive interview invitations
  • View application status updates
  • Access notification history
Account Security & Device Management
  • Change account passwords
  • Reset forgotten passwords using OTP verification
  • Manage active devices and login sessions
  • View device activity information
  • Log out from unauthorized devices remotely
Talent Features
  • Job search & filtering
  • Job application management
  • Resume management
  • Saved jobs
  • Applied jobs tracking
  • Interview tracking
  • Application status monitoring
  • Profile management
  • Notification center
  • Device & session management
  • Password recovery & reset
  • Secure authentication

Features & Module Overview

XpressHive is designed to streamline employee management, attendance tracking, payroll processing, project management, support ticketing, document generation, CRM activities, and business operations.

Setup, Installation & System Management
  • Install and configure the application
  • Manage system settings and preferences
  • Configure company information
  • Perform system updates and maintenance
Authentication & Access Control
  • Administrator login and authentication
  • Role-based access control
  • User permissions management
  • Session monitoring and security
  • Password reset
Organization Management
  • Create and manage departments
  • Manage designations and job roles
  • Organize teams and reporting structures
  • Maintain employee records
  • Manage workforce information centrally
Attendance & Timesheet Management
  • Employee attendance tracking
  • Check-in and check-out monitoring
  • Timesheet management
  • Working hours calculation
  • Attendance reporting and analytics
Leave Management
  • Create leave policies
  • Submit and approve leave requests
  • Track leave balances
  • Monitor employee absences
  • Generate leave reports
Payroll & Salary Management
  • Salary structure management
  • Payroll processing automation
  • Payslip generation
  • Allowance and deduction management
  • Payroll reporting and records
Project & Task Management
  • Create and manage projects
  • Assign tasks to employees
  • Track project progress
  • Monitor task completion
  • Manage project documentation
Support Ticket System
  • Create support tickets
  • Assign tickets to team members
  • Track ticket status
  • Manage customer support requests
  • Monitor service performance
Asset Management
  • Manage company assets
  • Track assets records
  • Allocate assets to employees
  • Monitor asset usage history
  • Generate asset reports
Recruitment & Careers
  • Create job openings
  • Manage candidate applications
  • Schedule interviews
  • Track hiring processes
  • Manage recruitment records
CRM & Lead Management
  • Capture and manage leads
  • Track customer interactions
  • Manage sales opportunities
  • Schedule follow-ups
  • Monitor lead conversion activities
Contracts & Document Generation
  • Create business documents
  • Generate contracts and letters
  • Use document templates
  • Manage digital signatures
  • Store generated documents securely
Purchase & Procurement
  • Create purchase requests
  • Manage purchase orders
  • Track vendor transactions
  • Manage bills and payments
  • Monitor procurement activities
Notifications & Communication
  • Send system notifications
  • Publish announcements
  • Configure communication channels
  • Track notification delivery
AI Powered Features
  • AI content generation
  • Smart assistance tools
  • Automated ticket reply responses
  • AI-powered document creation
Reports & Analytics
  • Employee performance reports
  • Attendance analytics
  • Payroll reports
  • Project and task insights
  • Business performance dashboards

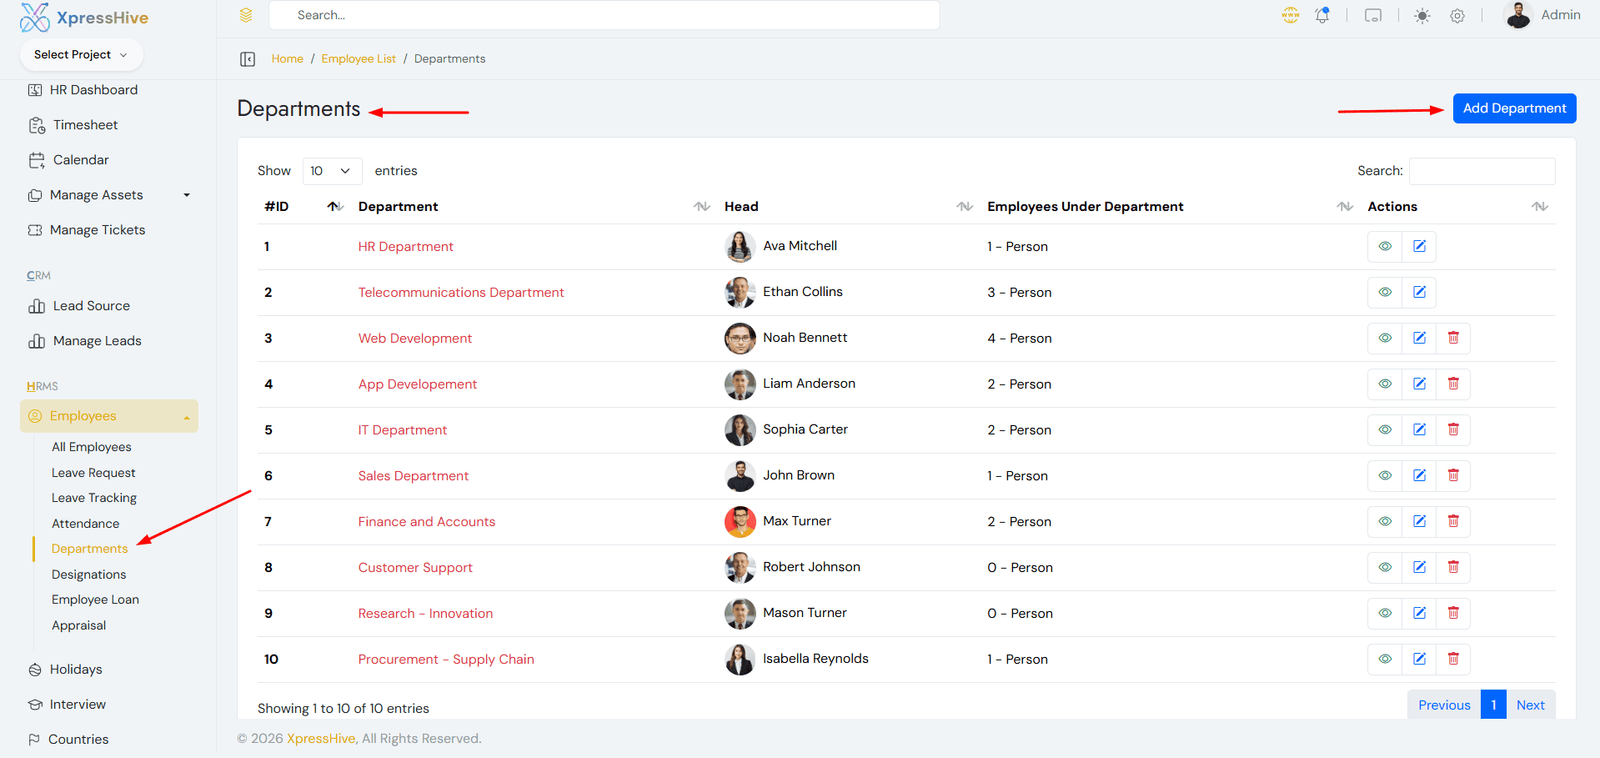
Department Management

  • Create departments such as Finance and Accounts, IT, Sales, etc.
  • Each employee must be assigned to a department
  • Edit or update department details anytime
  • Delete unused departments
  • This is required before creating designations and employees

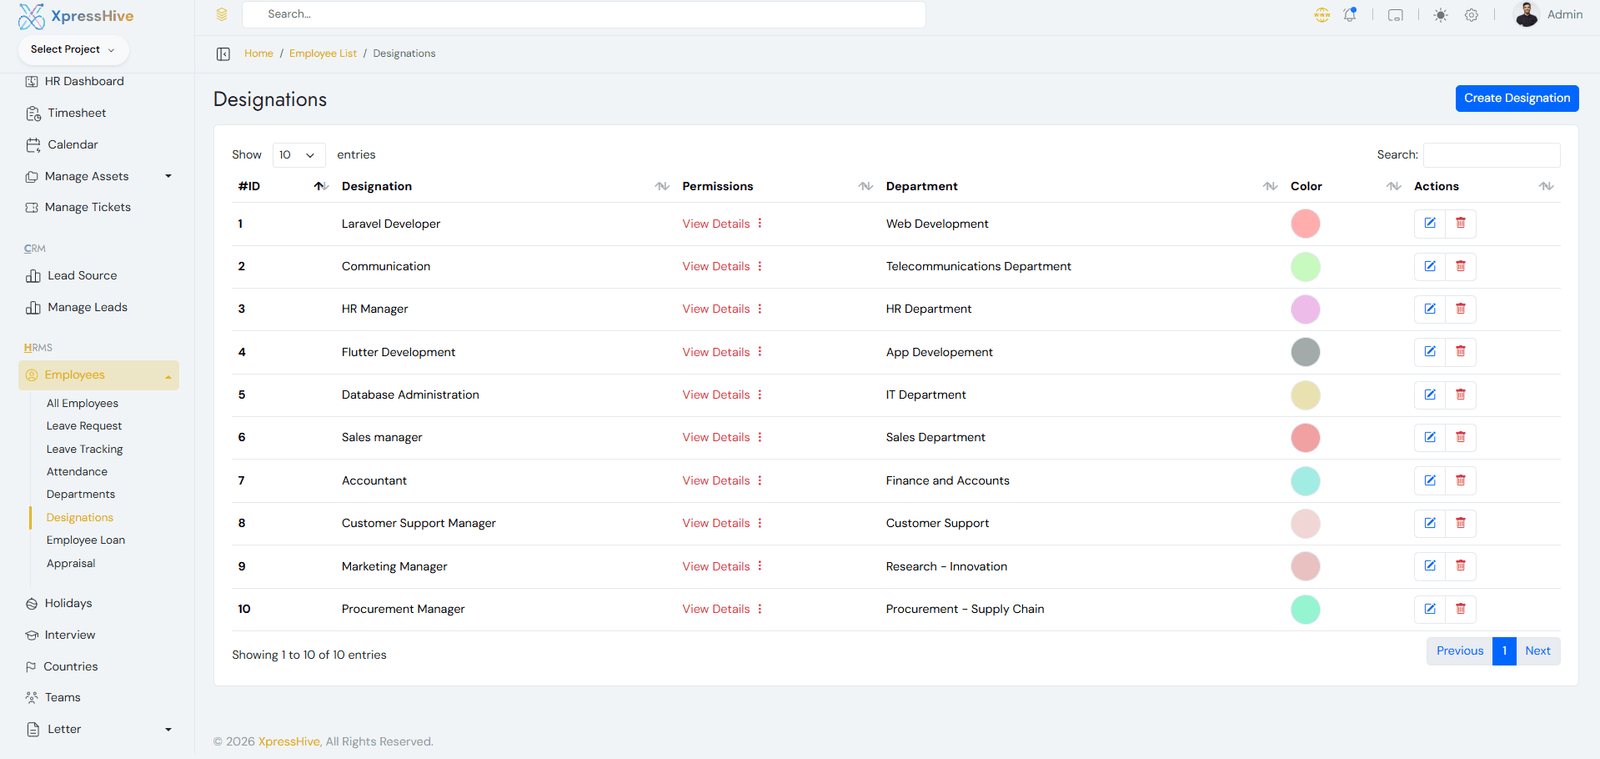
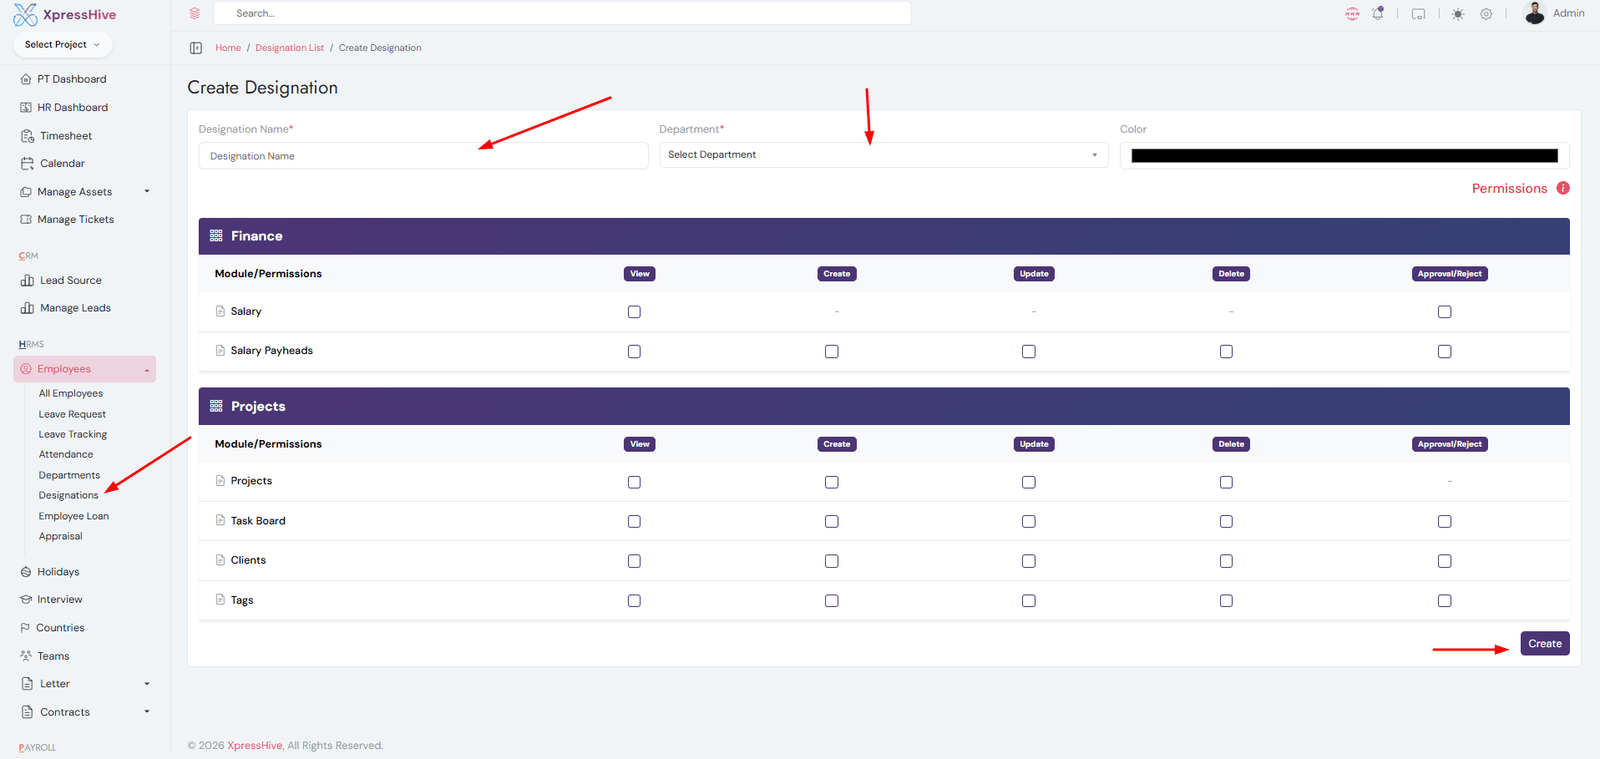
Designation Management

Designation List
Create Designation
  • Create roles such as Manager, Developer, HR Executive, etc.
  • Each designation is linked to a department
  • Edit or update designation details anytime
  • Delete unused designations
  • Used during employee creation and system structure

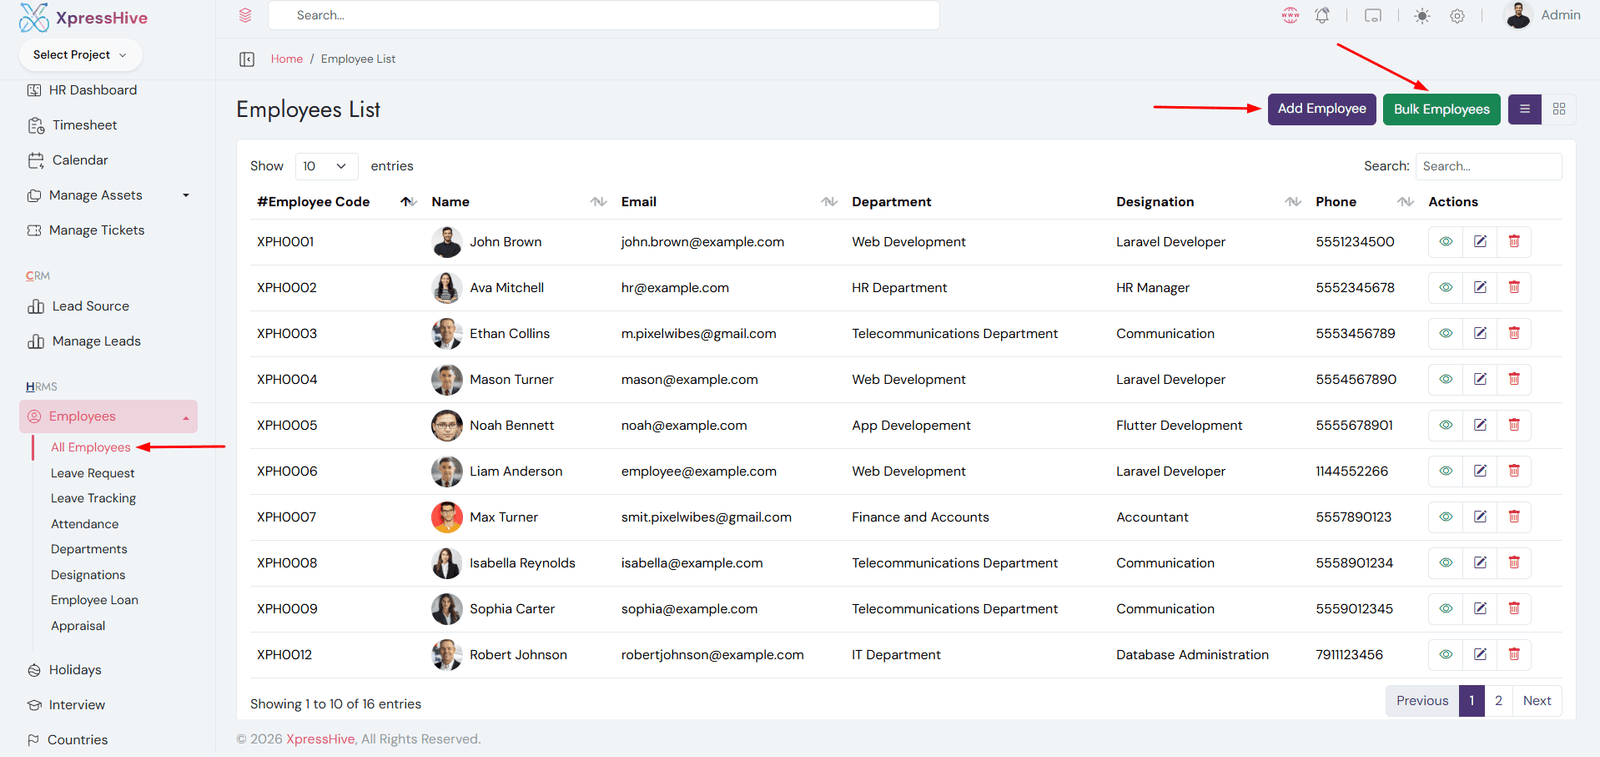
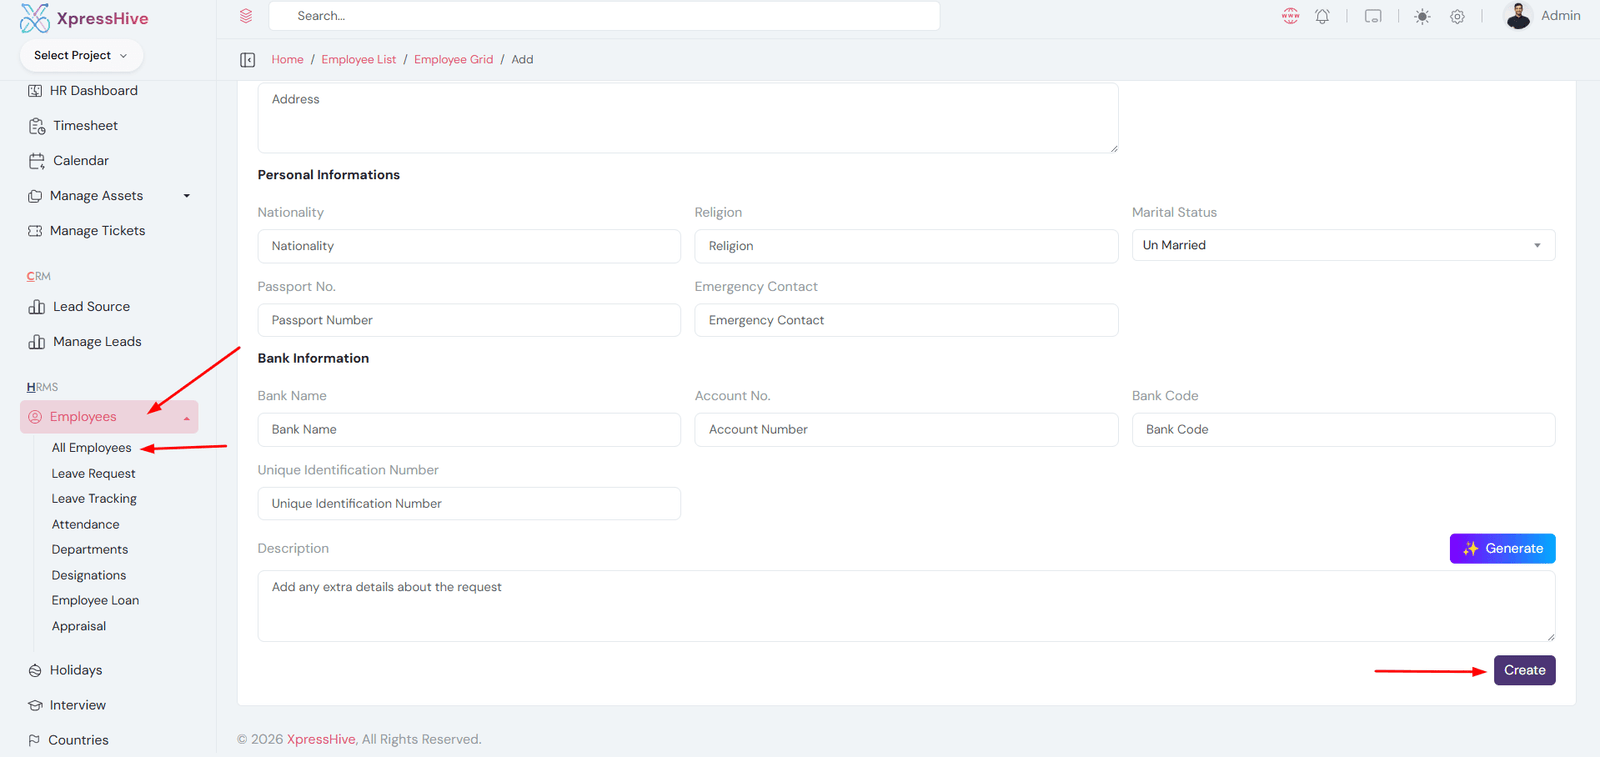
Employee Management

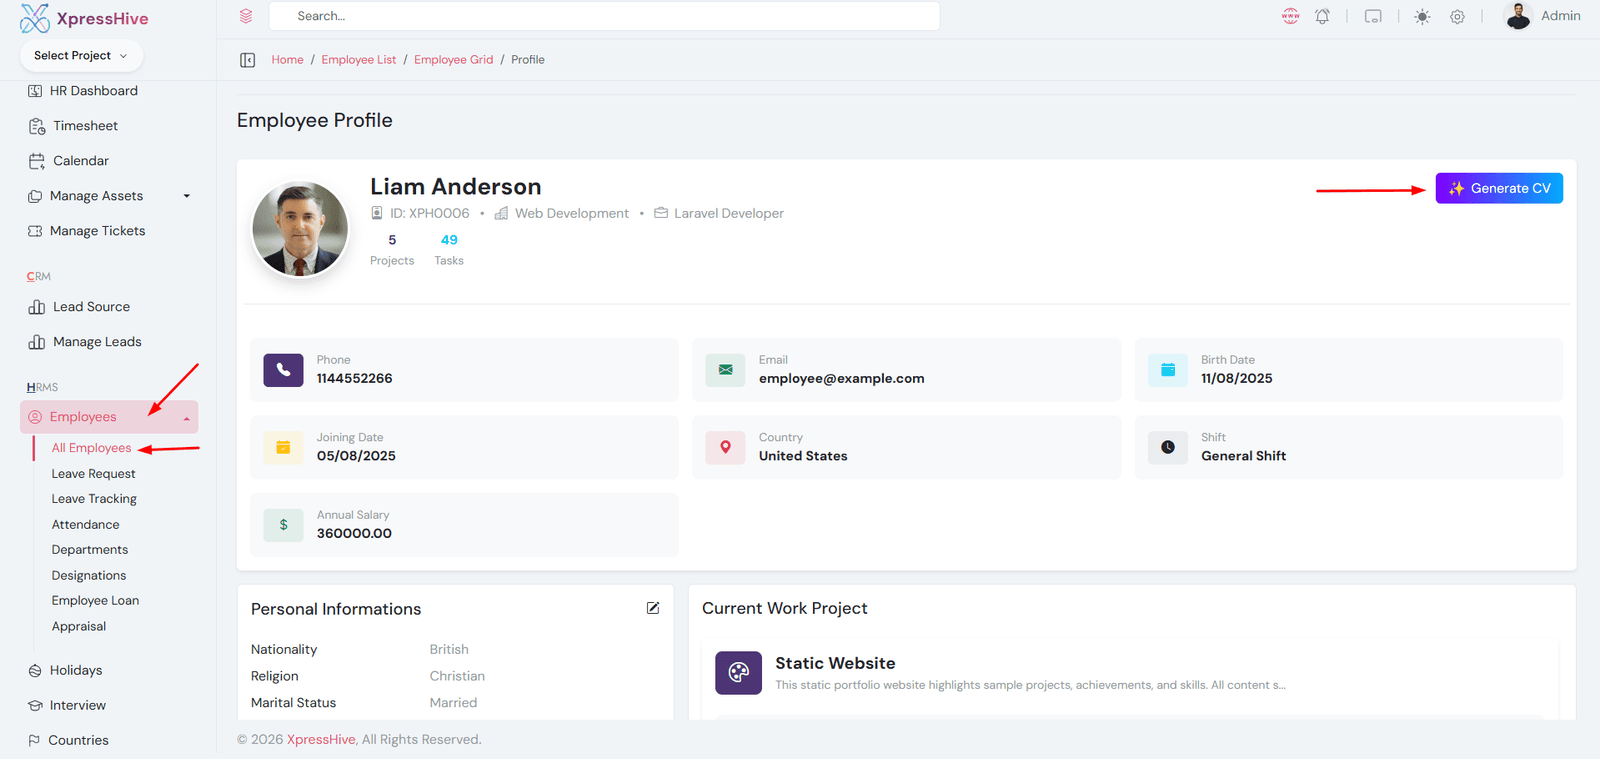
Employee List
Create Employee
Employee Profile
  • Add new employees with required details
  • Assign department, designation, and shift
  • Edit or update employee information anytime
  • View complete employee details
  • Delete inactive or unnecessary employee records
  • AI Feature: Generate employee CV using AI

Timesheet Management

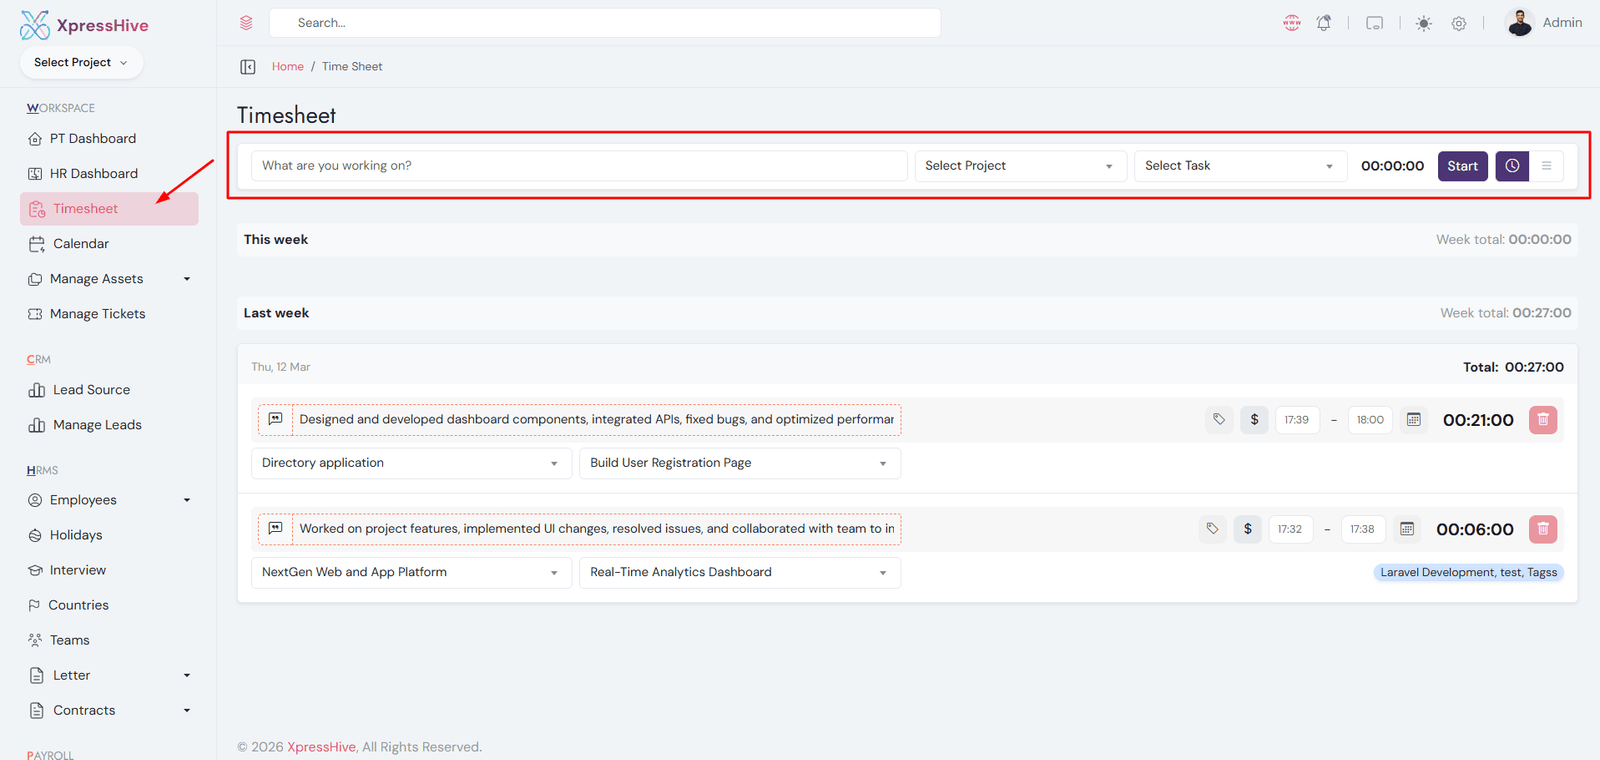
Timesheet Dashboard
  • Track daily working hours against projects and tasks in a structured way
  • Start and stop a live timer to automatically calculate working duration
  • Select project and task dynamically (tasks load based on selected project)
  • Switch between tasks while tracking without losing recorded time
  • Manual time entry option available for past or offline work
  • Add descriptions to explain the work performed during the time entry
  • Use personal tags to categorize and organize timesheet entries
  • Billable indicator automatically reflects based on selected task
  • System resumes running timer automatically after page refresh
  • Only one active timer is allowed per user to maintain accurate tracking
  • Edit or update time entries, including duration, task, and tags
  • Delete incorrect or unnecessary time records
  • View weekly summaries and total tracked hours
  • Supports filtering by date, project, and task for better visibility
  • Helps generate productivity insights and billing reports

Calendar & Event Management

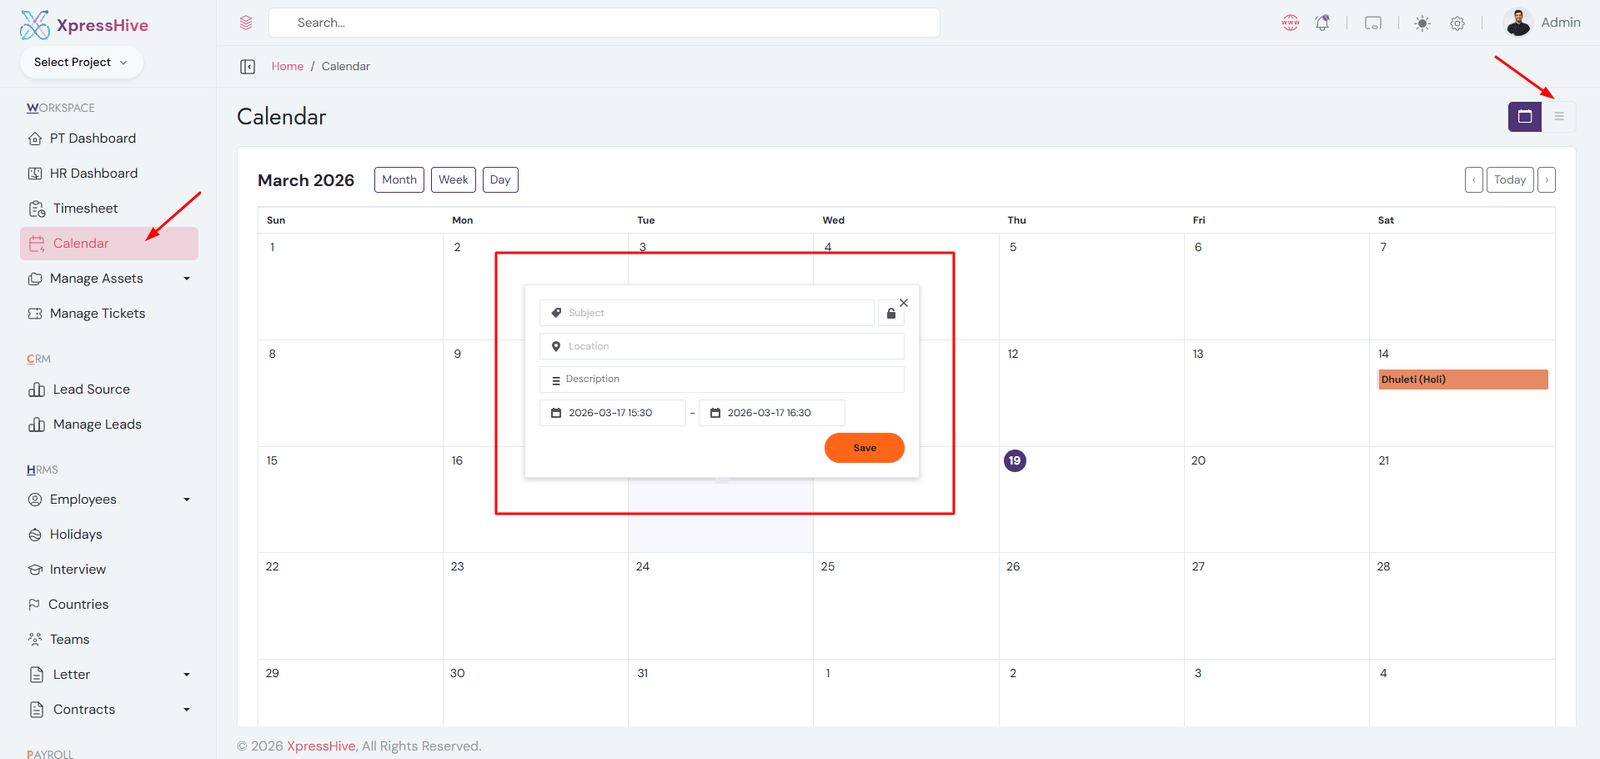
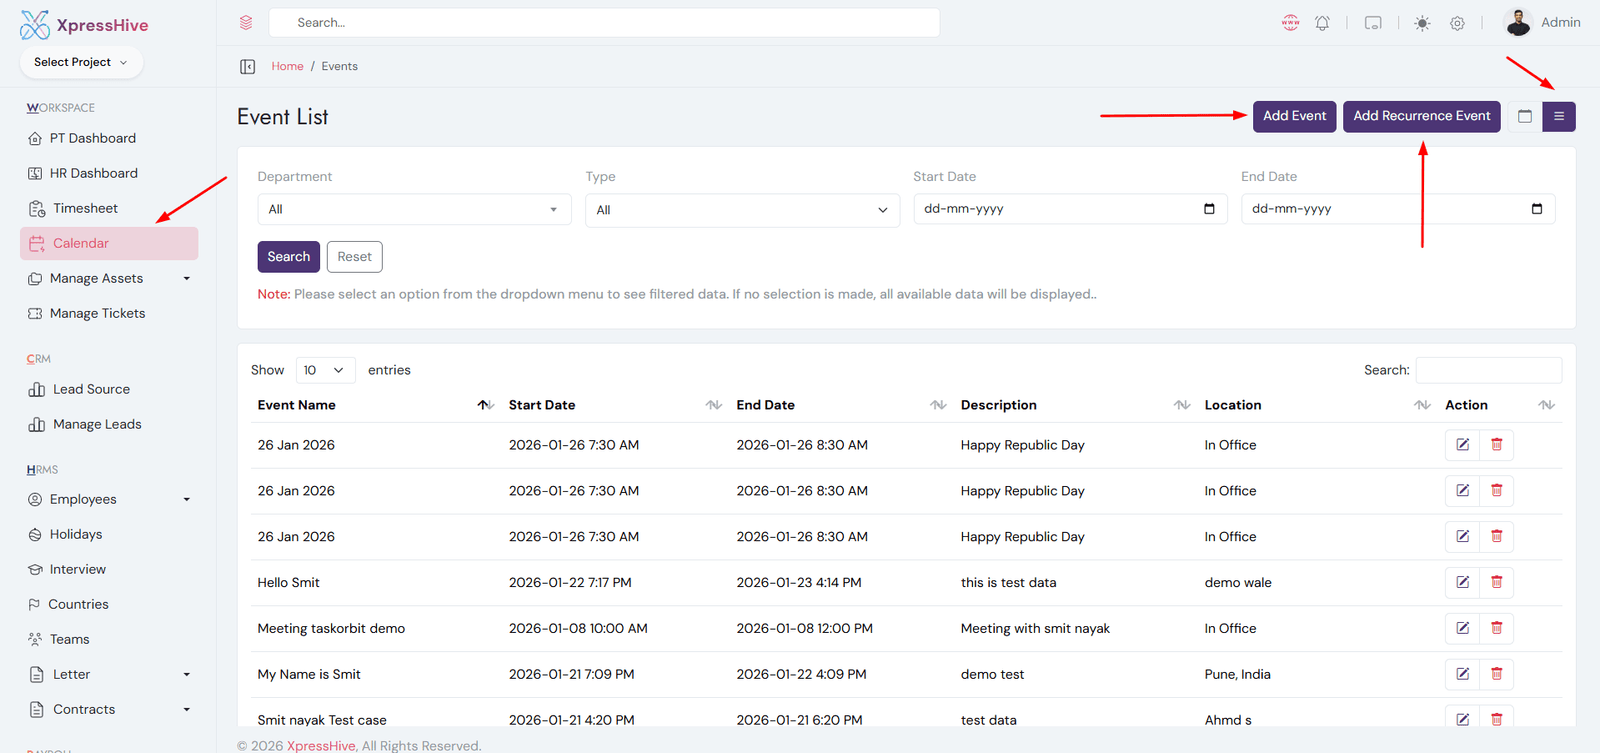
Calendar Overview
Create Event
  • View and manage schedules using calendar views (Month, Week, Day)
  • Create events by clicking on a date or using the quick add option
  • Add event details including title, location, description, and time
  • Assign events to specific users or departments
  • Set recurring events (daily, weekly, monthly) with custom intervals
  • Integrate Google Meet links for online meetings
  • Mark events as private to restrict visibility
  • Overlay holidays automatically for better planning
  • Edit or update events anytime from the calendar view
  • Delete events or manage recurring series efficiently
  • Receive notifications for assigned or updated events
  • Dynamic event loading using calendar feed for real-time updates

Leave Request Management

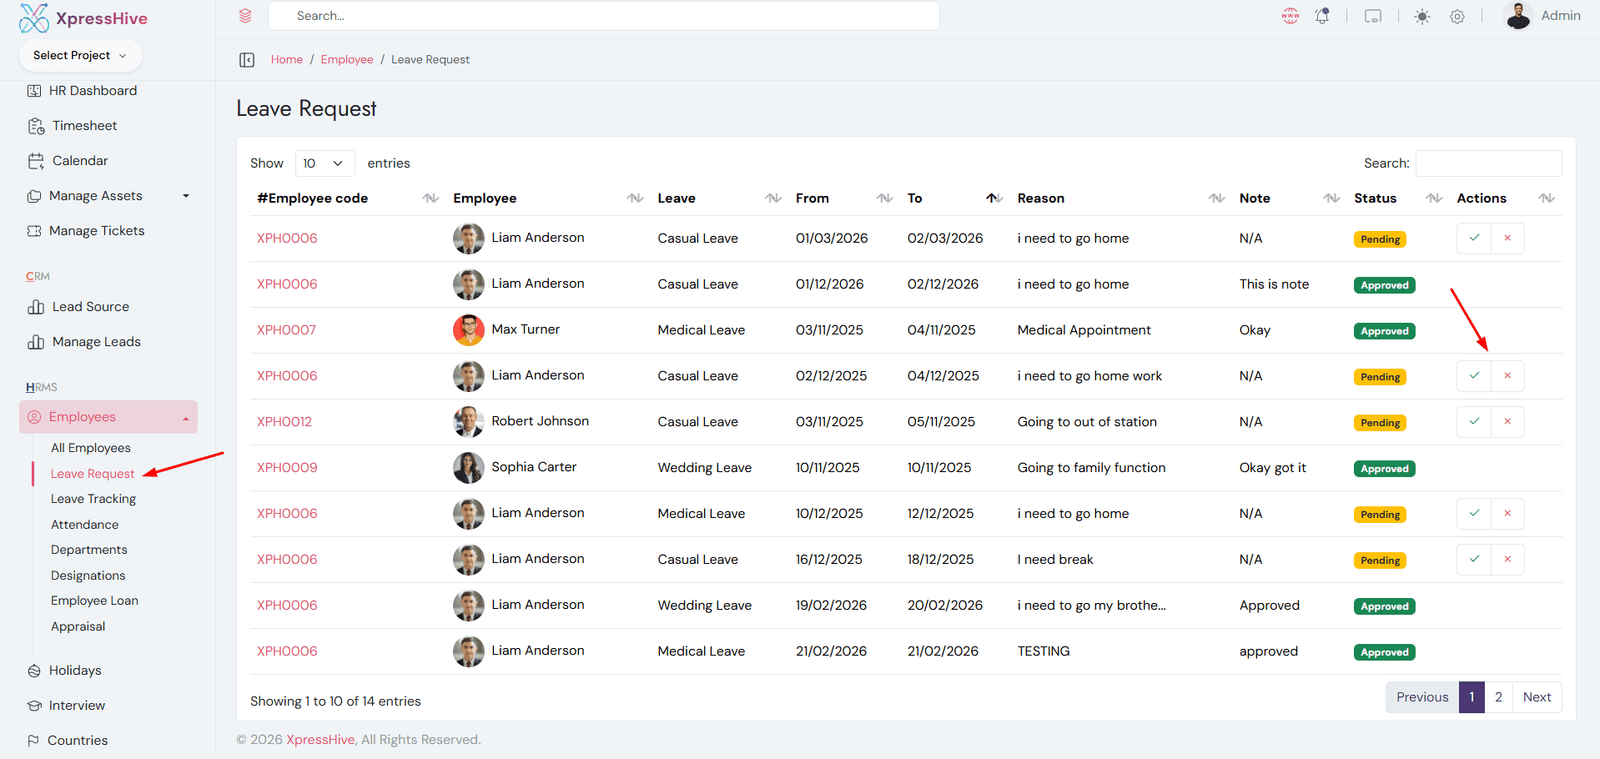
Leave Request List
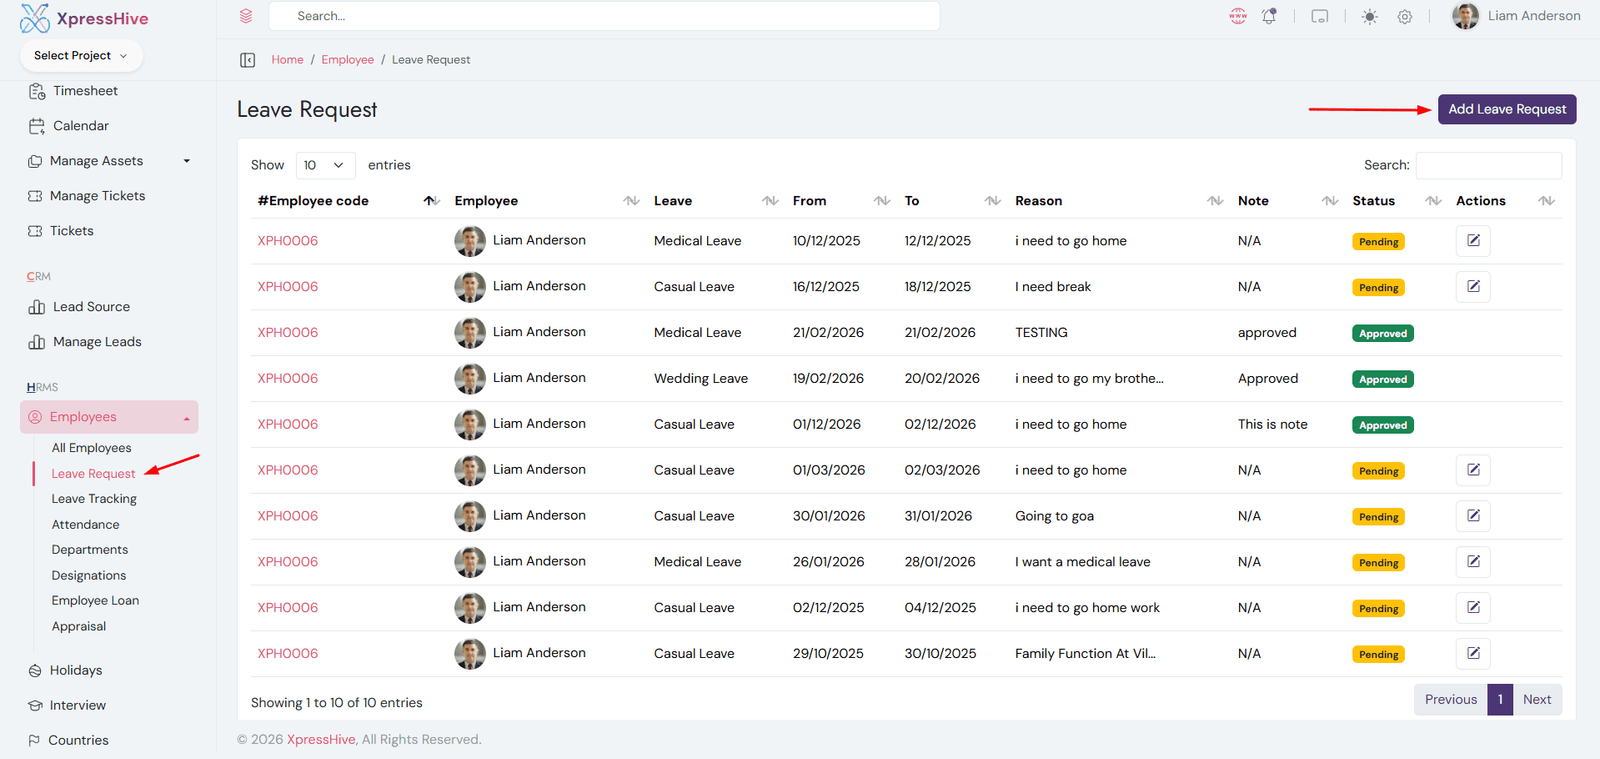
Create Leave Request
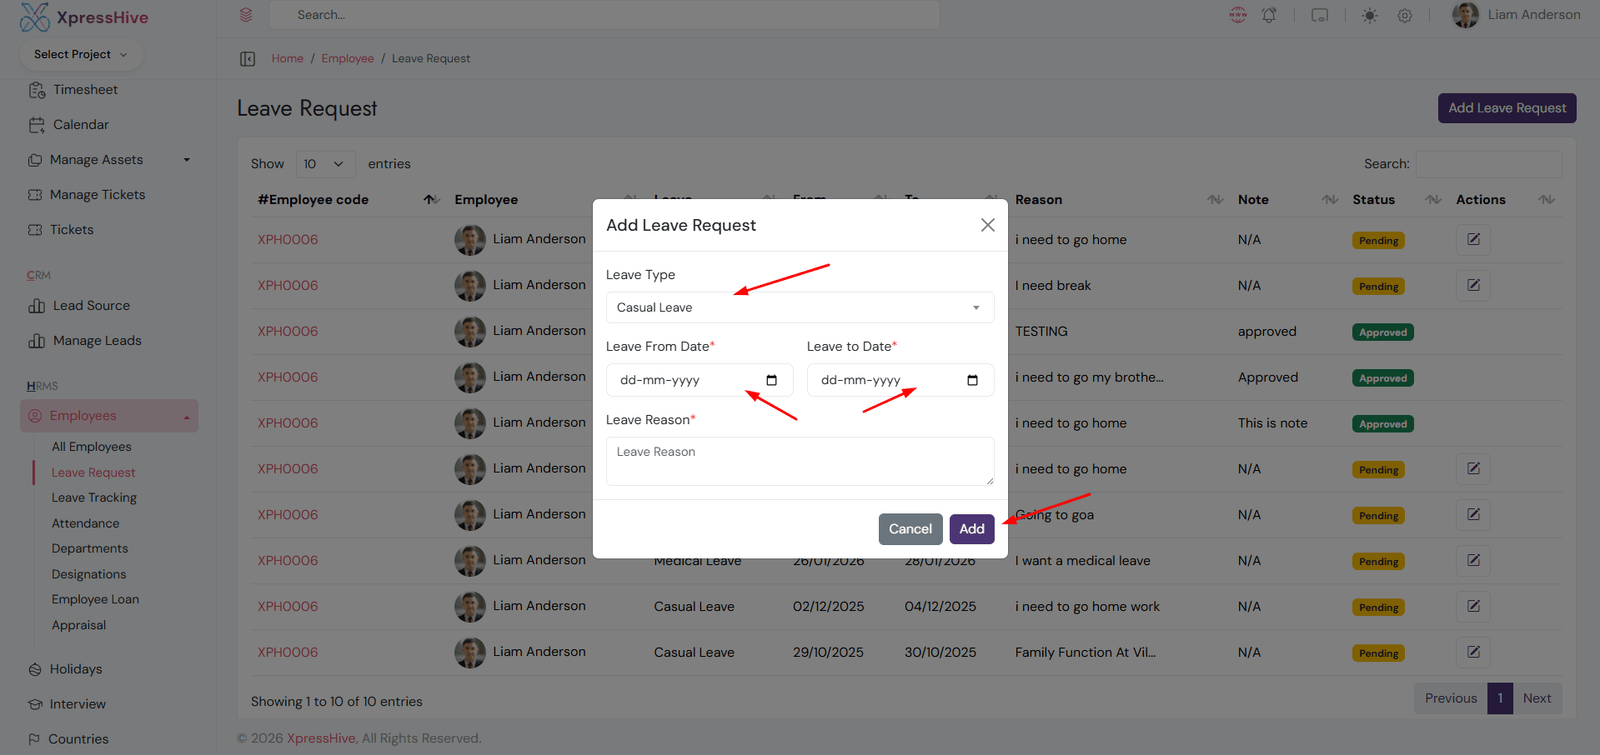
Leave Request Form
  • Employees can submit leave requests
  • Admin can approve or reject requests
  • View leave request details and history
  • Edit or update leave requests if required
  • Track leave status (Pending, Approved, Rejected)

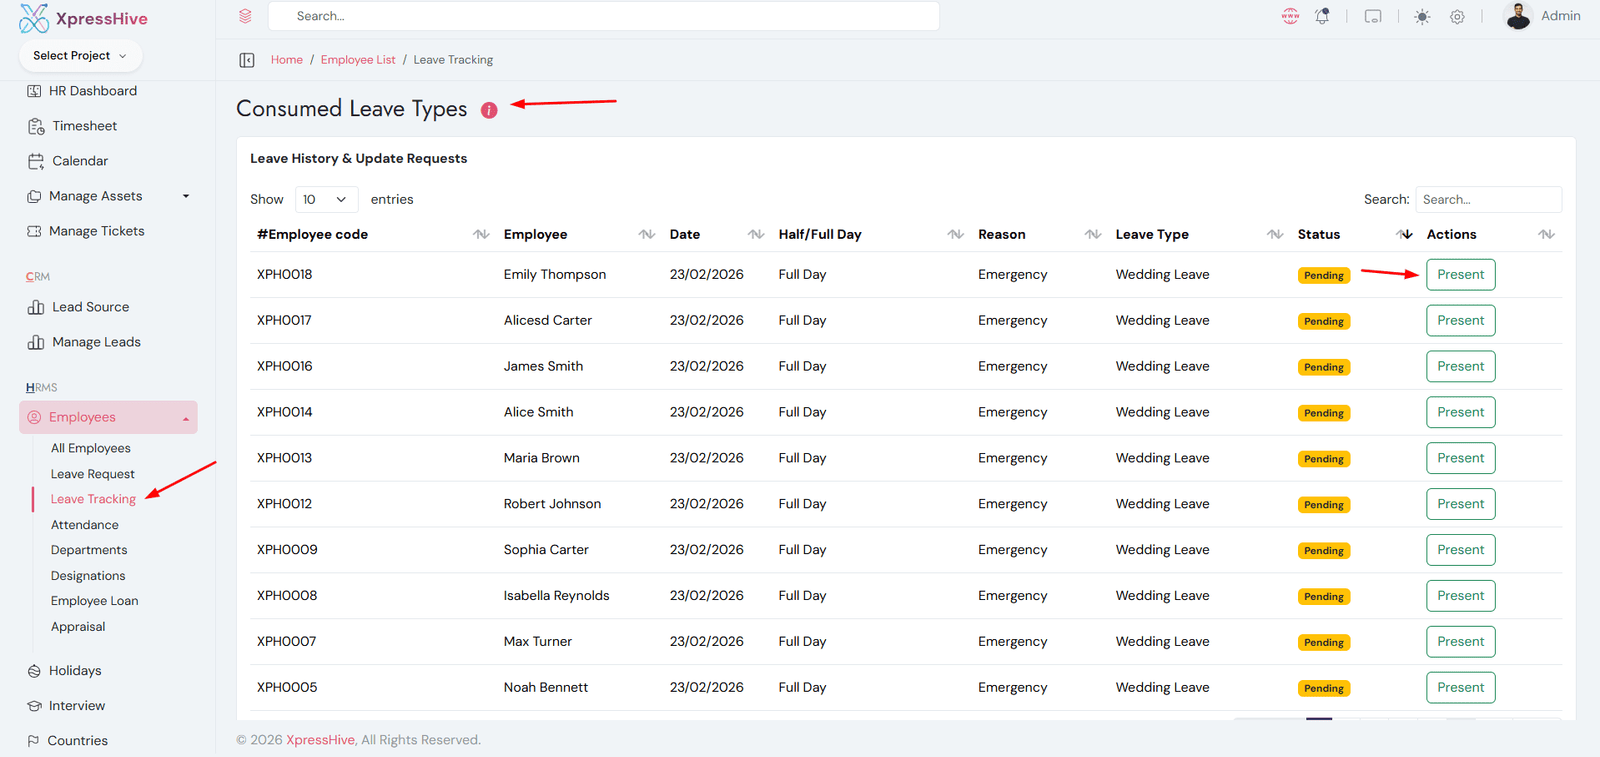
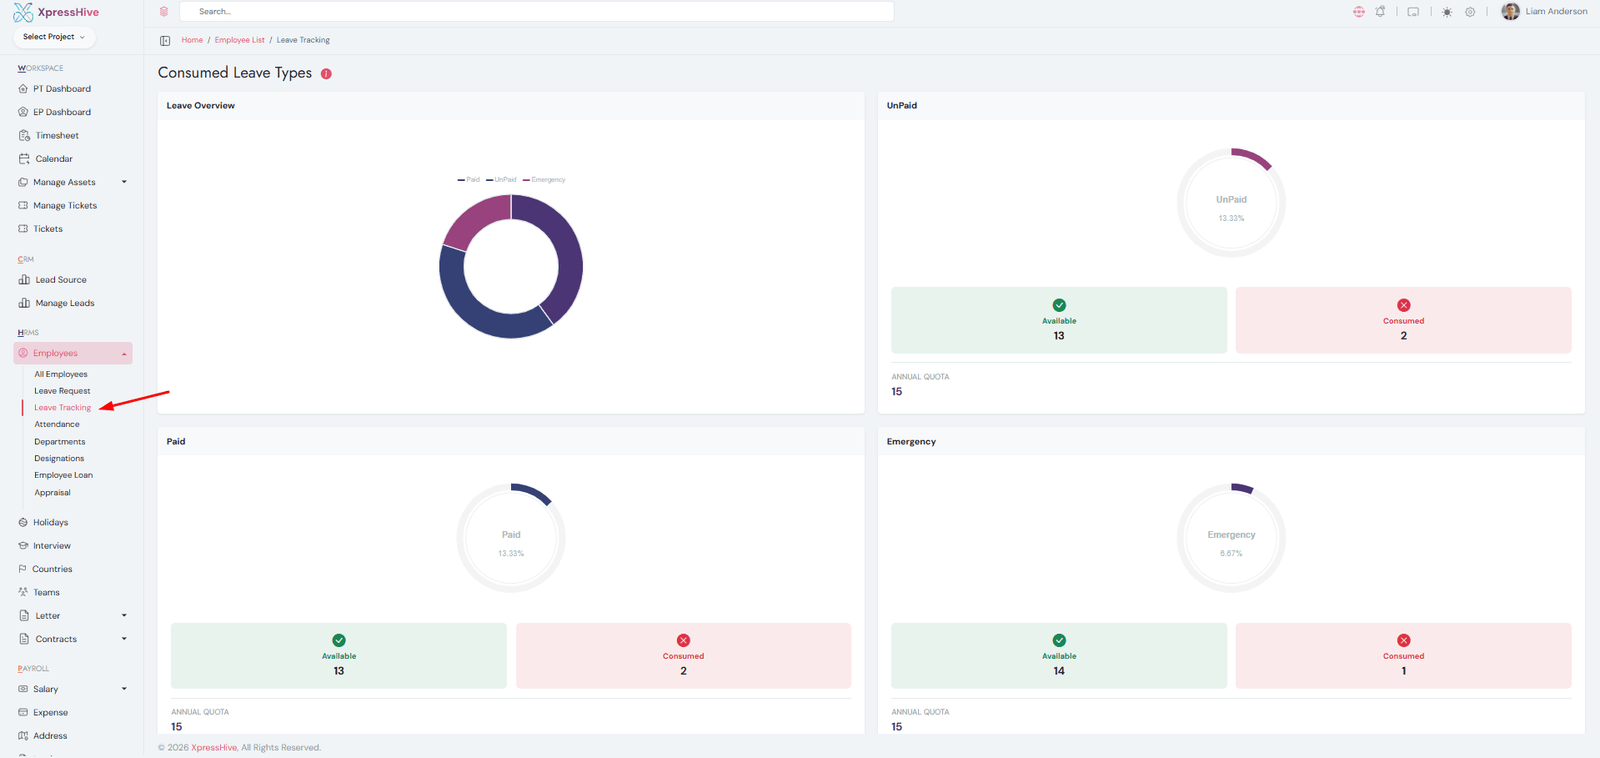
Consumed Leave Management

Consumed Leave List
Consumed Leave Report
  • Manage approved leave records
  • Approve or reject leave requests
  • Update attendance status based on leave
  • Modify clock-in and clock-out timings if needed
  • Track total consumed leaves of employees

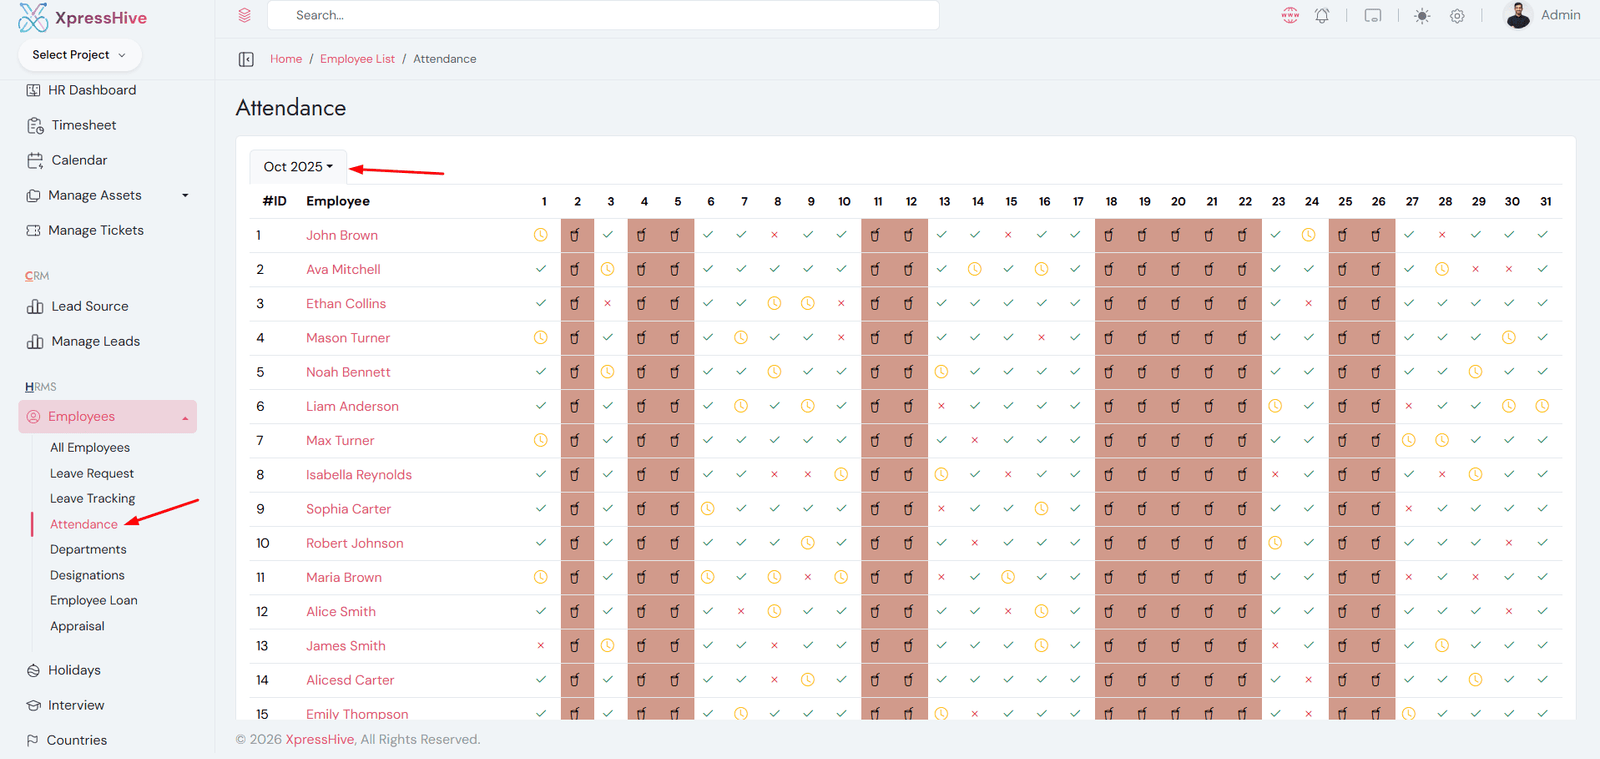
Attendance Management

  • View and manage employee attendance records
  • Mark attendance manually if required
  • Edit or update attendance details
  • Track daily, weekly, and monthly attendance
  • Used for payroll and reporting calculations

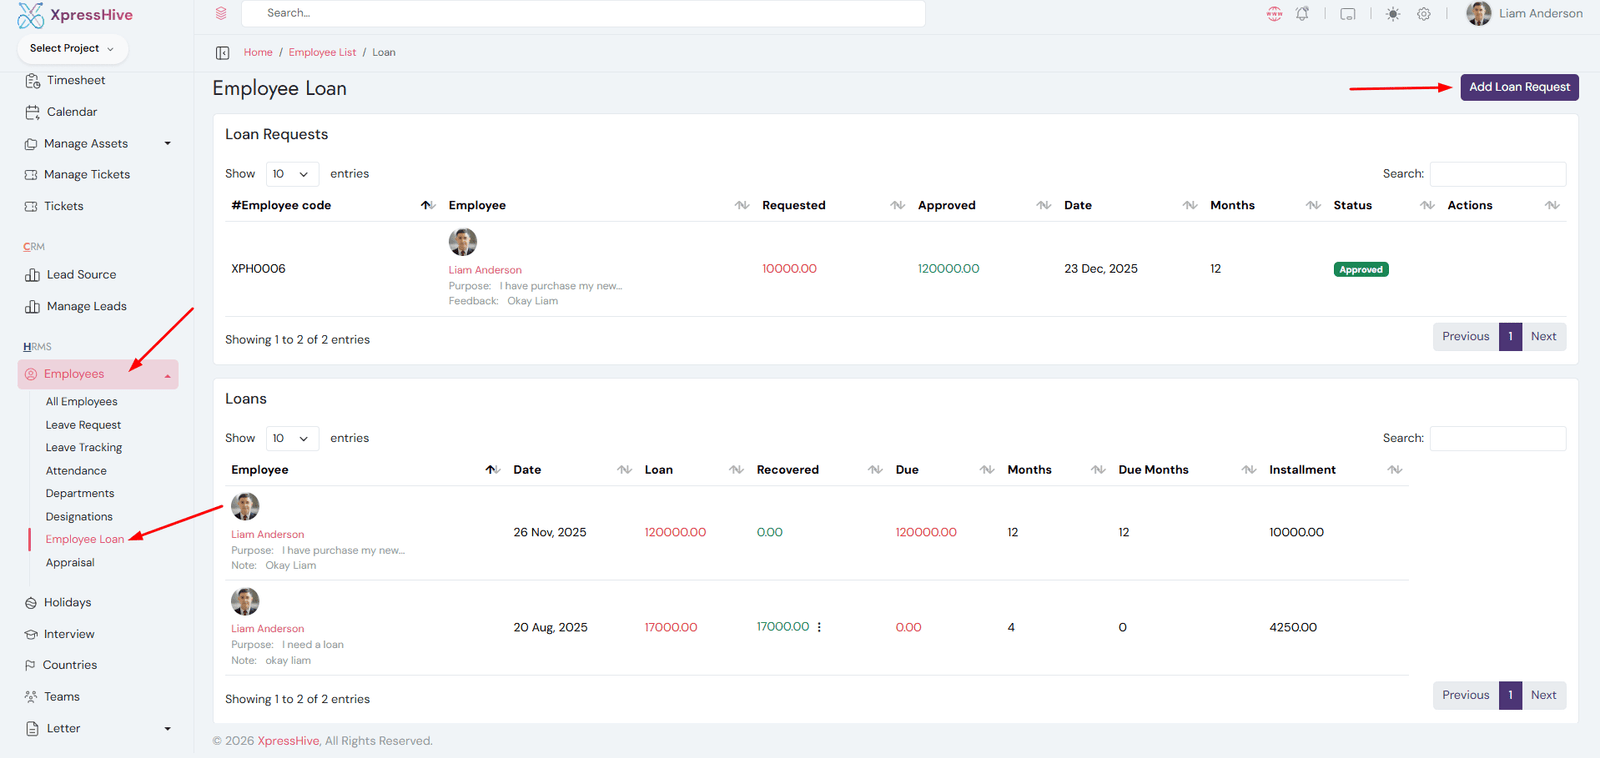
Employee Loan Management

  • Manage employee loan requests
  • Add new loan entries with amount and details
  • Approve or reject loan requests
  • Edit or update loan information
  • Track loan repayment and status

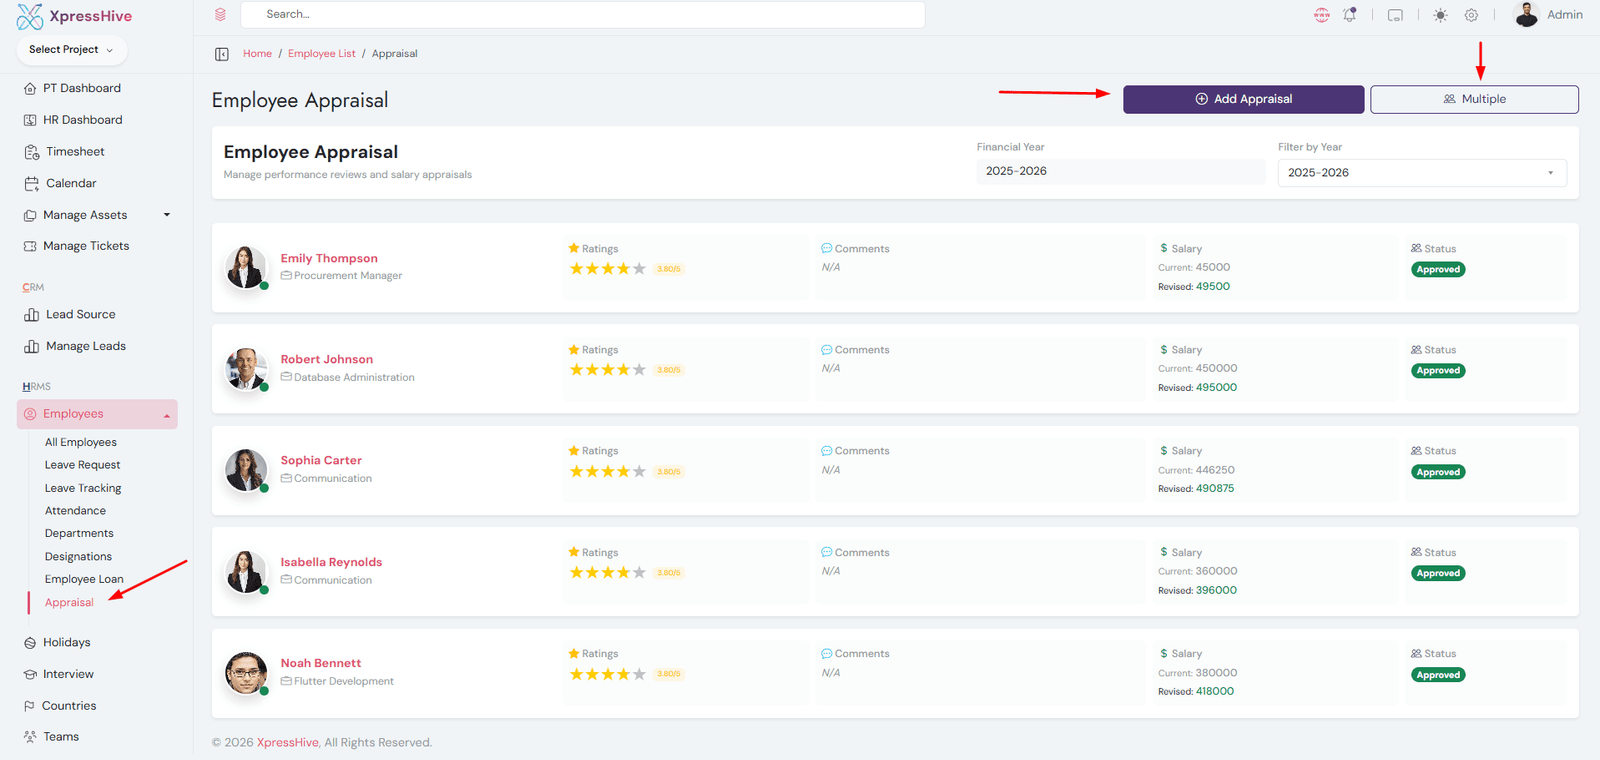
Appraisal Management

  • Create employee appraisals (single or multiple levels)
  • Evaluate performance based on defined attributes
  • Review appraisal details and scores
  • Approve or reject appraisal requests
  • Maintain structured performance records

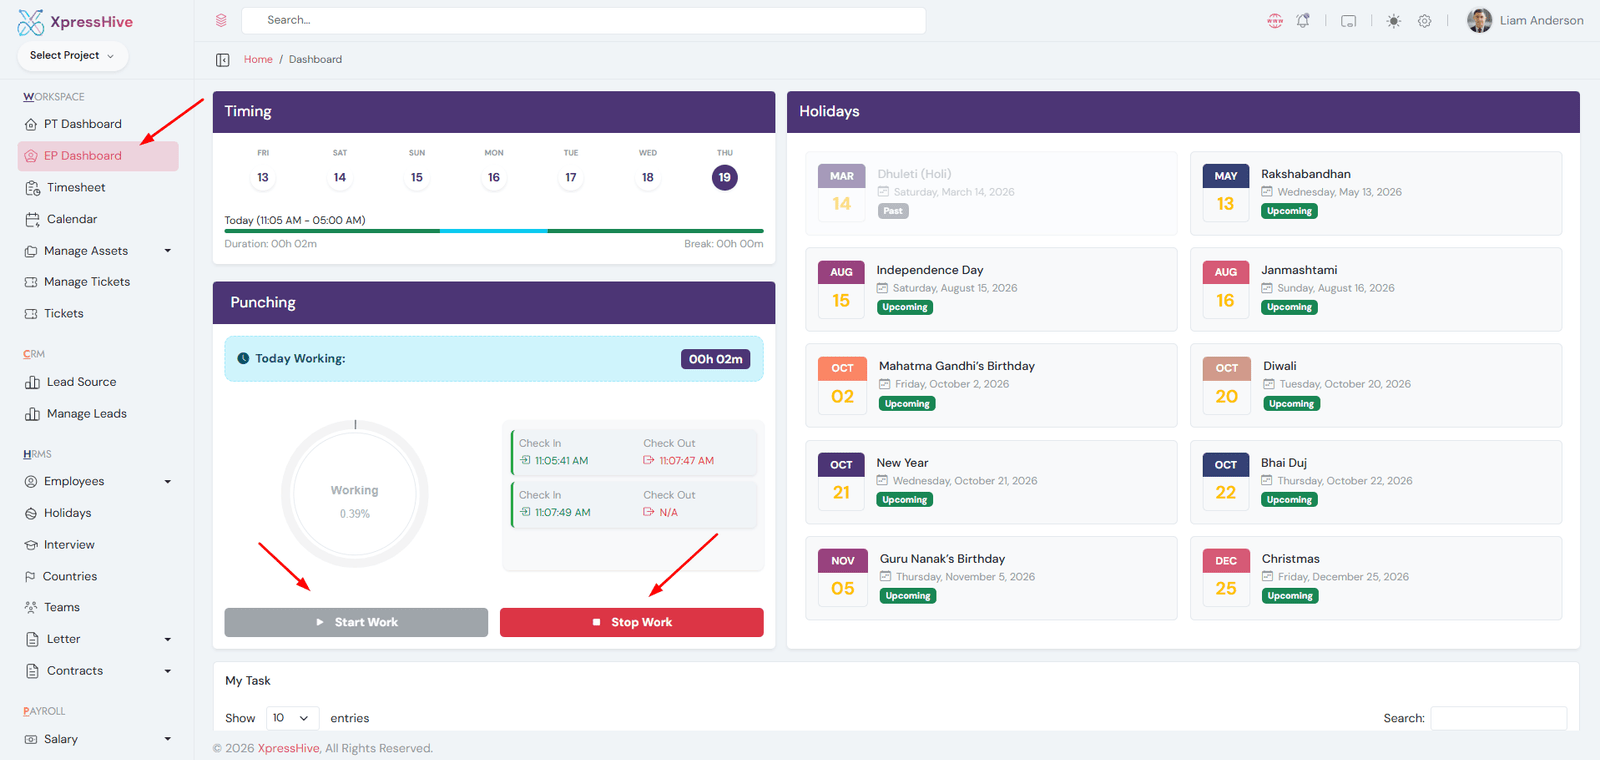
Employee Clock Management

  • Employees can clock in and clock out daily
  • Track working hours automatically
  • View clock-in and clock-out history
  • Helps maintain accurate attendance records
  • Used for payroll and performance tracking

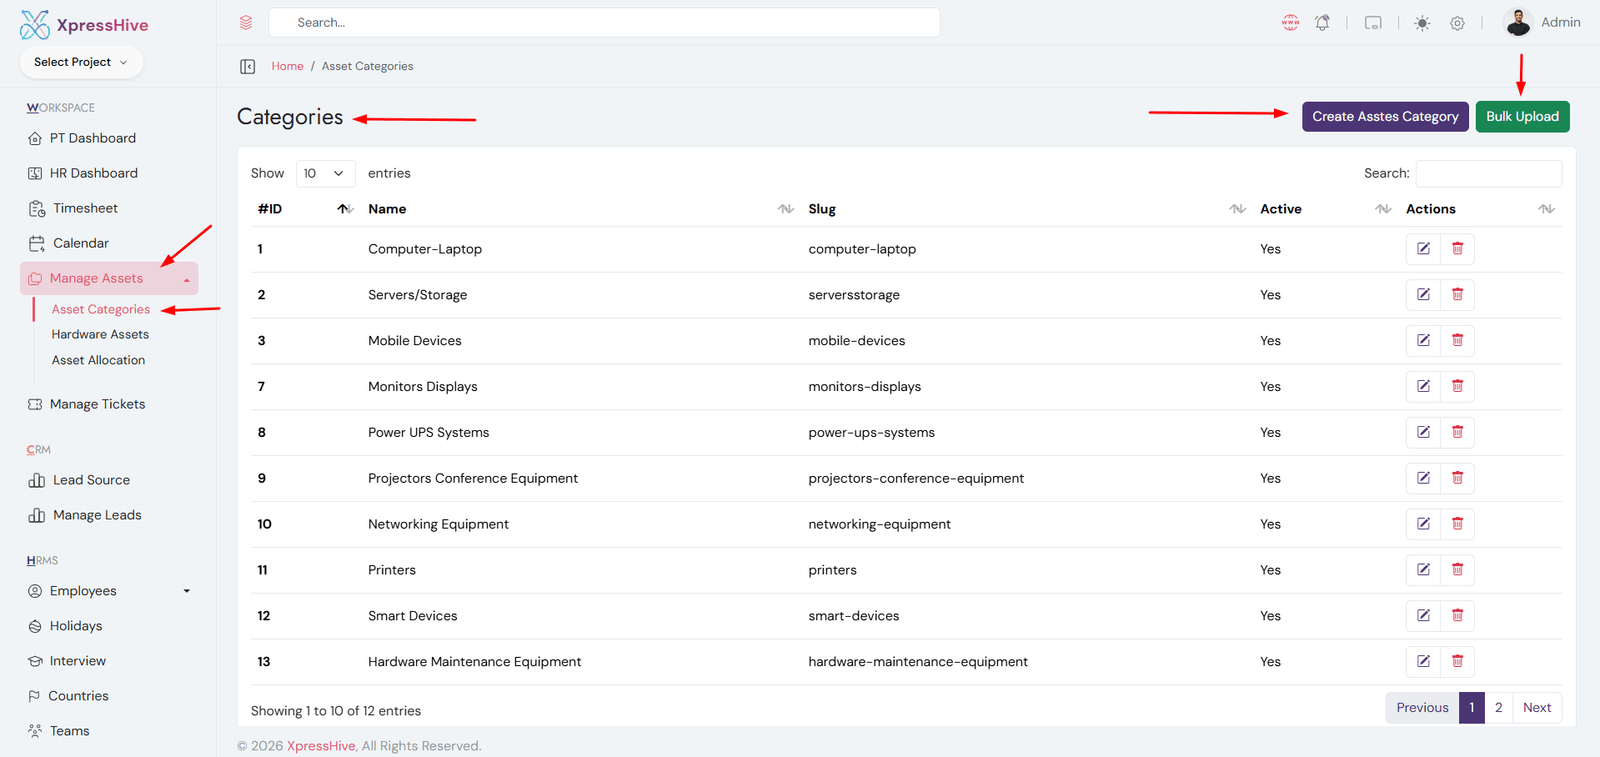
Asset Categories

  • Create and manage asset categories (Laptop, Mobile, Accessories, etc.)
  • Edit or update category details anytime
  • Delete unused categories
  • Used to organize hardware assets efficiently

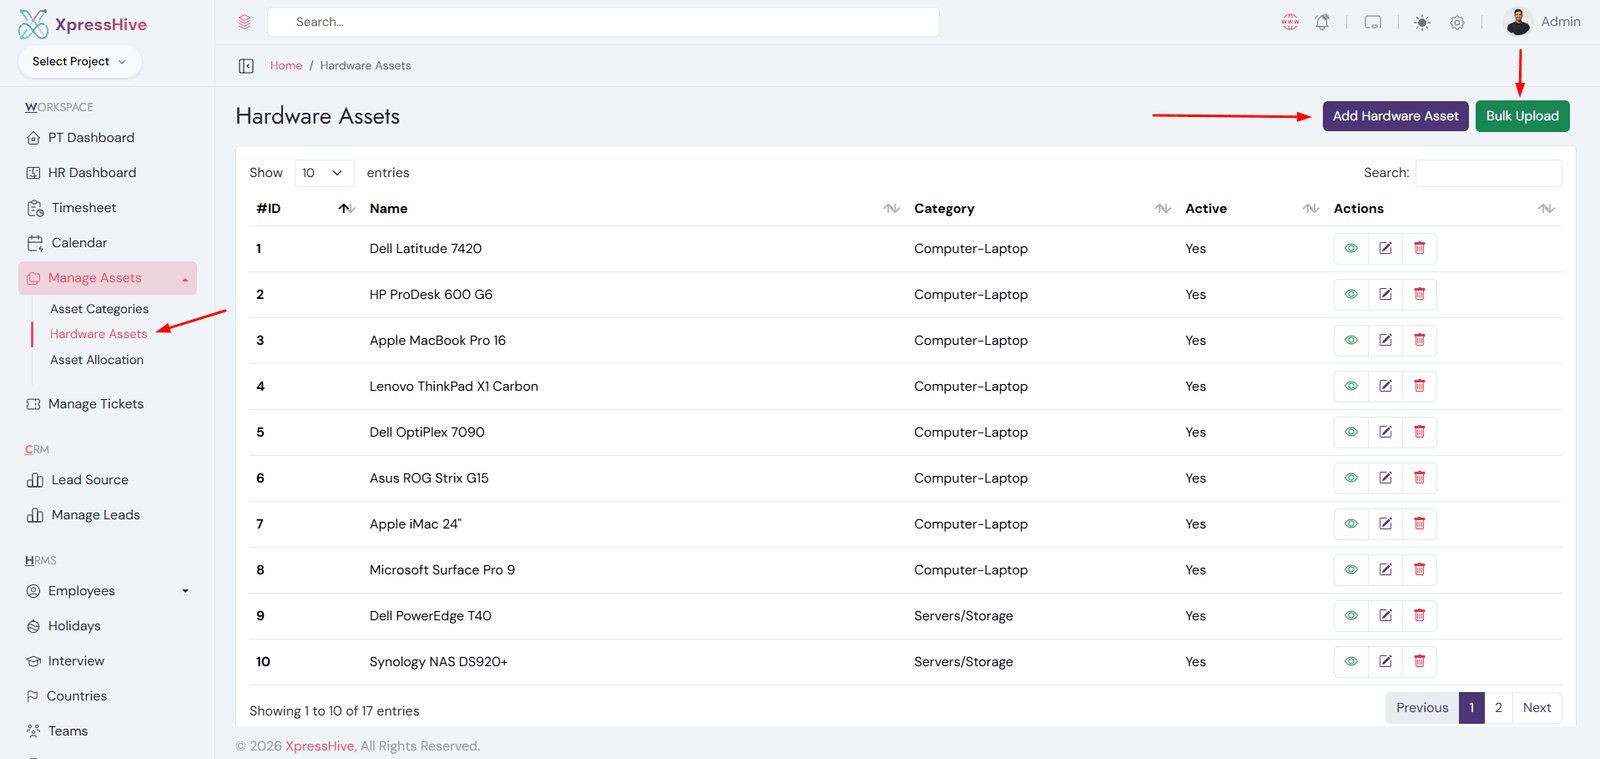
Hardware Assets

  • Manage the list of all hardware assets
  • Add new assets with details (name, category, serial number, etc.)
  • Edit or update asset information
  • Delete unused or inactive assets
  • View complete asset details

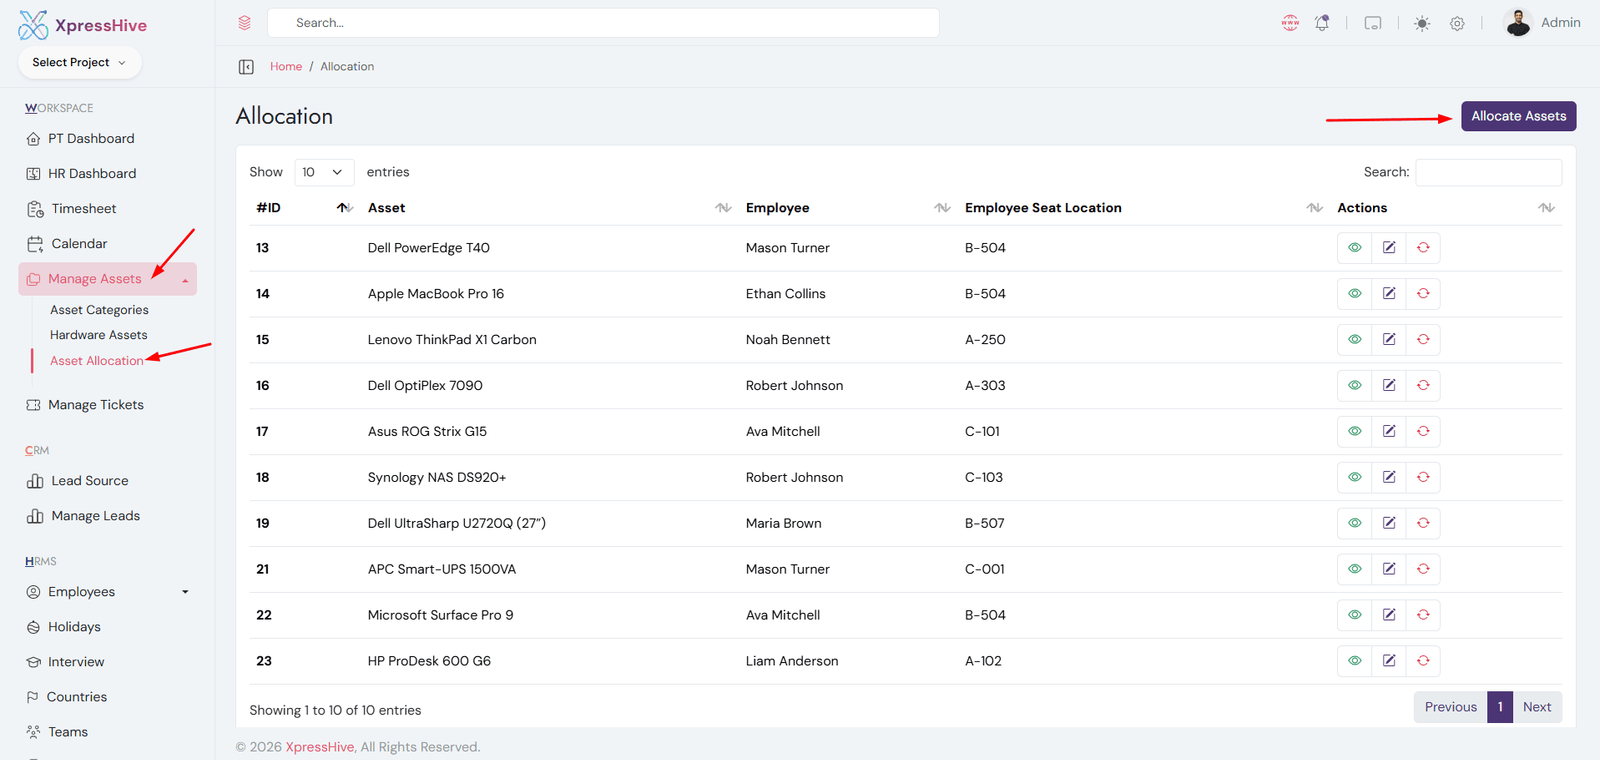
Asset Allocation

  • Assign hardware assets to employees
  • Track which employee is using which asset
  • Edit or update allocation details
  • Manage asset return and reallocation
  • Maintain proper asset usage records

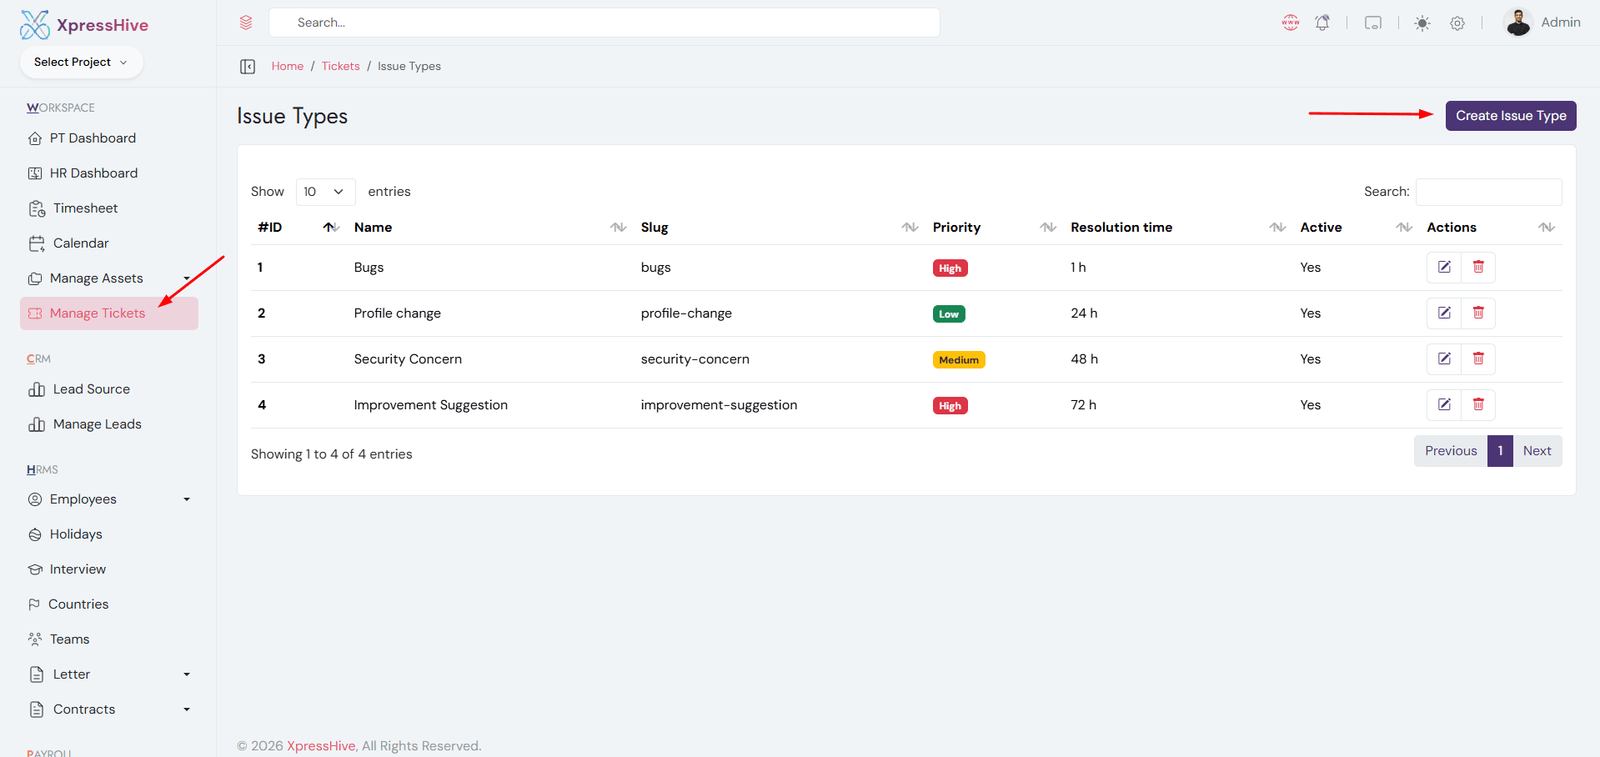
Ticket Issue Management

Go to Ticket Issue
Ticket Issue List
  • Define and manage ticket issue types (e.g., Hardware, Software, Telecom)
  • Set priority levels and SLA resolution time for each issue type
  • Helps categorize tickets for better tracking and reporting
  • Edit or update issue types as business needs evolve
  • Delete unused or outdated issue categories
  • Acts as a foundation for ticket assignment and SLA monitoring

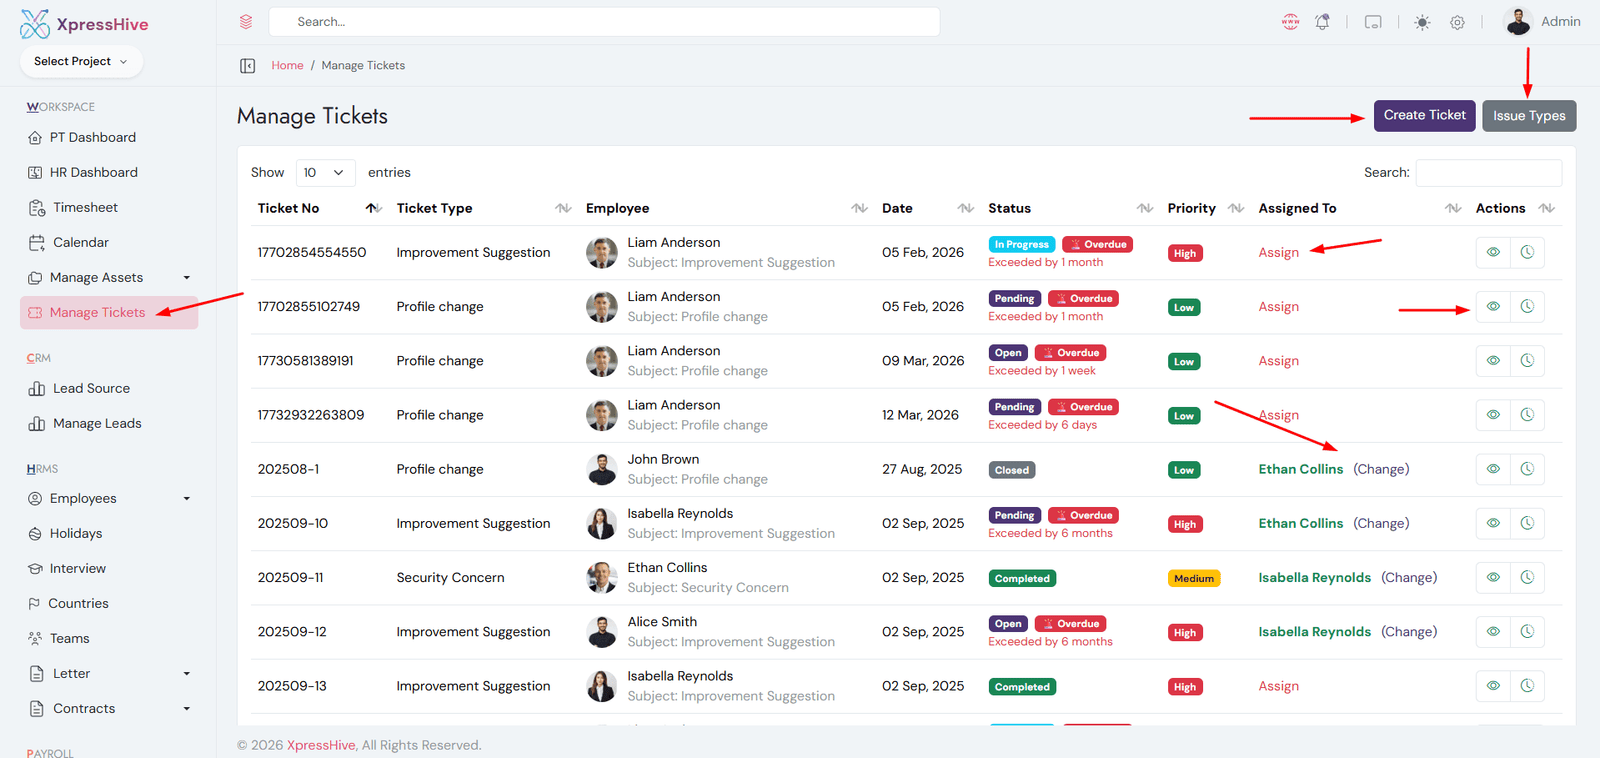
Ticket Management Flow

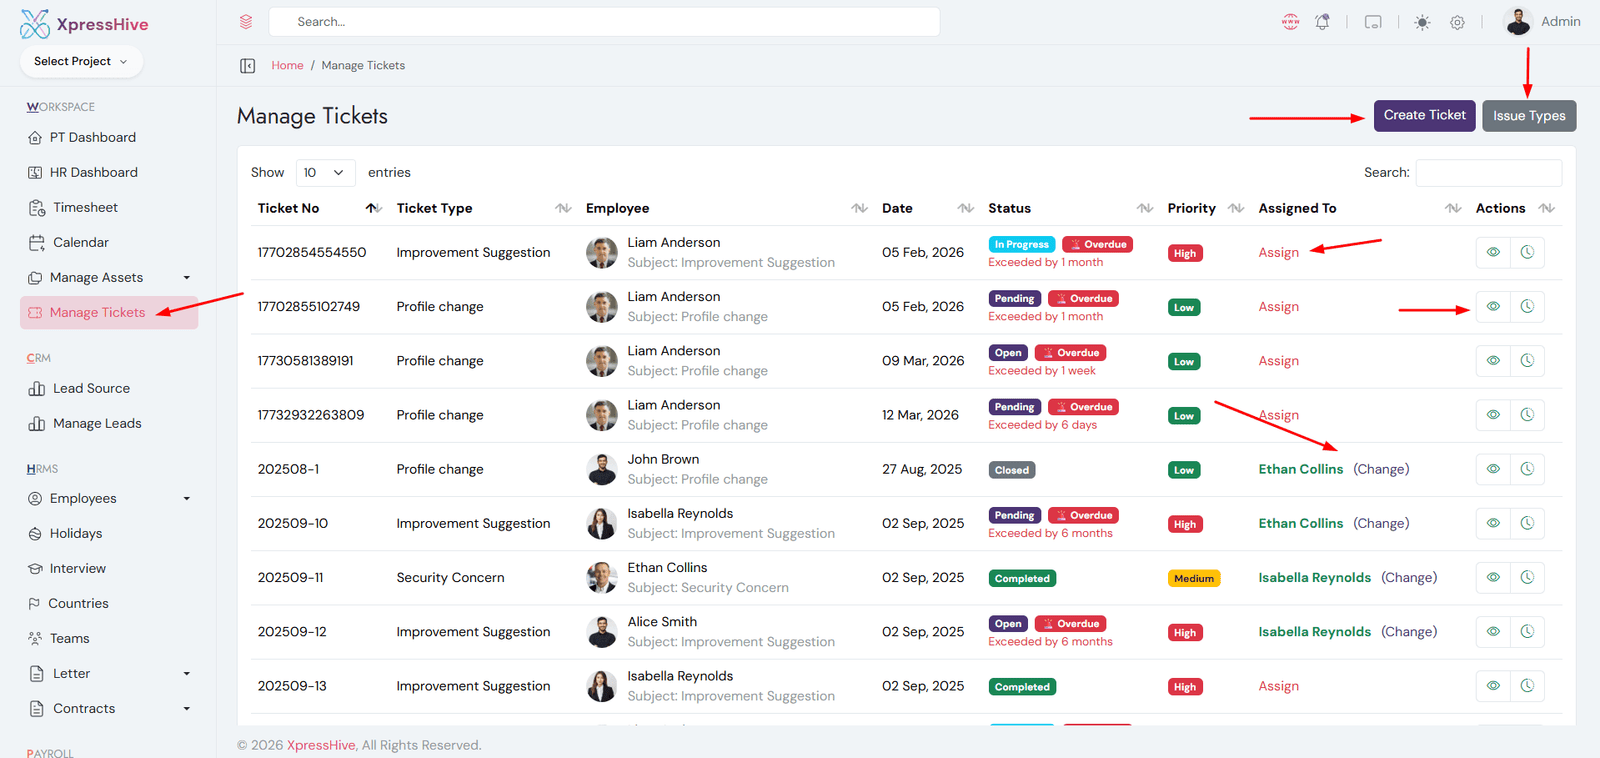
Ticket List
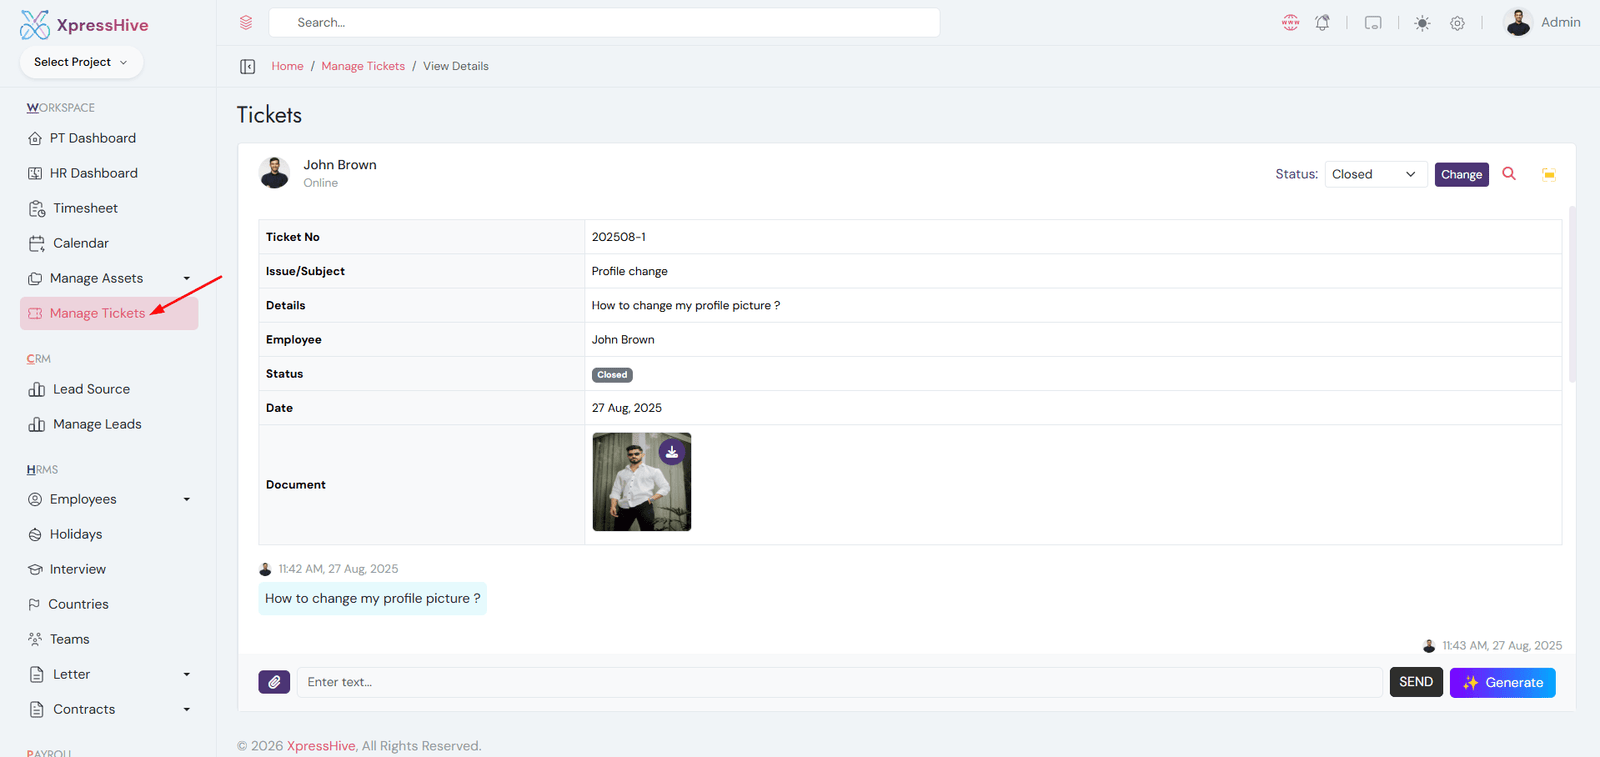
Ticket Details
  • Users can create support tickets for issues related to projects, systems, or services
  • Each ticket is categorized using predefined issue types for better organization
  • Tickets are automatically assigned a unique ID and initial status (Open)
  • Authorized users can assign tickets to specific employees or departments
  • Resolvers can update ticket progress, add logs, and upload attachments
  • Track ticket status through stages such as Open, In Progress, Resolved, and Closed
  • SLA tracking ensures tickets are resolved within the defined time limits
  • Notifications are triggered on ticket creation, assignment, and status updates
  • AI-powered feature helps generate smart replies or suggested solutions
  • Maintain complete ticket history including logs, actions, and updates
  • Managers can reassign tickets or monitor team performance
  • Reports provide insights into SLA breaches and resolver performance

Lead Management Flow

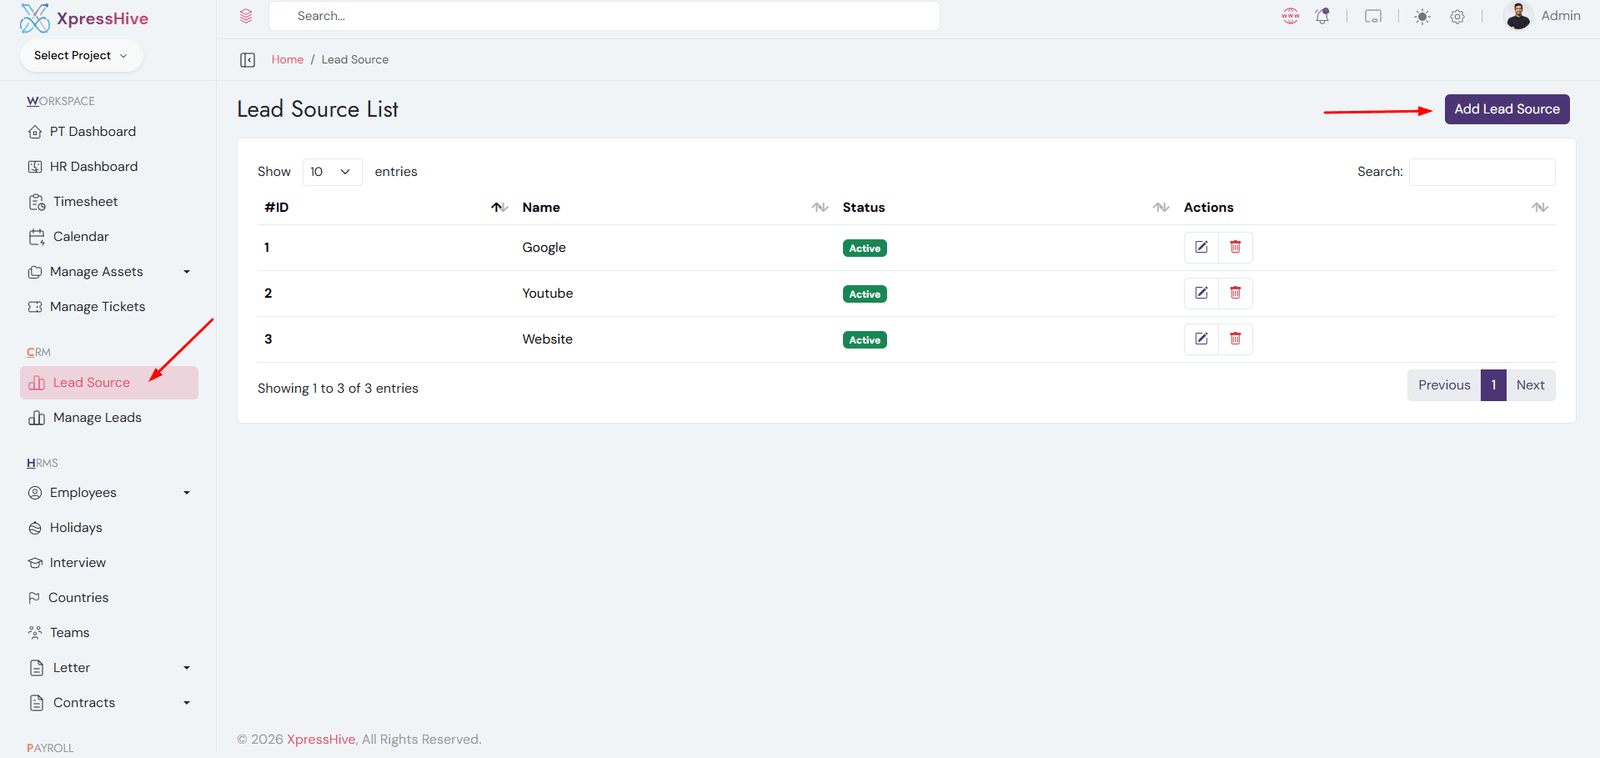
Lead Source List
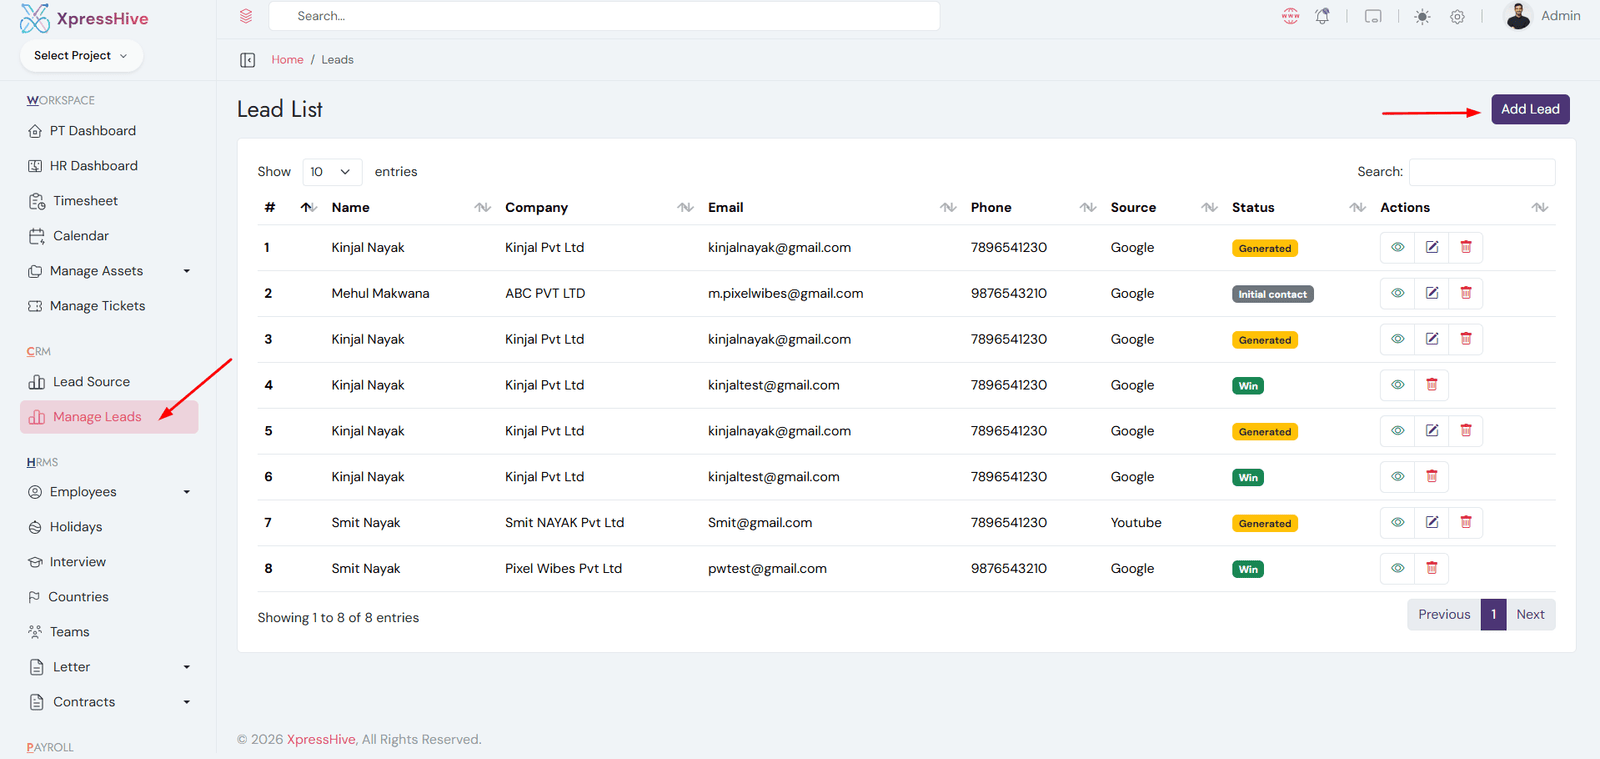
Lead List
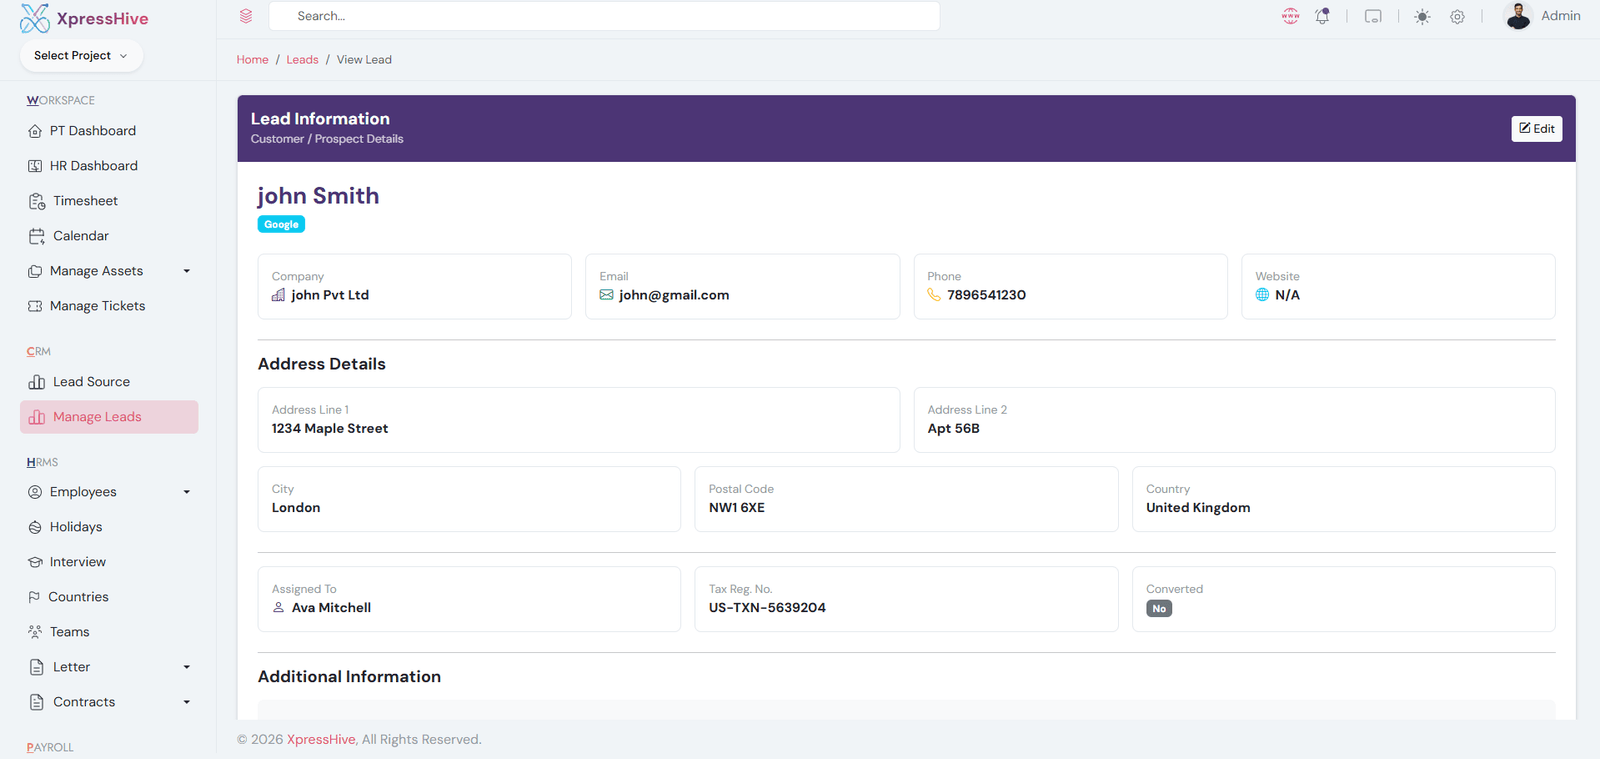
Lead Details View
  • Admin can create and manage leads from the CRM module
  • Leads can be assigned a source (e.g., Google, Website, Referral)
  • Track lead details including name, company, email, and phone
  • Manage lead status through stages (Generated, Qualified, Initial Contact, Proposal Sent, Win, Lost)
  • Add follow-ups to track communication history with prospects
  • Add notes for internal discussion and important information
  • Edit or update lead information anytime
  • Notifications are triggered on status updates, assignments, and follow-ups
  • View complete lead lifecycle and activity in a single detail page
  • Export lead reports for analysis and tracking

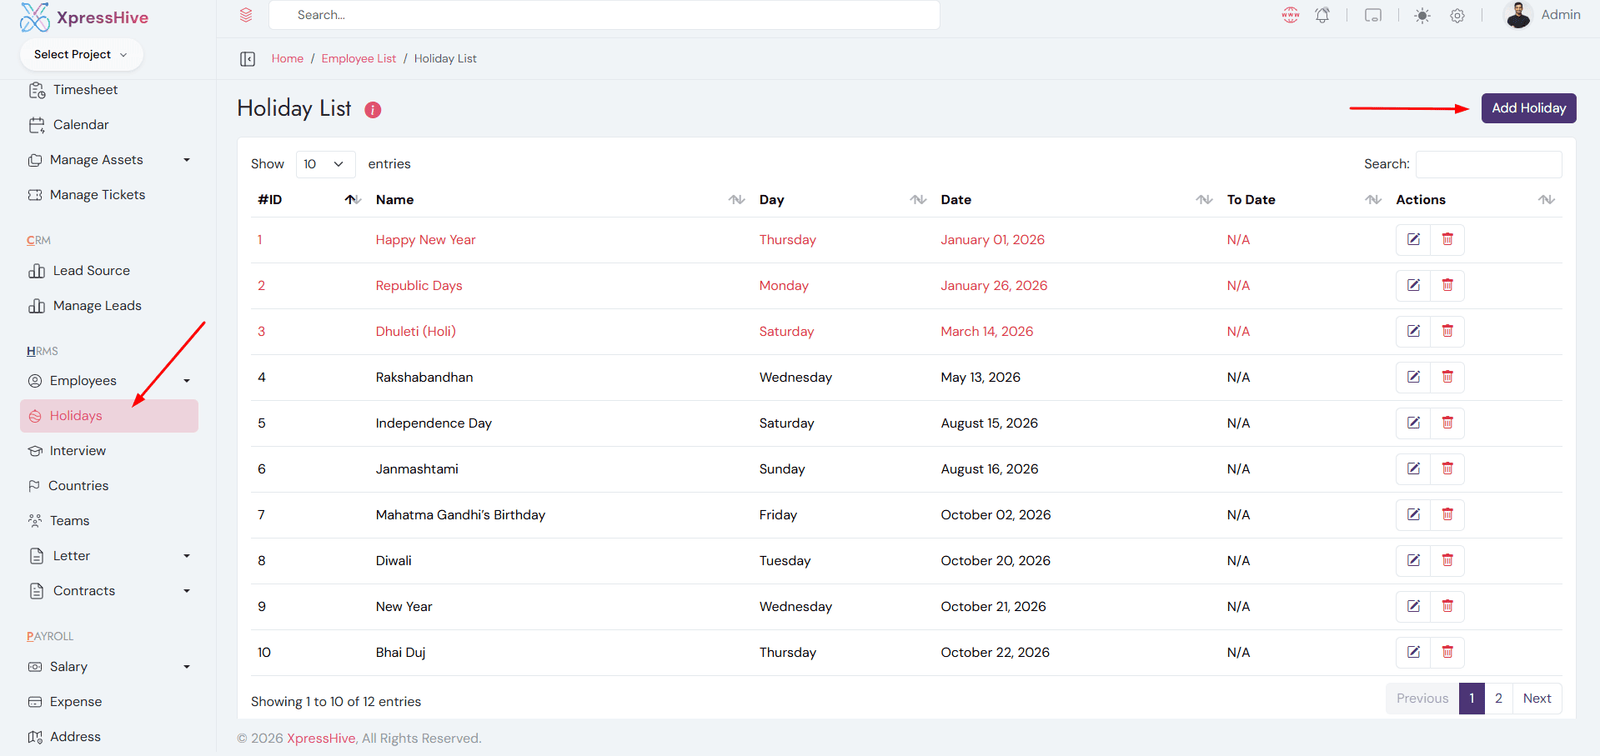
Holiday Management

  • Create and manage holiday list for the organization
  • Add new holidays with date and description
  • Edit or update holiday details anytime
  • Used in attendance and payroll calculations
  • Helps automatically exclude holidays from working days

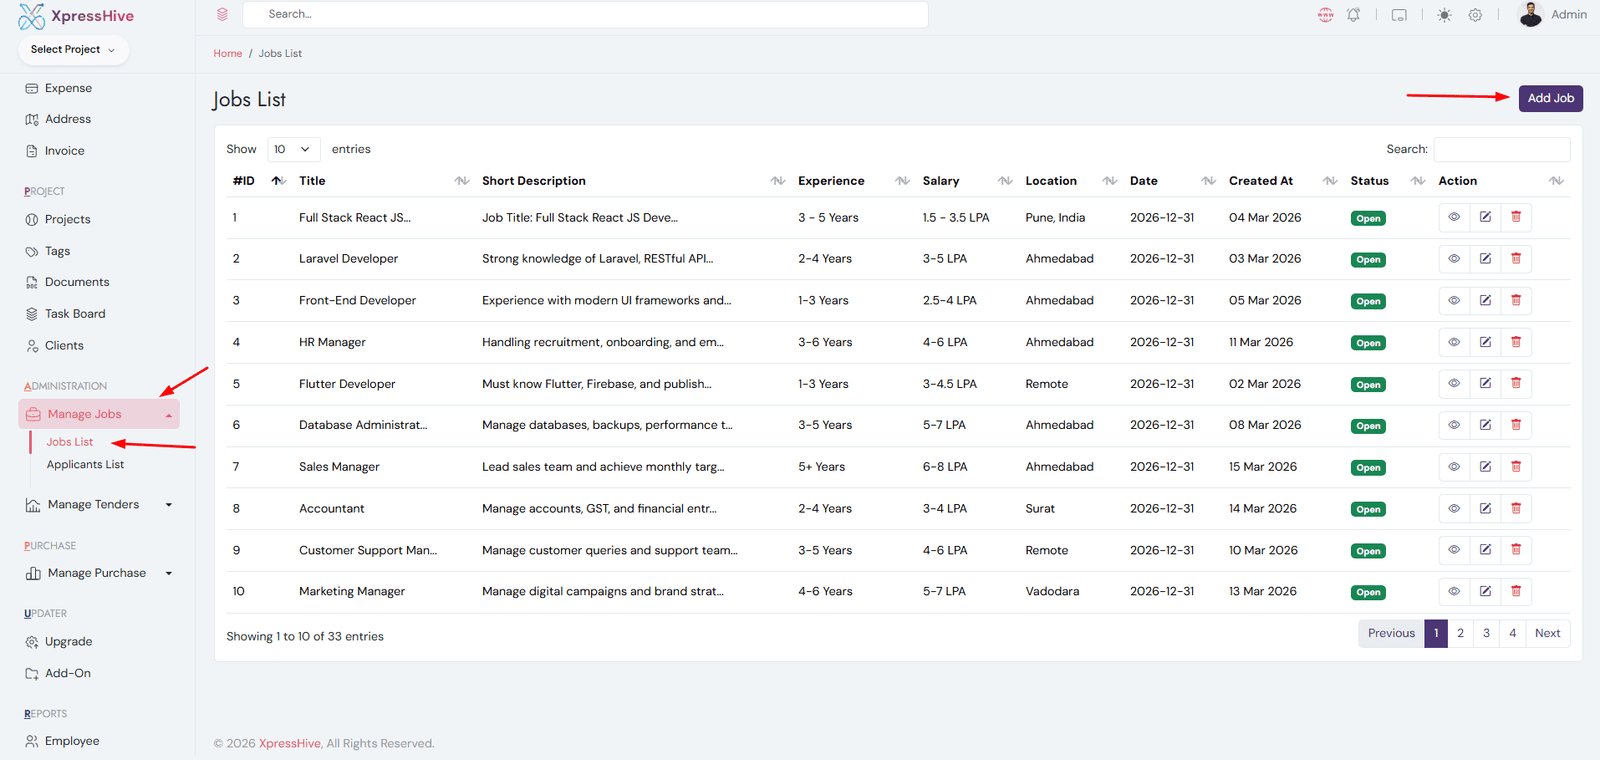
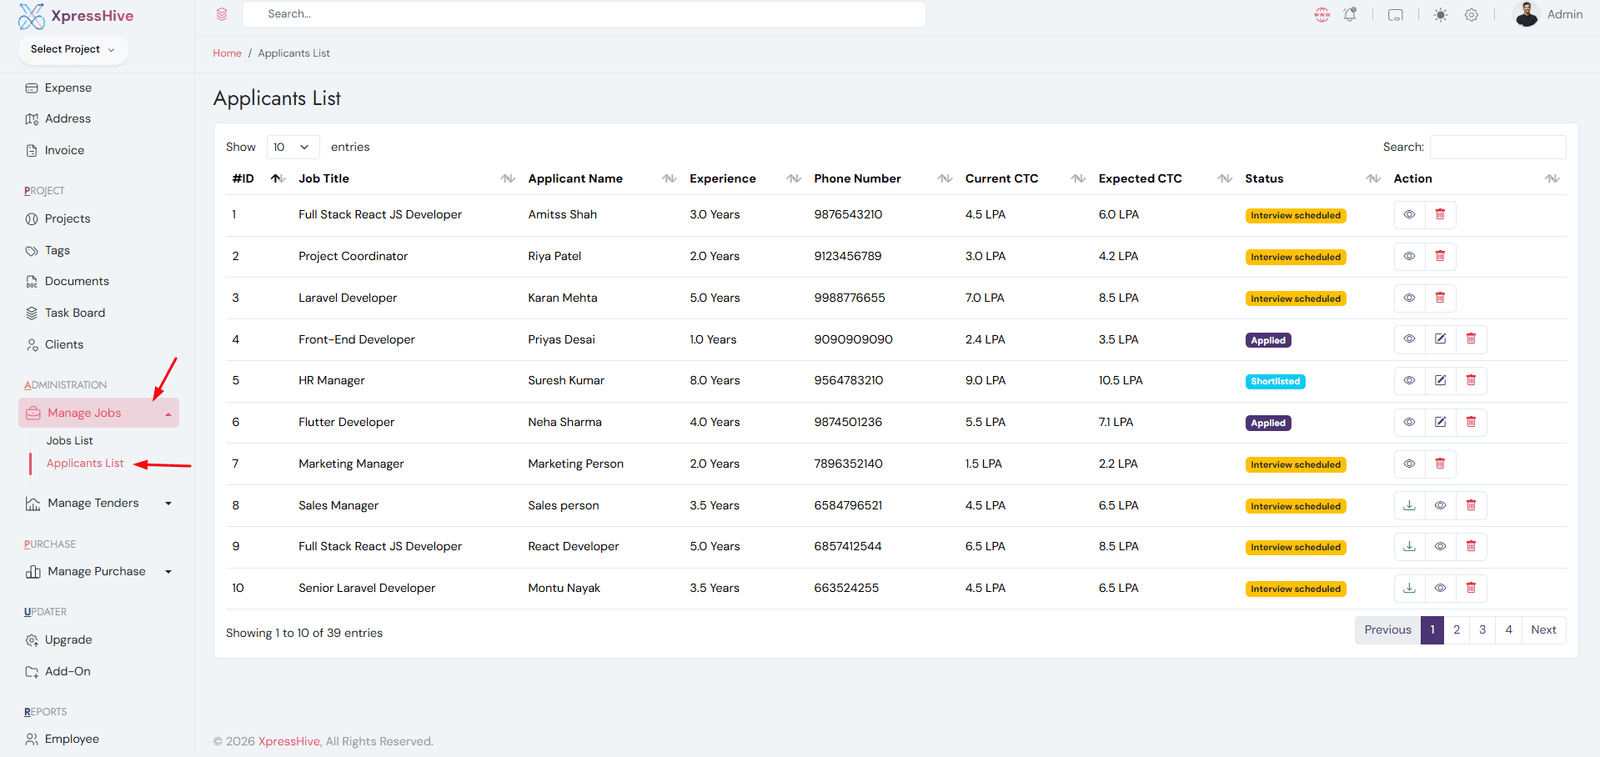
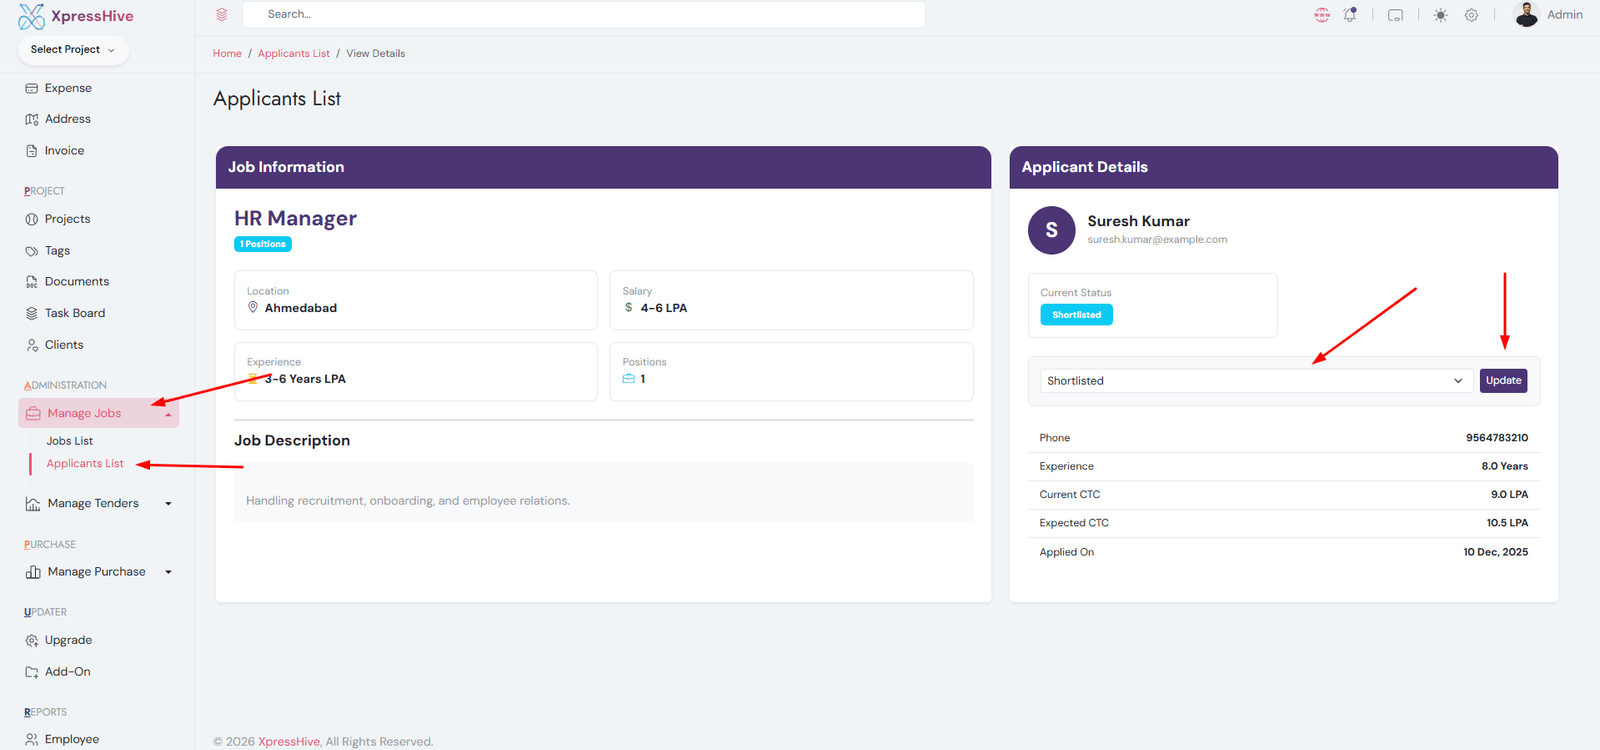
Recruitment Management (Job → Application → Interview)

Job Listing
Applicants Management
Applicant Details
  • Create and publish job openings with required details such as role, experience, and salary
  • Candidates apply through the career portal and submit their details
  • All applications are managed in a centralized applicants list
  • Shortlist candidates based on profile and requirements
  • Schedule interviews for shortlisted candidates
  • Track application status (Applied, Shortlisted, Interview Scheduled, Rejected, Hired)
  • Move candidates through the recruitment pipeline efficiently

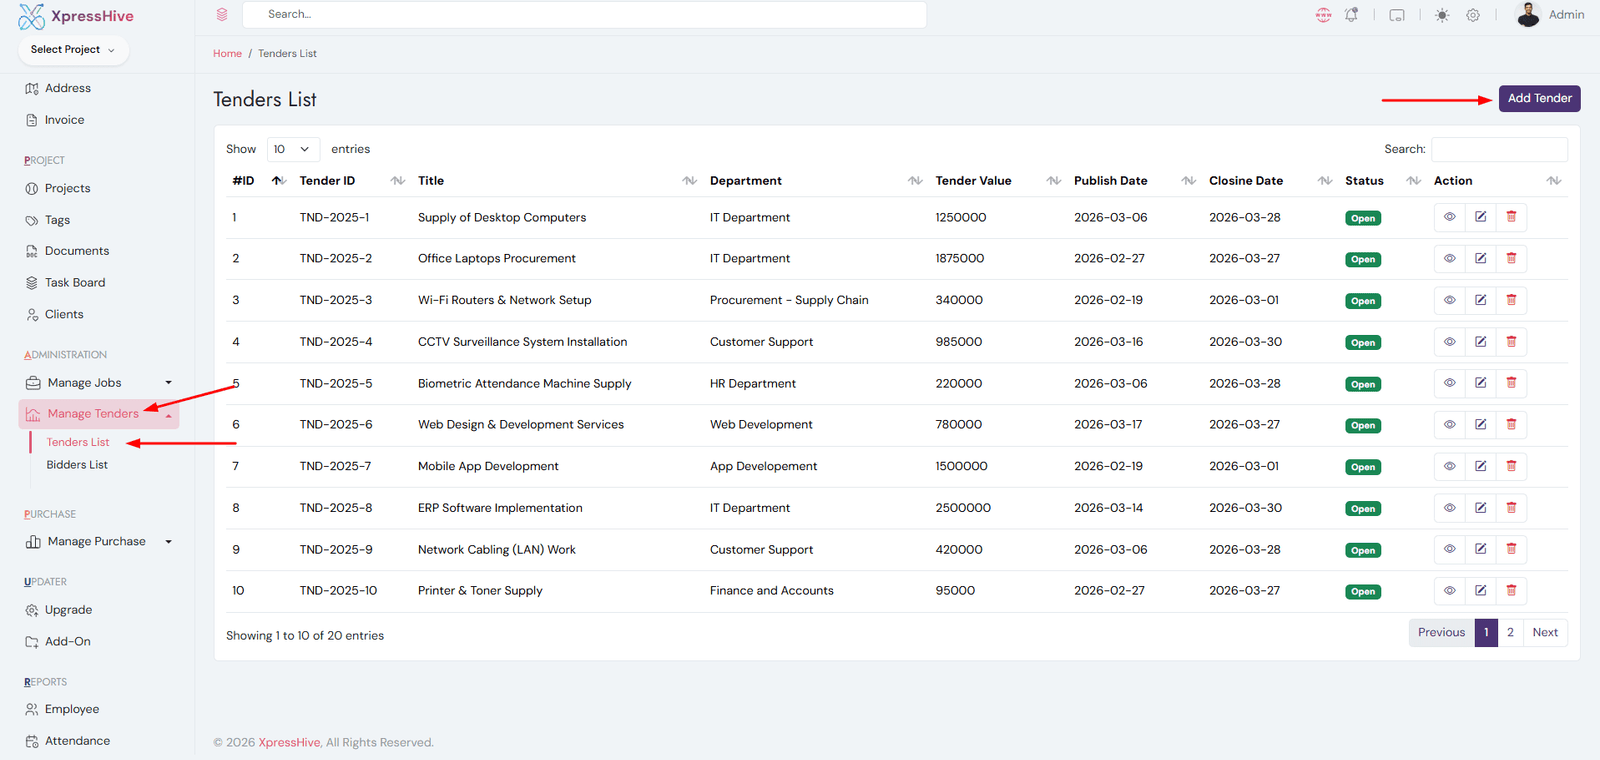
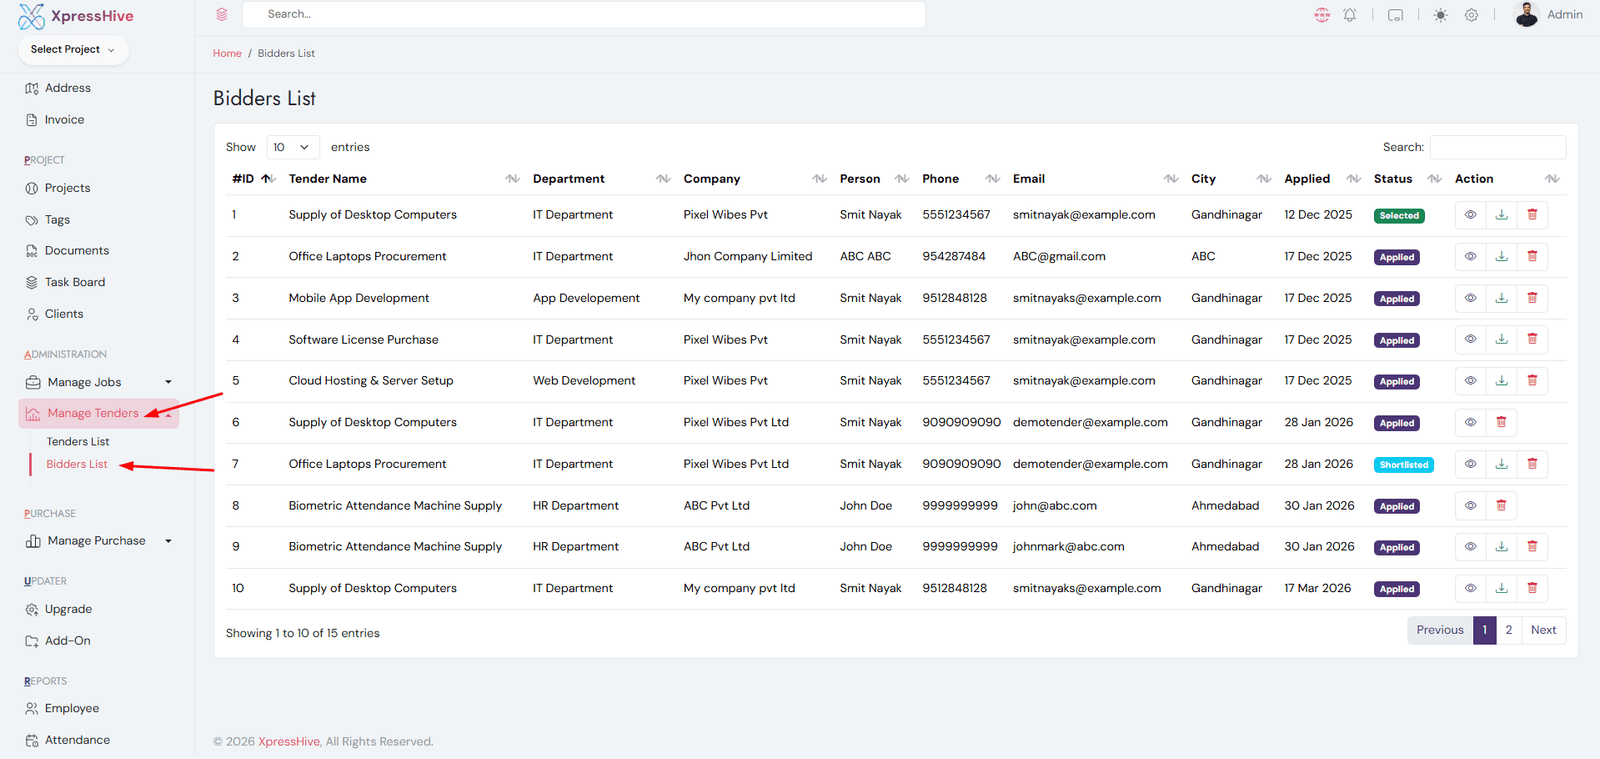
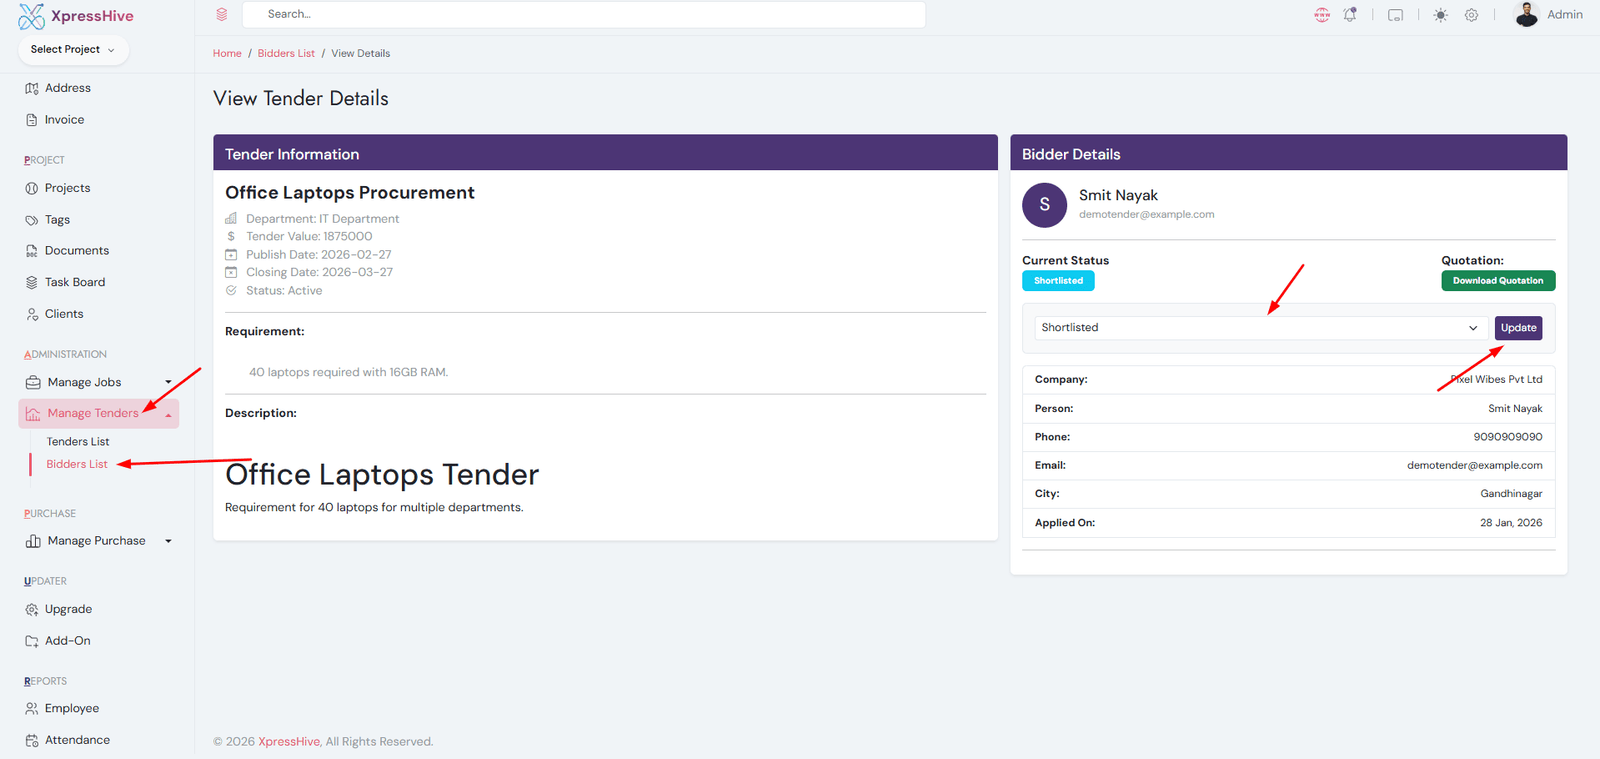
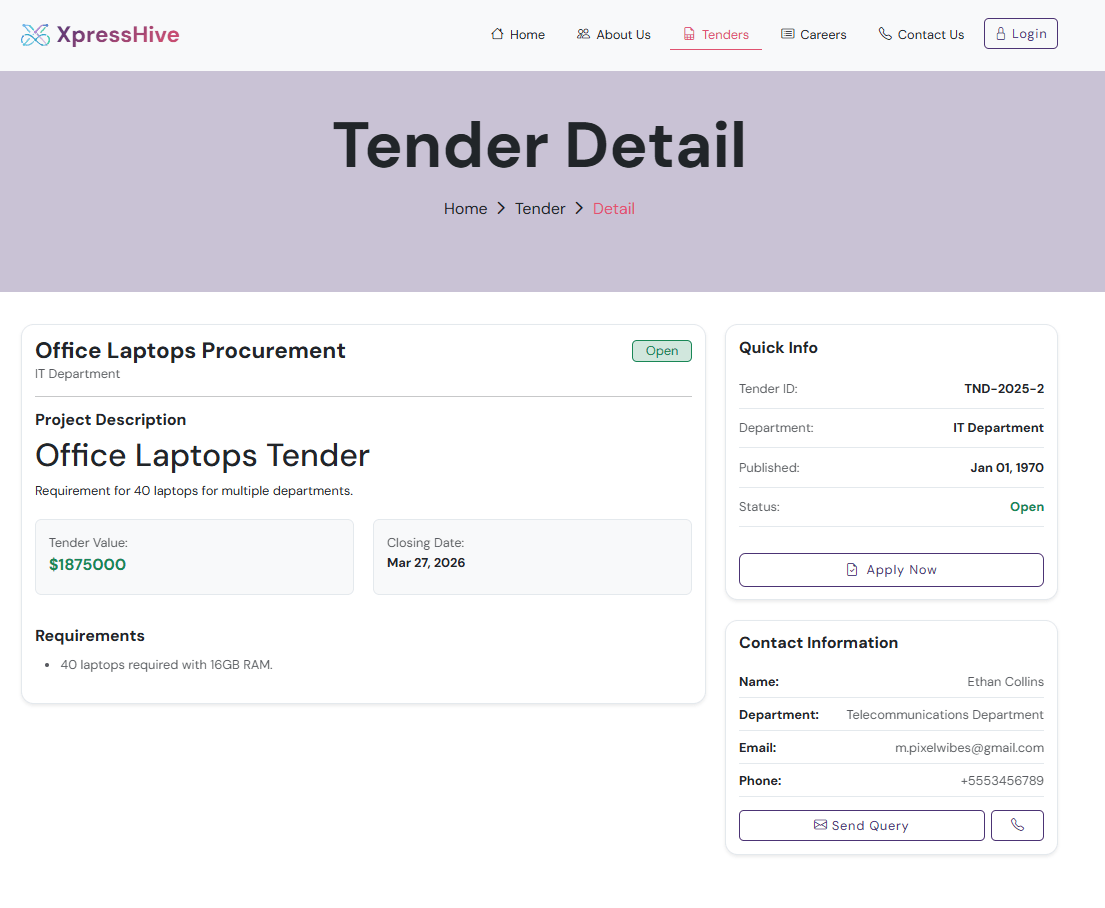
Tender & Bidder Management

Tender List
Bidders List
Bidder Details
  • Create and publish tenders with details such as department, value, and submission deadlines
  • Vendors can apply for tenders through a structured multi-step application process
  • Manage all bidder applications in a centralized bidders list
  • Review bidder details including company information, contact details, and submitted quotations
  • Download and verify uploaded documents such as quotations and supporting files
  • Update bidder status through stages (Pending, Applied, Shortlisted, Selected, Not Selected)
  • Shortlist qualified vendors based on evaluation criteria
  • Select the final bidder and mark as winner(Selected)
  • Track complete tender lifecycle from publishing to final selection
  • Generate reports for tender applications and bidding analysis

Vendor Registration & Bidding Flow

Vendor Applications (Admin View)
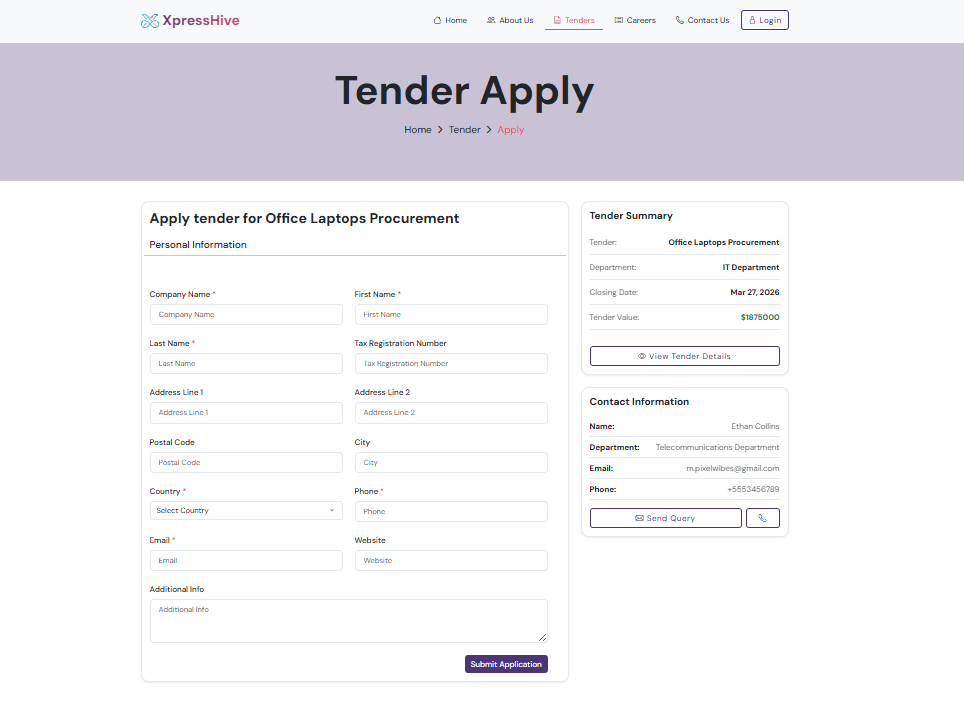
Tender Application (Step 1)
Tender Application (Step 2)
  • Vendors can apply for tenders through a structured step-by-step application process
  • Step 1 includes basic company and contact information registration
  • Step 2 allows vendors to upload quotations and required documents
  • System prevents duplicate applications for the same tender
  • Applications are stored and linked with the respective tender
  • Admin can view all vendor applications in the bidders list
  • Review vendor details including company profile, contact information, and submitted documents
  • Update application status (Pending, Applied, Shortlisted, Selected, Not Selected)
  • Download vendor quotations and supporting files for evaluation
  • Track the complete bidding lifecycle from application to final selection

Purchase Order & Billing Flow

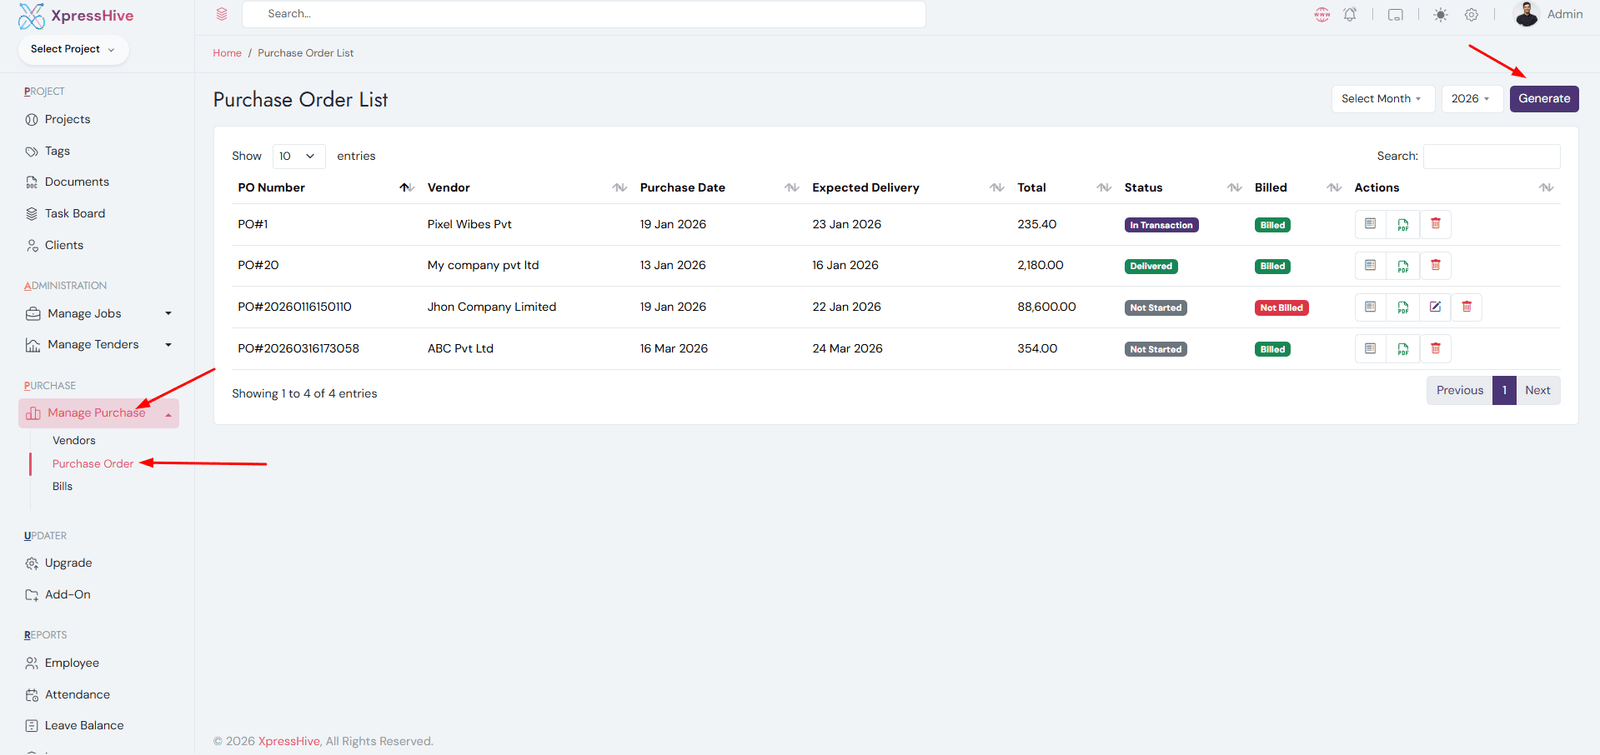
Purchase Order List
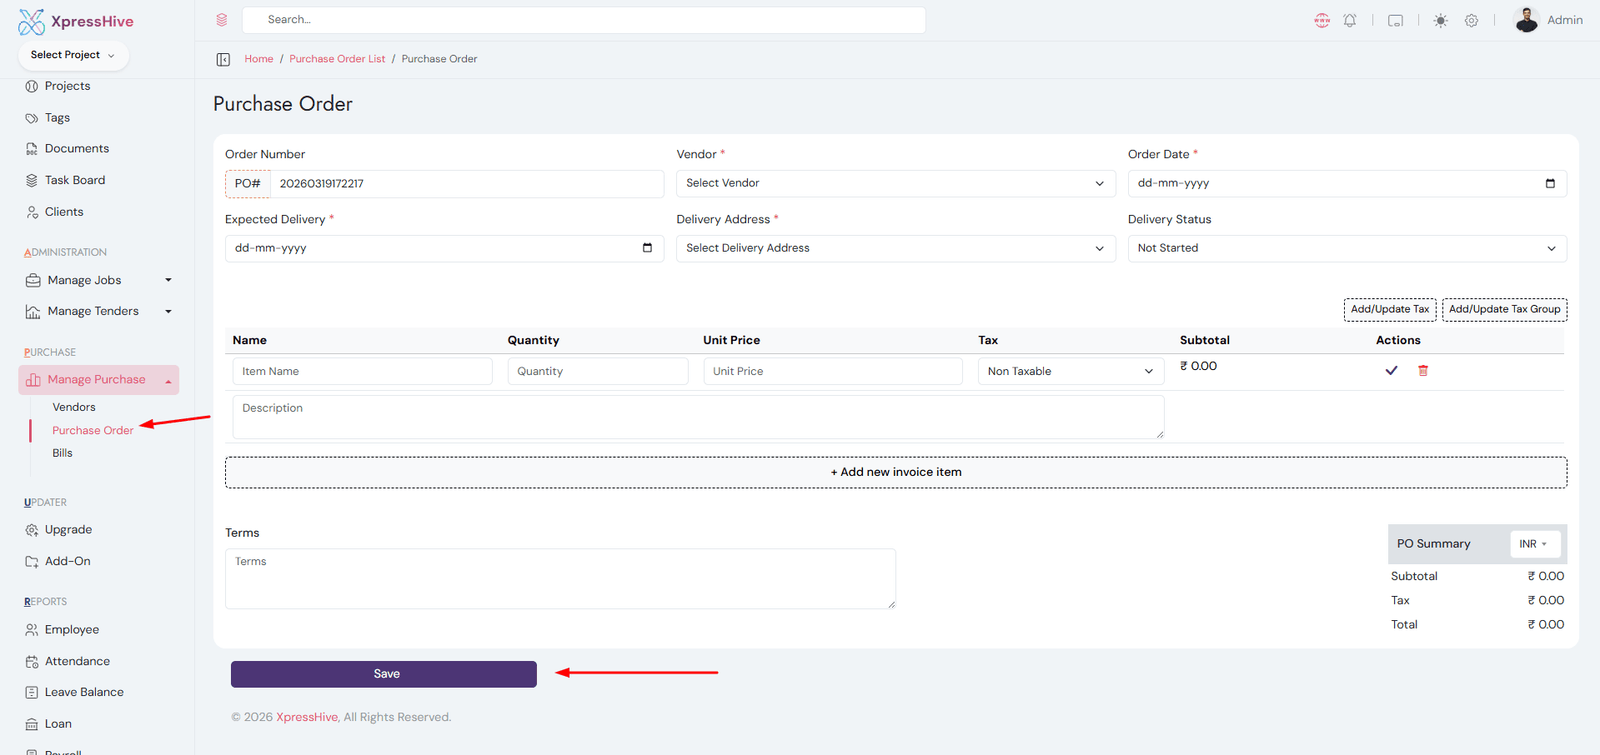
Generate Purchase Order
Bill Details
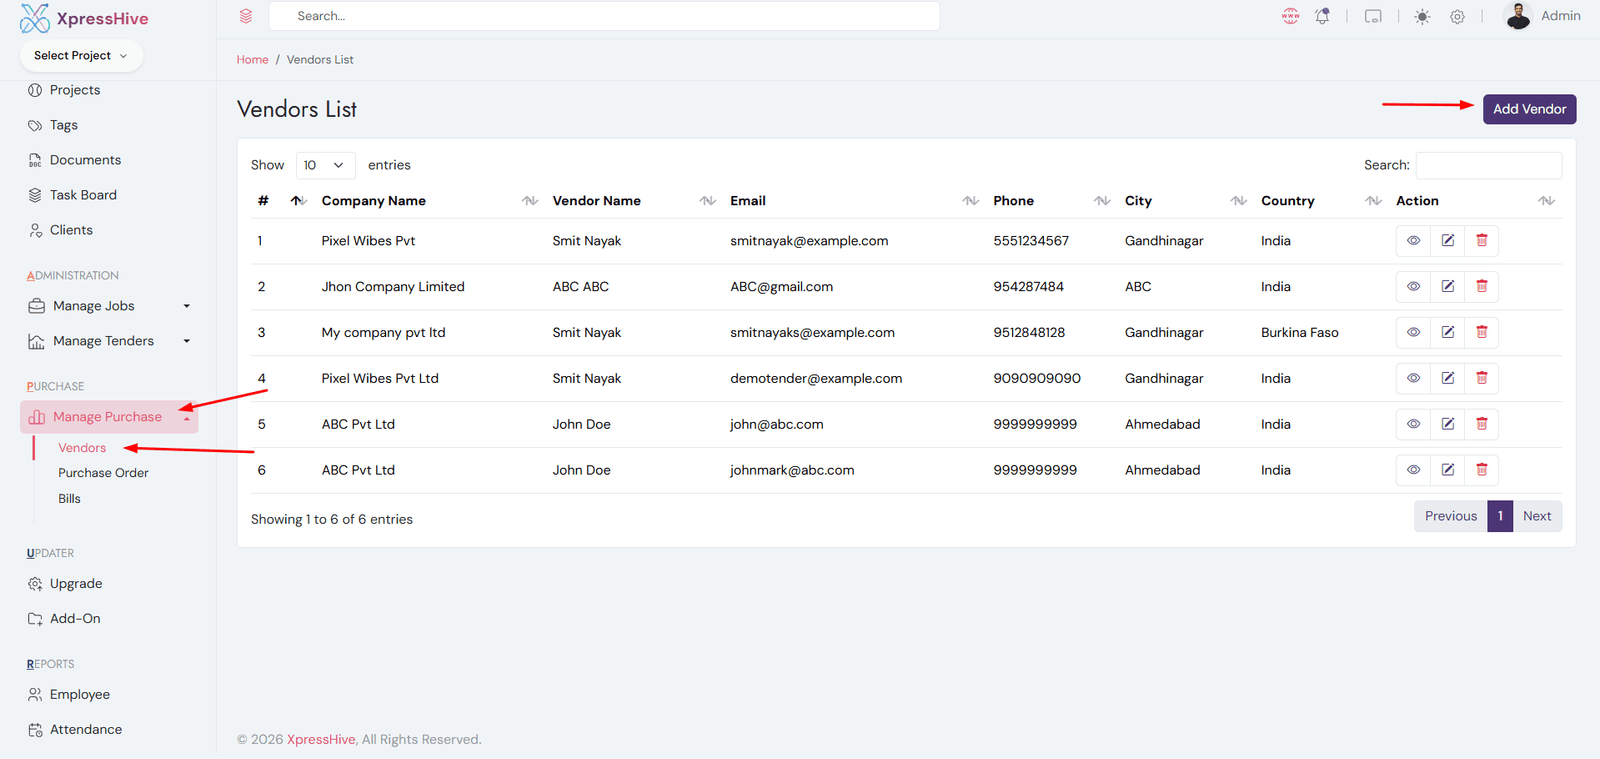
  • Create purchase orders by selecting vendor, items, quantity, pricing, and tax details
  • System automatically calculates subtotal, tax, and total amount
  • Track purchase order status (Not Started, In Transaction, Delivered)
  • Convert purchase orders into bills with a single action
  • Bill details are auto-filled from the purchase order including items and totals
  • Manage bill status (Unpaid, Partial, Paid) based on payments received
  • Add multiple payments and track payment history for each bill
  • System automatically updates due and paid amounts
  • Download purchase orders and bills in PDF format
  • Prevents editing or deleting purchase orders once billed
  • Ensures no duplicate bills are created for the same purchase order
  • Provides complete financial tracking from order creation to payment completion

Interview Management

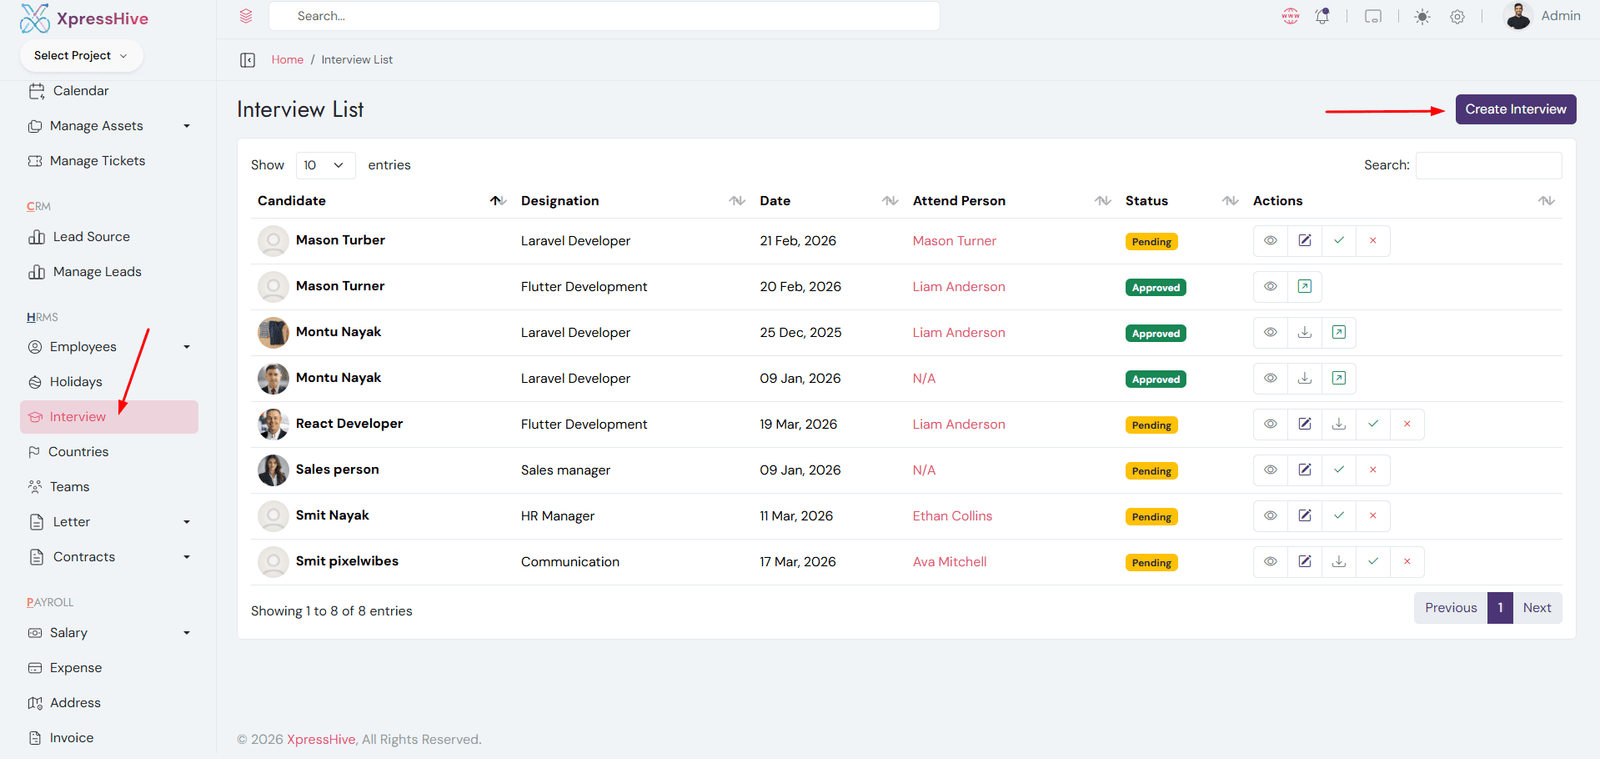
  • Schedule interviews for shortlisted candidates
  • Add interview details such as date, time, and interviewer
  • Update interview status and feedback
  • Track candidate progress through interview stages
  • Approve or reject candidates based on interview results
  • Convert interviews to employee directly

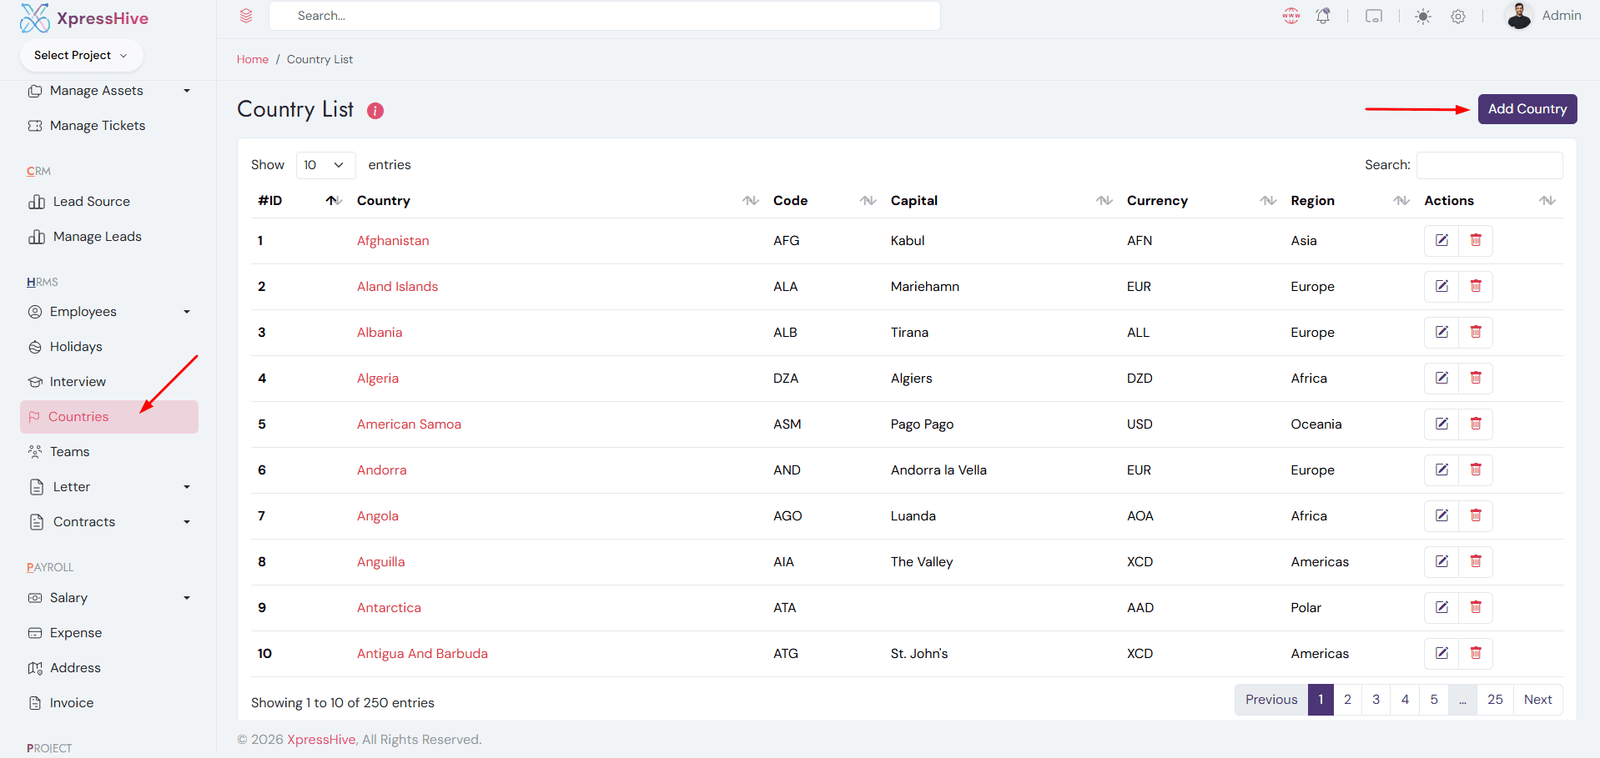
Country Management

  • Manage country list used in the system
  • Set default timezone based on selected country
  • Define default currency for financial modules
  • Edit or update country details anytime
  • Ensure correct country selection for accurate system settings

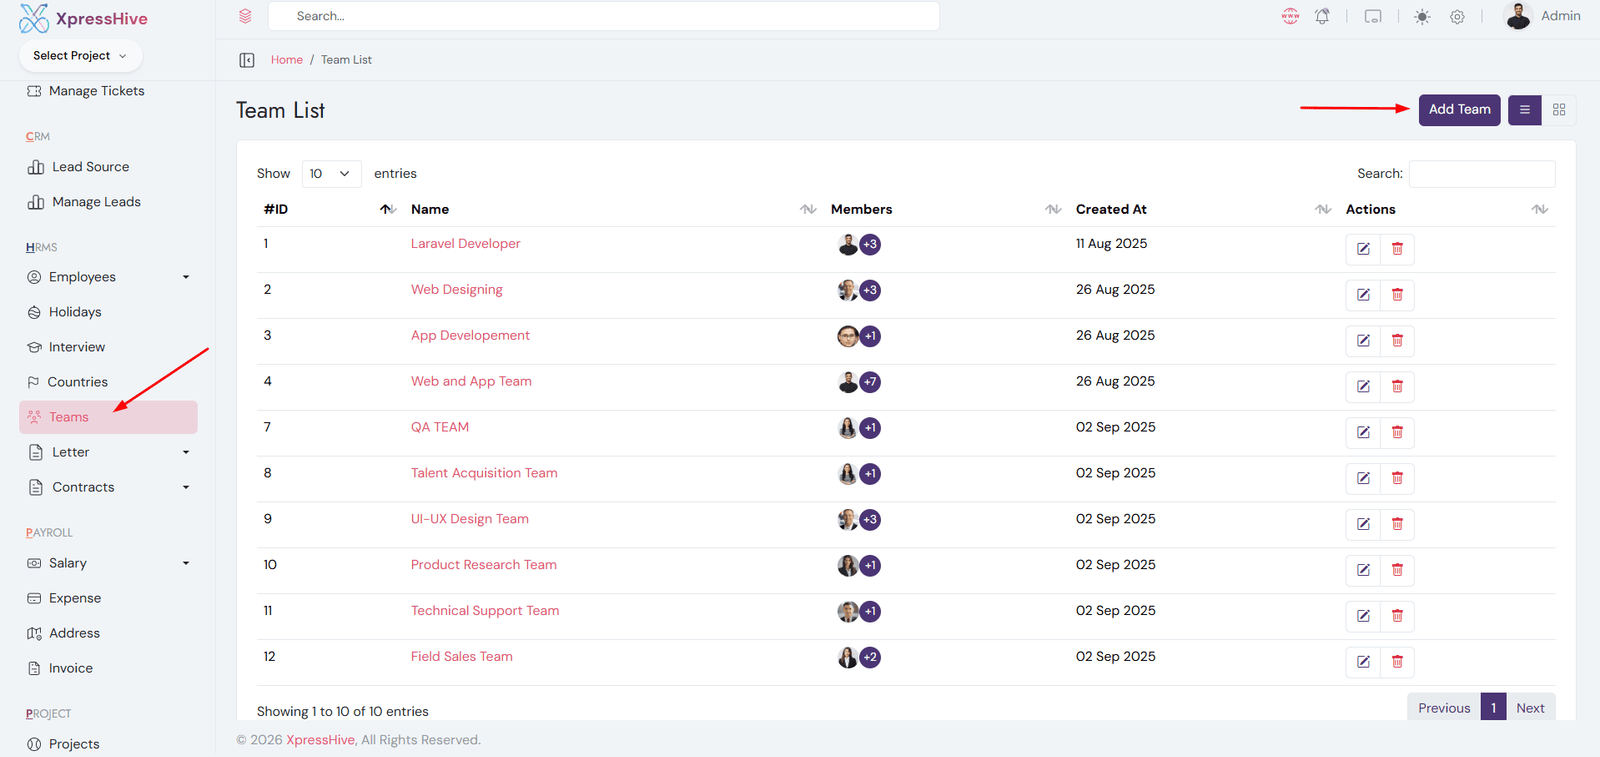
Team Management

  • Create and manage teams within the organization
  • Assign employees to specific teams
  • Edit or update team details
  • Organize employees for better project and task management

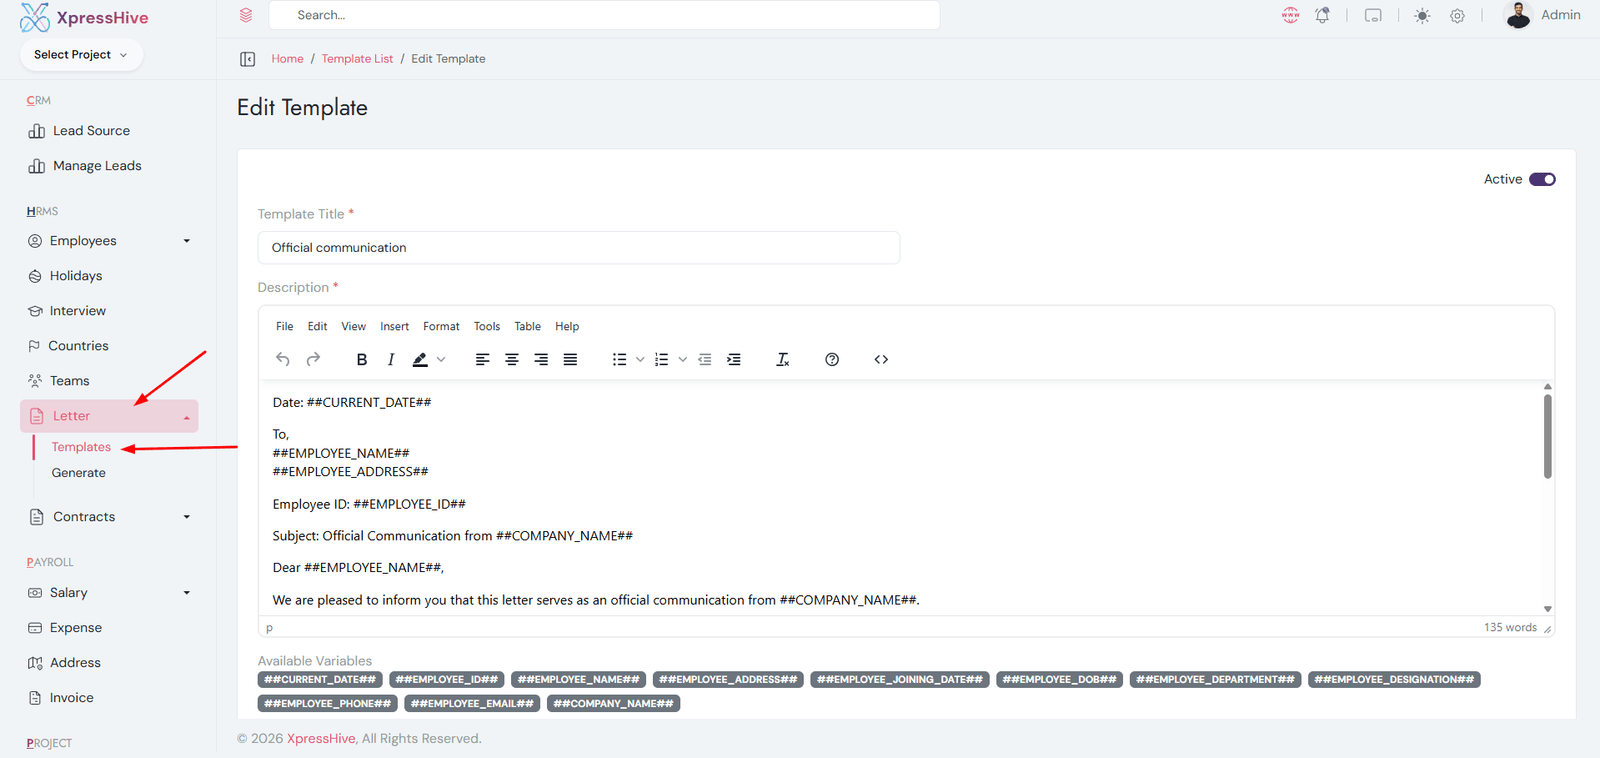
Letter Template & Generation

Create Letter Template
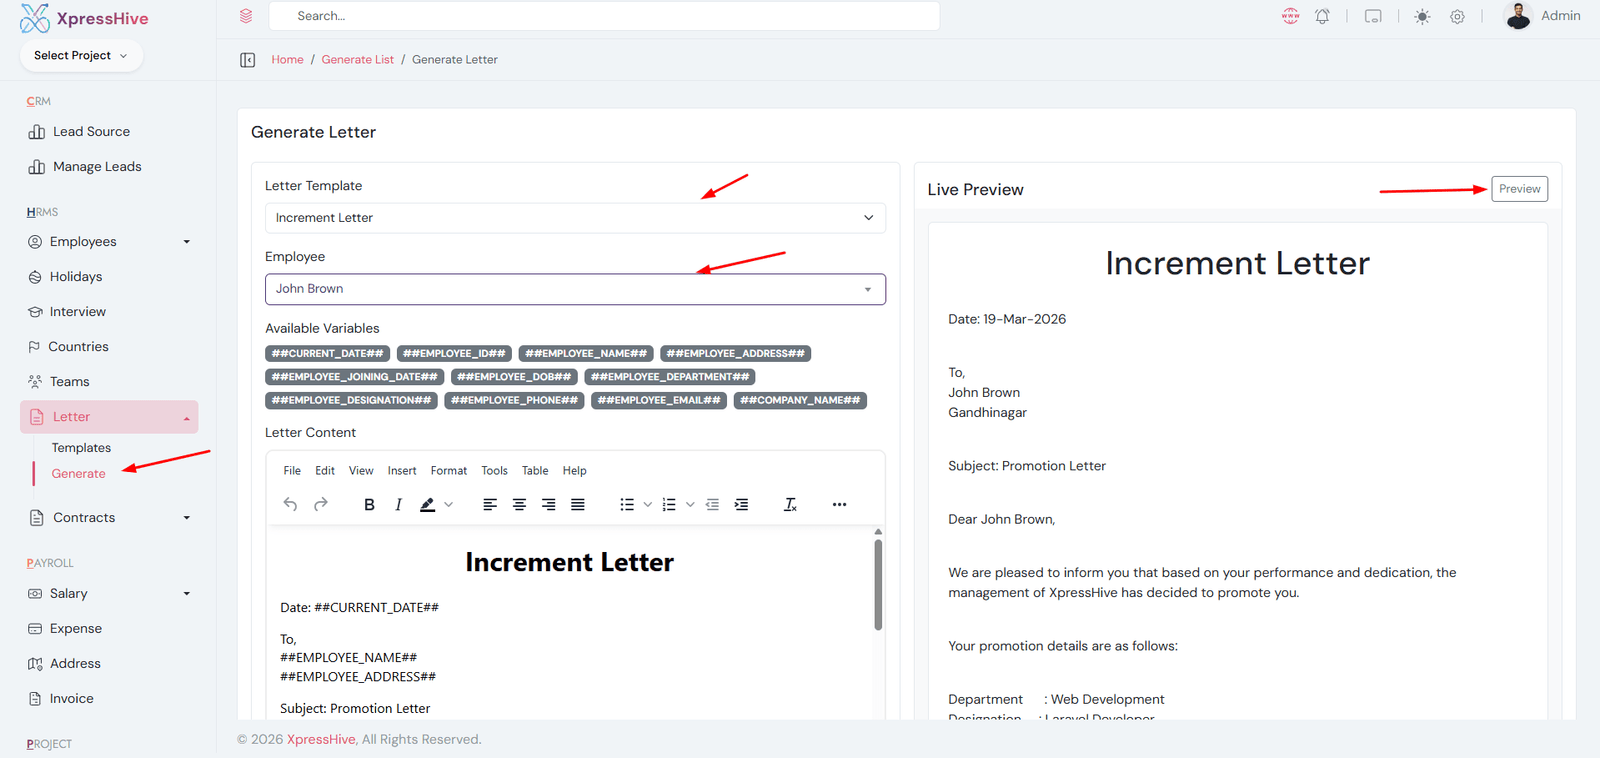
Generate Letter
  • Create reusable letter templates for HR documents like offer letters, promotion letters, and notices
  • Use dynamic variables (e.g., employee name, joining date, company name) to automate content generation
  • Manage templates with rich text editor for formatting and customization
  • Select a template and employee to generate a personalized letter
  • Preview the final letter with real data before saving
  • Edit generated content if required before finalizing
  • Automatically replace variables with actual employee or interview data
  • Download generated letters in PDF format for sharing or printing
  • Maintain a list of generated letters for future reference
  • Enable or disable templates using active status control
  • Supports both employee letters and offer/interview-based letters

Contract Template & Signing Flow

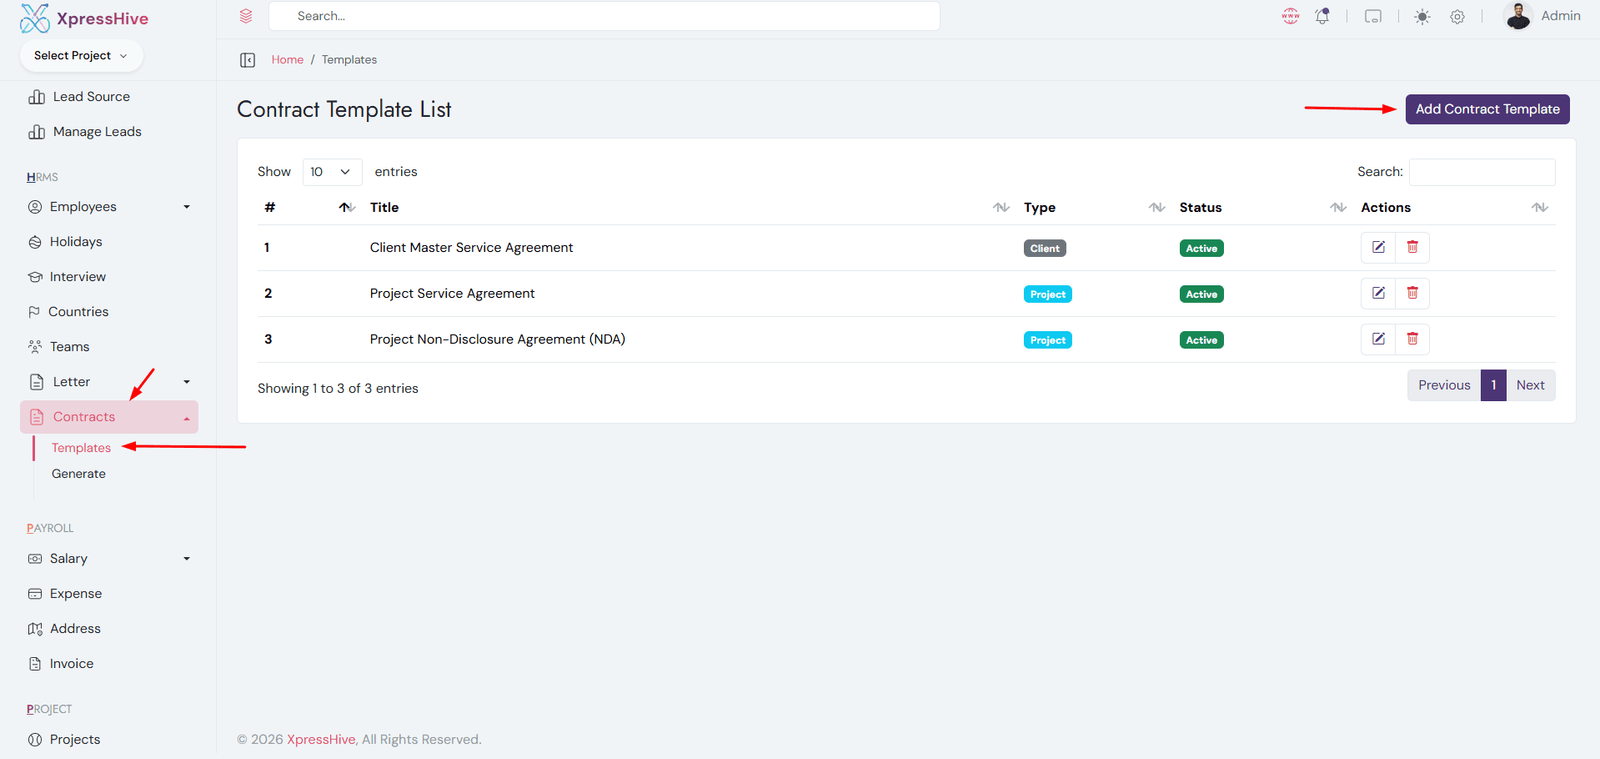
Contract Template List
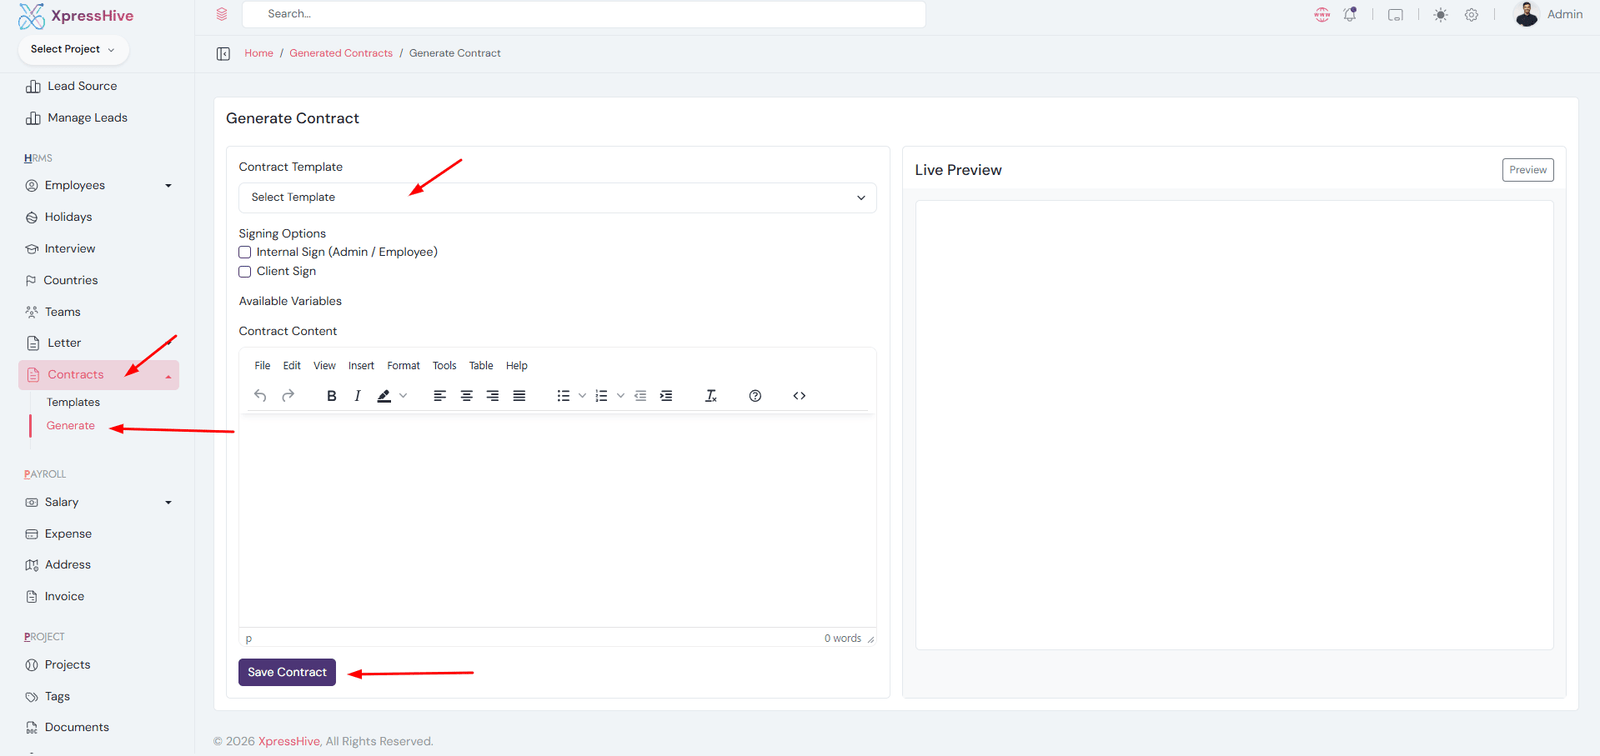
Generate Contract
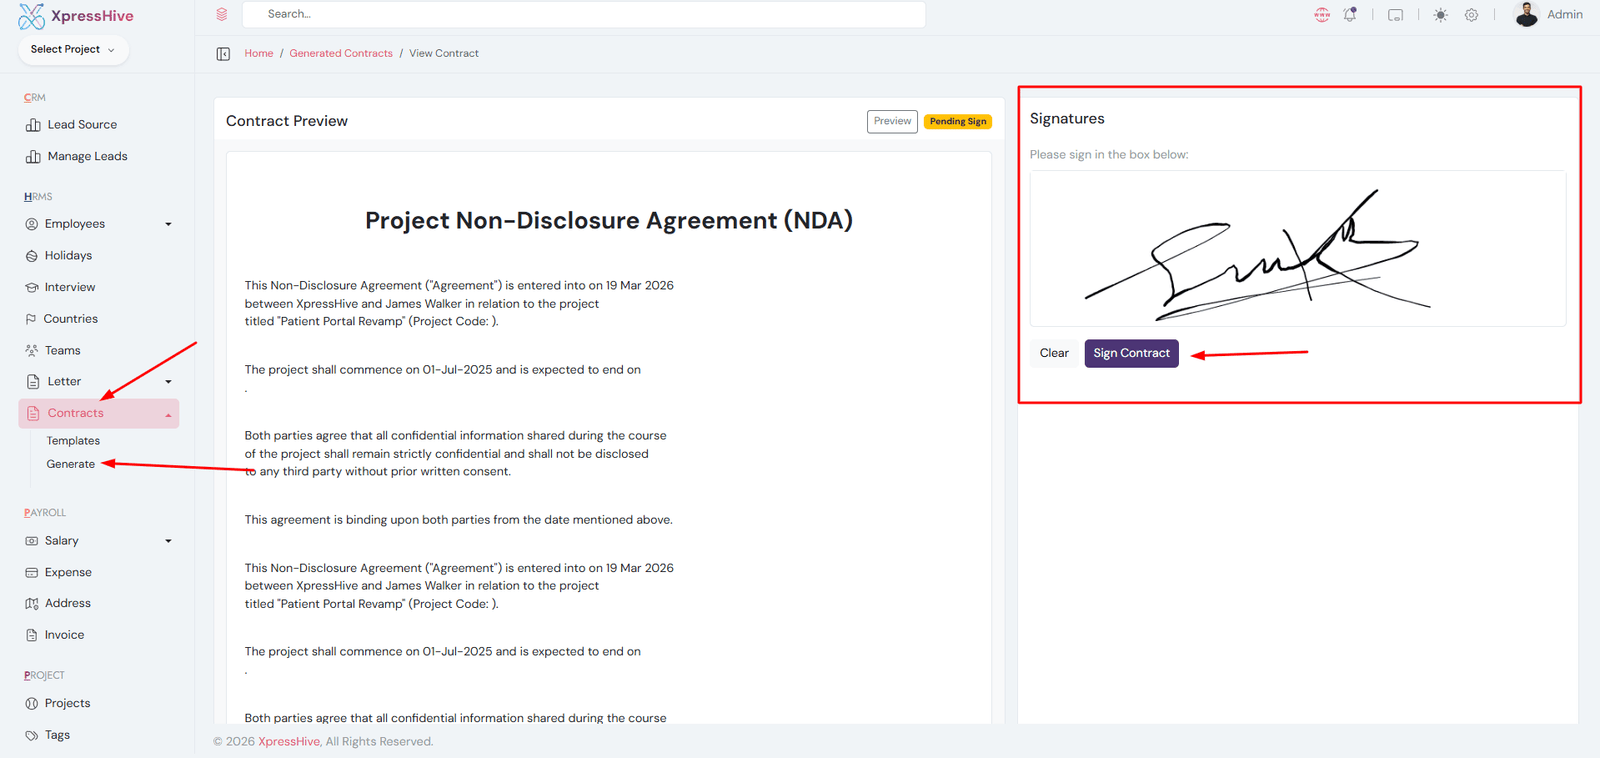
Contract Signing
  • Create reusable contract templates for projects or clients with dynamic variables
  • Define contract type (Project or Client) for accurate data mapping
  • Use placeholders to automatically populate contract details such as client name, project details, and dates
  • Generate contracts by selecting a template and associated project or client
  • Preview contract content with real data before finalizing
  • Enable internal and/or client signing options based on requirements
  • Share secure contract link using unique UUID for signing
  • Allow authorized users and clients to digitally sign contracts
  • Track contract signing status (Pending, Partially Signed, Fully Signed)
  • Download signed contracts as PDF for legal or business use
  • Maintain a complete history of generated contracts and signatures

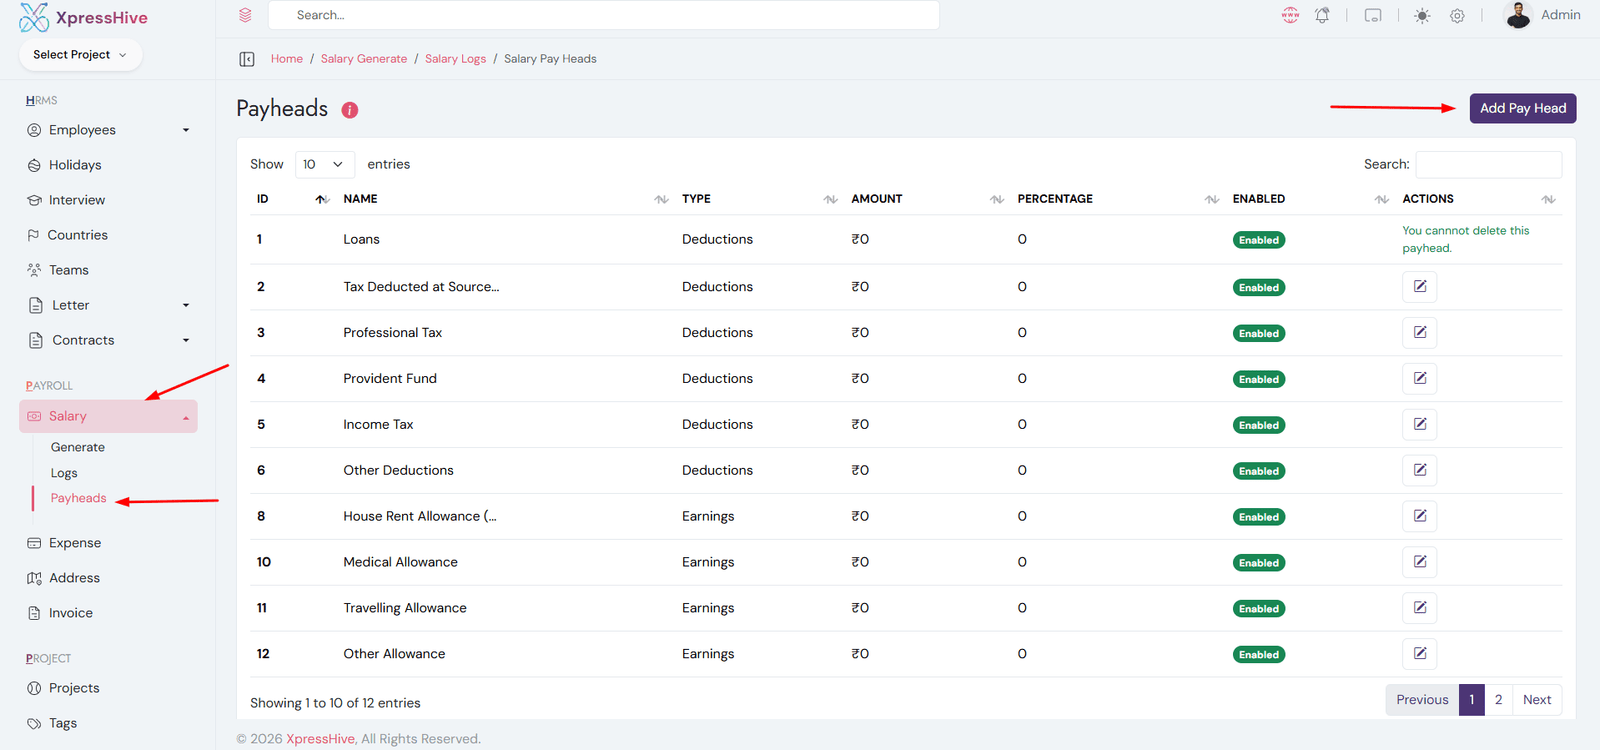
Salary Payheads

  • Define salary structure components
  • Create earnings (Basic, Bonus, Allowances)
  • Create deductions (Tax, Loan, PF)
  • Edit or update payhead details
  • Used in salary generation and payroll calculations

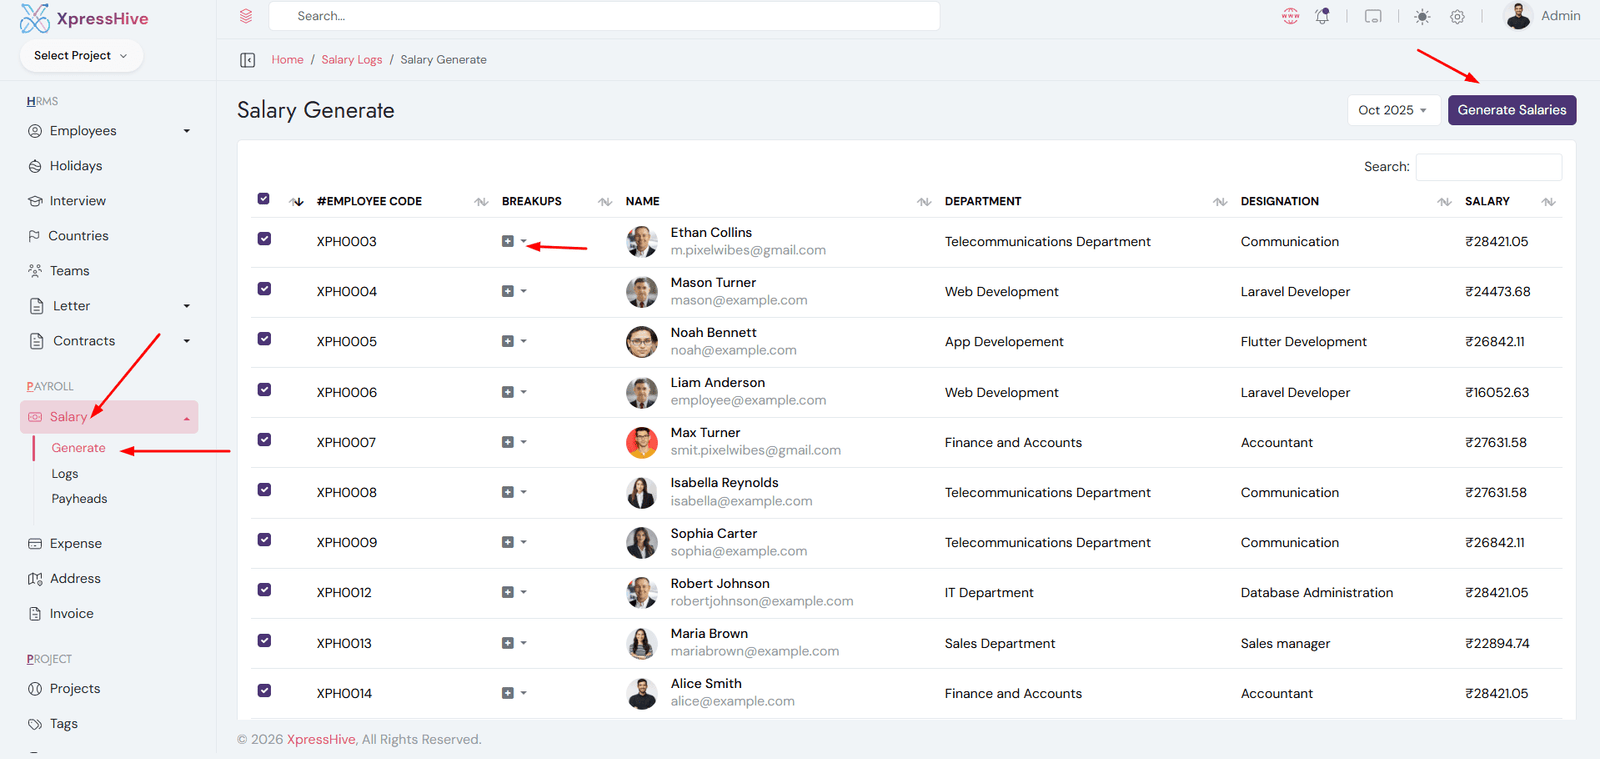
Salary Generate

  • Generate salaries for employees based on attendance and payheads
  • Select month and employee details
  • Automatically calculate earnings and deductions
  • Edit or update salary records if required
  • Used for payroll processing

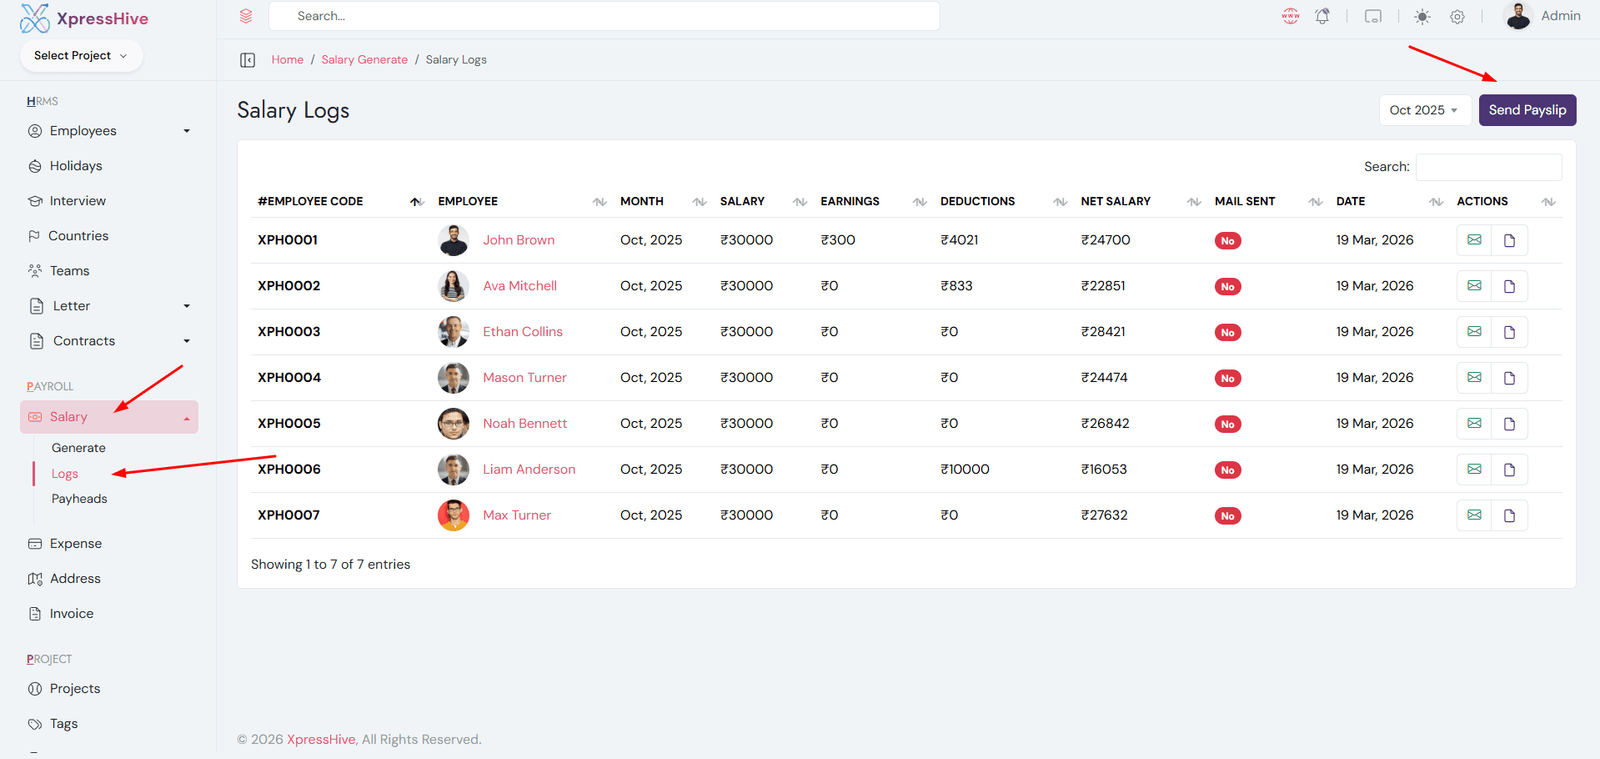
Salary Logs

  • View history of all generated salaries
  • Track salary records for each employee
  • Check detailed salary breakdown
  • Used for auditing and reporting purposes

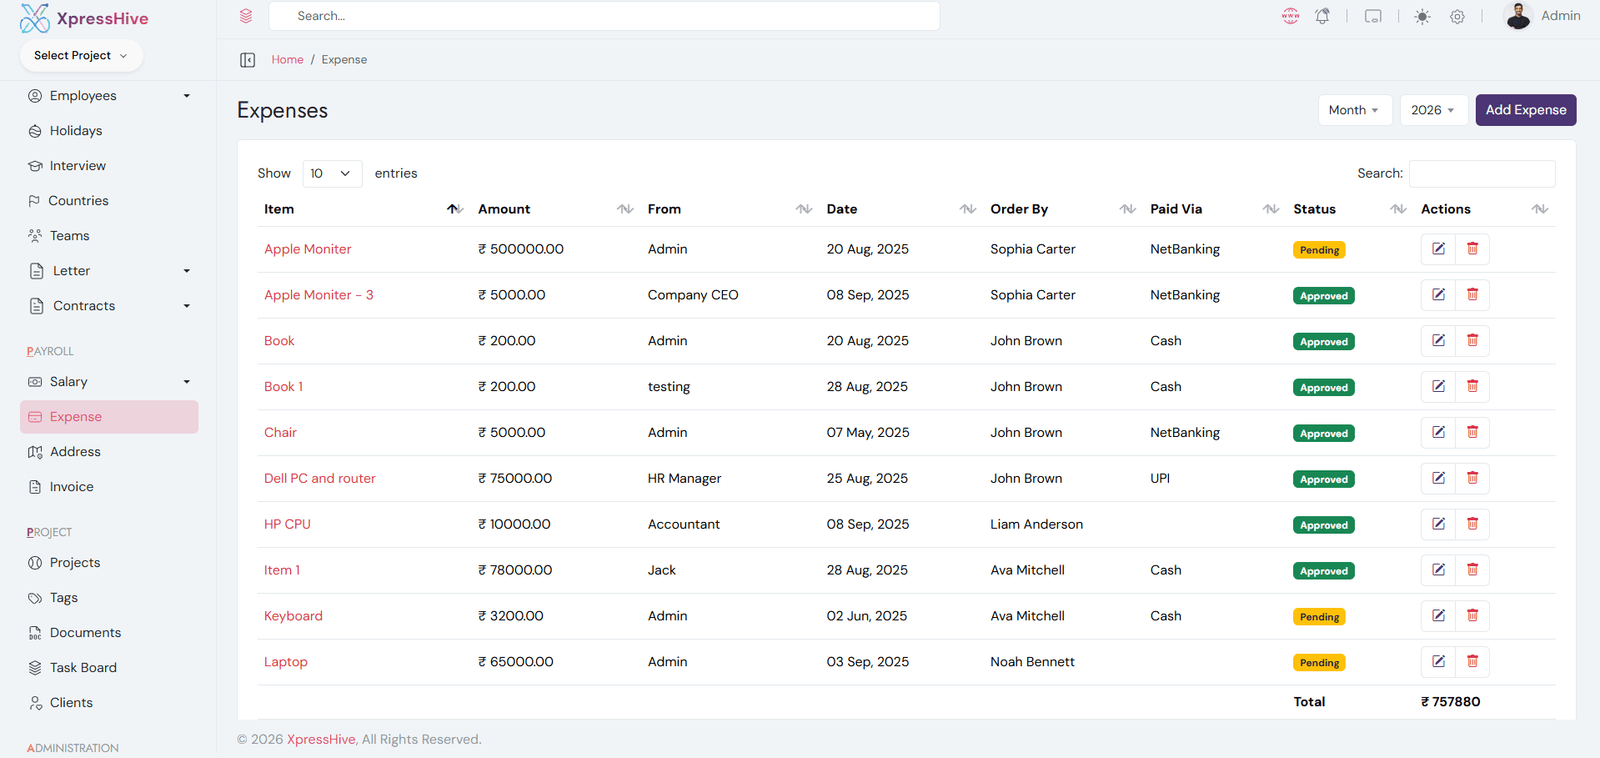
Expenses Management

  • Manage all company expenses in one place
  • Add new expense entries with details
  • Edit or update expense records anytime
  • Track spending and financial activities
  • Used for financial reporting and analysis

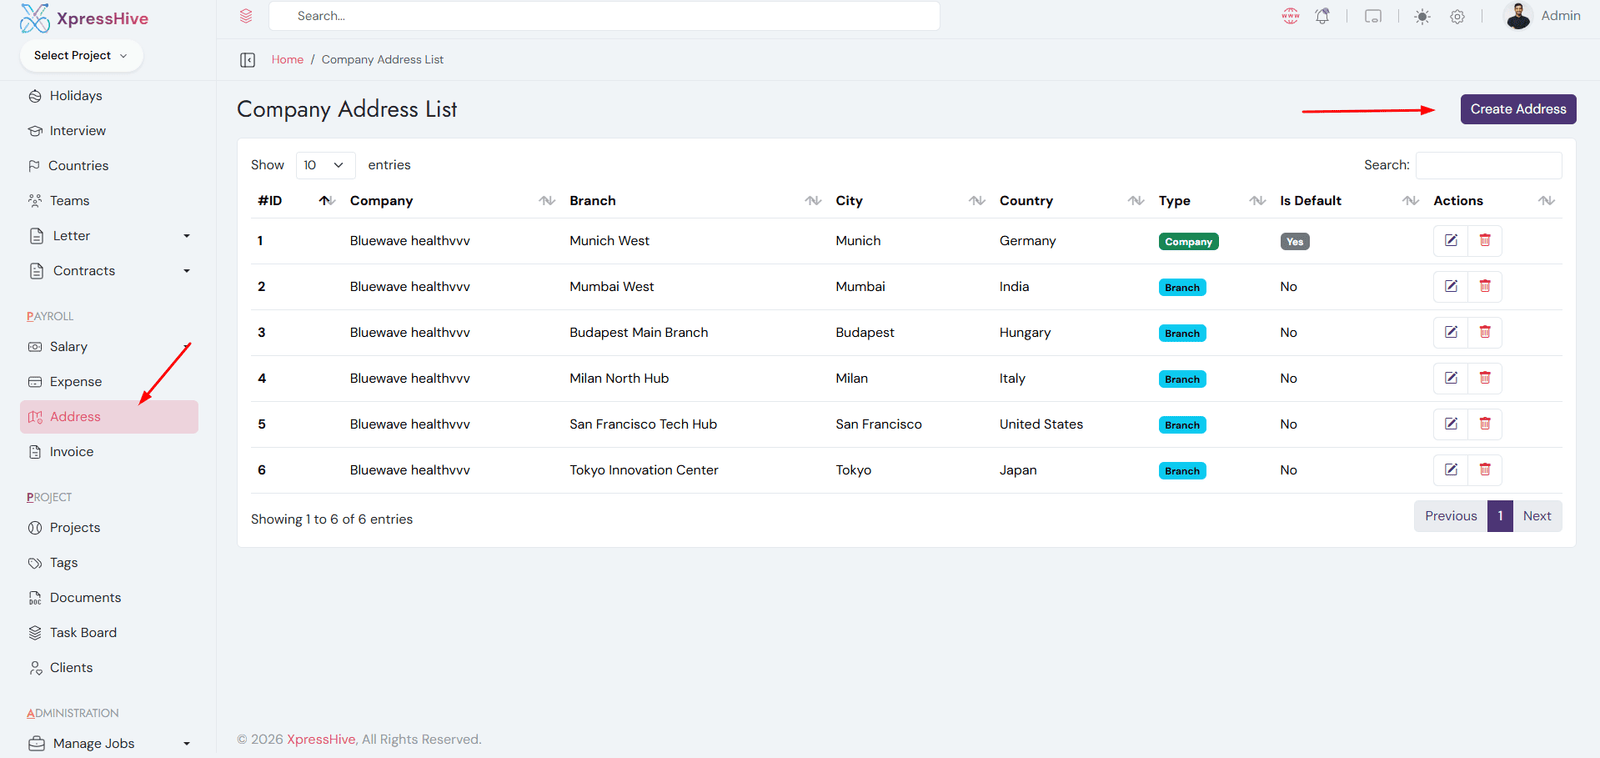
Company Address

  • Manage company address details
  • Add multiple office locations if required
  • Edit or update address information
  • Used in invoices and official documents

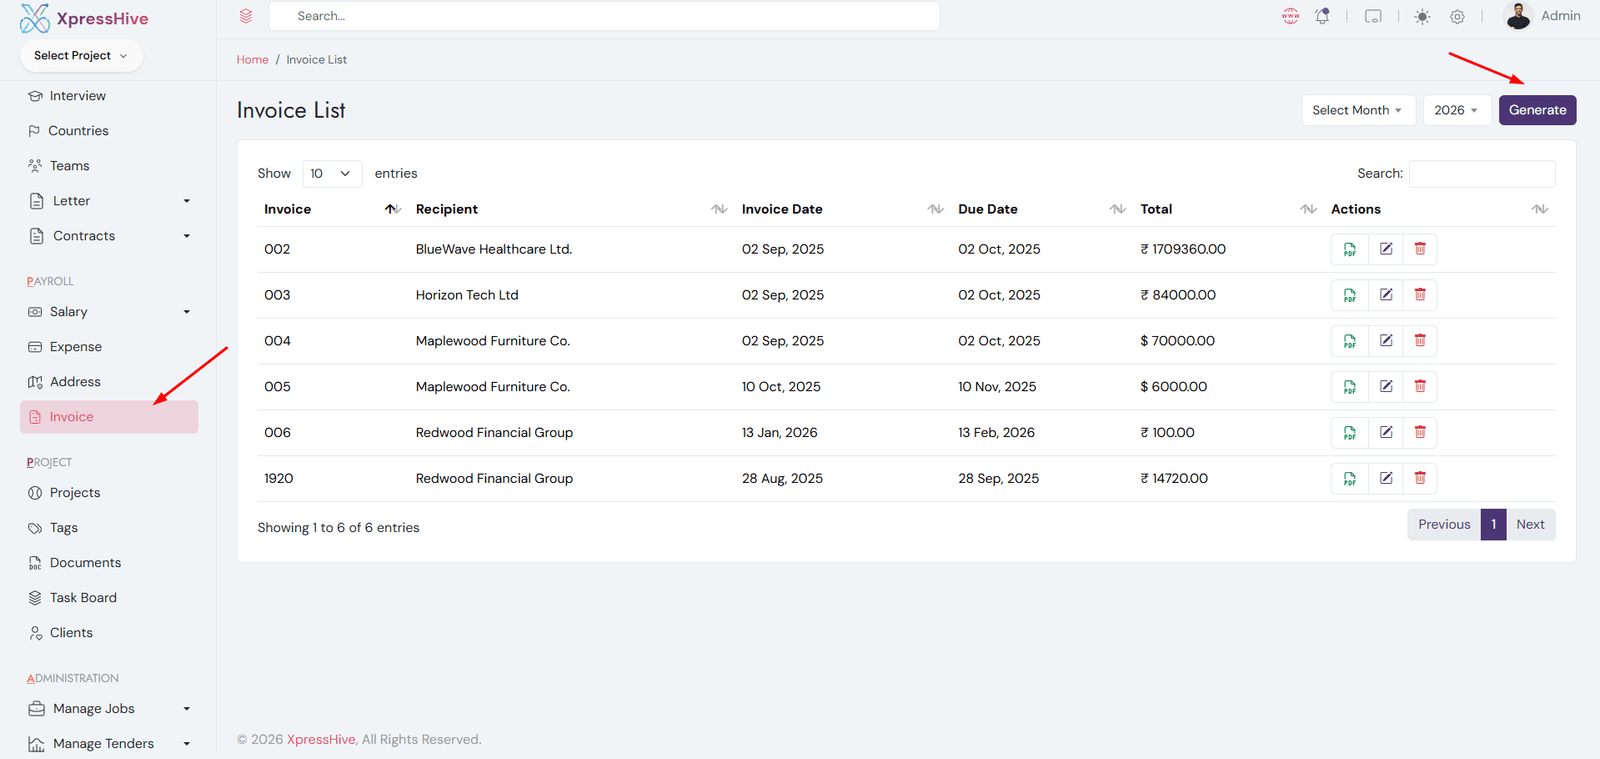
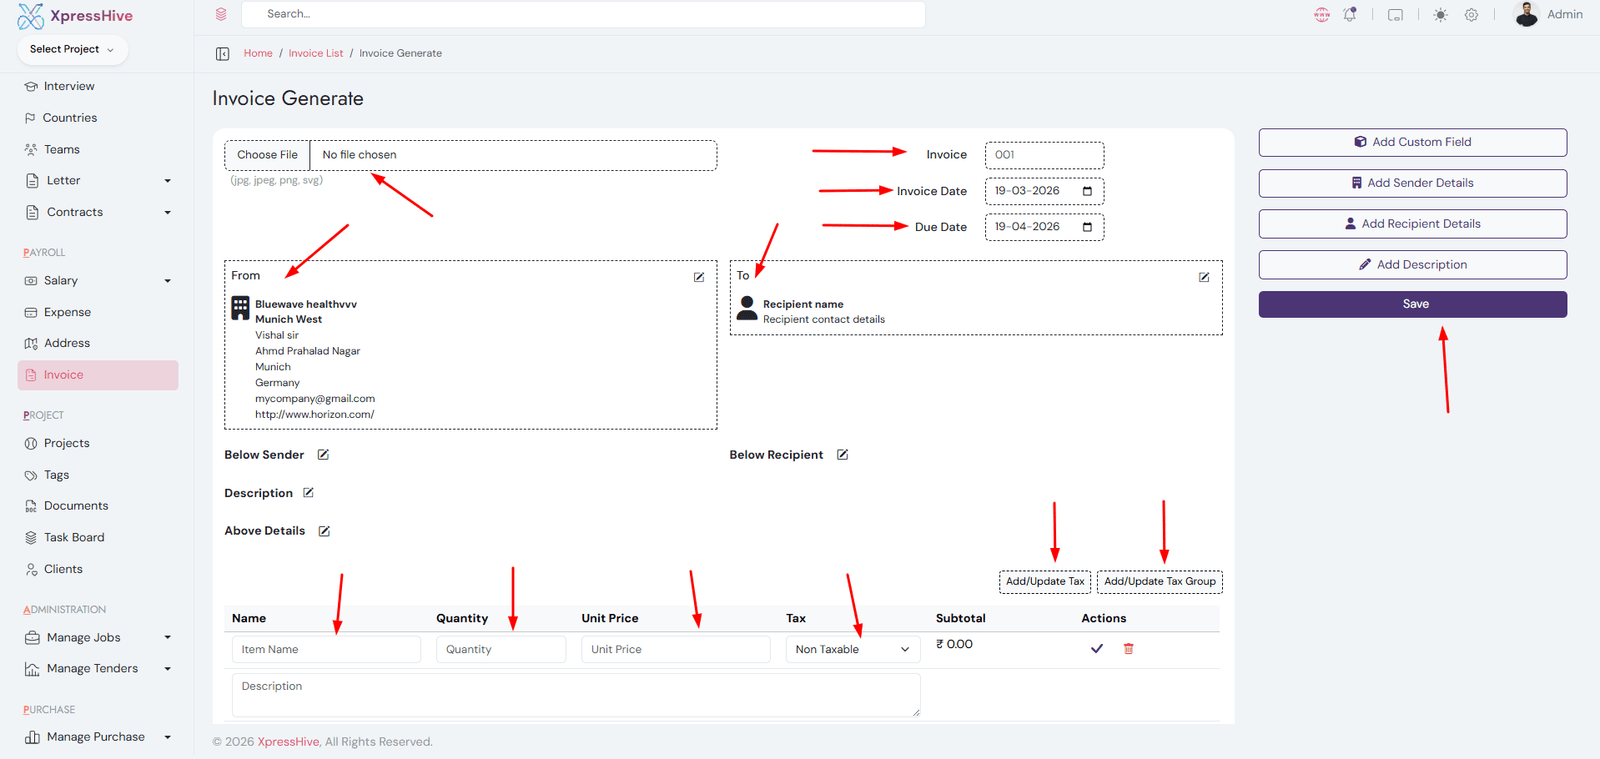
Invoice Management

  • Create and manage invoices for clients
  • Add invoice details including items, taxes, and amounts
  • Edit or update invoices anytime
  • Track payment status and invoice history
  • Used for billing and financial management

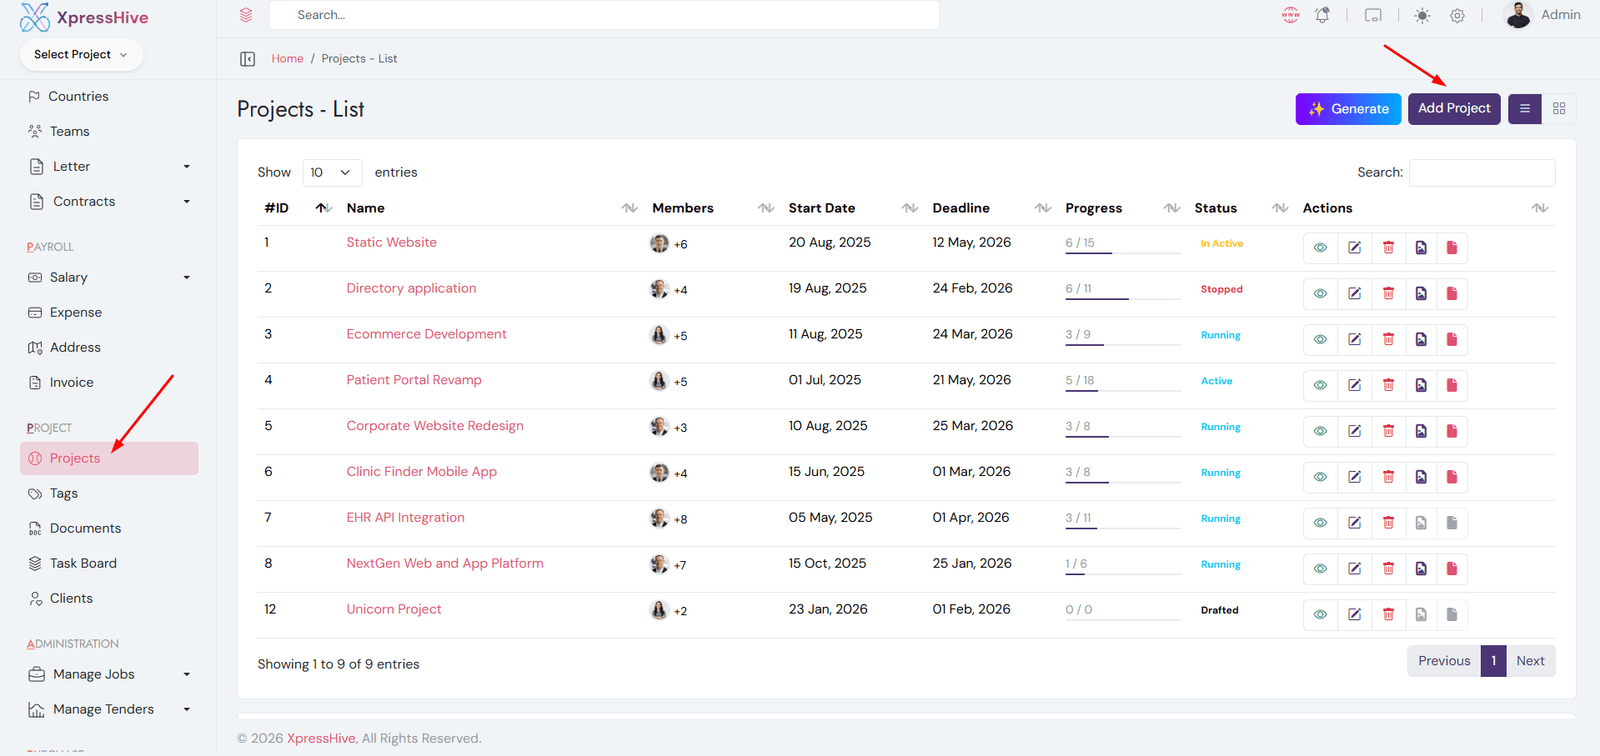
Project Management

  • Manage all projects in the system
  • Create new projects with details
  • Assign employees to projects
  • Update project status and progress
  • Link projects with clients and tasks

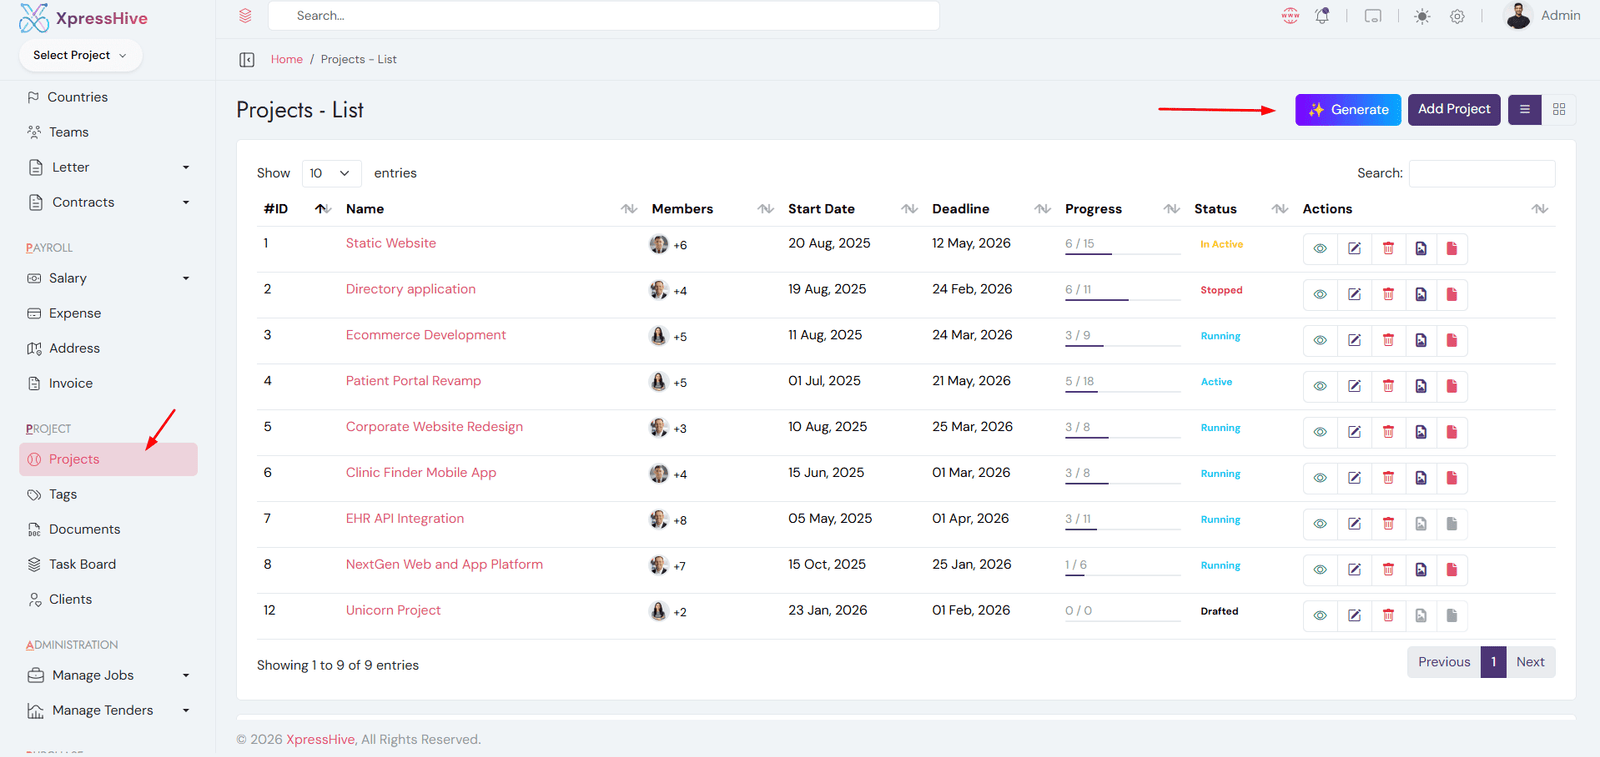
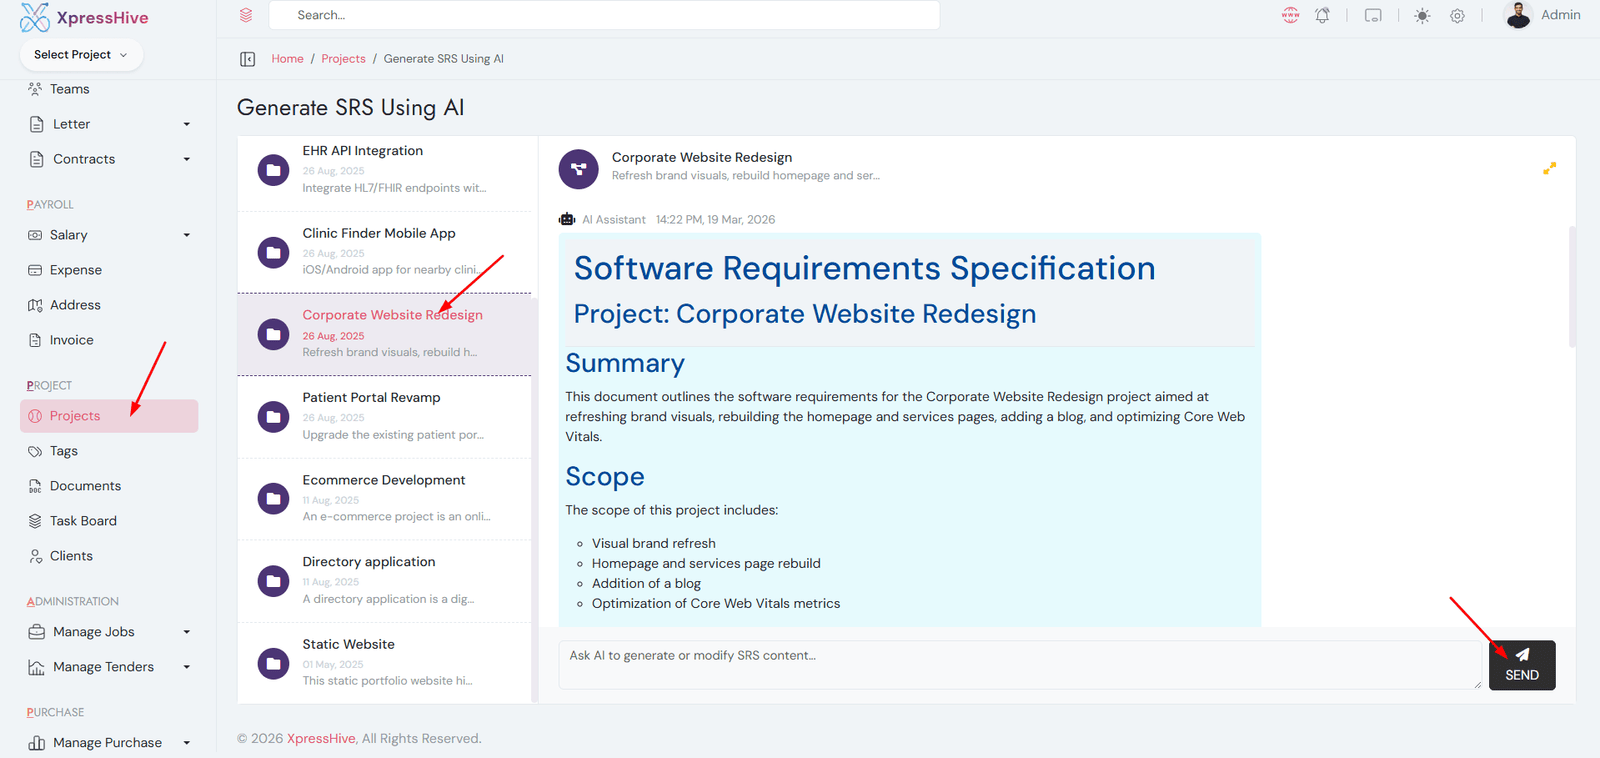
AI Base SRS Generate

Go to Projects > Generate SRS
Select Project and generate SRS
  • Generate Software Requirement Specification (SRS) using AI
  • Select a project from the project list
  • Click on the Generate button
  • AI will create structured SRS content automatically
  • Download and use the generated SRS document
  • Helps save time and improve documentation quality

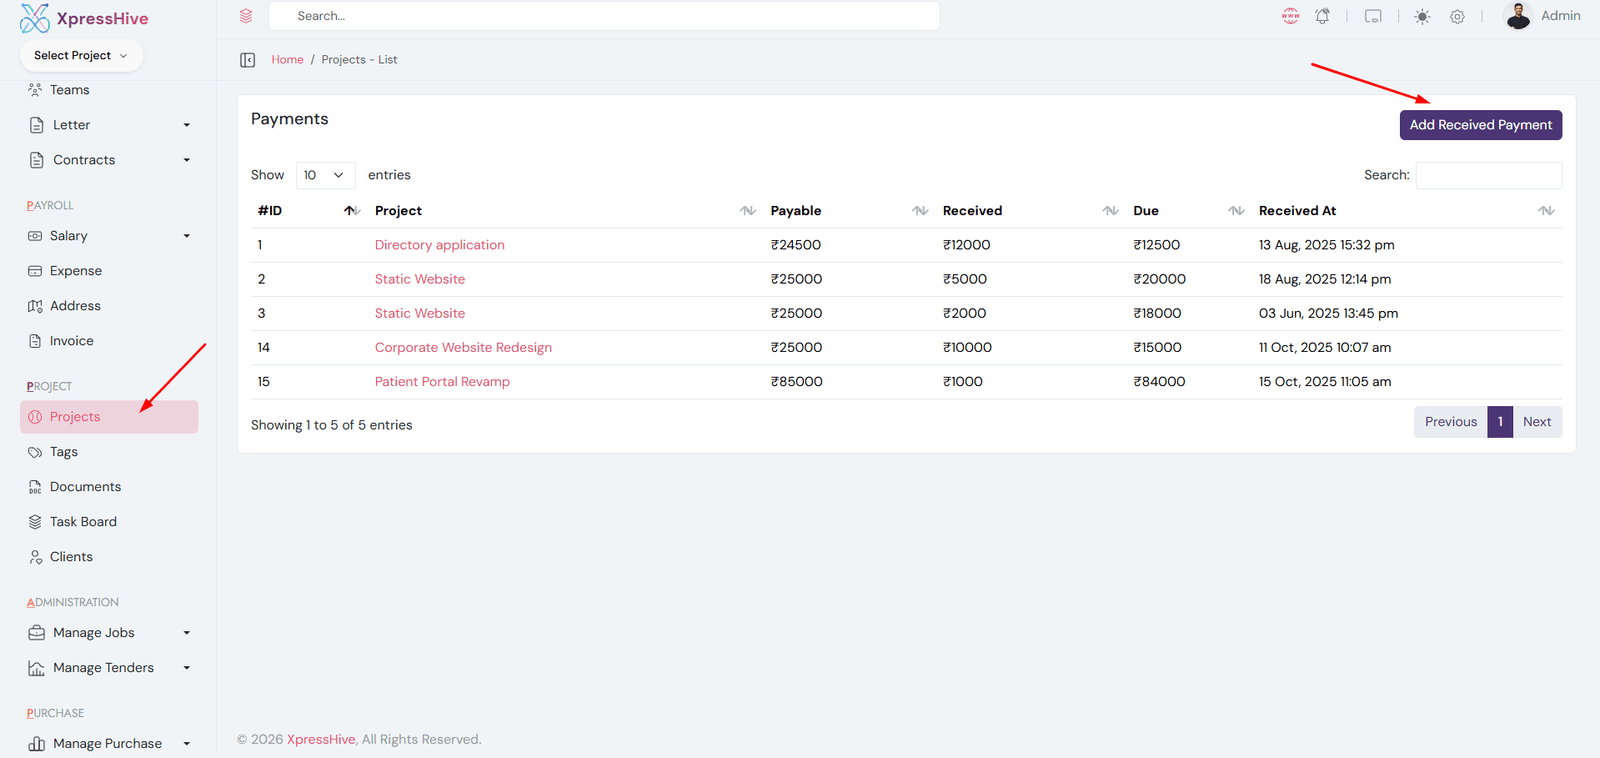
Payments Management

  • Manage all payment records in the system
  • Add new payments linked to projects
  • Track payment details and history
  • View complete payment records
  • Used for financial tracking and reporting

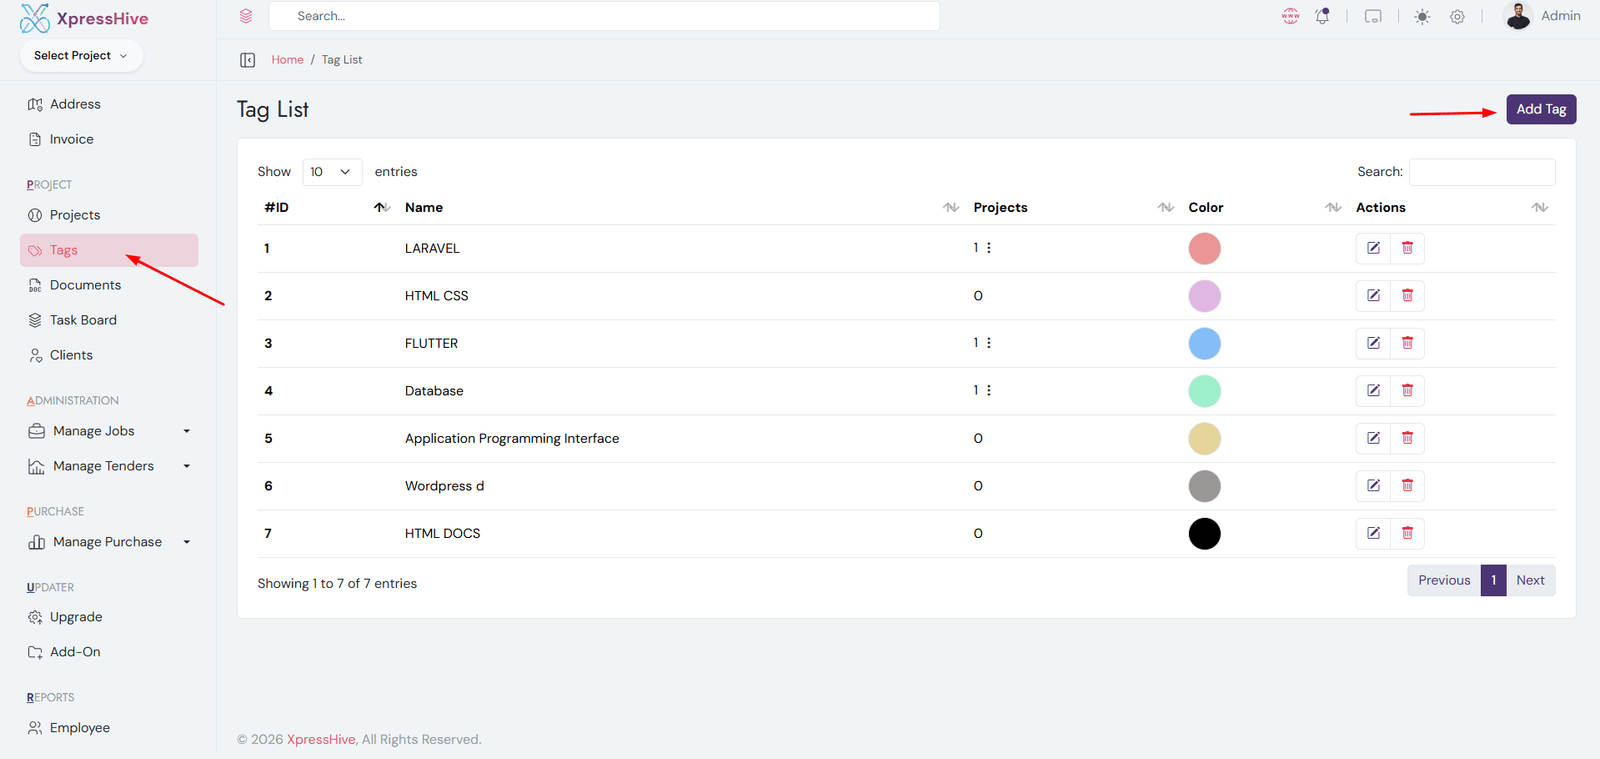
Tags Management

  • Create and manage tags
  • Use tags to categorize projects and tasks
  • Edit or update tag details
  • Delete unused tags
  • Helps organize and filter data efficiently

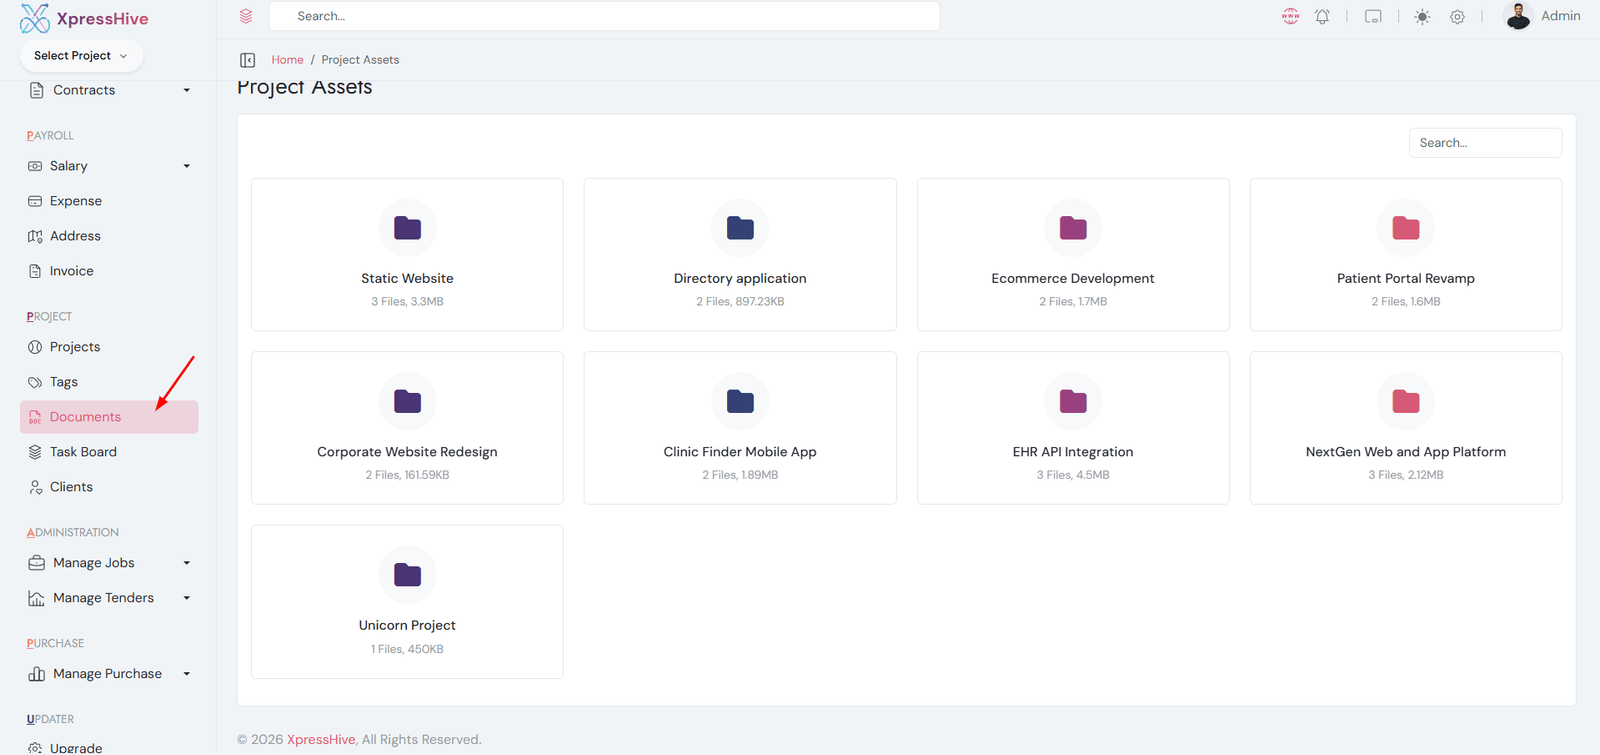
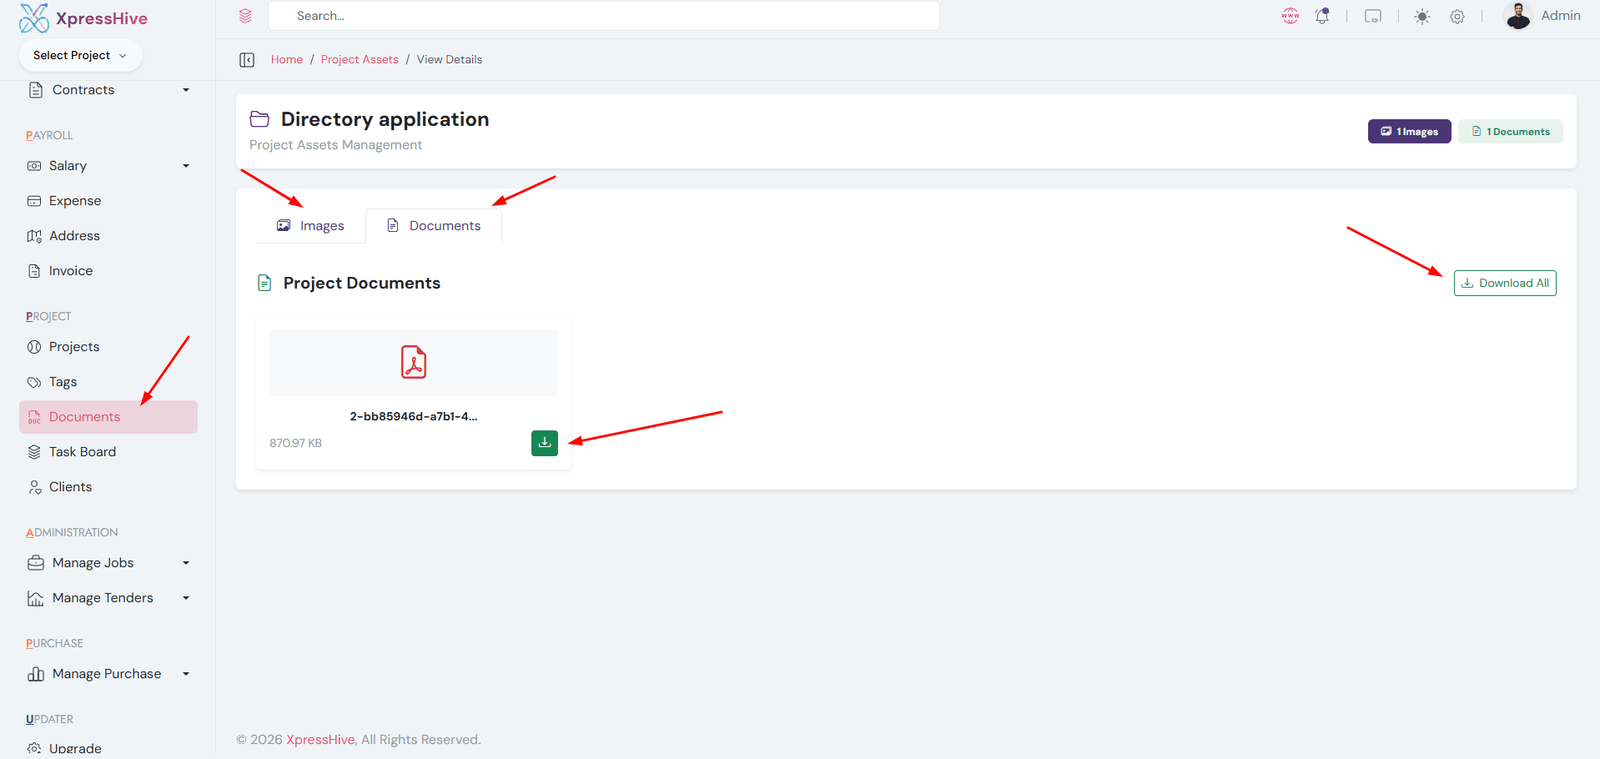
Project Assets

Project Assets
Project Asset Detail
  • Manage files and assets related to projects
  • Upload documents, images, or resources
  • Download and view project files
  • Each project can have multiple assets
  • Helps keep all project resources organized

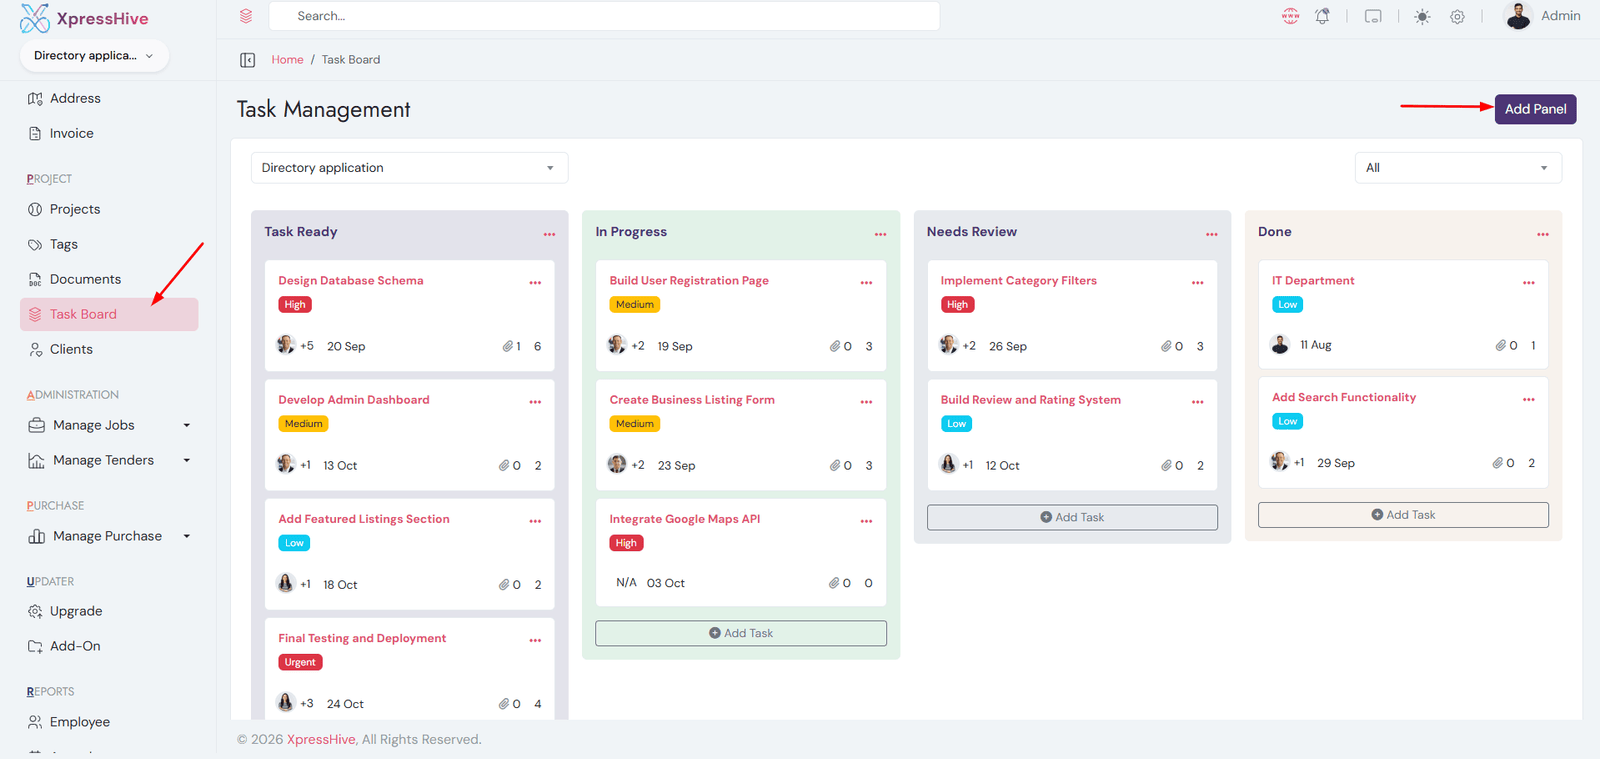
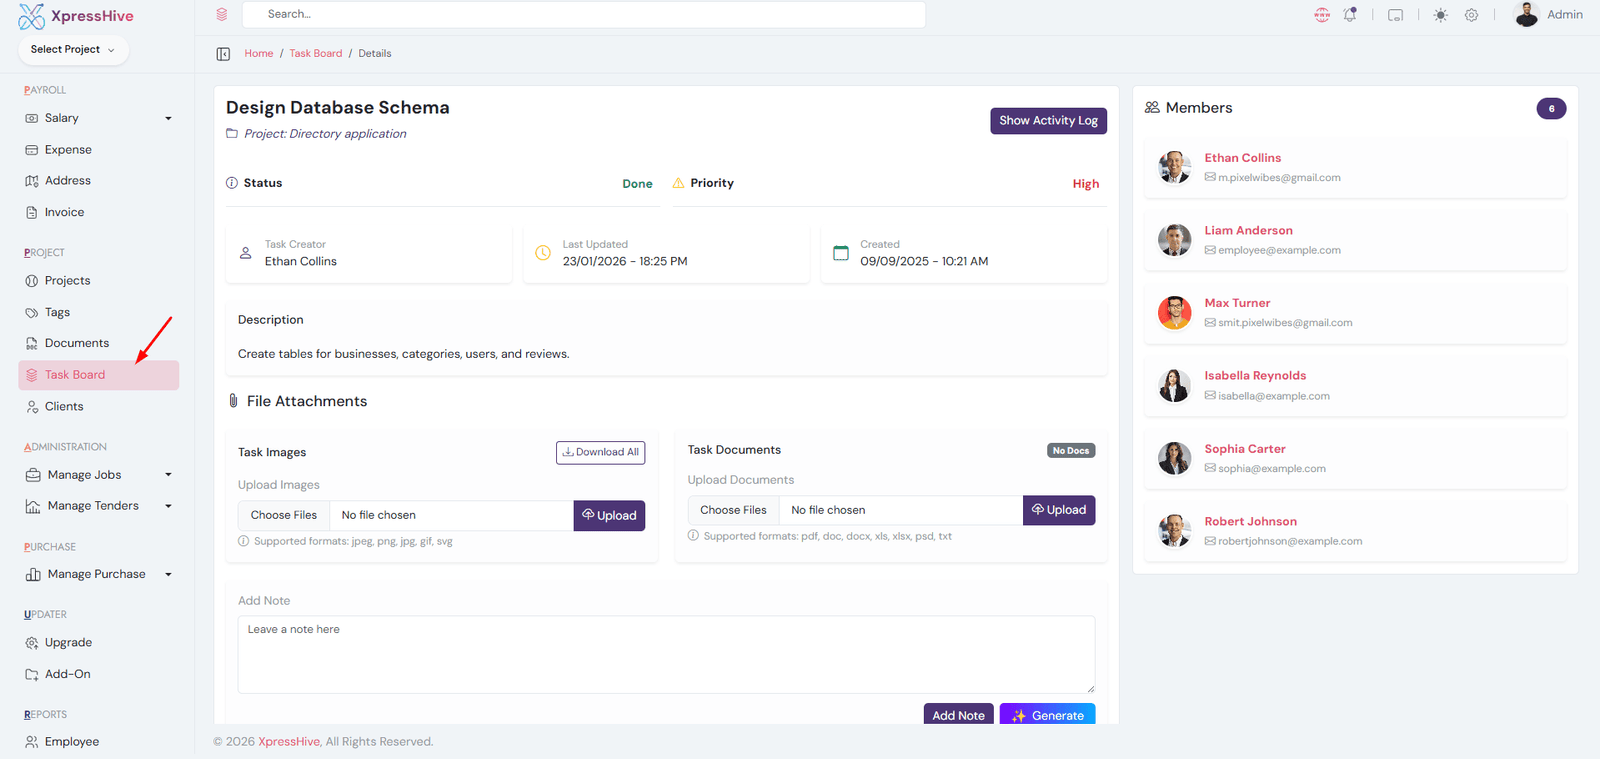
Task Management

Task Kanban
Task Detail
  • Create and manage tasks
  • Assign tasks to employees and projects
  • Track task status and progress
  • Edit or update task details
  • AI Feature: Generate smart responses or suggestions

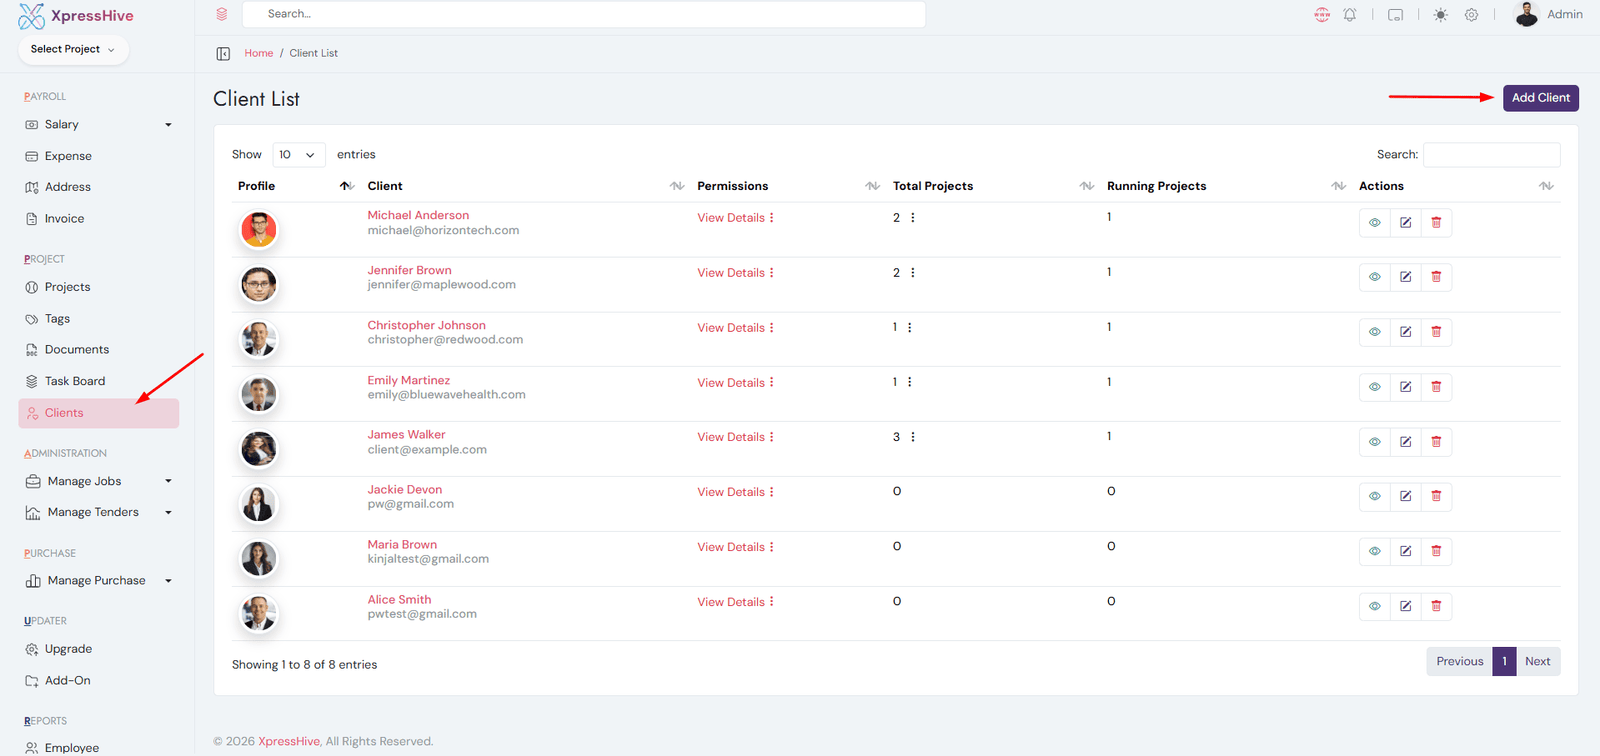
Client Management

  • Manage all client records
  • Add new clients with details
  • Edit or update client information
  • View complete client details
  • Used in projects and invoicing

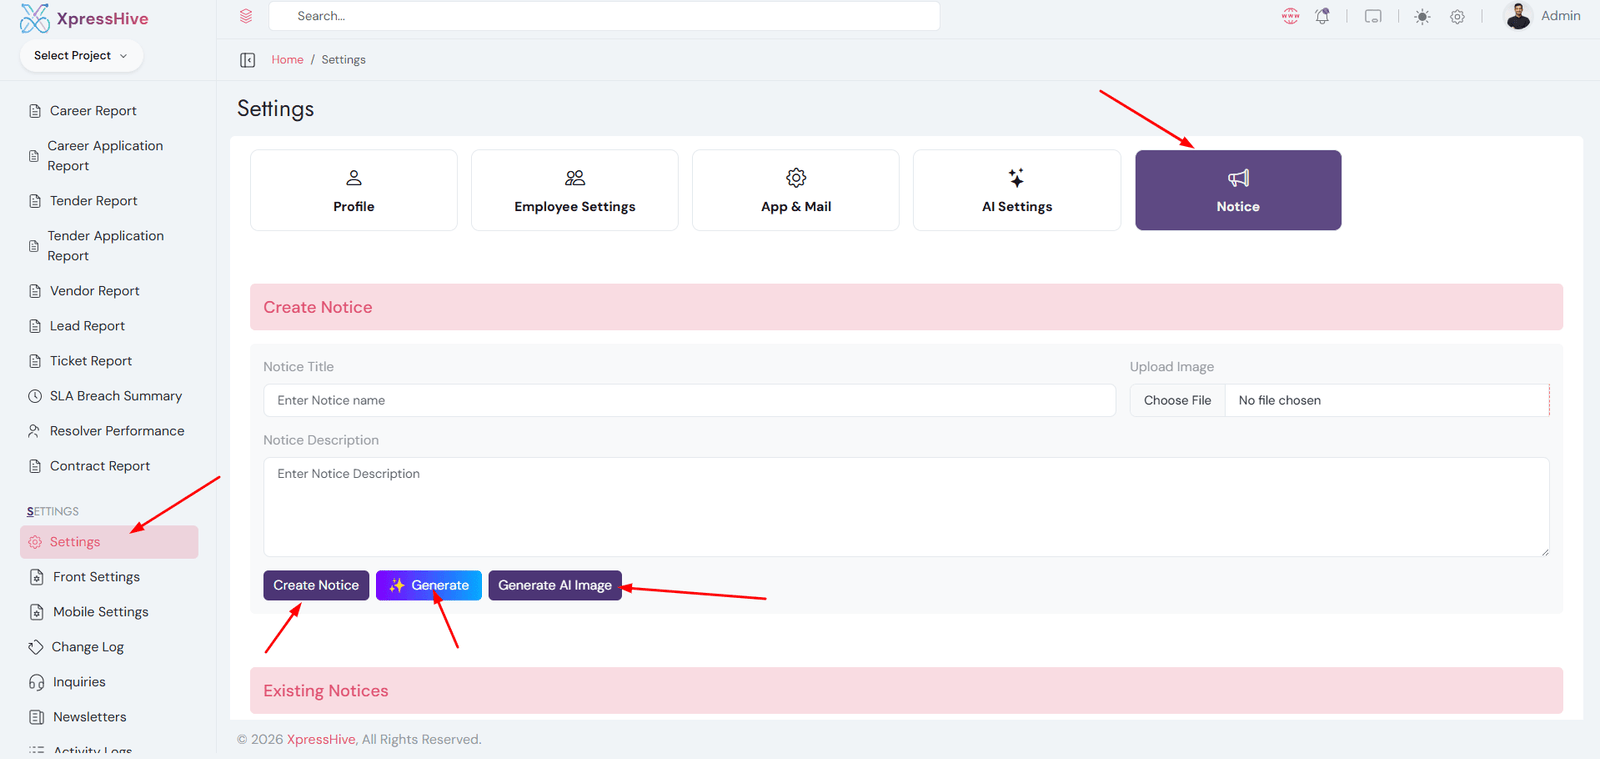
Notice Management

  • Create and manage notices
  • Share announcements with employees
  • Edit or update notices anytime
  • AI Feature: Generate notice content automatically
  • AI Image: Generate images for notices

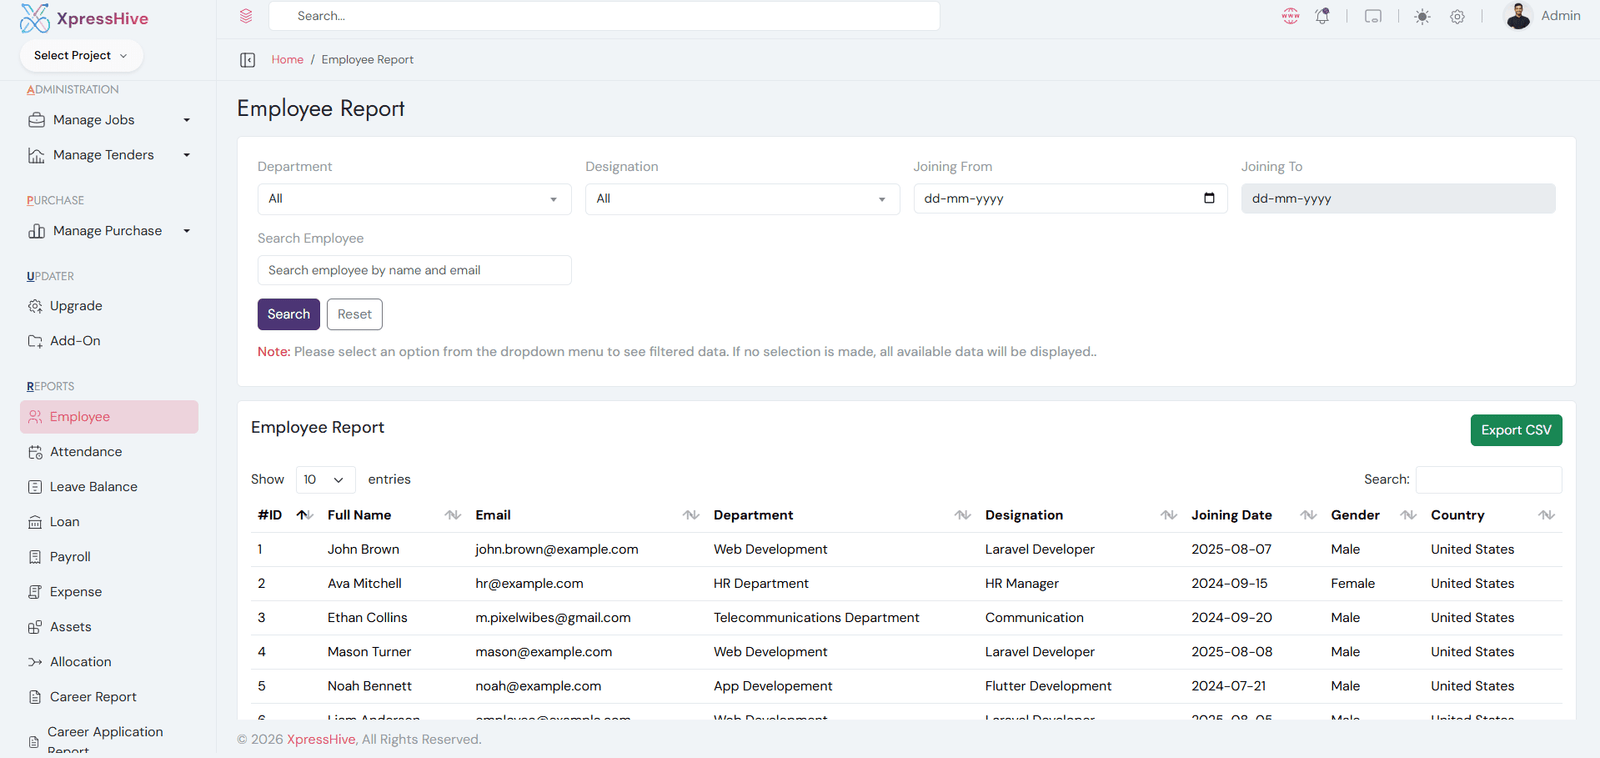
Report Generate

  • Generate reports based on different modules
  • Reports include employees, attendance, payroll, expenses, etc.
  • Filter data based on specific criteria
  • Download reports in CSV format
  • Used for analysis and decision making

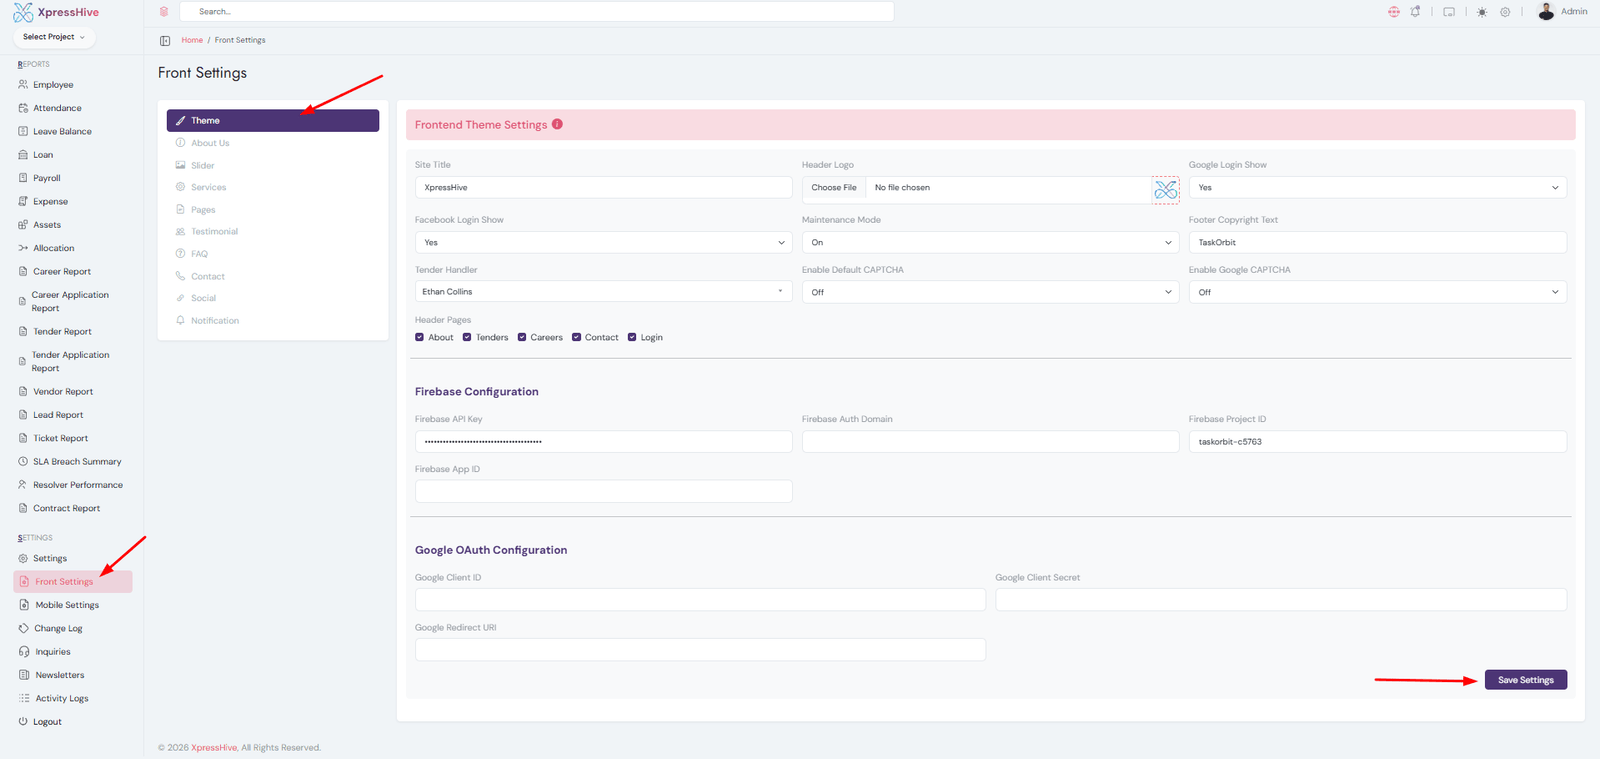
Theme Settings

  • Theme Settings allow you to manage all website content and UI sections from a single panel
  • It controls the frontend appearance, content, and user-facing features
  • Changes made here are directly reflected on the website
  • No coding is required to update content or layout
Theme Settings (Detailed)
  • Site Title: Displayed in browser tab and header
  • Header Logo: Upload your company logo
  • Google Login: Enable/disable Google authentication
  • Facebook Login: Enable/disable Facebook login
  • Maintenance Mode: Temporarily disable frontend access
  • Footer Text: Copyright text shown at bottom
  • CAPTCHA Settings: Enable spam protection
  • Header Pages: Select which pages appear in navbar
CAPTCHA Setup (Google reCAPTCHA)

If CAPTCHA is enabled in Theme Settings, you must provide valid Google reCAPTCHA keys.

How to Generate reCAPTCHA Keys
  1. Open Google reCAPTCHA Admin
  2. Enter a label (example: XpressHive Production)
  3. Select the reCAPTCHA type/version required by your frontend implementation
  4. Add your domain (and localhost for testing)
  5. Accept terms and click Submit
  6. Copy generated Site Key and Secret Key
What These Fields Mean
  • google_captcha_site_key: Public key used on frontend forms to render CAPTCHA
  • google_captcha_secret_key: Private server key used to verify CAPTCHA responses
  • Enable CAPTCHA only after both keys are added correctly

Important

Keep google_captcha_secret_key private. It must never be exposed in client-side code.

Firebase Social Login (Google & Facebook)

The system uses Firebase Authentication to enable secure and seamless social login using Google and Facebook accounts. Firebase acts as an intermediary layer that handles authentication on the frontend and provides a verified token to the backend.

Supported Login Providers
  • Google Login: Users can sign in using their Google account
  • Facebook Login: Users can sign in using their Facebook account
  • Both providers are managed through Firebase Authentication
How It Works
  • User clicks on Google or Facebook login button
  • Firebase opens a secure authentication popup
  • User completes login with selected provider
  • Firebase returns a secure ID Token
  • Frontend sends token to backend (/firebase-login)
  • Backend verifies token using Firebase Admin SDK
  • User is authenticated and logged into the system
Hybrid Authentication Flow
  • Firebase Authentication: Handles Google & Facebook login
  • Google OAuth: Used separately for advanced features like Calendar access
  • This ensures secure login + extended Google service integration
Configuration Requirements
  • Enable Google and/or Facebook provider in Firebase Console
  • Add Firebase credentials in Theme Settings
  • Configure Firebase Admin SDK on backend (FIREBASE_CREDENTIALS)
  • For Google services (Calendar), configure Google Client ID & Secret
Important Notes
  • Social login buttons appear only if enabled in settings
  • Users must already exist in the system (no auto-registration)
  • Firebase handles authentication only, not additional permissions
  • Keep all API keys and secrets secure
  • Ensure redirect URLs and provider settings are correctly configured

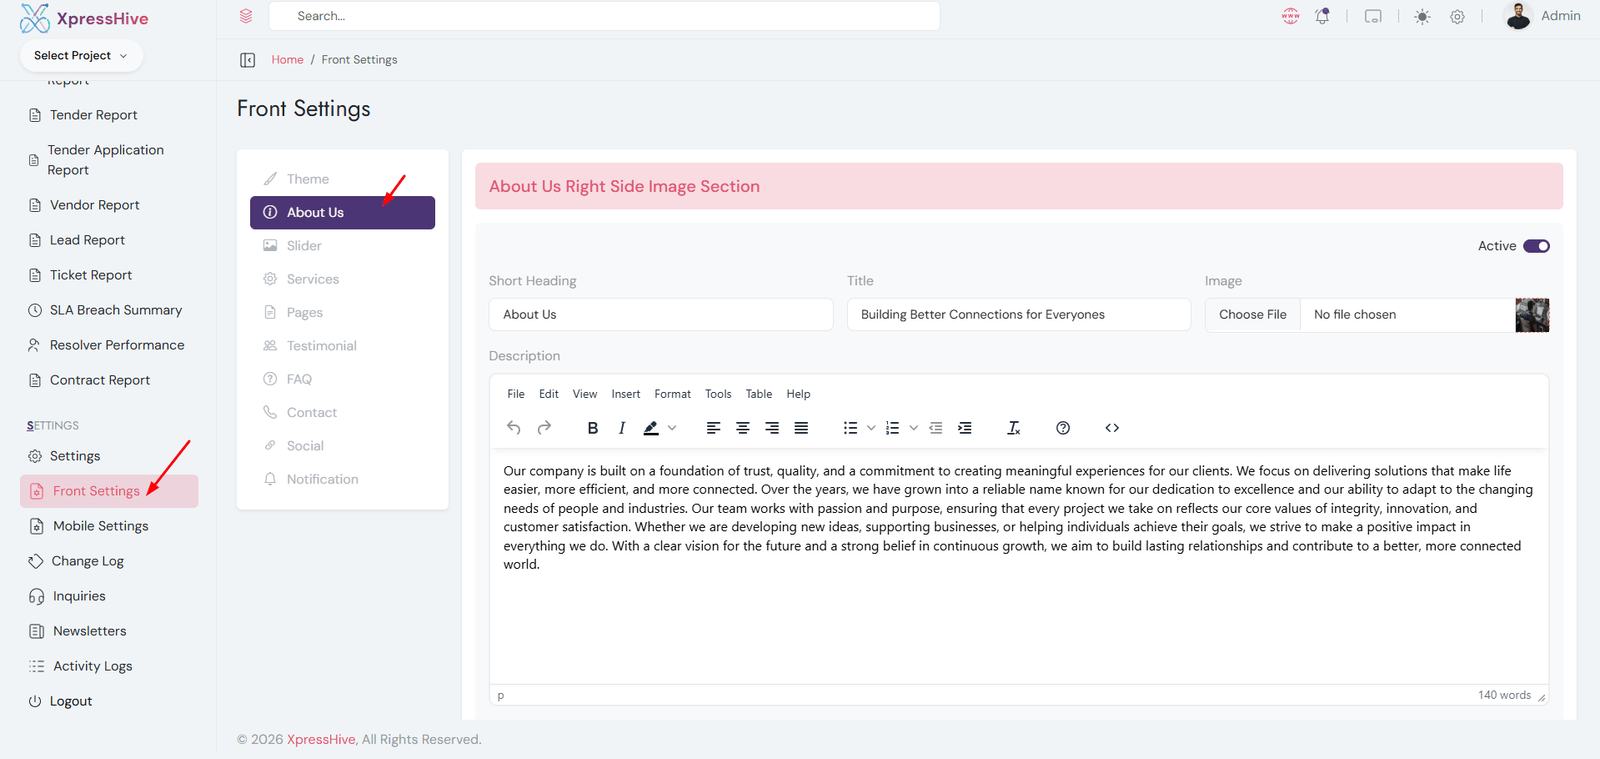
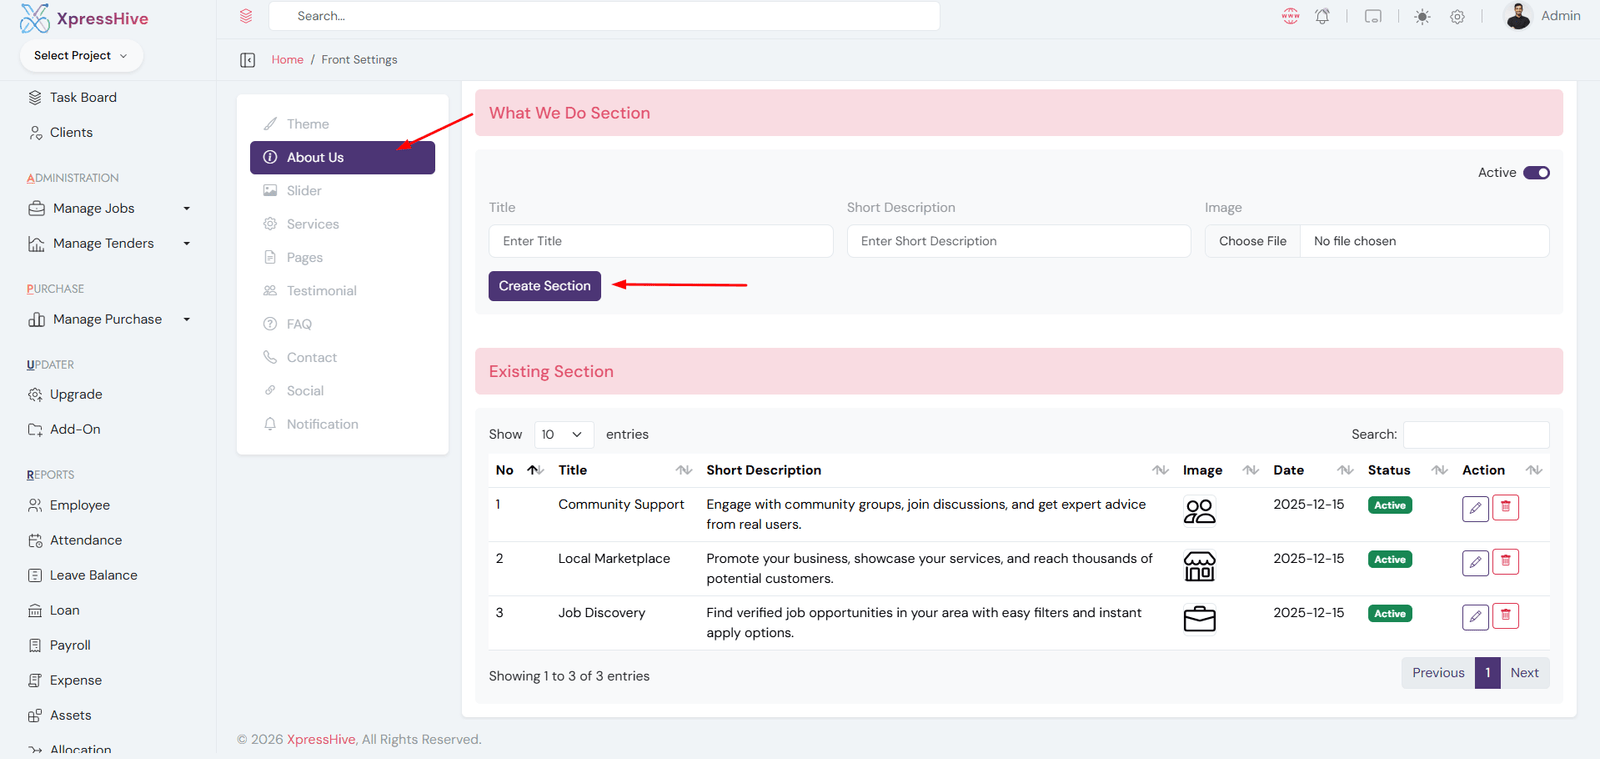
About Us

About Us Content (Right Side also left side is similar content)
What We Do Section
  • The About Us section allows you to manage company introduction content displayed on the website
  • You can update headings, titles, descriptions, and images without coding
  • This section is divided into two parts: About Content and What We Do
  • All changes are reflected instantly on the frontend
About Us Content
  • Short Heading: Small title displayed above main heading
  • Title: Main heading of the section
  • Description: Detailed company information using editor
  • Image: Upload image for visual representation
  • Status: Enable or disable the section visibility
What We Do Section
  • Add multiple service highlights or features
  • Title: Name of the feature/service
  • Short Description: Brief explanation
  • Image: Optional icon or image
  • Create Section: Add new entry
  • All added items appear in the "Existing Section" table
  • You can edit or delete entries anytime
Important Notes
  • Use clear and engaging content for better user experience
  • Keep descriptions concise and meaningful
  • Ensure images are optimized for fast loading
  • Enable status to display section on website

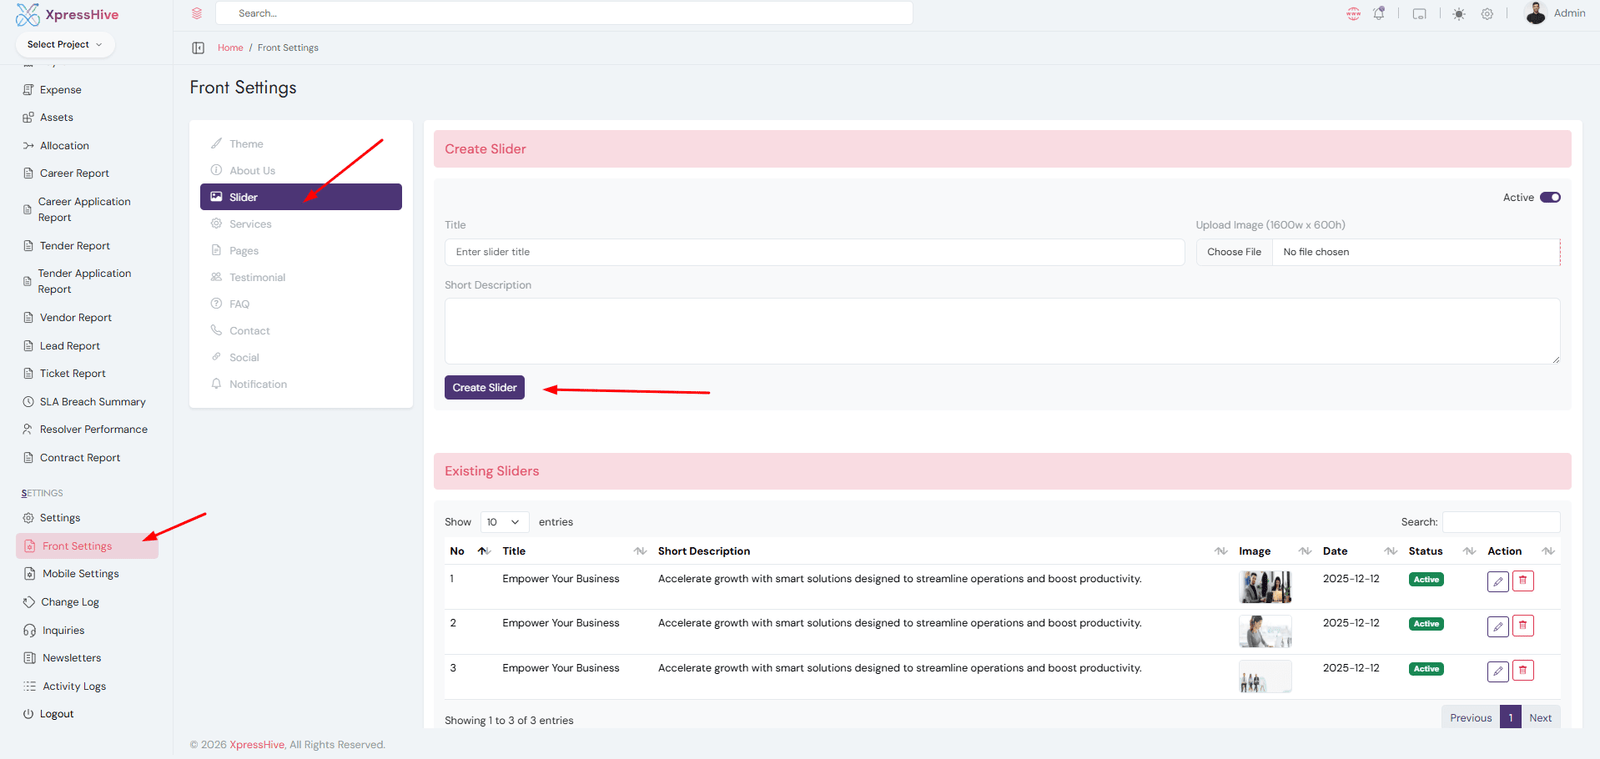
Slider

Create Slider
  • The Slider section is used to manage homepage banners
  • You can create multiple sliders to highlight key messages or features
  • Each slider includes a title, description, and image
  • All sliders are displayed on the homepage in a rotating format
Create Slider
  • Title: Enter the main heading for the slider
  • Short Description: Add a brief explanation or tagline
  • Image: Upload banner image (recommended size: 1600 x 600)
  • Status: Enable or disable slider visibility
  • Create Slider: Click to add new slider
Existing Sliders
  • View all created sliders in a table format
  • Check title, description, image, date, and status
  • Edit or delete sliders anytime
  • Use active status to display slider on frontend
Important Notes
  • Use high-quality images for better visual appearance
  • Keep titles short and impactful
  • Limit the number of sliders for better performance
  • Ensure images are optimized for fast loading

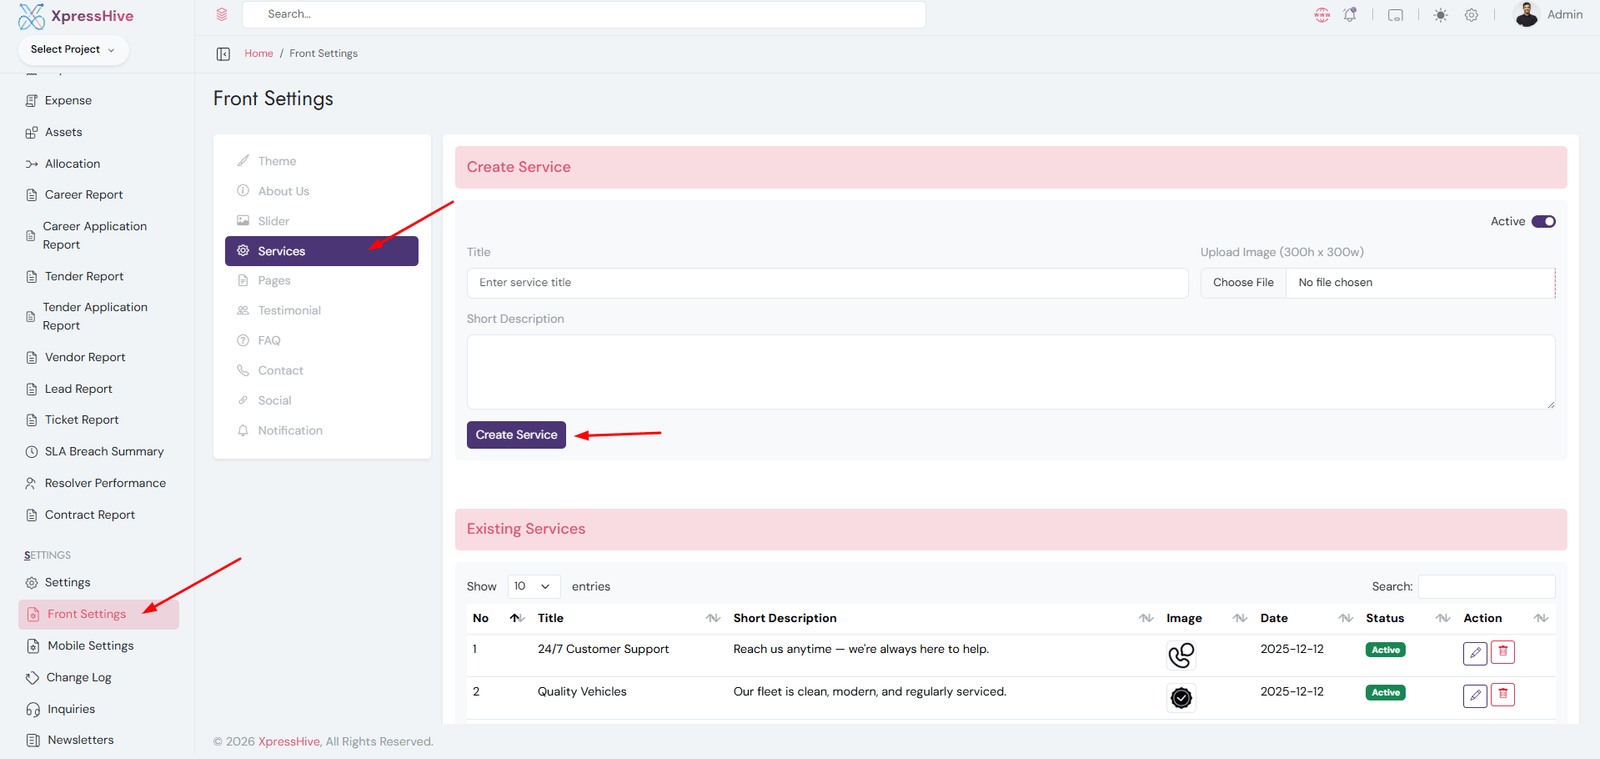
Services

Create Service
  • The Services section is used to display key services offered by your business
  • You can add multiple services with title, description, and image
  • All services are shown on the homepage in a structured layout
  • This helps users understand your offerings quickly
Create Service
  • Title: Enter the name of the service
  • Short Description: Add a brief explanation
  • Image: Upload icon/image (recommended size: 300 x 300)
  • Status: Enable or disable service visibility
  • Create Service: Click to add new service
Existing Services
  • View all services in a table format
  • Check title, description, image, date, and status
  • Edit or delete services anytime
  • Use active status to show services on frontend
Important Notes
  • Keep service titles short and clear
  • Use simple and meaningful descriptions
  • Upload optimized images for faster loading
  • Highlight your most important services first

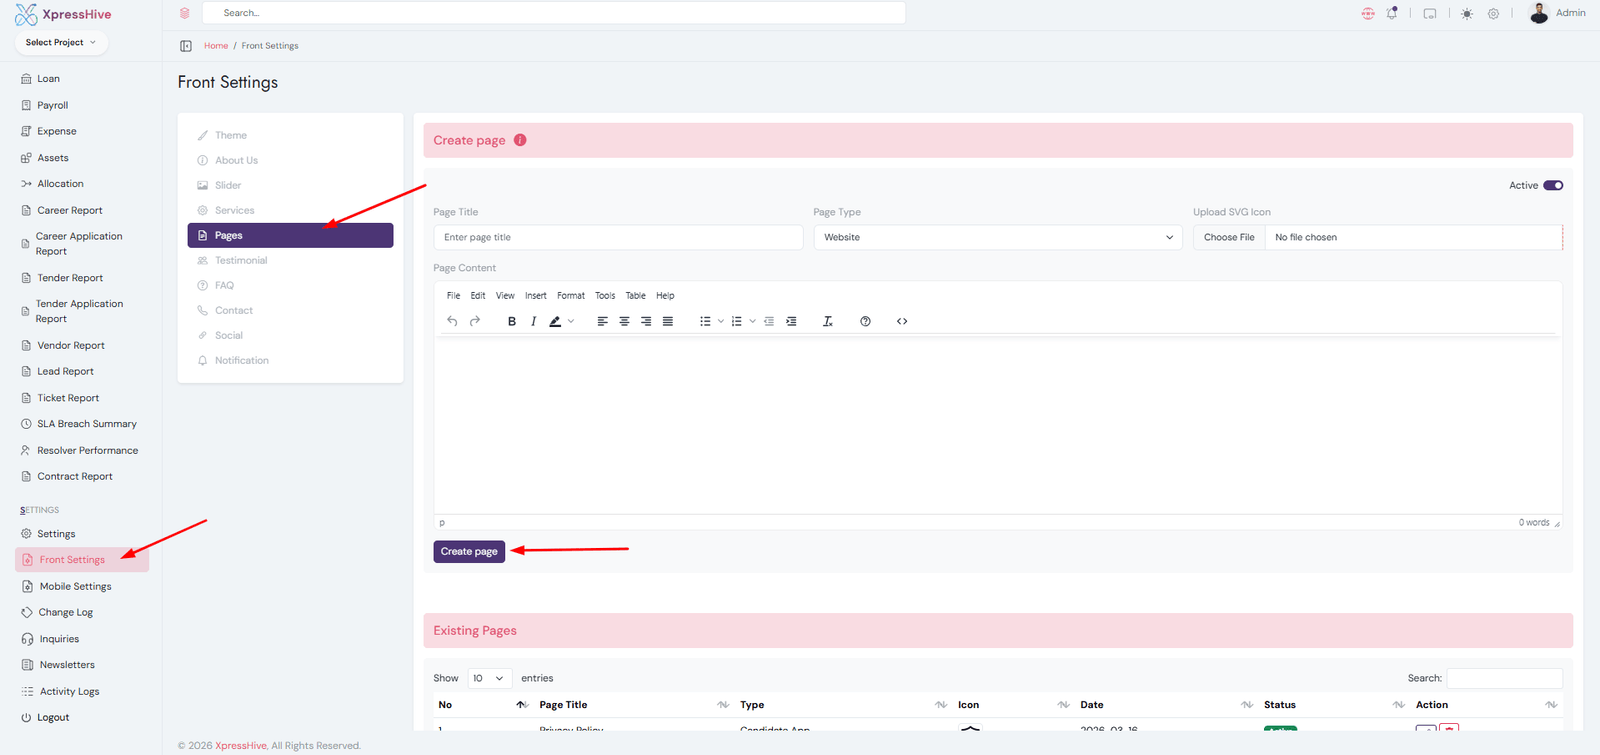
Pages

Create Page
  • The Pages section allows you to create and manage custom website pages
  • You can create pages like About, Privacy Policy, Terms & Conditions, etc.
  • Each page can have custom content using a rich text editor
  • Pages are displayed on the website based on status and configuration
Create Page
  • Page Title: Enter the name of the page
  • Page Type: Select type (e.g., Website)
  • Icon: Upload SVG icon (optional)
  • Page Content: Add detailed content using editor
  • Status: Enable or disable page visibility
  • Create Page: Click to add new page
Existing Pages
  • View all created pages in a table format
  • Check page title, type, icon, date, and status
  • Edit or delete pages anytime
  • Use active status to display pages on the website
Important Notes
  • Use clear and meaningful page titles
  • Ensure content is well-formatted and readable
  • Upload lightweight icons for better performance
  • Keep important pages like Privacy Policy always active

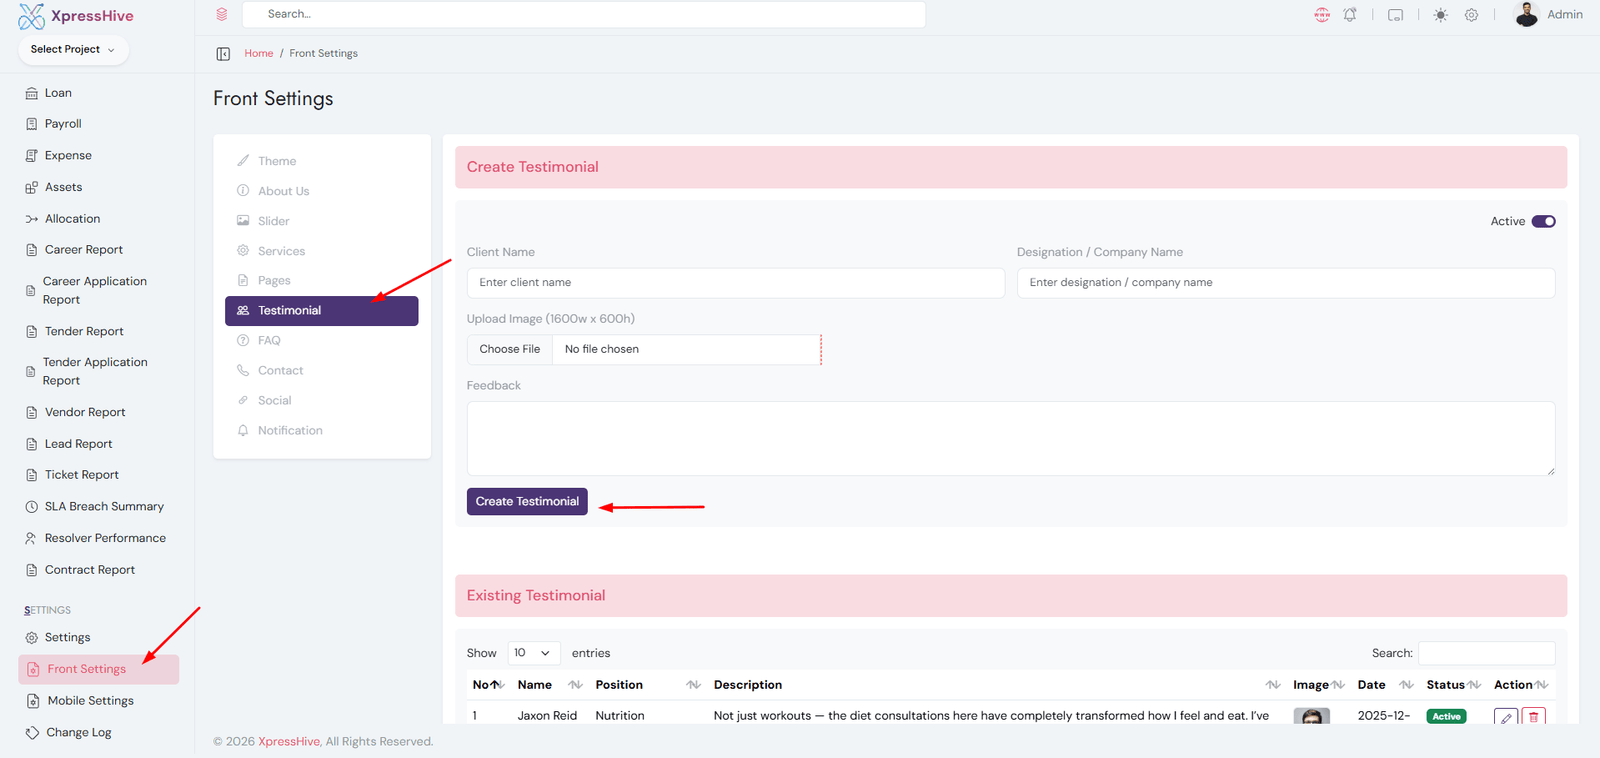
Testimonial

Create Testimonial
  • The Testimonial section allows you to showcase client feedback and reviews
  • It helps build trust and credibility for your business
  • Testimonials are displayed on the frontend website
  • You can easily add, edit, or remove testimonials
Create Testimonial
  • Client Name: Enter the name of the client
  • Designation / Company: Add client role or company name
  • Image: Upload client profile image
  • Feedback: Add testimonial message or review
  • Status: Enable or disable testimonial visibility
  • Create Testimonial: Click to save the testimonial
Existing Testimonials
  • View all testimonials in a structured table
  • Check client name, position, feedback, image, and status
  • Edit or delete testimonials anytime
  • Use active status to show testimonials on the website
Important Notes
  • Use real client feedback for better trust
  • Keep feedback short and meaningful
  • Upload clear and professional images
  • Highlight strong testimonials on homepage

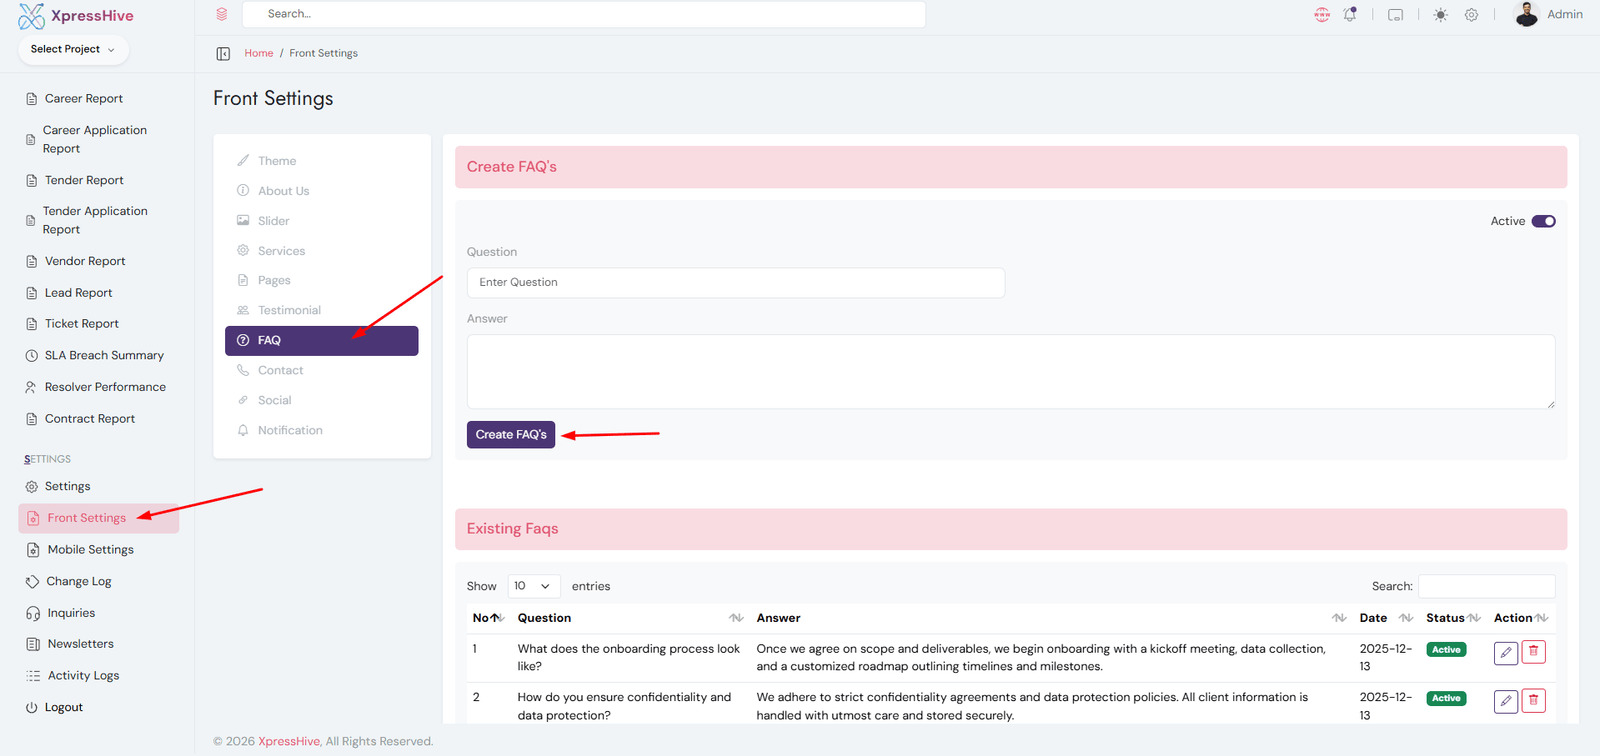
FAQ

Create FAQ
  • The FAQ section helps you provide answers to commonly asked questions
  • It improves user experience by resolving queries quickly
  • FAQs are displayed on the frontend for easy access
  • You can manage FAQs without any coding
Create FAQ
  • Question: Enter the frequently asked question
  • Answer: Provide a clear and helpful answer
  • Status: Enable or disable FAQ visibility
  • Create FAQ: Click to add the FAQ
Existing FAQs
  • View all FAQs in a table format
  • Check question, answer, date, and status
  • Edit or delete FAQs anytime
  • Use active status to display FAQs on website
Important Notes
  • Keep questions short and clear
  • Provide precise and helpful answers
  • Avoid duplicate or repeated FAQs
  • Update FAQs regularly based on user queries

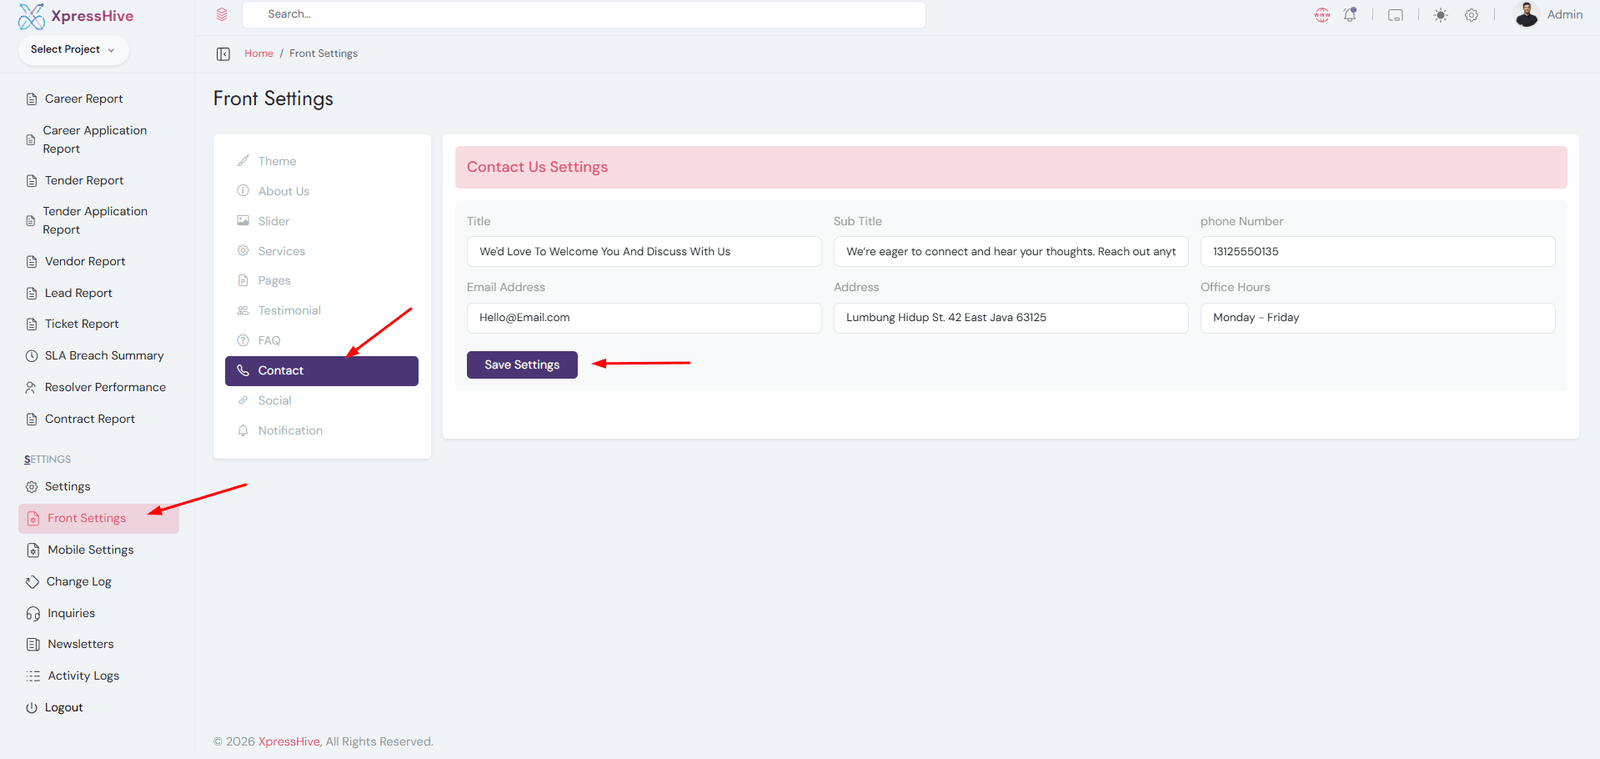
Contact

Contact Settings
  • The Contact section allows you to manage all business contact details
  • This information is displayed on the website contact page
  • Users can easily reach you using the provided details
  • No coding is required to update contact information
Contact Settings Fields
  • Title: Main heading for contact section
  • Sub Title: Short description or message
  • Phone Number: Business contact number
  • Email Address: Official support email
  • Address: Company office address
  • Office Hours: Working days and timings
  • Save Settings: Click to apply changes
Usage
  • Displayed on frontend Contact page
  • Used for customer communication and support
  • Helps users find business location and timing
Important Notes
  • Ensure phone and email are correct
  • Keep address updated for better trust
  • Use professional and clear messaging
  • Always click Save Settings after changes

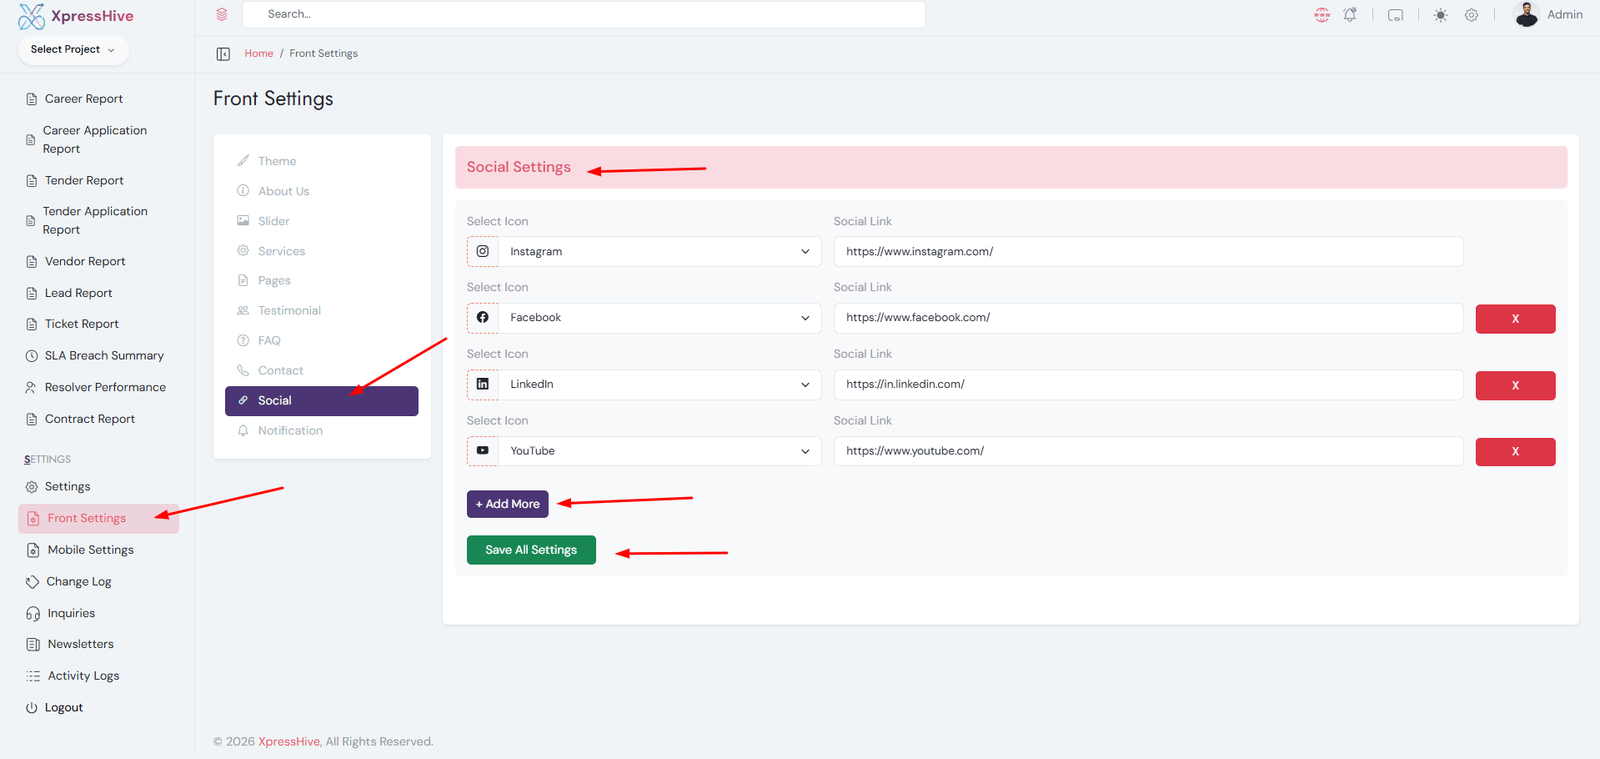
Social

Social Settings
  • The Social section allows you to manage your website's social media links
  • These links are displayed on the frontend (header/footer)
  • Users can connect with your business via social platforms
  • You can dynamically add or remove social links
Social Settings Fields
  • Select Icon: Choose platform (Facebook, Instagram, LinkedIn, etc.)
  • Social Link: Enter full profile URL
  • Add More: Add multiple social platforms
  • Remove: Delete unwanted social links
  • Save All Settings: Save all changes
Supported Platforms
  • Facebook
  • Instagram
  • LinkedIn
  • YouTube
  • Twitter (X)
  • And more
Usage
  • Displayed in website header/footer
  • Helps users follow your brand
  • Improves online presence and engagement
Important Notes
  • Always use full valid URLs (https://...)
  • Keep links updated and active
  • Avoid adding duplicate platforms
  • Click Save All Settings after changes

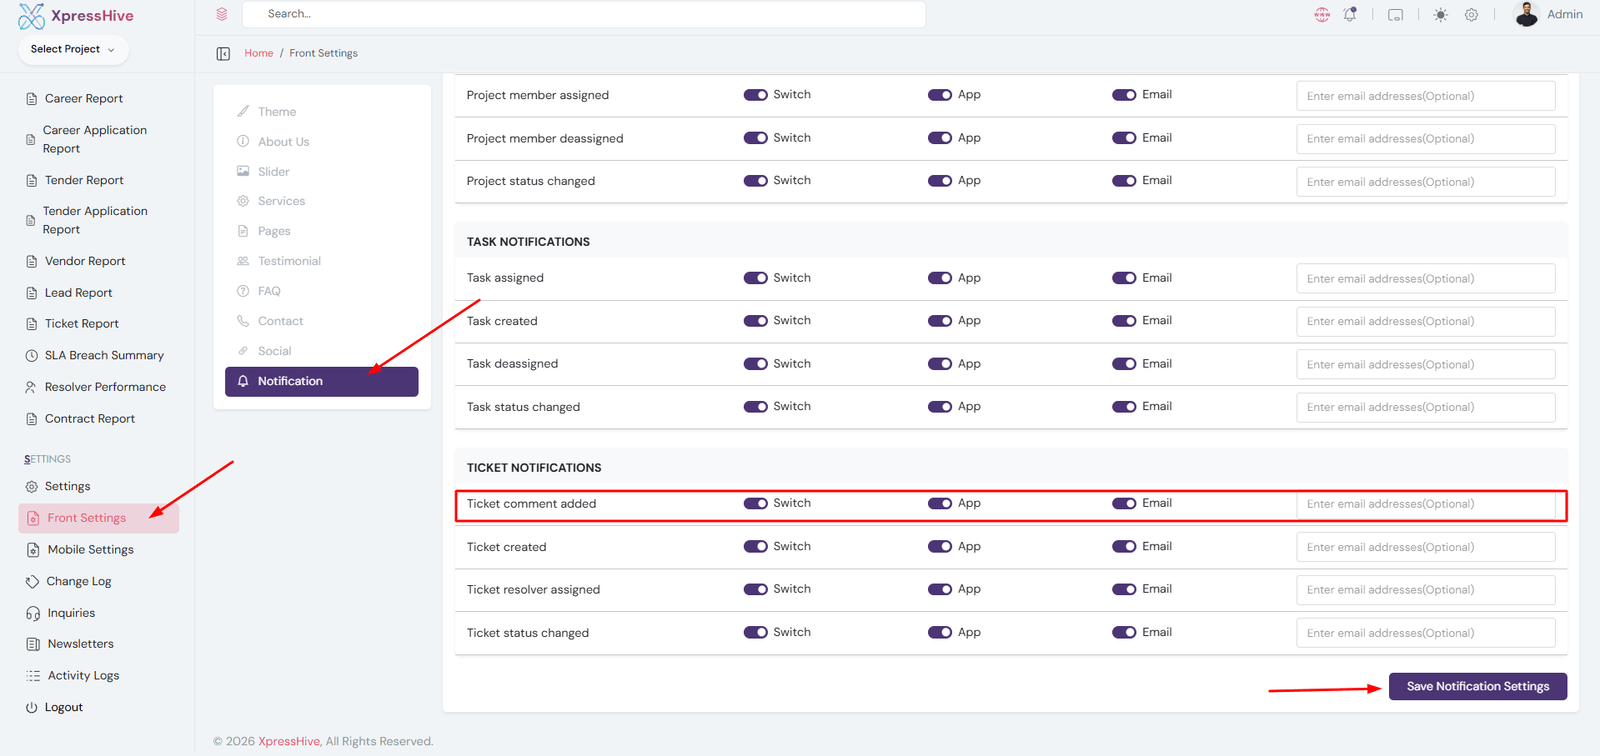
Notification

Notification Settings
  • The Notification section allows you to control system alerts and user notifications
  • You can enable or disable notifications for different system events
  • Supports multiple channels like Database, App (FCM), and Email
  • Helps keep users informed about important updates
Notification Channels
  • Switch: Enable or disable the notification event
  • App: Send push notifications (Firebase / App)
  • Email: Send email notifications
  • Custom Emails: Add additional recipients (optional)
Notification Categories
  • Project Notifications: Member assigned, status changed
  • Task Notifications: Task created, assigned, updated
  • Ticket Notifications: Ticket created, comment added, status changed
  • Each event can be configured independently
Usage
  • Notifies users about system activities in real-time
  • Improves communication and workflow tracking
  • Ensures no important updates are missed
Important Notes
  • Enable only required notifications to avoid spam
  • Ensure correct email configuration for email alerts
  • Firebase setup is required for app notifications
  • Click Save Notification Settings after changes

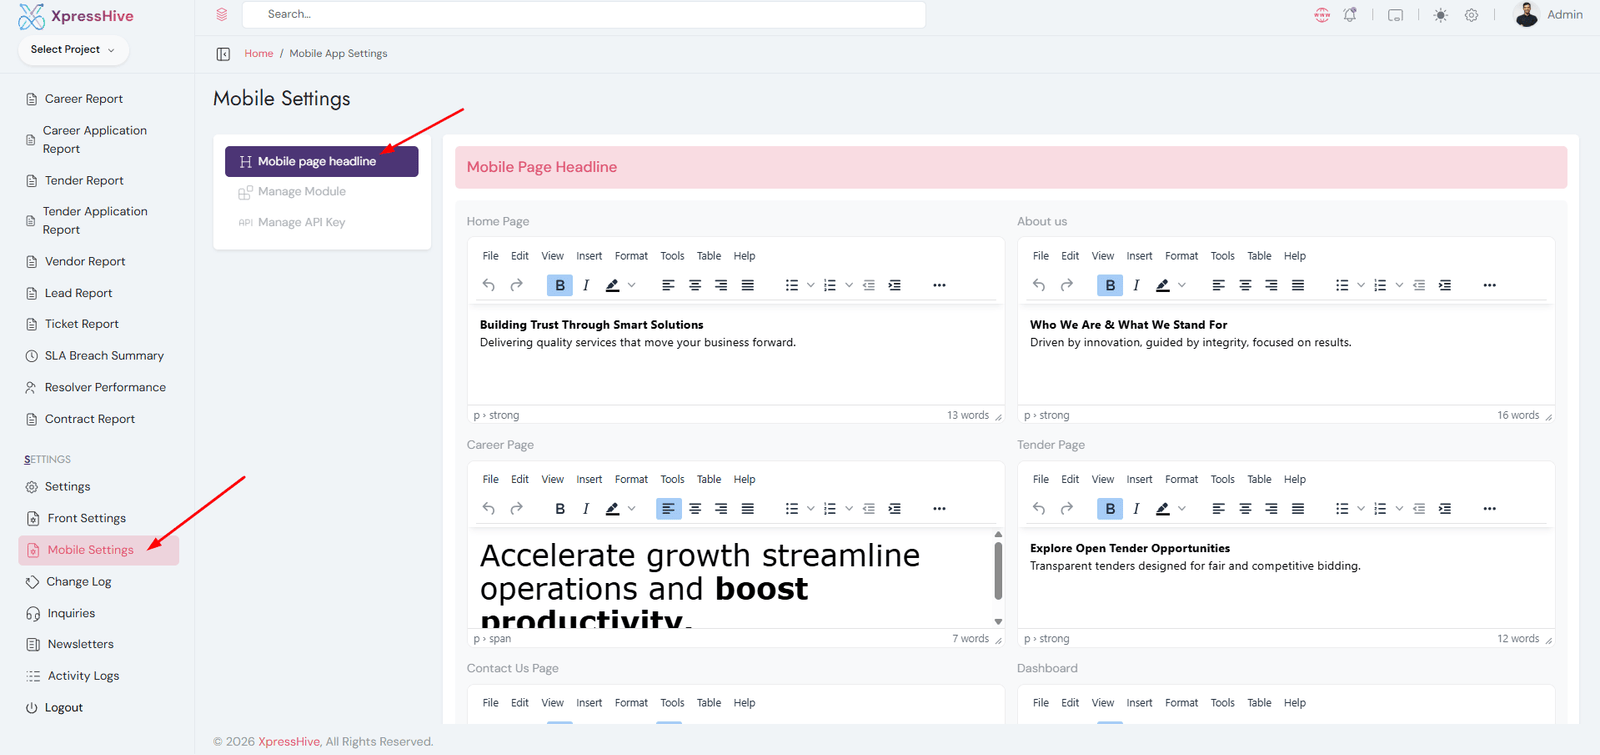
Mobile Settings - Page Headline

Mobile Page Headline Settings
  • The Mobile Page Headline section allows you to customize headings for mobile app screens
  • Each page in the mobile app can have a unique title and description
  • Content is managed using a rich text editor
  • Changes are reflected directly in the mobile application UI
Editable Sections
  • Home Page: Main app landing heading
  • About Us: Company introduction for mobile
  • Career Page: Job/career section headline
  • Tender Page: Tender listing headline
  • Contact Us Page: Contact section heading
  • Dashboard: User dashboard heading
Editor Features
  • Format text (bold, italic, alignment)
  • Add headings and structured content
  • Customize messaging for each page
Usage
  • Displayed inside mobile app screens
  • Helps improve user engagement
  • Provides clear communication per section
Important Notes
  • Keep content short and mobile-friendly
  • Avoid very long paragraphs
  • Use clear headings and simple language
  • Save changes after updating content

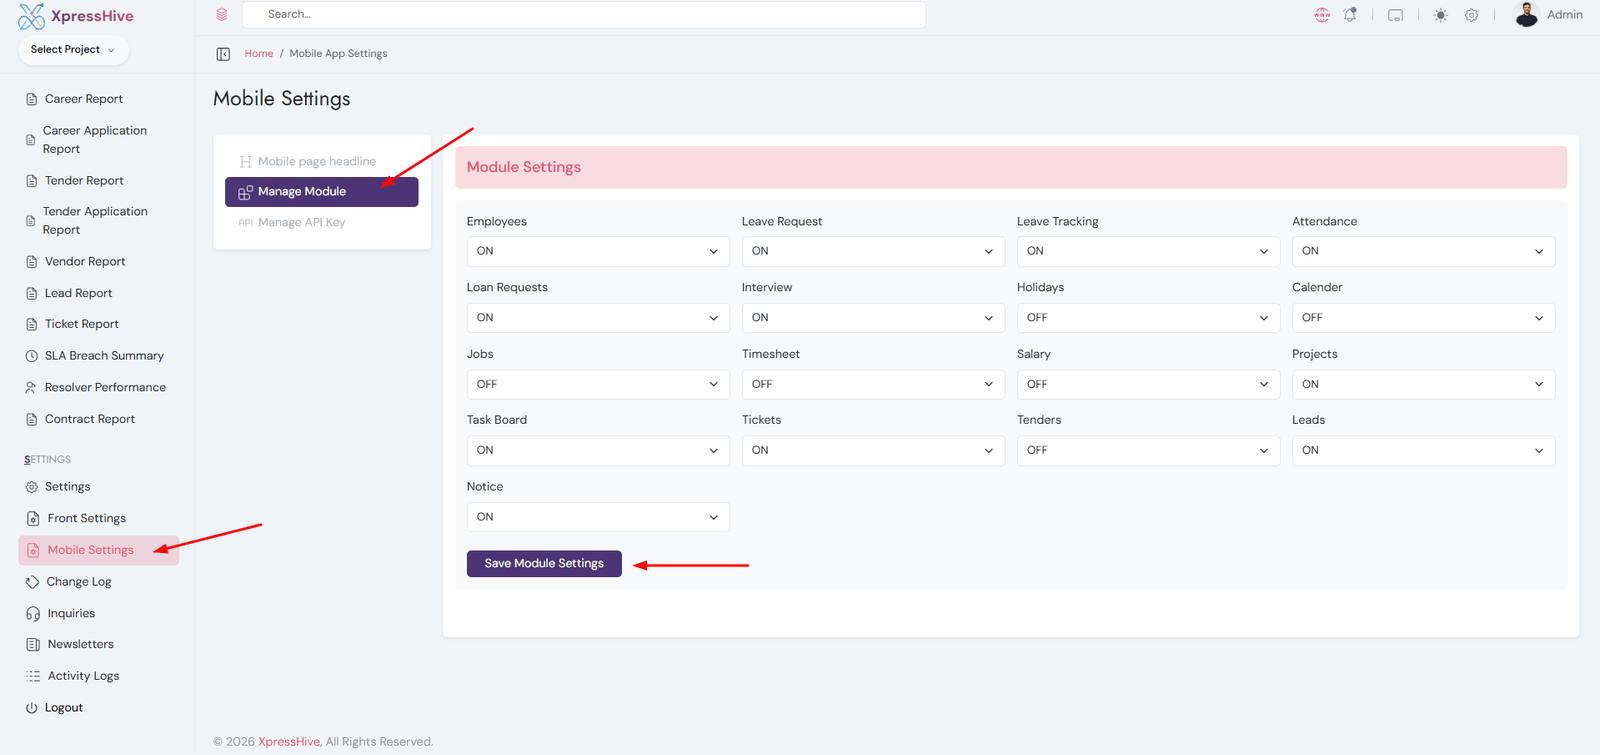
Mobile Settings - Manage Module

Module Settings
  • The Manage Module section allows you to control which features are visible in the mobile app
  • You can enable or disable modules using simple ON/OFF options
  • This helps customize the mobile app based on business needs
  • No coding is required to manage module visibility
How It Works
  • ON: The module will be visible and accessible in the mobile app
  • OFF: The module will be hidden and not shown in the mobile app
  • Changes take effect after saving settings
Usage
  • Customize mobile app features per organization
  • Hide unused modules to keep UI clean
  • Enable only required functionalities for users
Important Notes
  • Always click Save Module Settings after changes
  • Disabled modules will not appear in the mobile app
  • Ensure critical modules are enabled before deployment
  • Useful for role-based or company-specific configurations

Employee App Features & Workflow

The Employee Mobile Application provides employees with access to attendance, leave management, projects, tasks, payroll, support tickets, company assets, notifications, and many other HR-related services directly from their mobile devices.

Available Features
  • Attendance: Check In, Check Out, attendance logs, and working hours tracking.
  • Leave Requests: Apply for leave and monitor approval status and leave balance.
  • Projects: View assigned projects, team members, priorities, and deadlines.
  • Tasks: Create, manage, and track task progress.
  • Support Tickets: Submit issues, attach files, and monitor ticket status.
  • Loans: Apply for employee loans and track installment payments.
  • Salary & Payslips: View salary details and download payslips.
  • My Profile: Manage personal information and employee details.
  • Company Assets: View assigned hardware and company assets.
  • Project Files: Access project-related documents and attachments.
  • Notifications: Receive instant updates and alerts.
  • Team Directory: Search employees and view contact information.
  • Interviews: Manage interview schedules and feedback.
  • Leads: Track business leads and follow-up activities.
  • Timesheet: Log daily work hours and track productivity.
  • Holidays: View company holidays and upcoming events.
  • Notice Board: Read company announcements and important notices.
Employee Usage Flow
  1. Login to the Employee Mobile Application.
  2. Access the Dashboard to view attendance, tasks, and notifications.
  3. Mark attendance using Check In and Check Out.
  4. Review assigned projects and daily tasks.
  5. Submit leave requests when required.
  6. Track support tickets and employee loan applications.
  7. View salary details and download payslips.
  8. Access company assets, project files, and team directory.
  9. Receive notifications, announcements, and holiday updates.
  10. Manage profile information and account settings.
Benefits
  • Centralized employee self-service platform.
  • Real-time attendance and leave management.
  • Improved communication and collaboration.
  • Easy access to payroll and employee records.
  • Enhanced productivity through mobile accessibility.

Employee Mobile Experience

The Employee App enables employees to perform daily HR activities, manage work assignments, access payroll information, and stay connected with the organization from anywhere at any time.

Talent Application Flow

The Talent Application helps candidates discover job opportunities, manage applications, track recruitment progress, and stay connected with recruiters throughout the hiring process.

Overview
  • Browse and discover available job opportunities.
  • Apply directly using your candidate profile.
  • Track application progress from submission to hiring.
  • Receive instant notifications about recruitment updates.
  • Manage interviews and communication from a single platform.
Available Features
  • Smart Dashboard: View total applications, saved jobs, interviews, and recent activity.
  • Advanced Job Filtering: Search jobs using department, location, experience, and salary filters.
  • Precision Job Details: Review job requirements, skills, qualifications, and salary information.
  • 1-Tap Direct Application: Apply instantly without repeatedly filling lengthy forms.
  • Application Tracking: Monitor application status from applied to interview and hiring stages.
  • Instant Push Notifications: Receive updates when recruiters respond or job statuses change.
  • Saved Jobs: Bookmark interesting opportunities for future applications.
  • Profile Management: Update personal information, resume, and professional details.
  • Interview Management: Track interview schedules and recruitment progress.
Candidate Workflow
  1. Create an account or login to the Talent Application.
  2. Complete your profile and upload your resume.
  3. Browse available job opportunities.
  4. Use advanced filters to find relevant positions.
  5. Review detailed job descriptions and requirements.
  6. Submit applications directly from the application.
  7. Track application status through the My Jobs section.
  8. Receive interview invitations and recruitment updates.
  9. Attend scheduled interviews.
  10. Monitor final hiring decisions and onboarding updates.
Benefits
  • Faster and simpler job application process.
  • Real-time recruitment status tracking.
  • Centralized job search and application management.
  • Improved communication with recruiters.
  • Better visibility into career opportunities.

Talent Recruitment Experience

The Talent Application provides a streamlined recruitment journey, helping candidates discover opportunities, submit applications, track progress, and connect with employers efficiently from a single mobile platform.

Vendor Application Flow

The Vendor Application enables vendors to discover tenders, submit bids, monitor approval status, and manage procurement opportunities from a single mobile platform.

Overview
  • Browse available tenders and procurement opportunities.
  • Submit bids directly through the mobile application.
  • Track tender approval and bid status in real time.
  • Receive instant notifications for tender updates.
  • Manage all tender activities from a centralized dashboard.
Available Features
  • Organize Tenders: Switch between Saved, Applied, and Approved tenders using simple dashboard tabs.
  • Check Key Metrics: View project value, tender closing dates, and current status instantly.
  • Department Filtering: Filter tenders by departments such as IT, Sales, Operations, and more.
  • Quick Bidding Process: Review tender requirements and submit bids quickly.
  • Live Notifications: Receive real-time alerts for tender approvals and updates.
  • Tender Tracking: Monitor submitted bids and approval progress.
  • Saved Tenders: Bookmark tenders for future bidding.
  • Bid Management: Manage all active and completed bids in one place.
Vendor Workflow
  1. Login to the Vendor Application.
  2. Browse available tenders from the dashboard.
  3. Use department filters to find relevant opportunities.
  4. Review tender details, requirements, and project value.
  5. Submit your quotation or bid proposal.
  6. Track bid progress and tender status.
  7. Receive notifications when tenders are approved or updated.
  8. Manage awarded tenders and ongoing procurement activities.
Benefits
  • Faster tender discovery and bidding process.
  • Centralized vendor procurement management.
  • Real-time approval and status tracking.
  • Improved visibility of business opportunities.
  • Mobile access to procurement activities anytime.

Vendor Procurement Experience

The Vendor Application simplifies tender management by allowing vendors to discover opportunities, submit bids, receive approvals, and track procurement activities efficiently from their mobile devices.

System Update

Use the built-in updater panel to upgrade your system easily.

Important Notes

Before Updating

Always update sequentially and avoid skipping versions.

  • Full Backup: Take complete system backup
  • Code Backup: Save all files including custom changes
  • Database Backup: Export database safely
Recommended PHP Settings

upload_max_filesize = 100M
post_max_size = 100M
max_execution_time = 300
memory_limit = 512M
    
Update Process
  1. Download the latest XpressHive update package
  2. Locate update file: upgrade from vX.X to vX.X.X.zip
  3. Open: http://yourdomain.com/add-on-plugin
  4. Upload: update.zip
  5. Click Upload & Extract
  6. Enter your purchase code
  7. Click Import
  8. System will update automatically
  9. 🎉 Update completed successfully

Success

Your system is now updated to the latest version.

Troubleshooting
  • White Screen: php artisan config:clear
  • Permission Issues: Check storage & cache folders
  • Update Failed: Retry upload process

Plugin Add-On

Install and manage plugins from the add-on panel.

Important Notes

Before Installing

Ensure compatibility and always backup your system.

  • Take full system backup
  • Check plugin compatibility
  • Install plugins one by one
  • Clear cache after installation
Recommended PHP Settings

upload_max_filesize = 100M
post_max_size = 100M
max_execution_time = 300
memory_limit = 512M
    
Installation Process
  1. Download plugin package
  2. Open: http://yourdomain.com/add-on-plugin
  3. Upload: plugin.zip
  4. Click Upload & Extract
  5. Enter purchase code
  6. Click Import
  7. 🎉 Plugin installed successfully

Success

Plugin is ready to use from the admin panel.

Troubleshooting
  • Upload failed → increase PHP limits
  • Plugin not working → check compatibility
  • Error → clear cache

XpressHive Project Architecture

This section provides an overview of the XpressHive solution architecture and project directory structure. The package includes the Laravel Admin Panel, Documentation Source, HR Mobile Application, Talent Mobile Application, and Vendor Mobile Application. Understanding the project organization will help developers quickly locate source files, customize modules, and maintain the platform efficiently.

XpressHive Project Architecture

▼ 📁 xpresshive-hr-and-workforce-management-flutter-app-with-laravel-admin-panel/
▼ 📁 admin_panel_v.1.0.1/
▼ 📁 app/
▼ 📁 Http/
▼ 📁 Controllers/
▶ 📁 Employee/
📁 Assets/
📁 Attendance/
...
📁 Middleware/
📁 Requests/
▼ 📁 Models/
📄 User.php
📄 Employee.php
📄 Department.php
...
▼ 📁 Services/
📄 AuthService.php
📄 UserService.php
📄 AttendanceService.php
...
📁 Helpers/
📁 Jobs/
...
▼ 📁 bootstrap/
📄 app.php
📁 cache/
📄 providers.php
📁 config/
▼ 📁 database/
📁 migrations/
📁 seeders/
📁 factories/
...
📁 lang/
▼ 📁 public/
📁 assets/
📁 build/
📄 index.php
...
▼ 📁 resources/
▼ 📁 views/
▶ 📁 employees/
📁 dashboard/
📁 holidays/
...
📁 css/
📁 js/
▼ 📁 routes/
▼ 📁 RestAPI/
▼ 📁 v1/
📄 employee.php
📄 candidate.php
📄 vendor.php
...
📄 web.php
📄 api.php
📄 console.php
▼ 📁 storage/
📁 app/
📁 logs/
📁 framework/
📄 .env
📄 artisan
📄 composer.json
▼ 📁 Documentation/
▼ 📁 assets/
📁 css/
📁 fonts/
▼ 📁 images/
📁 configuration/
📁 data/
📁 install/
📄 favicon-96x96.png
📄 favicon.ico
📄 favicon.svg
📄 logo.svg
▼ 📁 js/
📄 docs.js
...
▼ 📁 plugins/
📄 bootstrap
📄 prism
...
▼ 📁 scss/
▼ 📁 global/
📄 _base.scss
📄 _pjwamp64.scss
📄 _docs.scss
📄 _documentation.scss
📄 _index.scss
📄 styles.scss
📄 .gitignore
📄 android-developer-verification.html
📄 appstore-deployment.html
📄 changelog.html
📄 docs-page.html
📄 documentation.html
📄 mobile-page.html
📄 playstore-deployment.html
📄 Gruntfile.js
📄 package-lock.json
▼ 📁 hr_app_v.1.0.0/
📁 .idea/
▼ 📁 android/
▼ 📁 app/
▼ 📁 src/
▼ 📁 main/
📄 AndroidManifest.xml
📁 kotlin/
📁 res/
📁 debug/
📁 profile/
📄 build.gradle.kts
📄 google-services.json
📁 gradle/
📄 build.gradle.kts
📄 gradle.properties
📄 settings.gradle.kts
▼ 📁 assets/
📁 icons/
📁 images/
▼ 📁 ios/
📁 Flutter/
▼ 📁 Runner/
📄 AppDelegate.swift
📄 Info.plist
📄 GoogleService-Info.plist
📁 Assets.xcassets/
📁 Runner.xcodeproj/
📁 Runner.xcworkspace/
📁 RunnerTests/
▼ 📁 lib/
📁 core/
▼ 📁 features/
📁 auth/
📁 common/
▼ 📁 employee/
📁 attendence/
📁 home/
📁 dashboard/
📁 employees/
📁 leave/
📁 holiday/
📁 project/
📁 task/
📁 salary/
📁 appraisal/
📁 loan/
📁 ticket/
📁 interview/
📁 job/
📁 lead/
📁 hardware/
📁 notice/
📁 notification/
📁 profile/
📁 timesheet/
📁 frontsite/
📁 helper/
📁 theme/
📁 utils/
📄 firebase_options.dart
📄 main.dart
📁 test/
📄 .gitignore
📄 .metadata
📄 pubspec.lock
📄 pubspec.yaml
📄 README.md
📄 xpresshive.iml
▼ 📁 talent_app_v.1.0.0/
📁 .idea/
▼ 📁 android/
📁 app/
📁 gradle/
📄 build.gradle.kts
📄 gradle.properties
📄 settings.gradle.kts
▼ 📁 assets/
📁 icons/
📁 images/
▼ 📁 ios/
📁 Flutter/
📁 Runner/
📁 Runner.xcodeproj/
📁 Runner.xcworkspace/
▼ 📁 lib/
▼ 📁 core/
📁 common/
📁 data/
▼ 📁 features/
📁 auth/
📁 common/
📁 dashboard/
📁 home/
📁 my_jobs/
📁 notification/
📁 profile/
📁 helper/
📁 theme/
📁 utils/
📄 firebase_options.dart
📄 main.dart
📁 test/
📄 .gitignore
📄 .metadata
📄 pubspec.lock
📄 pubspec.yaml
📄 README.md
📄 xpresshive.iml
▼ 📁 vendor_app_v.1.0.0/
📁 .idea/
▼ 📁 android/
▼ 📁 app/
▼ 📁 src/
▼ 📁 main/
📄 AndroidManifest.xml
📁 kotlin/
📁 res/
📁 debug/
📁 profile/
📄 build.gradle.kts
📄 google-services.json
📁 gradle/
📄 build.gradle.kts
📄 gradle.properties
📄 settings.gradle.kts
▼ 📁 assets/
📁 icons/
📁 images/
▼ 📁 ios/
📁 Flutter/
▼ 📁 Runner/
📄 AppDelegate.swift
📄 Info.plist
📄 GoogleService-Info.plist
📁 Assets.xcassets/
📁 Runner.xcodeproj/
📁 Runner.xcworkspace/
📁 RunnerTests/
▼ 📁 lib/
▼ 📁 core/
📁 common/
📁 data/
▼ 📁 features/
📁 auth/
📁 common/
📁 dashboard/
📁 home/
📁 my_tenders/
📁 notification/
📁 profile/
📁 helper/
📁 theme/
📁 utils/
📄 firebase_options.dart
📄 main.dart
📁 test/
📄 .gitignore
📄 .metadata
📄 pubspec.lock
📄 pubspec.yaml
📄 README.md
📄 xpresshive.iml

Credits & Open-Source

Latest

XpressHive is powered by modern open-source technologies. We extend our gratitude to the developers and communities behind these tools.

Product: XpressHive   |   Version: v1.0.0   |   License: Open Source Dependencies
📦 Libraries & Tools

Community Support

We appreciate the global open-source community for continuous innovation and support that makes products like XpressHive possible.

Disclaimer

All third-party libraries are used under their respective licenses. No paid or copyrighted assets are included in this product.

Support

We are committed to helping you get the best experience with XpressHive. If you need assistance, our support team is ready to help.

Support Resources

Contact Information

Email: support@pixelwibes.com

Support Hours: Monday to Friday, 9:00 AM to 6:00 PM (IST)

Support Policy

Scope of Support

  • Installation assistance
  • Bug fixing & issue resolution
  • Usage guidance

Not Included:

  • Customization of code
  • Third-party integrations not included in the original package
  • Server configuration or hosting issues

Response Time

We strive to respond to all support inquiries within 24-48 business hours. To help our customers, we constantly be in touch with every customer if they need any assistance regarding our product.

Support

Your feedback helps us improve XpressHive. If you have suggestions, feature requests, or ideas, feel free to share them with us.

Frequently Asked Questions (FAQ)

Below are some commonly asked questions and answers to help you quickly resolve issues and understand product usage.

Database Configuration Issues

The most common reason is that the nd_pdo_mysql extension is not installed on your server. Install the extension and try again. If the issue persists, please contact our support team.

Admin Panel Updates

No. A fresh installation is required only during the initial setup. Future updates can be applied using the System Update feature.

Navigate to Upgrade from the admin panel and follow the on-screen instructions to install the latest version.

License

Yes. You are free to modify the source code according to your business requirements after purchasing the product.

For detailed license information, please refer to: Key license details:
  • Source Code Modification: Allowed after purchase
  • Commercial Use: Allowed for a single business with one domain per license
  • Multiple Domains: Not permitted under a single purchase code
  • Project Continuity: Full rights to modify and continue using the product if the developer discontinues support

No, using the product on multiple domains is not permitted under a single purchase code.

Yes. Commercial use is permitted for one business and one domain per license.

Updates & Support

Updates are released every 1.5 to 2 months and are included in the purchase price without additional fees.

Technical support is available for 6 months after purchase and is provided through Microsoft Teams.

Hosting & Requirements

  • PHP 8.4.0 or higher
  • MySQL Database
  • Shared hosting or VPS Hosting
  • At least 3-4 GB free storage

Refund Policy

Yes, refunds are provided as per Codecanyon's refund policy.

Contact Us

We are committed to helping you get the best experience with XpressHive. If you need assistance, our support team is ready to help.

Get in Touch

Support Hours

  • We offer support from Monday to Friday, 9:00 AM to 6:00 PM IST (GMT +5:30). We are a team located in India, Asia.
  • Typically we reply to all questions and queries within 24 hours via comments, support forum, or emails.
  • For urgent issues, please mention "Urgent" in the subject line of your email, and we will prioritize your request.
  • Thank you for your choosing XpressHive!

Rating

Your Feedback

Dear valuable customer,
Thank you very much for choosing our product. It's our pleasure to serve top-notch service to you.
Please give us your honest feedback that will help us to make a more strong and reliable product by clicking here: Rate Us.
Thank you very much.

Changelog

Latest

Stay up to date with the latest improvements and release updates for XpressHive.

Product Version Flutter Version Kotlin Version AGP Version distributionUrl (Gradle) JDK Version
1.0.0 3.41.7 2.1.0 8.9.1 gradle-8.12-all.zip 22

VERSION 1.0.1 - 19 JUNE 2026

  • [Feature Enhancement] Added new functionality to improve workforce management workflows.
  • [UI/UX Improvements] Enhanced usability, accessibility, and overall user experience.
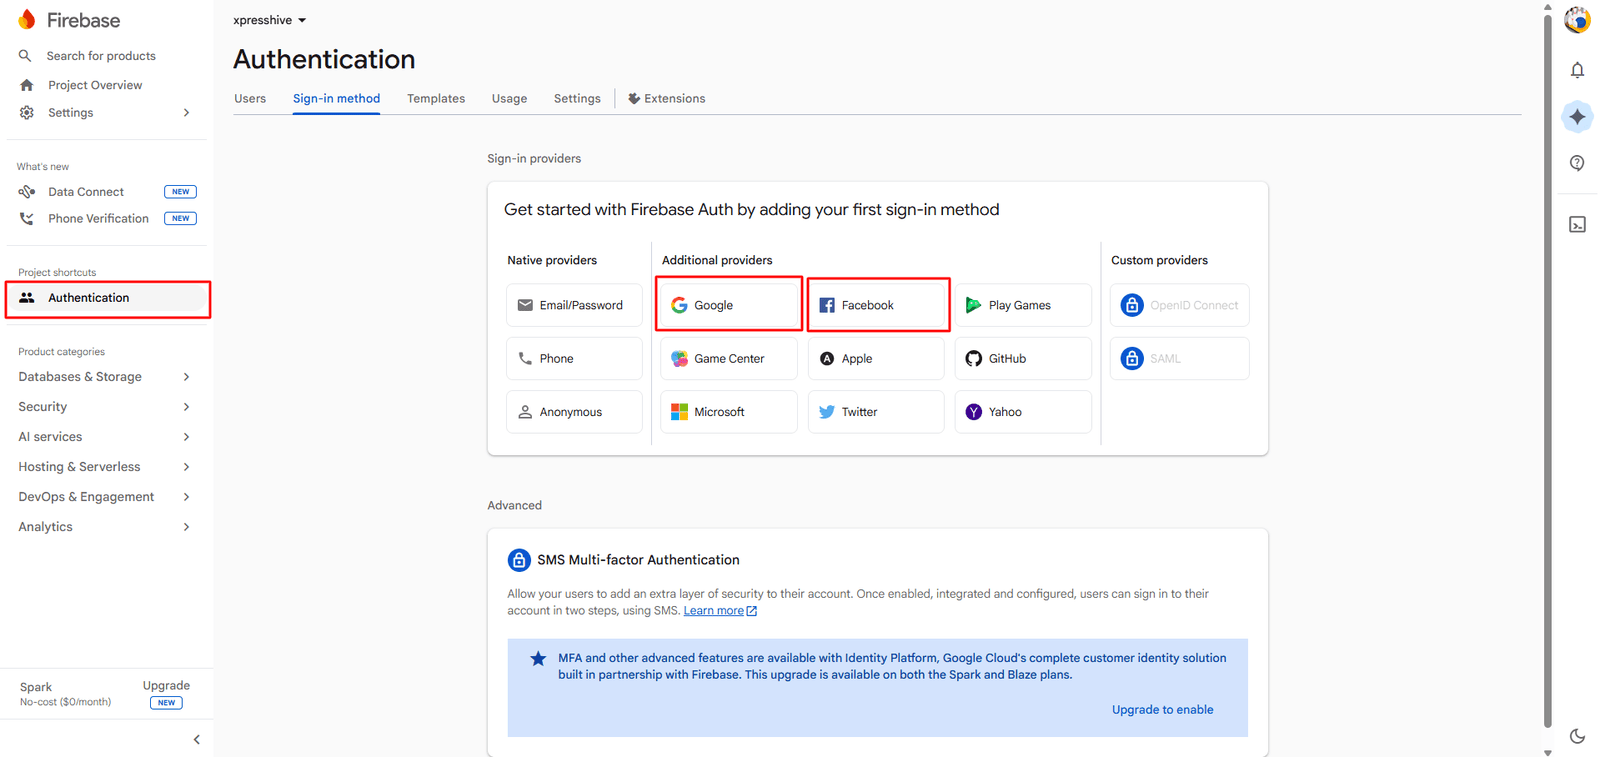
  • [Performance Improvements] Optimized application speed, responsiveness, and resource utilization.
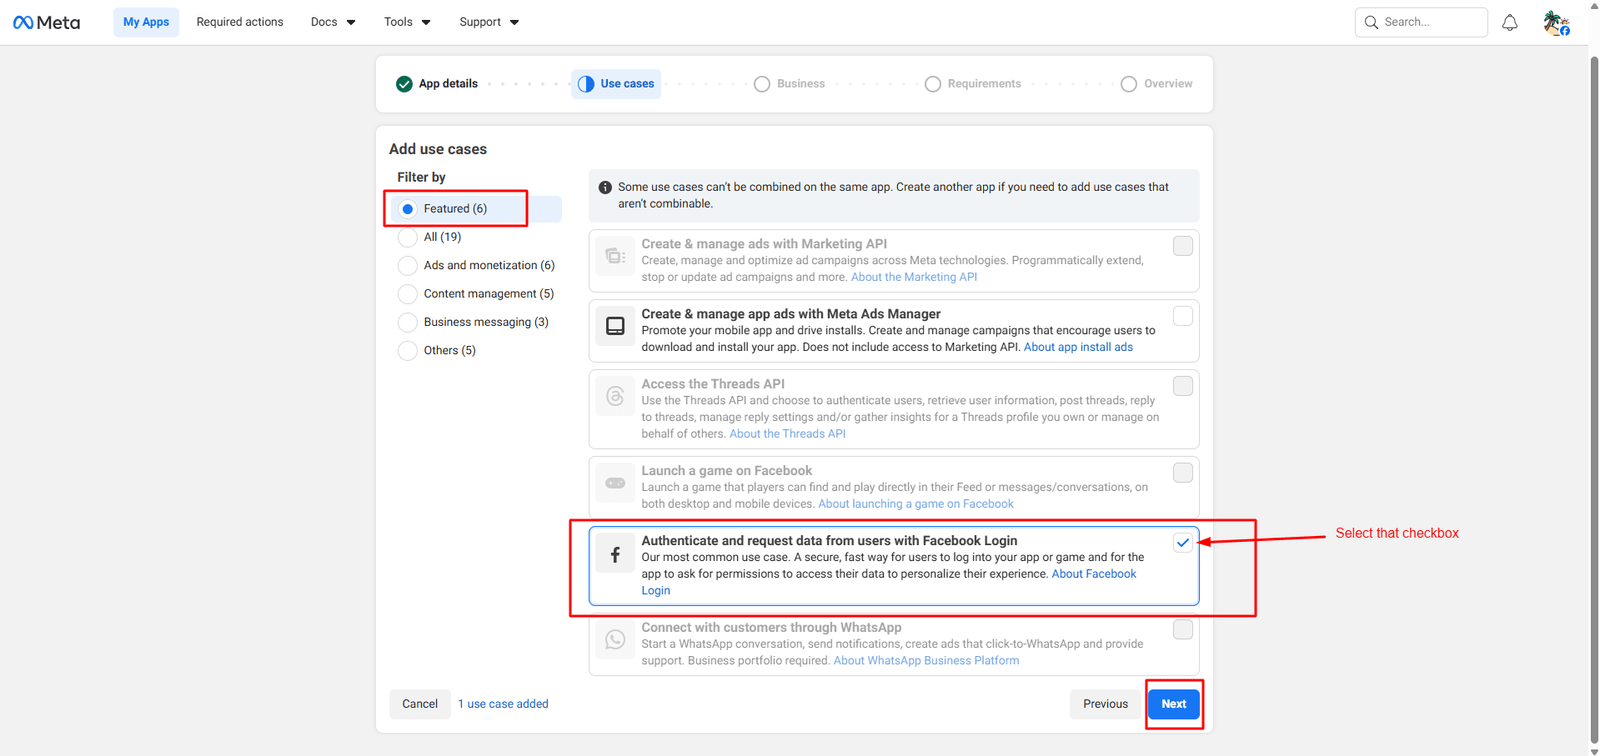
  • [Security & Stability] Applied security updates and platform stability enhancements.
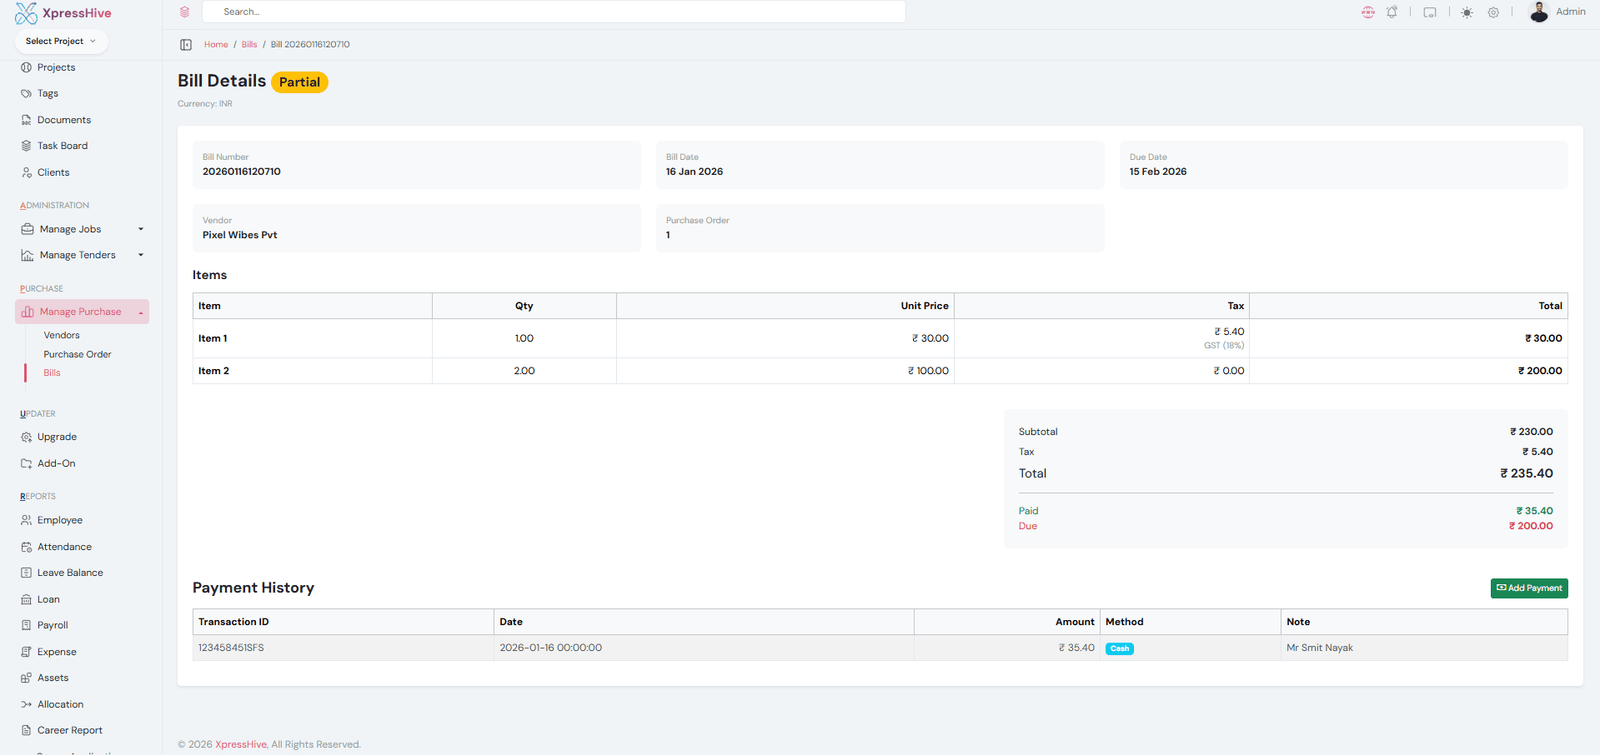
VERSION 1.0.0 - 16 JUNE 2026

  • [Initial Release] Complete HR + Project Management System launched
  • [Added] Employee, Department, and Designation Management
  • [Added] Attendance, Leave, Payroll, and Loan Management
  • [Added] Project & Task Management with tracking and reporting
  • [Added] Recruitment system with job posting and interview tracking
  • [Added] Role-Based Access Control with permissions
  • [Added] Shift, Holiday, and Workforce scheduling
  • [Added] Client and Support Ticket Management system
  • [Added] Reports, CSV export, and dashboard analytics
  • [Added] Vendor & Tender Management modules
  • [Added] AI-powered features
  • [UI] Modern responsive design with mobile support
  • [System] Secure update handling and validation rules